Multi-Factor Authentication (MFA) in a Custom Login UI
Multi-factor authentication (MFA) is a multi-step account authentication which requires to user to enter more than only the password. It is highly recommended to use MFA or Passkeys to make your user accounts more secure.
ZITADEL supports different Methods:
- Time-based one time password (TOTP), which are Authenticator apps like Google/Microsoft Authenticator, Authy, etc
- OTP sent as SMS
- OTP sent as Email
- Universal Second Factor (U2F), which is authentication with your device like Windows Hello, Apple FaceID, Fingerprint, FIDO2 keys, Yubikey, etc.
TOTP Registration
Flow
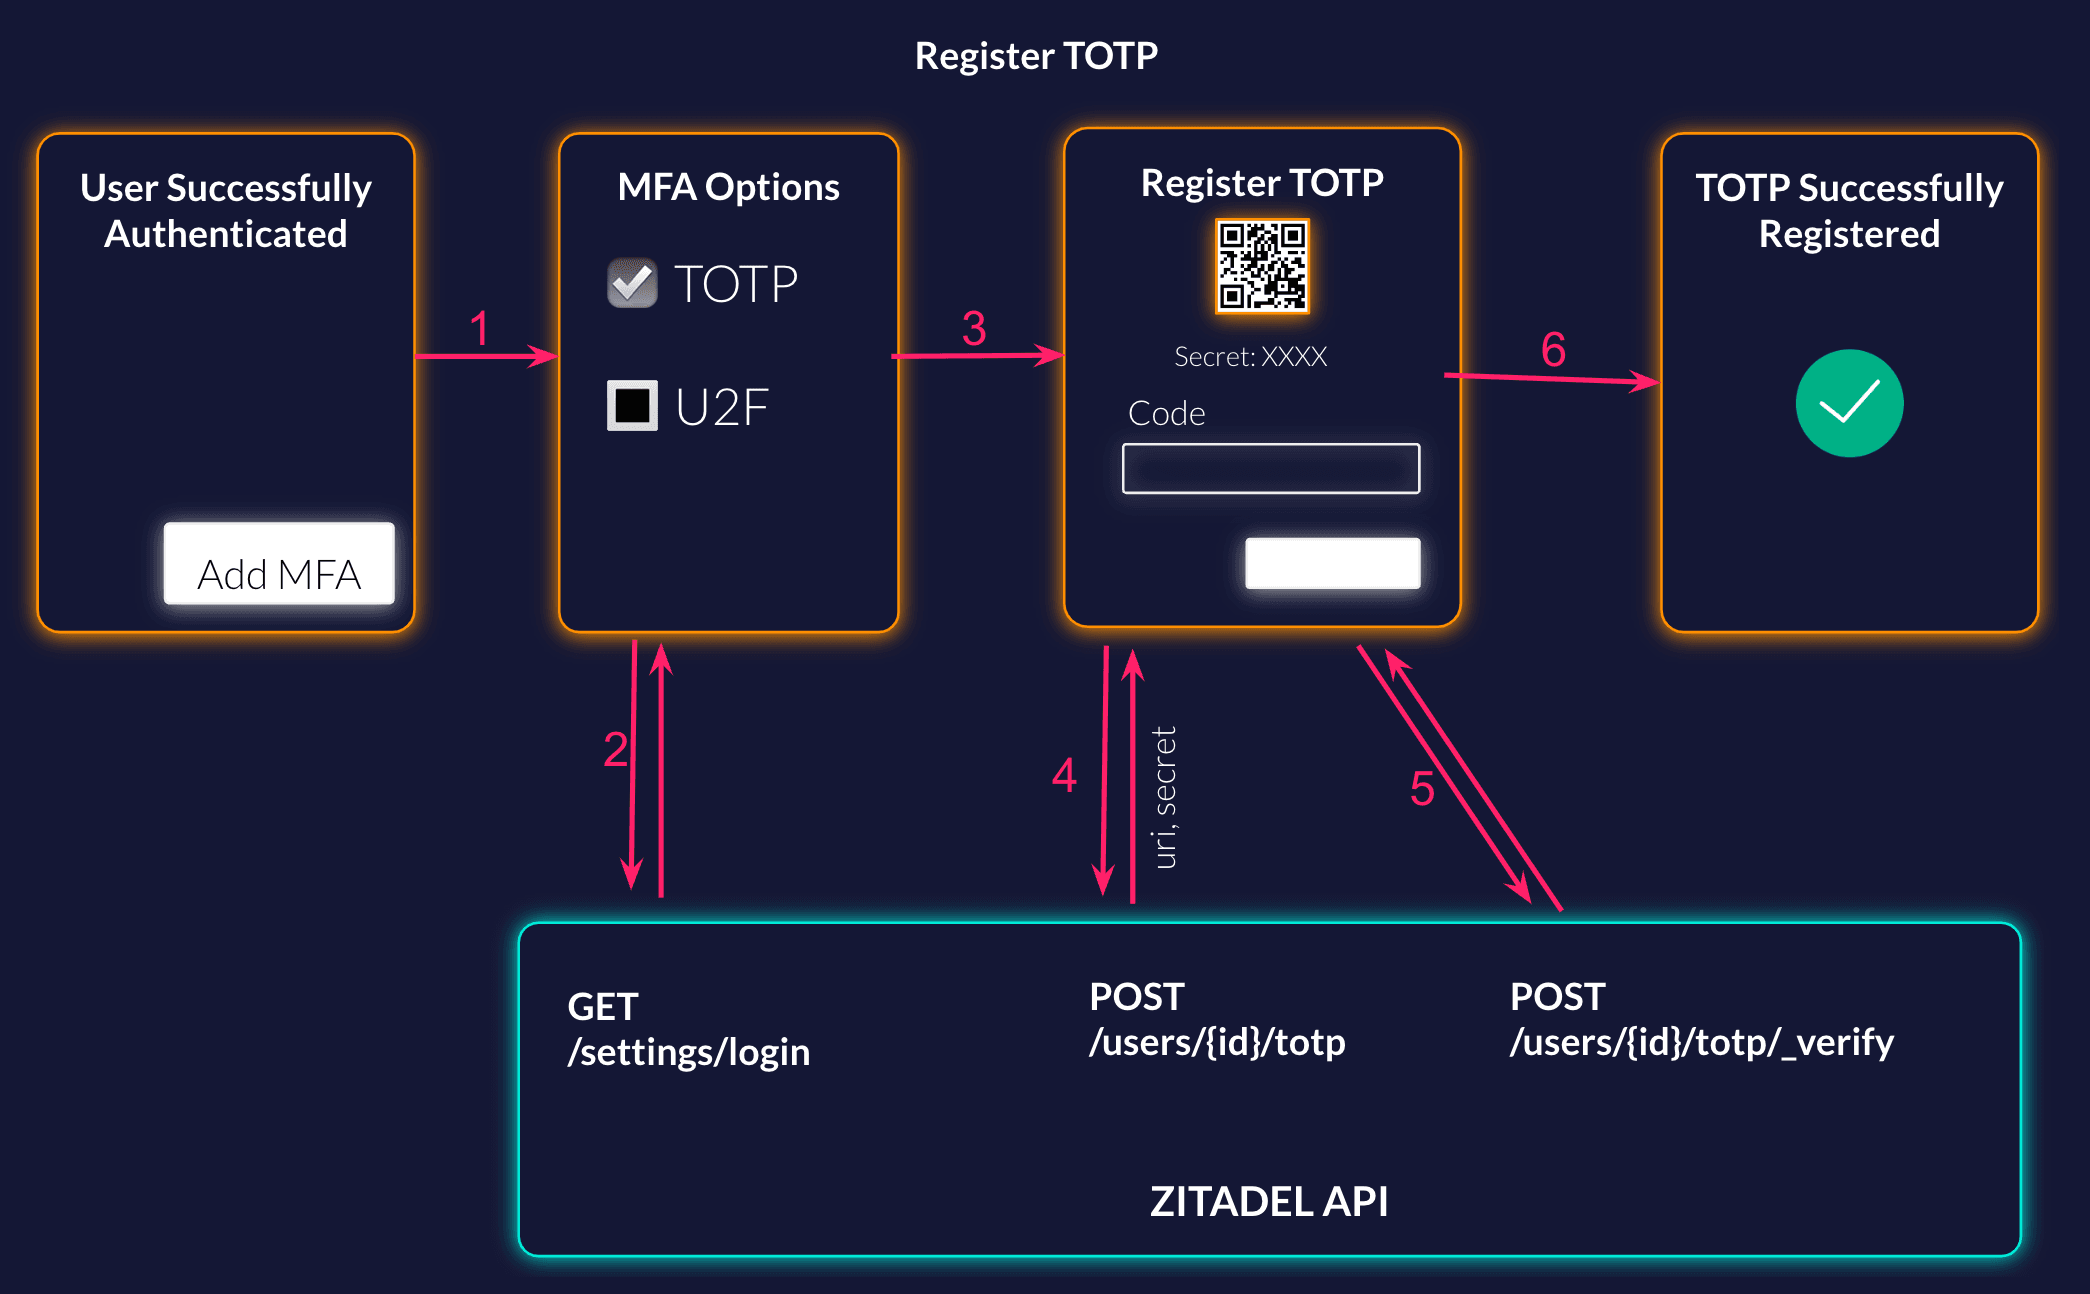
List the Possible Methods
Your user has successfully authenticated, and now you ask them if they want to set up MFA to have a more secure account. When the user starts the setup, first you want to show them the possible methods. You can either list it implicitly or call the settings service from ZITADEL to get what is configured on the login settings.
More detailed information about the API: Get Login Settings Documentation
Request Example:
curl --request GET \
  --url https://${CUSTOM_DOMAIN}/v2/settings/login \
  --header 'Accept: application/json' \
  --header 'Authorization: Bearer '"$TOKEN"''
Response Example: The relevant part for the list is the second factor and multifactor list.
{
	"details": {
		"sequence": "293",
		"changeDate": "2023-03-29T14:16:55.570482Z",
		"resourceOwner": "163840776835432705"
	},
	"settings": {
		"allowUsernamePassword": true,
		"allowRegister": true,
		"allowExternalIdp": true,
		"passkeysType": "PASSKEYS_TYPE_ALLOWED",
		"passwordCheckLifetime": "864000s",
		"externalLoginCheckLifetime": "864000s",
		"mfaInitSkipLifetime": "2592000s",
		"secondFactorCheckLifetime": "64800s",
		"multiFactorCheckLifetime": "43200s",
		"secondFactors": [
			"SECOND_FACTOR_TYPE_OTP",
			"SECOND_FACTOR_TYPE_U2F"
		],
		"multiFactors": [
			"MULTI_FACTOR_TYPE_U2F_WITH_VERIFICATION"
		],
		"resourceOwnerType": "RESOURCE_OWNER_TYPE_ORG"
	}
}
Start TOTP Registration
The user has selected to setup TOTP. To show the user the QR to register TOTP with his Authenticator App like Google/Microsoft Authenticator or Authy you have to start the registration on the ZITADEL API. Generate the QR Code with the URI from the response. For users that do not have a QR Code reader make sure to also show the secret, to enable manual setup.
More detailed information about the API: Start TOTP Registration Documentation
Request Example:
curl --request POST \
    --url https://${CUSTOM_DOMAIN}/v2/users/$USER_ID/totp \
    --header 'Accept: application/json' \
    --header 'Authorization: Bearer '"$TOKEN"''
    --header 'Content-Type: application/json' \
    --data '{}'
Response Example:
{
  "details": {
    "sequence": "2",
    "changeDate": "2023-06-28",
    "resourceOwner": "69629023906488334"
  },
  "uri": "otpauth://totp/ZITADEL:minni-mouse@mouse.com?algorithm=SHA1&digits=6&issuer=ZITADEL&period=30&secret=TJOPWSDYILLHXFV4MLKNNJOWFG7VSDCK",
  "secret": "TJOPWSDYILLHXFV4MLKNNJOWFG7VSDCK"
}
Verify TOTP Registration
When the user has added the account to the authenticator app, the code from the App has to be entered to finish the registration. This code has to be sent to the verify endpoint in ZITADEL.
More detailed information about the API: Verify TOTP Documentation
Request Example:
curl --request POST \
  --url https://${CUSTOM_DOMAIN}/v2/users/$USER_ID/totp/verify \
  --header 'Accept: application/json' \
  --header 'Authorization: Bearer '"$TOKEN"''
  --header 'Content-Type: application/json' \
  --data '{
  "code": "123456"
}'
TOTP Authentication
Flow

Check User
To be able to check the TOTP you need a session with a checked user. This can either happen before the TOTP check or at the same time. In this example we do two separate requests. So the first step is to create a new Sessions.
More detailed information about the API: Create new session Documentation
Example Request
curl --request POST \
  --url https://${CUSTOM_DOMAIN}/v2/sessions \
  --header 'Accept: application/json' \
  --header 'Authorization: Bearer '"$TOKEN"'' \
  --header 'Content-Type: application/json' \
  --data '{
  "checks": {
    "user": {
      "loginName": "minnie-mouse@mouse.com"
    }
  }
}'
Example Response
{
	"details": {
		"sequence": "580",
		"changeDate": "2023-06-14T05:32:39.007096Z",
		"resourceOwner": "163840776835432705"
	},
	"sessionId": "218480890961985793",
	"sessionToken": "yMDi6uVPJAcphbbz0LaxC07ihWkNTe7m0Xqch8SzfM5Cz3HSIQIDZ65x1f5Qal0jxz0MEyo-_zYcUg"
}
Check TOTP
Now you can show the code field to the user, where the code needs to be entered from the Authenticator App. With that code you have to update the existing session with a totp check.
More detailed information about the API: Update session Documentation
Example Request
curl --request PATCH \
  --url https://${CUSTOM_DOMAIN}/v2/sessions/$SESSION-ID \
  --header 'Accept: application/json' \
  --header 'Content-Type: application/json' \
  --data '{
  "checks": {
    "totp": {
      "code": "323764"
    },
  }
}'
SMS Code Registration
Flow
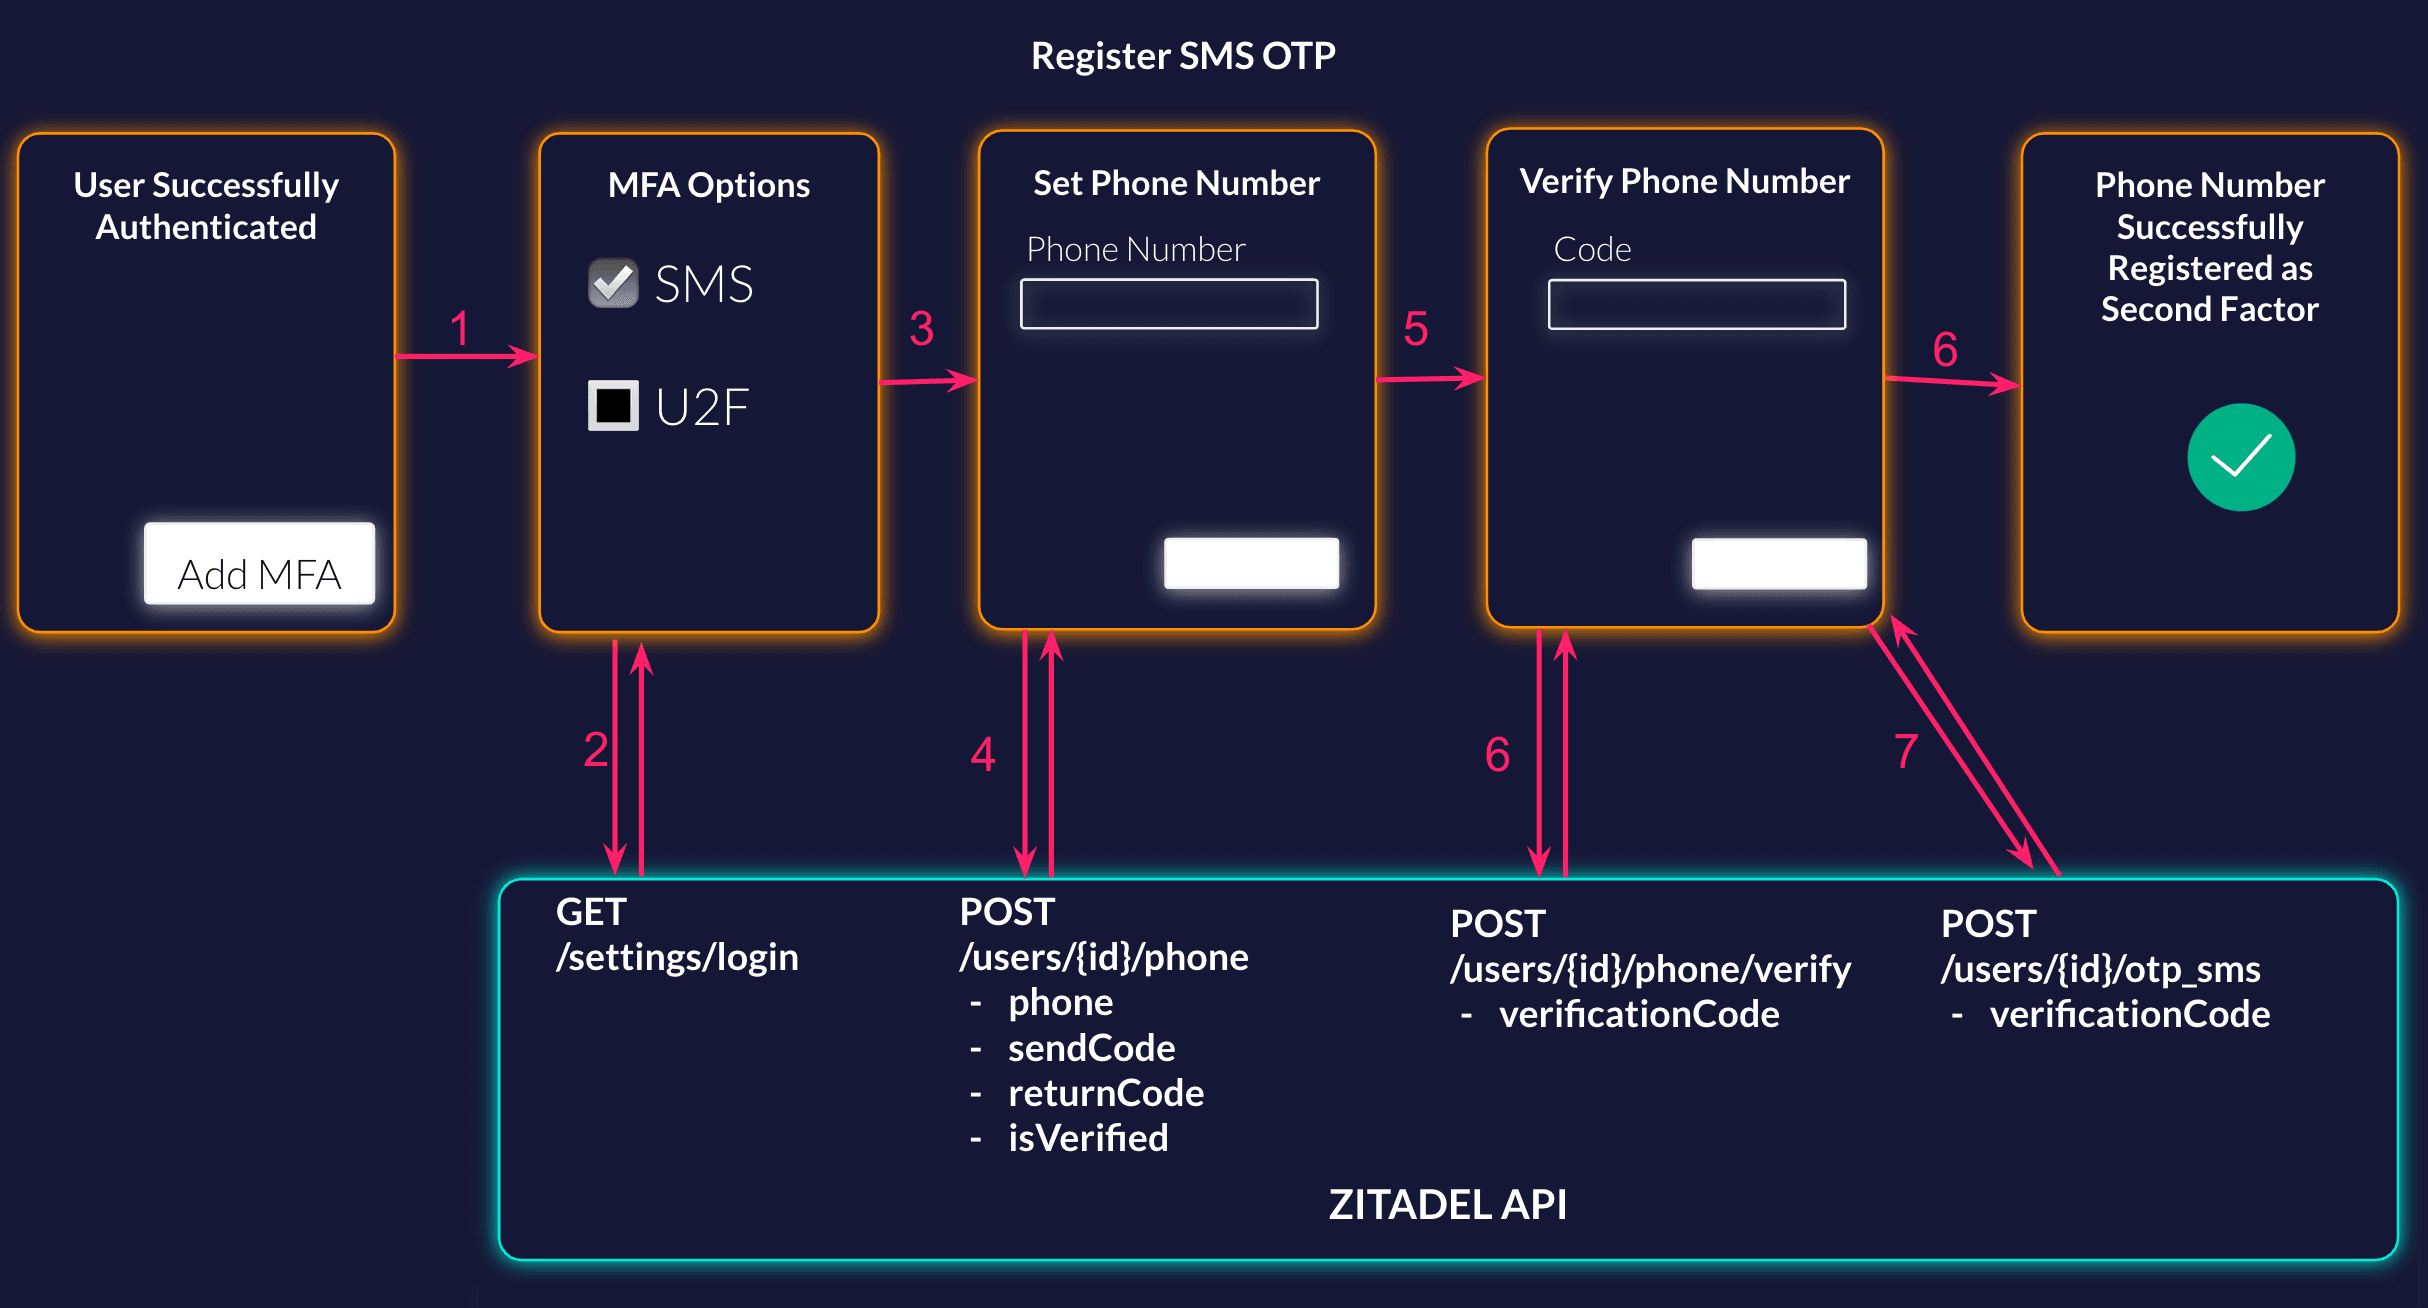
List the Possible Methods
Your user has successfully authenticated, and now you ask them if they want to set up MFA to have a more secure account. When the user starts the setup, first you want to show them the possible methods. You can either list it implicitly or call the settings service from ZITADEL to get what is configured on the login settings.
More detailed information about the API: Get Login Settings Documentation
Request Example:
curl --request GET \
  --url https://${CUSTOM_DOMAIN}/v2/settings/login \
  --header 'Accept: application/json' \
  --header 'Authorization: Bearer '"$TOKEN"''
Response Example: The relevant part for the list is the second factor and multifactor list.
{
	"details": {
		"sequence": "293",
		"changeDate": "2023-03-29T14:16:55.570482Z",
		"resourceOwner": "163840776835432705"
	},
	"settings": {
		"allowUsernamePassword": true,
		"allowRegister": true,
		"allowExternalIdp": true,
		"passkeysType": "PASSKEYS_TYPE_ALLOWED",
		"passwordCheckLifetime": "864000s",
		"externalLoginCheckLifetime": "864000s",
		"mfaInitSkipLifetime": "2592000s",
		"secondFactorCheckLifetime": "64800s",
		"multiFactorCheckLifetime": "43200s",
		"secondFactors": [
			"SECOND_FACTOR_TYPE_OTP",
			"SECOND_FACTOR_TYPE_U2F"
		],
		"multiFactors": [
			"MULTI_FACTOR_TYPE_U2F_WITH_VERIFICATION"
		],
		"resourceOwnerType": "RESOURCE_OWNER_TYPE_ORG"
	}
}
Add Phone Number
When the user has decided to register the phone number to get a code as a second factor, the first step is to add a verified phone number to the user. If the user already has a verified phone number you can skip this step.
When adding a new phone number, you can choose if you want ZITADEL to send the verification code to the number, or if you want to send it by yourself. If ZITADEL should do it, make sure that you have registered an SMS Provider and send an empty sendCode object in the request. With an empty returnCode object in the request, ZITADEL will not send the code, but return it in the response.
If you don't want the user to verify the phone number, you can also create it directly as verified, by sending the isVerified attribute.
More detailed information about the API: Add phone
Example Request:
curl --request POST \
  --url https://${CUSTOM_DOMAIN}/v2/users/$USER-ID/phone \
  --header 'Accept: application/json' \
  --header 'Authorization: Bearer '"$TOKEN"'' \
  --header 'Content-Type: application/json' \
  --data '{
      "phone": "+41791234567",
      "sendCode": {}
  }'
Verify Phone Number
The next step is to show a screen, so the user is able to enter the code for verifying the phone number. Send a verify phone request with the code in the body.
More detailed information about the API: Verify phone
Example Request:
curl --request POST \
    --url https://${CUSTOM_DOMAIN}/v2/users/$USER-ID/phone/verify \
    --header 'Accept: application/json' \
    --header 'Authorization: Bearer '"$TOKEN"'' \
    --header 'Content-Type: application/json' \
    --data '{
      "verificationCode": "VBQREB"
    }'
Add OTP SMS to the user
Now that the user has a verified phone number you can enable OTP SMS on the user.
More detailed information about the API: Add OTP SMS for a user
Example Request:
curl --request POST \
  --url https://${CUSTOM_DOMAIN}/v2/users/$USER-ID/otp_sms \
  --header 'Accept: application/json' \
  --header 'Authorization: Bearer '"$TOKEN"'' \
  --header 'Content-Type: application/json'
SMS Code Authentication
Flow
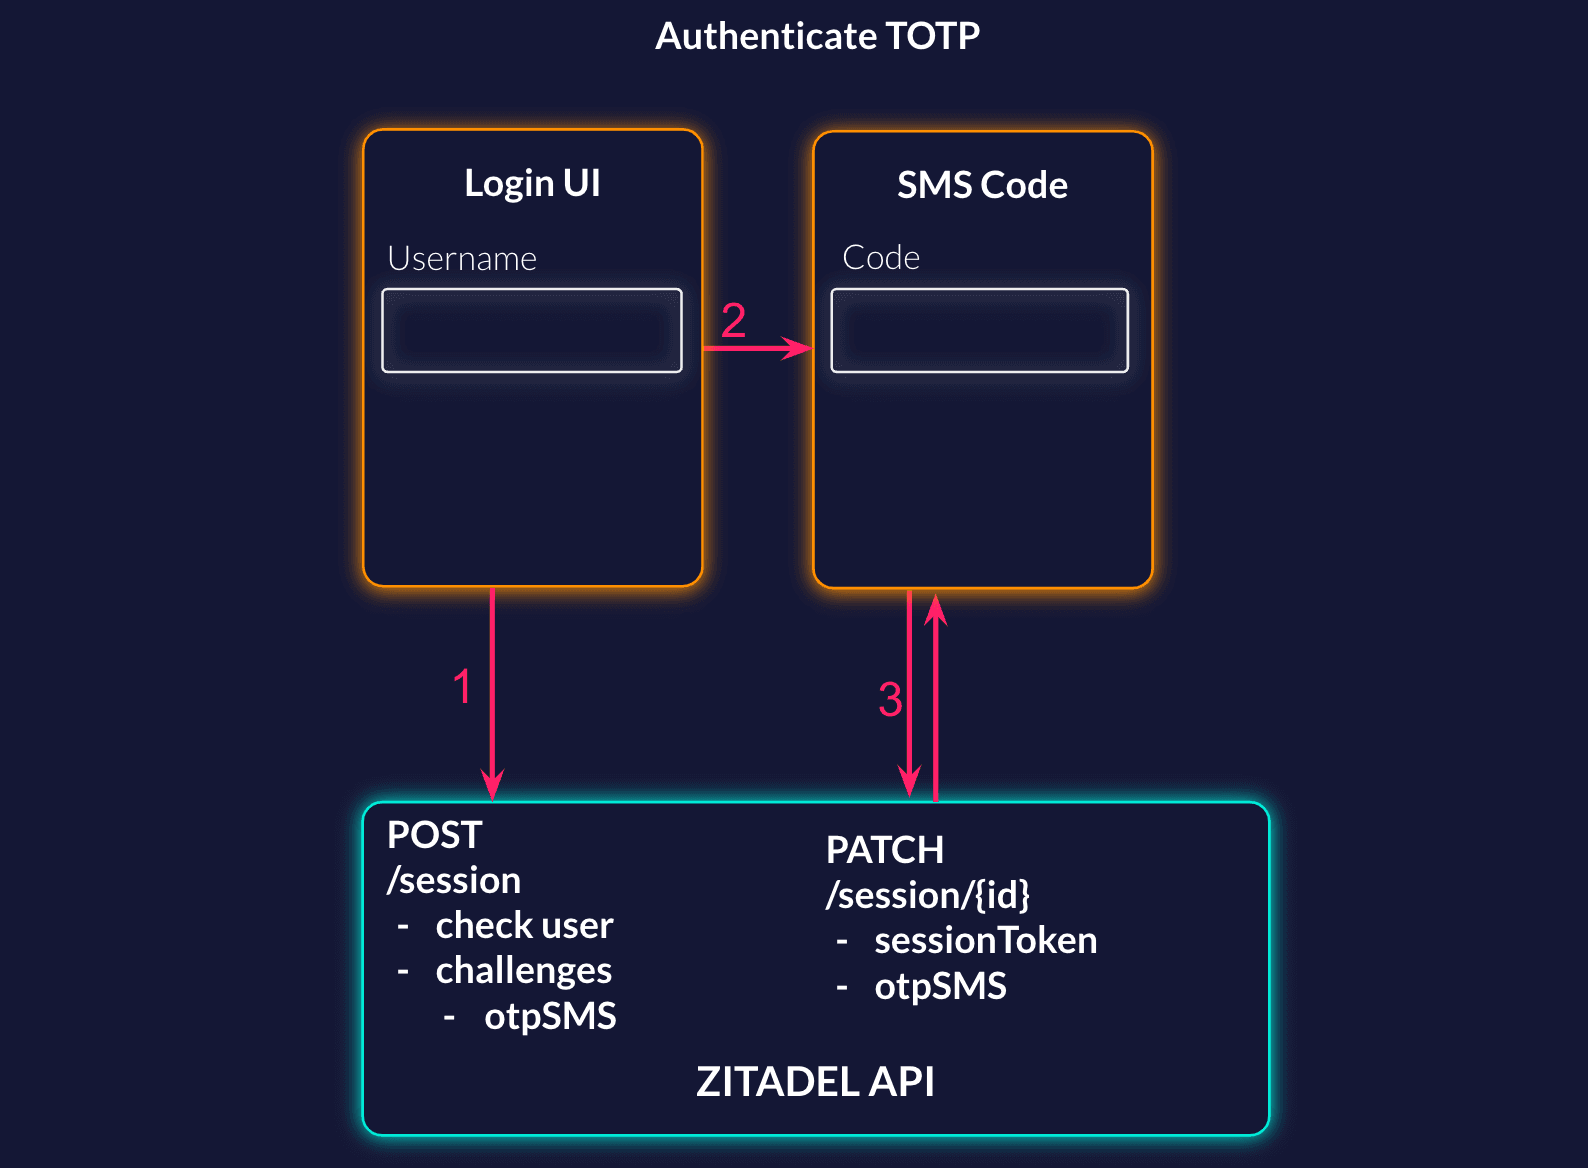
Check User
To be able to check the SMS Code you need a session with a checked user. When creating the session you can already start the sms challenge, this will only be executed if the user check was successful. You can tell the challenge, if the code should be returned (returnCode: true) or if ZITADEL should send it (returnCode: false).
More detailed information about the API: Create new session Documentation
Example Request
curl --request POST \
  --url https://${CUSTOM_DOMAIN}/v2/sessions \
  --header 'Accept: application/json' \
  --header 'Authorization: Bearer '"$TOKEN"'' \
  --header 'Content-Type: application/json' \
  --data '{
  "checks": {
    "user": {
      "loginName": "minni-mouse@mouse.com"
    }
  },
  "challenges": {
		"otpSms": {
			"returnCode": false
		}
	}
}'
Check SMS Code
In the next step you should prompt the user to enter the SMS verification code in the provided field. The update session request has a check otpSMS where you should send the code, the user has entered.
Example Request
curl --request PATCH \
  --url https://${CUSTOM_DOMAIN}/v2/sessions/225307381909694507 \
  --header 'Accept: application/json' \
  --header 'Authorization: Bearer '"$TOKEN"'' \
  --header 'Content-Type: application/json' \
  --data '{
  "checks": {
    "otpSms": {
      "code": "3237642"
    },
  }
}'
Email Code Registration
Flow
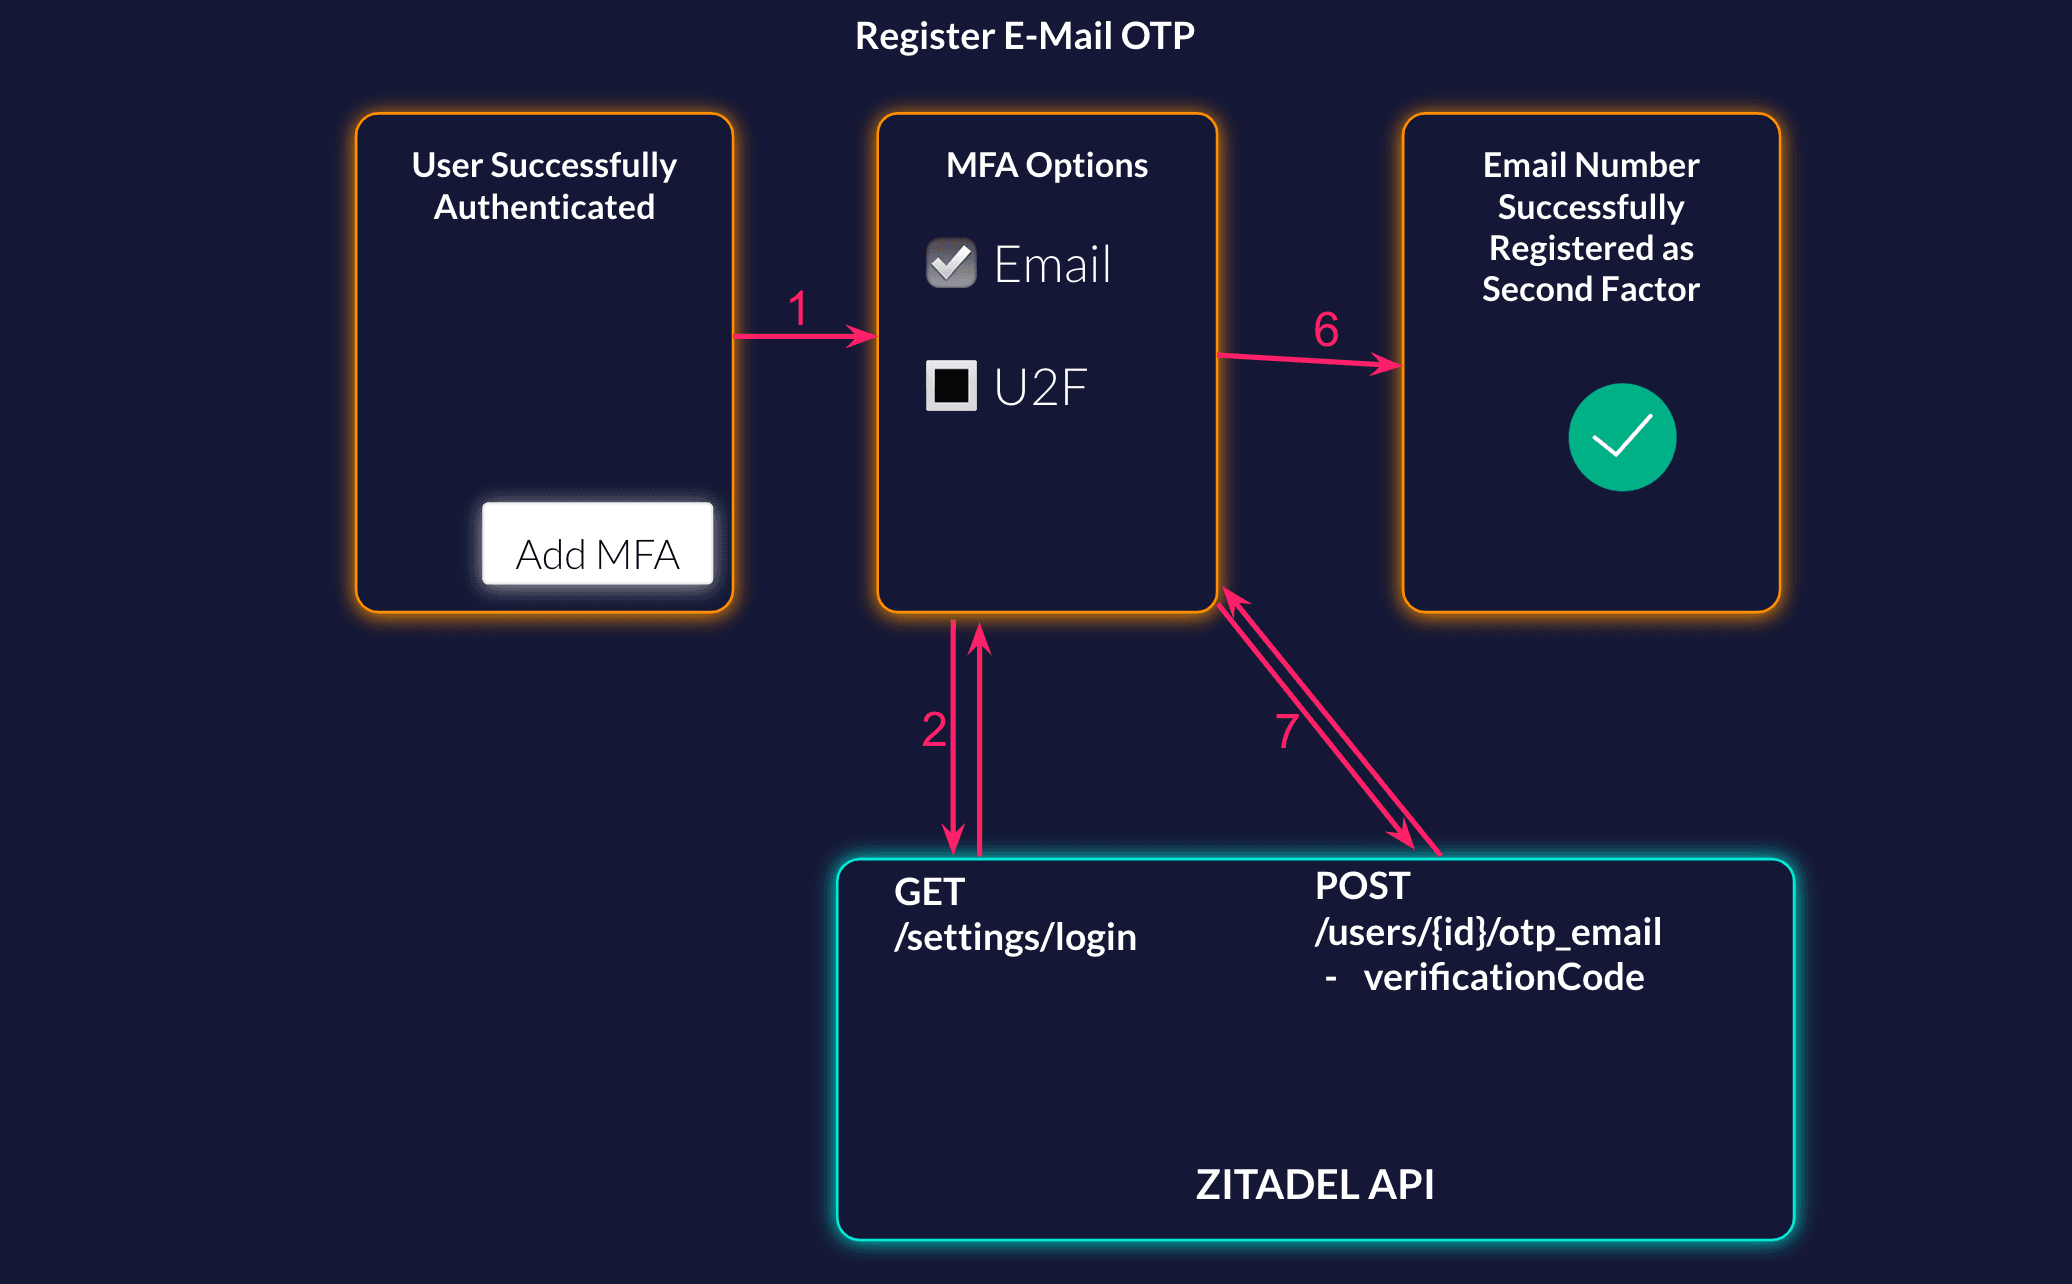
List the Possible Methods
Your user has successfully authenticated, and now you ask them if they want to set up MFA to have a more secure account. When the user starts the setup, first you want to show them the possible methods. You can either list it implicitly or call the settings service from ZITADEL to get what is configured on the login settings.
More detailed information about the API: Get Login Settings Documentation
Request Example:
curl --request GET \
  --url https://${CUSTOM_DOMAIN}/v2/settings/login \
  --header 'Accept: application/json' \
  --header 'Authorization: Bearer '"$TOKEN"''
Response Example: The relevant part for the list is the second factor and multifactor list.
{
	"details": {
		"sequence": "293",
		"changeDate": "2023-03-29T14:16:55.570482Z",
		"resourceOwner": "163840776835432705"
	},
	"settings": {
		"allowUsernamePassword": true,
		"allowRegister": true,
		"allowExternalIdp": true,
		"passkeysType": "PASSKEYS_TYPE_ALLOWED",
		"passwordCheckLifetime": "864000s",
		"externalLoginCheckLifetime": "864000s",
		"mfaInitSkipLifetime": "2592000s",
		"secondFactorCheckLifetime": "64800s",
		"multiFactorCheckLifetime": "43200s",
		"secondFactors": [
			"SECOND_FACTOR_TYPE_OTP",
			"SECOND_FACTOR_TYPE_U2F"
		],
		"multiFactors": [
			"MULTI_FACTOR_TYPE_U2F_WITH_VERIFICATION"
		],
		"resourceOwnerType": "RESOURCE_OWNER_TYPE_ORG"
	}
}
Verified Email
As ZITADEL required all users to have a verified email address, you do not need to add a new email and verify it for setting up the second factor. For the Email second factor the already verified email address will be taken.
Add OTP Email to the user
As the user already has a verified E-Mail address you can enable E-Mail OTP on the user.
More detailed information about the API: Add OTP Email for a user
Example Request:
curl --request POST \
  --url https://${CUSTOM_DOMAIN}/v2/users/$USER-ID/otp_email \
  --header 'Accept: application/json' \
  --header 'Authorization: Bearer '"$TOKEN"'' \
  --header 'Content-Type: application/json'
Email Code Authentication
Flow
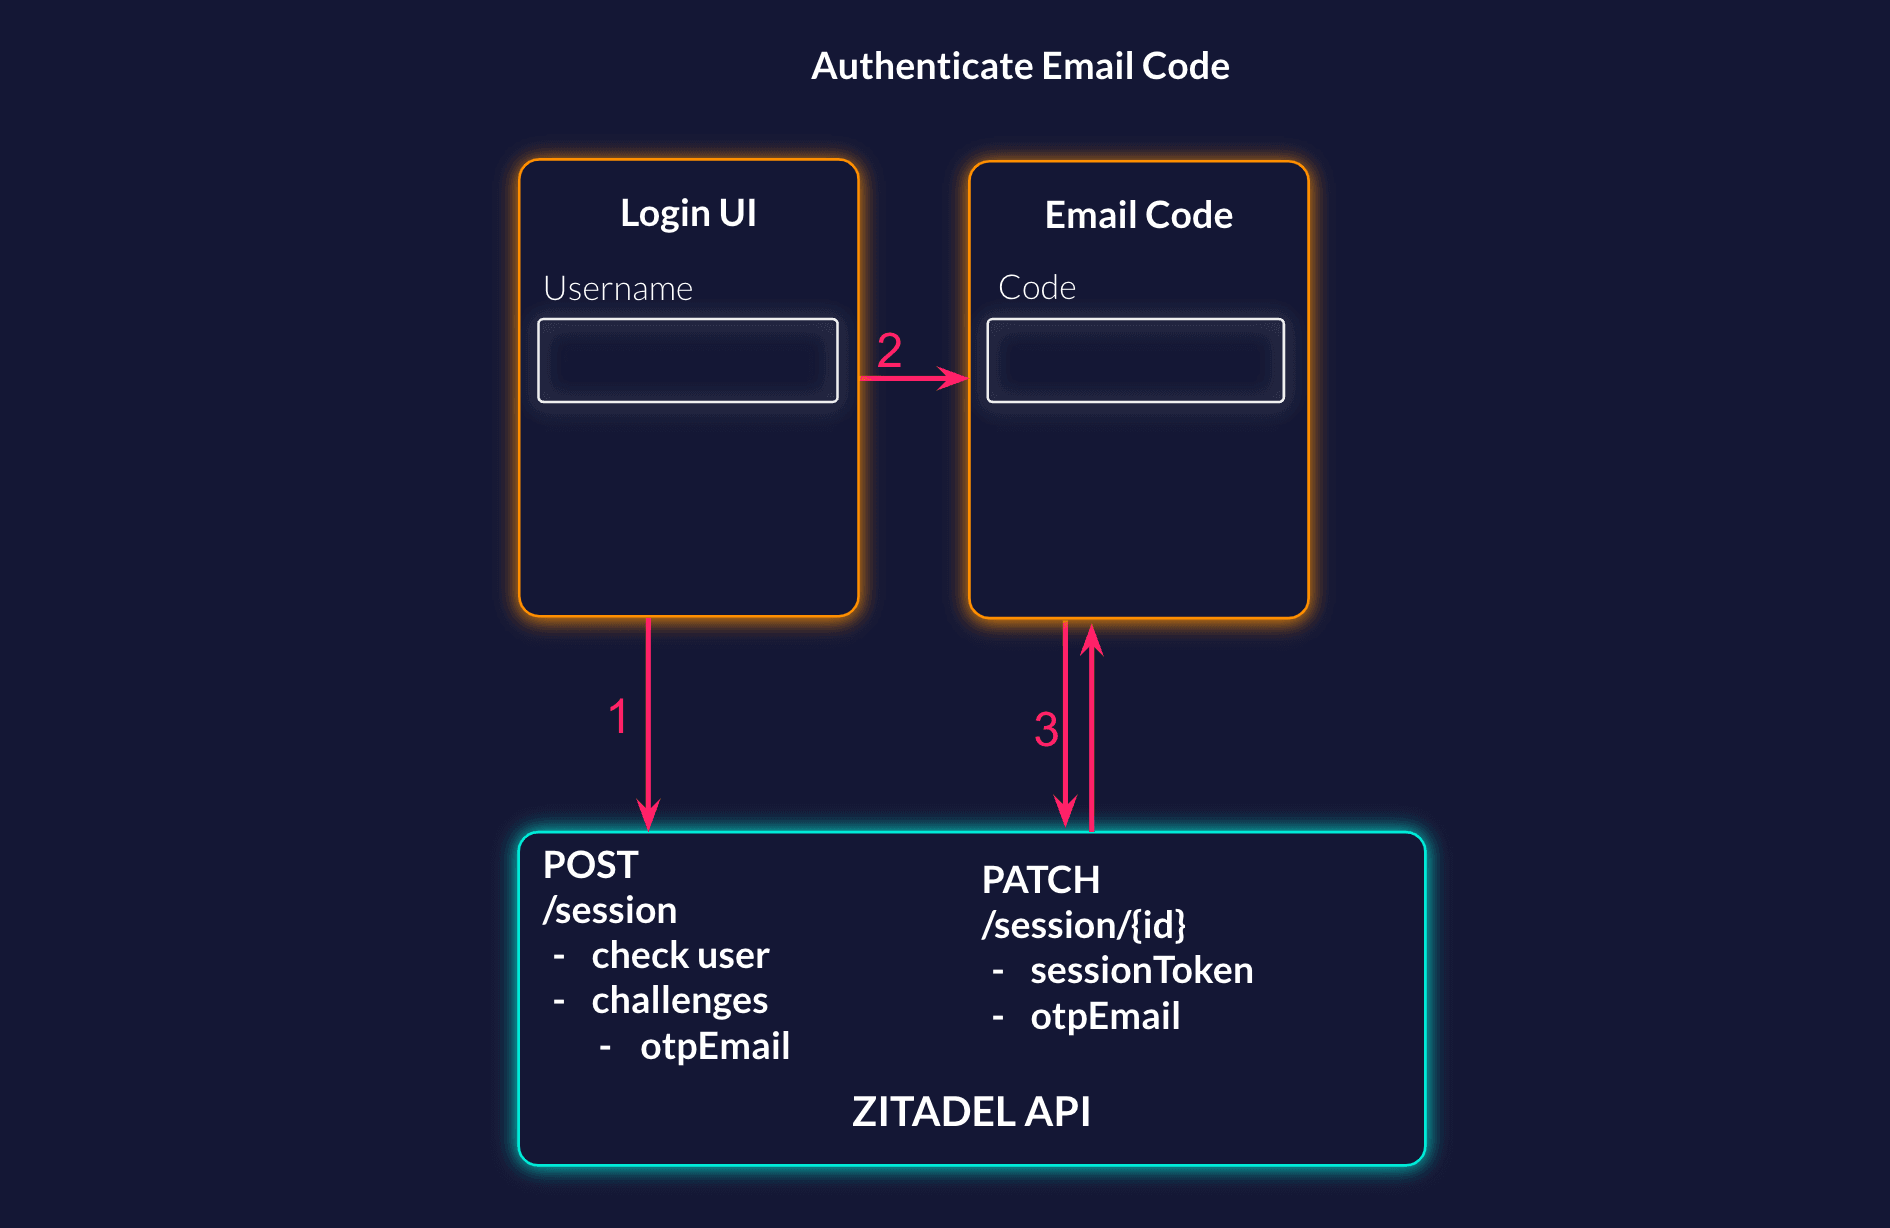
Check User
To be able to check the Email Code you need a session with a checked user. When creating the session you can already start the sms challenge, this will only be executed if the user check was successful. You can tell the challenge, if the code should be returned (returnCode: true) or if ZITADEL should send it (returnCode: false).
More detailed information about the API: Create new session Documentation
Example Request
curl --request POST \
  --url https://${CUSTOM_DOMAIN}/v2/sessions \
  --header 'Accept: application/json' \
  --header 'Authorization: Bearer '"$TOKEN"'' \
  --header 'Content-Type: application/json' \
  --data '{
  "checks": {
    "user": {
      "loginName": "minni-mouse@mouse.com"
    }
  },
  "challenges": {
		"otpEmail": {
			"returnCode": false
		}
	}
}'
Check Email Code
Next, display a code field for the user to enter the verification code they received via email. The update session request has a check otpEmail where you should send the code, the user has entered.
Example Request
curl --request PATCH \
  --url https://${CUSTOM_DOMAIN}/v2/sessions/225307381909694507 \
  --header 'Accept: application/json' \
  --header 'Authorization: Bearer '"$TOKEN"'' \
  --header 'Content-Type: application/json' \
  --data '{
  "checks": {
    "otpEmail": {
      "code": "3237642"
    },
  }
}'
U2F Registration
Flow
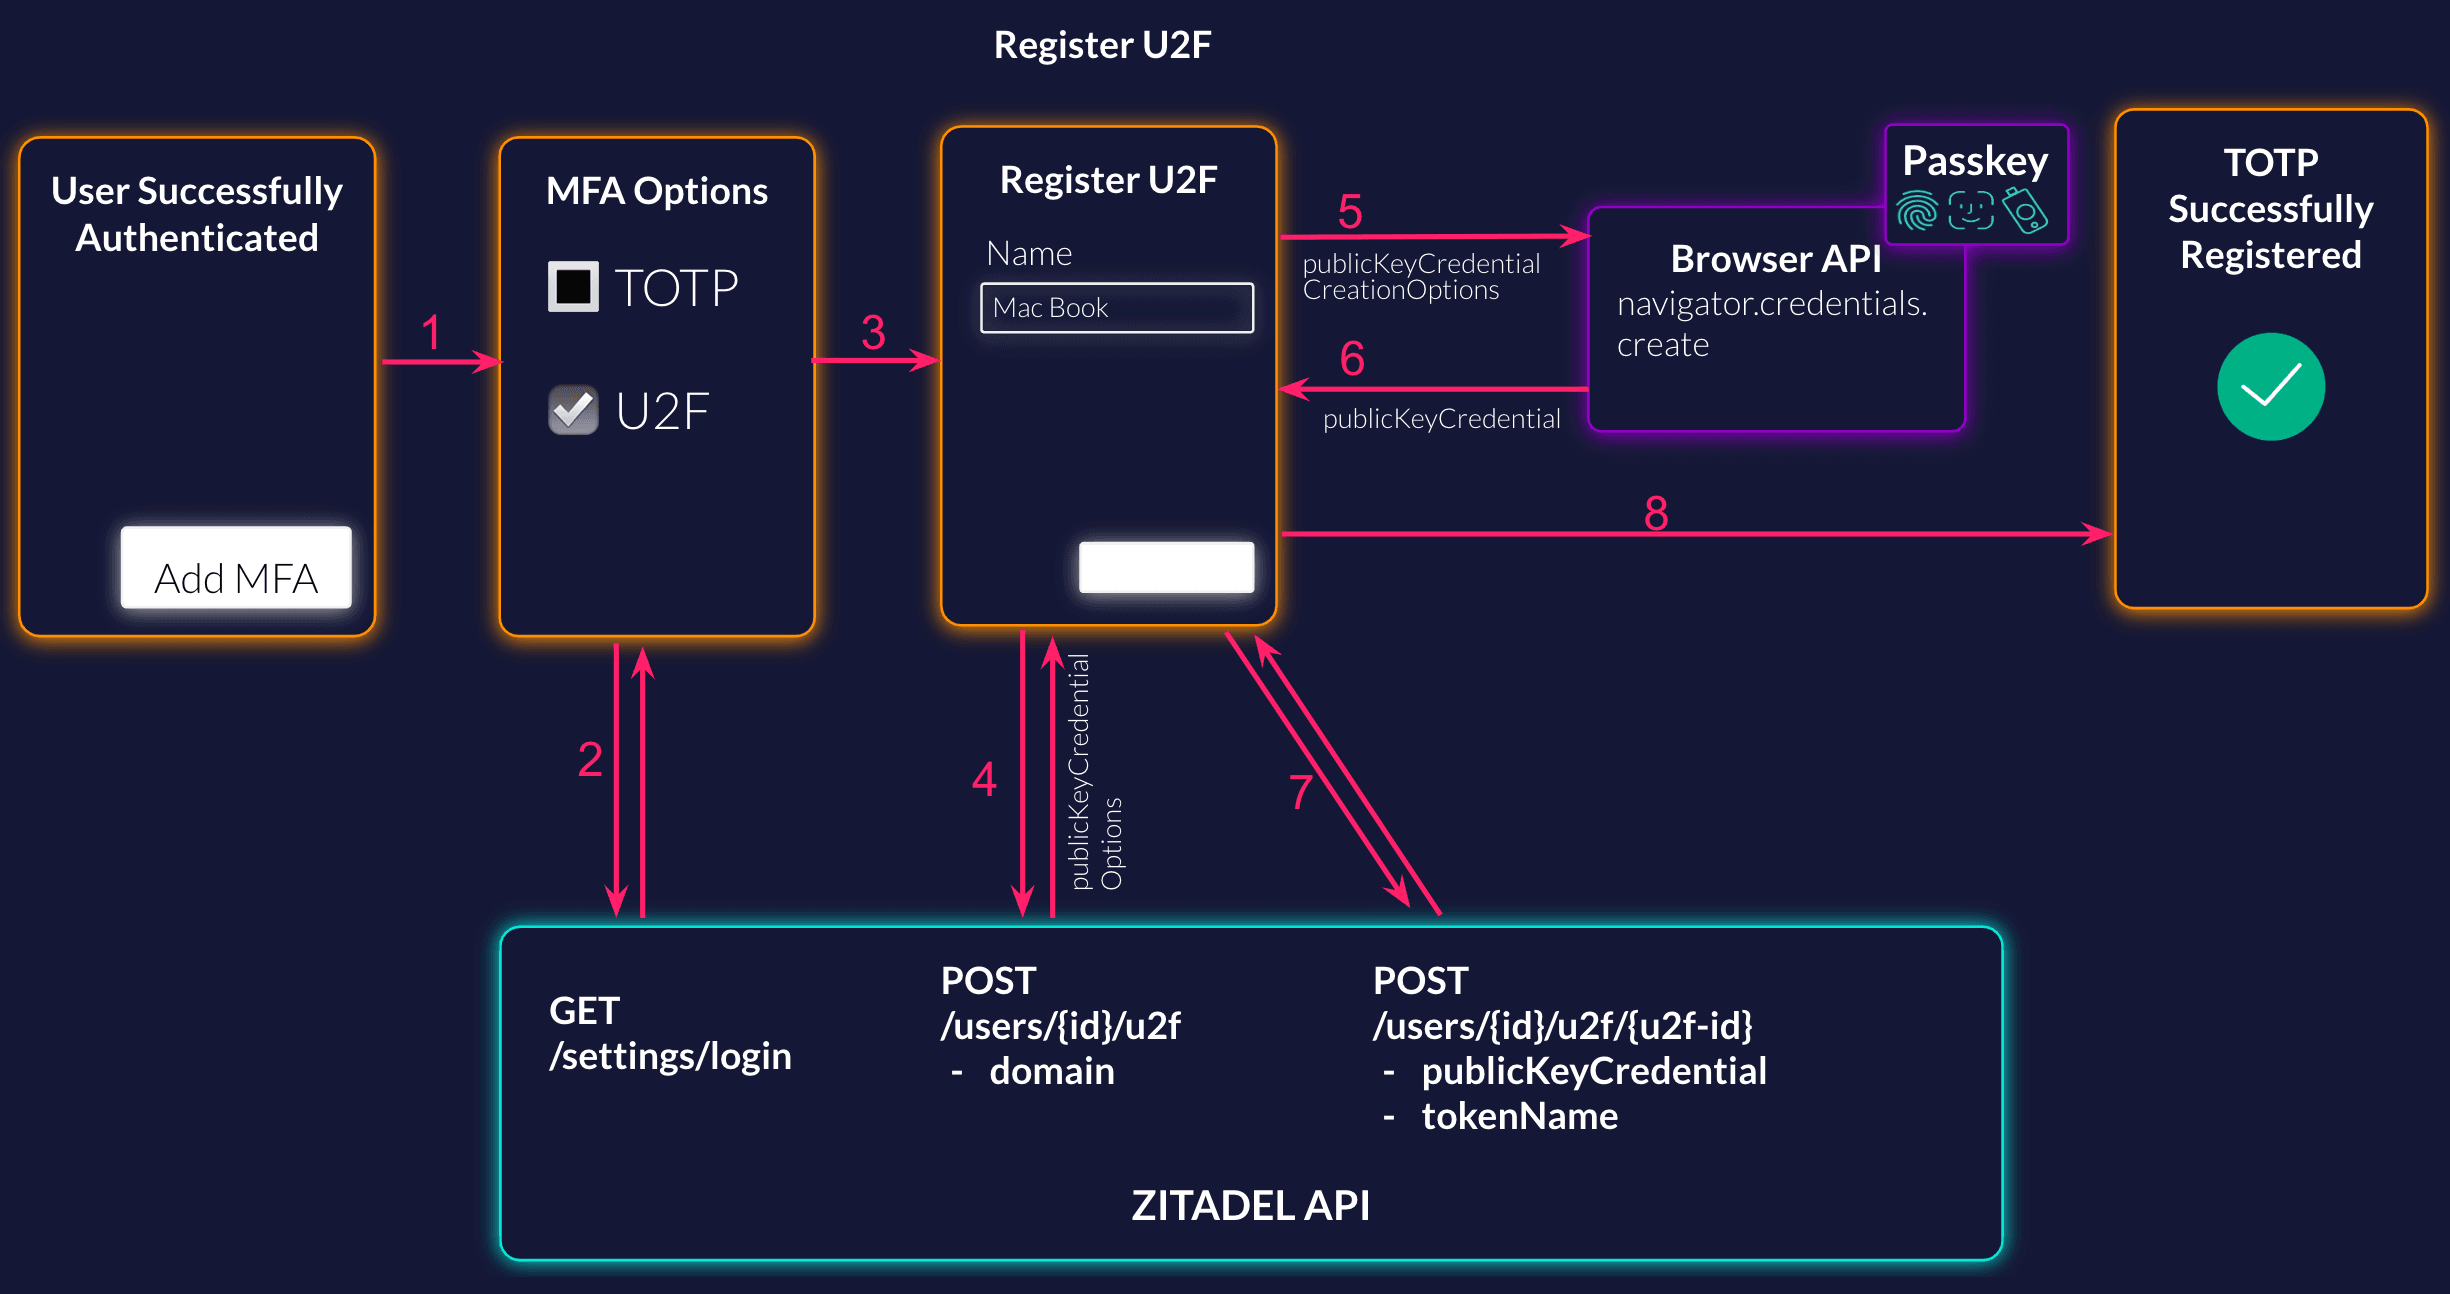
List the Possible Methods
Your user has successfully authenticated, and now you ask them if they want to set up MFA to have a more secure account. When the user starts the setup, first you want to show them the possible methods. You can either list it implicitly or call the settings service from ZITADEL to get what is configured on the login settings.
More detailed information about the API: Get Login Settings Documentation
Request Example:
curl --request GET \
  --url https://${CUSTOM_DOMAIN}/v2/settings/login \
  --header 'Accept: application/json' \
  --header 'Authorization: Bearer '"$TOKEN"''
Response Example: The relevant part for the list is the second factor and multifactor list.
{
	"details": {
		"sequence": "293",
		"changeDate": "2023-03-29T14:16:55.570482Z",
		"resourceOwner": "163840776835432705"
	},
	"settings": {
		"allowUsernamePassword": true,
		"allowRegister": true,
		"allowExternalIdp": true,
		"passkeysType": "PASSKEYS_TYPE_ALLOWED",
		"passwordCheckLifetime": "864000s",
		"externalLoginCheckLifetime": "864000s",
		"mfaInitSkipLifetime": "2592000s",
		"secondFactorCheckLifetime": "64800s",
		"multiFactorCheckLifetime": "43200s",
		"secondFactors": [
			"SECOND_FACTOR_TYPE_OTP",
			"SECOND_FACTOR_TYPE_U2F"
		],
		"multiFactors": [
			"MULTI_FACTOR_TYPE_U2F_WITH_VERIFICATION"
		],
		"resourceOwnerType": "RESOURCE_OWNER_TYPE_ORG"
	}
}
Start U2F Registration
The user has selected to setup Universal Second Factor (U2F). To be able to authenticate in the browser you have to start the u2f registration within ZITADEL.
More detailed information about the API: Start U2F Registration Documentation
Request Example:
curl --request POST \
  --url https://${CUSTOM_DOMAIN}/v2/users/$USER_ID/u2f \
  --header 'Accept: application/json' \
  --header 'Authorization: Bearer '"$TOKEN"''
  --header 'Content-Type: application/json' \
  --data '{
    "domain": "acme.com"
  }'
Response Example:
{
  "details": {
    "sequence": "2",
    "changeDate": "2023-07-03",
    "resourceOwner": "69629023906488334"
  },
  "u2fId": "163840776835432705",
  "publicKeyCredentialCreationOptions": {
    "publicKey": {
      "attestation": "none",
      "authenticatorSelection": {
        "userVerification": "required"
      },
      "challenge": "XaMYwWOZ5hj6pwtwJJlpcI-ExkO5TxevBMG4R8DoKQQ",
      "excludeCredentials": [
        {
          "id": "tVp1QfYhT8DkyEHVrv7blnpAo2YJzbZgZNBf7zPs6CI",
          "type": "public-key"
        }
      ],
      "pubKeyCredParams": [
        {
          "alg": -7,
          "type": "public-key"
        }
      ],
      "rp": {
        "id": "localhost",
        "name": "ZITADEL"
      },
      "timeout": 300000,
      "user": {
        "displayName": "Minie Mouse",
        "id": "MjE1NTk4MDAwNDY0OTk4OTQw",
        "name": "minie-mouse"
      }
    }
  }
}
Register new U2F on current device
Now that you have started the registration within ZITADEL, you have to register the credentials in the browser. This requires a call to the browser api and looks something like the following. Make sure to send the public key credential creation options you got in the previous request from ZITADEL.
const credential = await navigator.credentials.create({
    publicKey: publicKeyCredentialCreationOptions
});
For more information about WebAuthN and registering credential flow, read the following guide: Registering a WebAuthN Credentials
Verify U2F Registration
In the next request you have to verify the U2F within ZITADEL. Include the public key credential you got from the browser in your request. You can give the U2F a name, which makes it easier for the user to identify the registered authentication methods. Example: Google Pixel, iCloud Keychain, Yubikey, etc
More detailed information about the API: Verify U2F Documentation
Example Request:
curl --request POST \
  --url https://${CUSTOM_DOMAIN}/v2/users/$USER_ID/u2f/$PASSKEY_ID \
  --header 'Accept: application/json' \
  --header 'Authorization: Bearer '"$TOKEN"''\
  --header 'Content-Type: application/json' \
  --data '{
  "publicKeyCredential": {
    "type": "public-key",
    "id": "pawVarF4xPxLFmfCnRkwXWeTrKGzabcAi92LEI1WC00",
    "rawId": "pawVarF4xPxLFmfCnRkwXWeTrKGzabcAi92LEI1WC00",
    "response": {
      "attestationObject": "o2NmbXRmcGFja2VkZ2F0dFN0bXSiY2FsZyZjc2lnWEcwRQIgRKS3VpeE9tfExXRzkoUKnG4rQWPvtSSt4YtDGgTx32oCIQDPey-2YJ4uIg-QCM4jj6aE2U3tgMFM_RP7Efx6xRu3JGhhdXRoRGF0YVikSZYN5YgOjGh0NBcPZHZgW4_krrmihjLHmVzzuoMdl2NFAAAAADju76085Yhmlt1CEOHkwLQAIKWsFWqxeMT8SxZnwp0ZMF1nk6yhs2m3AIvdixCNVgtNpQECAyYgASFYIMGUDSP2FAQn2MIfPMy7cyB_Y30VqixVgGULTBtFjfRiIlggjUGfQo3_-CrMmH3S-ZQkFKWKnNBQEAMkFtG-9A4zqW0",
      "clientDataJSON": "eyJ0eXBlJjoid2ViYXV0aG4uY3JlYXRlIiwiY2hhbGxlbmdlIjoiQlhXdHh0WGxJeFZZa0pHT1dVaUVmM25zby02aXZKdWw2YmNmWHdMVlFIayIsIm9yaWdpbiI6Imh0dHBzOi8vbG9jYWxob3N0OjgwODAifQ"
    }
  },
  "tokenName": "Google Pixel"
}'
You have successfully registered a new U2F to the user.
U2F Authentication
Flow
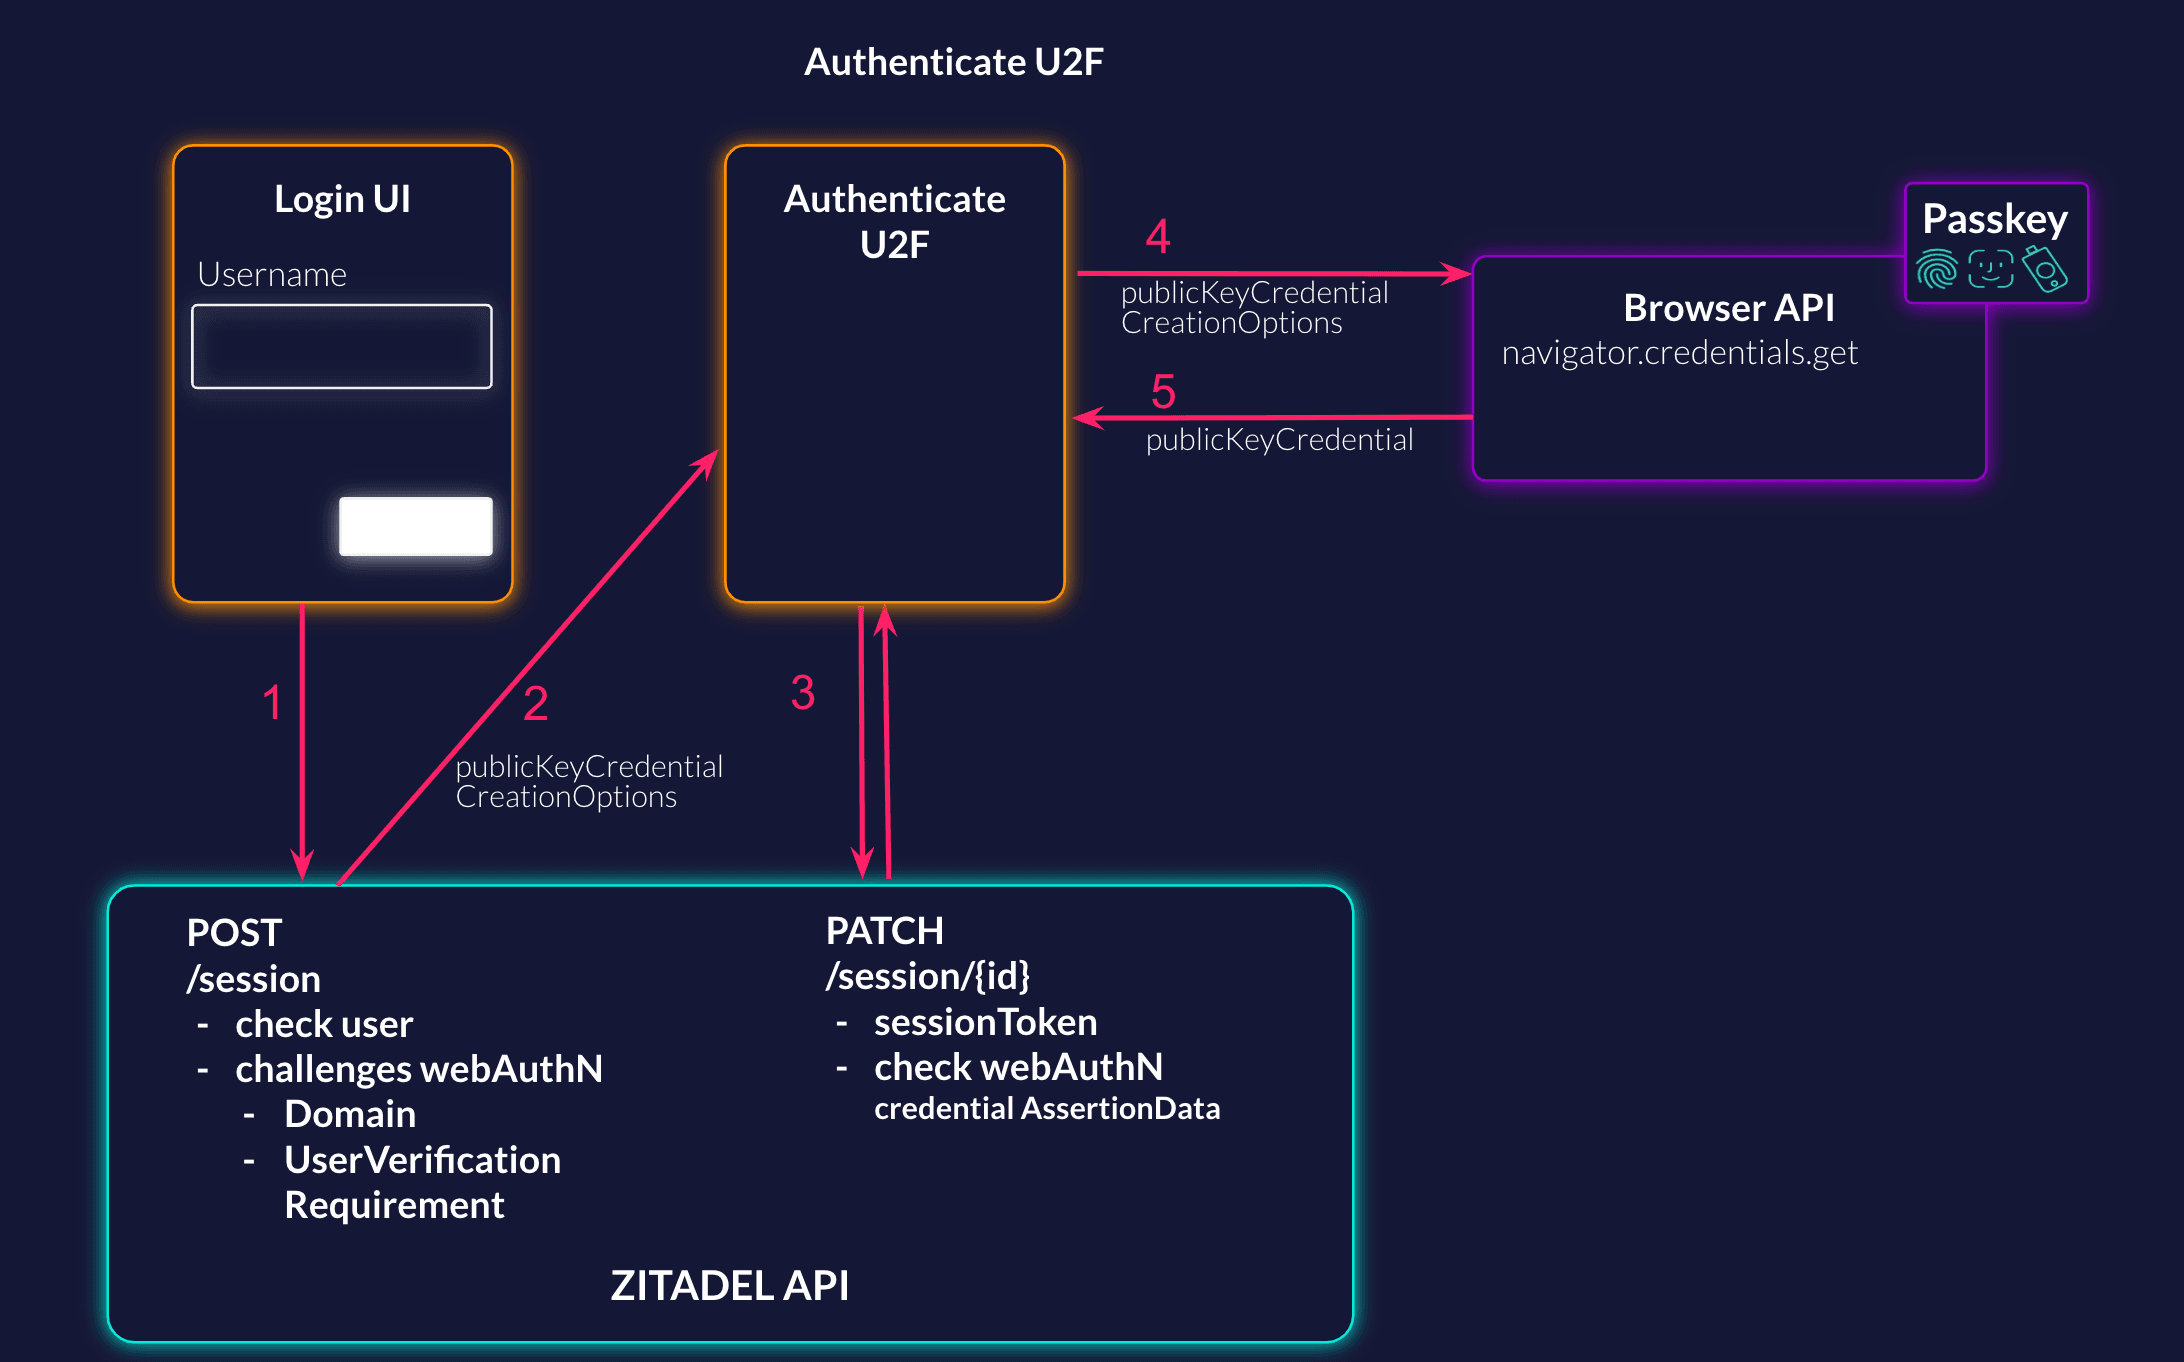
Check User
To be able to check the Universal Second Factor (U2F) you need a user check and a webAuthN challenge. In the create session request you can check for the user and directly initiate the webAuthN challenge.
For U2F you can choose between "USER_VERIFICATION_REQUIREMENT_PREFERRED" and "USER_VERIFICATION_REQUIREMENT_DISCOURAGED" for the challenge.
Best practice is using discouraged, as this doesn't require the user to enter a PIN. With preferred the user might be prompted for the PIN, but it is not necessary.
More detailed information about the API: Create new session Documentation
Example Request
curl --request POST \
  --url https://${CUSTOM_DOMAIN}/v2/sessions \
  --header 'Accept: application/json' \
  --header 'Authorization: Bearer '"$TOKEN"'' \
  --header 'Content-Type: application/json' \
  --data '{
  "checks": {
    "user": {
      "loginName": "minni-mouse@mouse.com"
    }
  },
  "metadata": {},
  "challenges": {
		"webAuthN": {
			"domain": "CUSTOM_DOMAIN",
			"userVerificationRequirement": "USER_VERIFICATION_REQUIREMENT_DISCOURAGED"
		}
	}
}'
Example Response
{
	"details": {
		"sequence": "580",
		"changeDate": "2023-06-14T05:32:39.007096Z",
		"resourceOwner": "163840776835432705"
	},
	"sessionId": "218480890961985793",
	"sessionToken": "yMDi6uVPJAcphbbz0LaxC07ihWkNTe7m0Xqch8SzfM5Cz3HSIQIDZ65x1f5Qal0jxz0MEyo-_zYcUg"
}
Signin in Browser
After starting the WebAuthN authentication on the side of ZITADEL you have to challenge the browser. To do this you need to call the browser API to get the credentials. Make sure to send the public key credential request options you got from ZITADEL.
const credential = await navigator.credentials.get({
    publicKey: publicKeyCredentialRequestOptions
});
Read the WebAuthN Guide for more information about "Authenticating with a WebAuthN Credential".
Update Session with WebAuthN
Now that you have successfully authenticated in the browser, you can update the session of the user. Fill the webAuthN checks with the credential assertion data you get from the browser.
More detailed information about the API: Update Session Documentation
Example Request:
curl --request PATCH \
  --url https://${CUSTOM_DOMAIN}/v2/sessions/218480890961985793 \
  --header 'Accept: application/json' \
  --header 'Authorization: Bearer '"$TOKEN"''\
  --header 'Content-Type: application/json' \
  --data '{
  "checks": {
    "webAuthN": {
      "credentialAssertionData": {}
    }
  }
}'
Was this page helpful?