OpenID Connect (OIDC) in Custom Login UI
To build your own login ui for your own application it is not necessary to have the OIDC standard included or any additional work that has to be done. However, it might make sense, if you want to connect your login to different applications especially if they are not in your control and they rely on the standard.
The following flow shows you the different components you need to enable OIDC for your login.
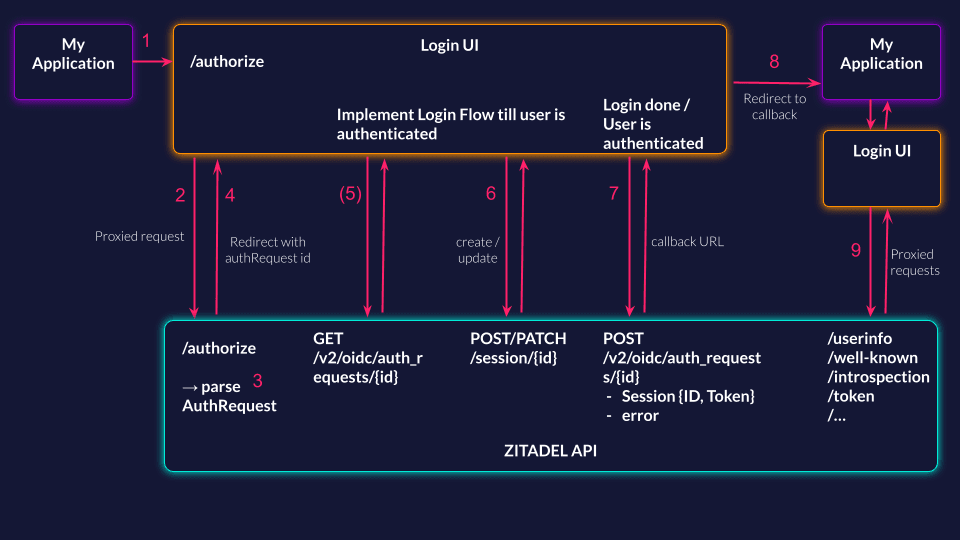
- Your application makes an authorization request to your login UI
- The login UI proxies the request to the ZITADEL API.
- The ZITADEL API parses the request and does what it needs to interpret certain parameters (e.g., organization scope, etc.)
- Redirect to a predefined, relative URL of the login UI that includes the authrequest ID ("/login?authRequest="), configurable per application.
- Request to ZITADEL API to get all the information from the auth request. This is optional and only needed if you like to get all the parsed information from the authrequest-
- Authenticate the user in your login UI by creating and updating a session with all the checks you need.
- Finalize the auth request by sending the session to the request, you will get the callback URL in the response
- Redirect to your application with the callback URL you got in the previous request
- All OIDC-specific endpoints have to be accepted in the Login UI and should be proxied and sent to the ZITADEL API
Example
Let's assume you host your login UI on the following URL:
https://login.example.comAuthorize Request
A user opens your application and is unauthenticated, the user will then be redirected to your login with the following auth Request:
https://login.example.com/oauth/v2/authorize?client_id=170086824411201793%40yourapp&redirect_uri=https%3A%2F%2Fyourapp.example.com%2Fauth%2Fcallback&response_type=code&scope=openid%20email%20profile&code_challenge=9az09PjcfuENS7oDK7jUd2xAWRb-B3N7Sr3kDoWECOY&code_challenge_method=S256&login_hint=minnie-mouse```The auth request includes all the relevant information for the OIDC standard and in this example we also have a login hint for the login name "minnie-mouse".
You now have to proxy the auth request from your own UI to the authorize Endpoint of ZITADEL. For more information, see OIDC Proxy for the necessary headers.
The version and the optional custom URI for the available login UI is configurable under the application settings.
Read more about the Authorize Endpoint Documentation
The endpoint will redirect you to the domain of your UI on the path /login and add the auth Request ID as parameter.
https://login.example.com/login?authRequest=V2_224908753244265546
Get Auth Request by ID
With the ID from the redirect before you will now be able to get the information of the auth request. Get Auth Request By ID Documentation
curl --request GET \
  --url https://${CUSTOM_DOMAIN}/v2/oidc/auth_requests/V2_224908753244265546 \
  --header 'Authorization: Bearer '"$TOKEN"''
Response Example:
{
	"authRequest": {
		"id": "V2_224908753244265546",
		"creationDate": "2023-07-28T13:47:43.471505Z",
		"clientId": "224901977648260028@mytestproject",
		"scope": [
			"openid",
			"profile"
		],
		"redirectUri": "https://myapp.example.com/auth/callback",
		"loginHint": "mini@mouse.com"
	}
}
Perform Login
After you have initialized the OIDC flow you can implement the login. Implement all the steps you like the user the go trough by creating and updating the user-session.
Read the following resources for more information about the different checks:
Finalize Auth Request
To finalize the auth request and connect an existing user session with it, you have to update the auth request with the session token. On the create and update user session request you will always get a session token in the response.
The latest session token has to be sent to the following request:
Read more about the Finalize Auth Request Documentation
Make sure that the authorization header is from an account which is permitted to finalize the Auth Request through the IAM_LOGIN_CLIENT role.
curl --request POST \
  --url ${CUSTOM_DOMAIN}/v2/oidc/auth_requests/V2_224908753244265546 \
  --header 'Accept: application/json' \
  --header 'Authorization: Bearer '"$TOKEN"''\
  --header 'Content-Type: application/json' \
  --data '{
  "session": {
    "sessionId": "225307381909694508",
    "sessionToken": "7N5kQCvC4jIf2OuBjwfyWSX2FUKbQqg4iG3uWT-TBngMhlS9miGUwpyUaN0HJ8OcbSzk4QHZy_Bvvv"
  }
}'
In the response you will get a callback URL to which you have to redirect from your login UI.
Example Response:
{
	"details": {
		"sequence": "686",
		"changeDate": "2023-07-31T08:09:19.314537Z",
		"resourceOwner": "163840776801878273"
	},
	"callbackUrl": "https://myapp.example.com/auth/callback?code=k98NBLrdjVbwQQI-oM_rR_cYHv0k3dqpkqlQX8UXTWVnYSQL9g&state=testd"
}
OIDC Endpoints
All OIDC relevant endpoints are provided by ZITADEL. In your login UI you just have to proxy them through and send them directly to the backend.
These are endpoints like:
- Userinfo
- Well-known
- Introspection
- Token
- etc
End Session / Logout
The end session endpoint has to be implemented as all the other OIDC endpoints. This means you have to proxy the request from you UI to the ZITADEL. In case the ZITADEL backend is not able to determine which session to terminate directly or requires additional approval from the user, it will redirect the browser to the following endpoint:
/logout?post_logout_redirect=
Prompt the user to select a session, terminate it using the corresponding endpoint and send the user to the post_logout_redirect URL.
Was this page helpful?