Login App
To replace the old embedded Login built with Golang and to showcase the use of our session and OIDC APIs, we've created the new Login app.
Used Apps And Packages
- Login app: The Login app used by ZITADEL Cloud, powered by Next.js
@zitadel/proto: Typescript implementation of Protocol Buffers, suitable for web browsers and Node.js.@zitadel/client: Core components for establishing a client connection
Login App
The new implementation of the Login app is based on Next.js and implements the OIDC standard by proxying requests to the ZITADEL backend and using the session API. The UI uses the branding and behaves based on the policies and settings of your instance or organization. It is also allows users to authenticate directly (without an OIDC context) and self service their account. Its set of features will increase with time and its progress will be tracked here.
Architectural Overview
The new Login app consists of a confidential (backend) part and a browser (client side) part.
In addition to that, the OIDC specification builds upon a proxy which is set up in the Next.js middleware. It rewrites requests of the paths /.well-known/:path*, /oauth/:path*, /oidc/:path* to ZITADEL.
The backend side of the application is authorized using a machine user's personal access token. This token is used to fetch policies and settings from your instances or organization which define how users are authenticated and how the Login app is displayed.
The frontend side of the application communicates to the backend side by using a cookie which is set by the server. The cookie consists of an id and a token and is bound to a session which is updated continuously.
The following illustration shows the architecture of the Login app and a potential authentication code flow starting from an application which implements the OIDC specification respectively.
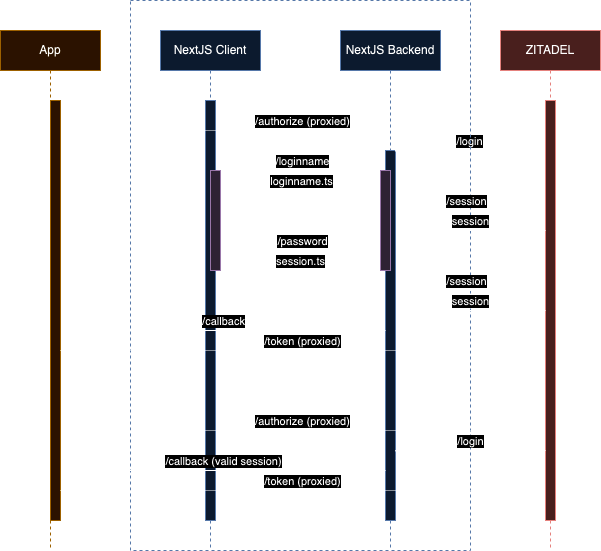
Note that the illustration is just a representation of the architecture and may not specify actual endpoints.
The flow starts by the /authorize endpoint which is intercepted by the Login app and forwarded to ZITADEL.
ZITADEL interprets the request and specifically redirects back to the Login app.
It does so by redirecting to /login.
The Login app is then able to load an AuthRequest.
The Auth Request defines how users proceed to authenticate. If no special prompts or scopes are set, the Login app brings up the /loginname page.
The /loginname page allows to enter loginname or email of a user which is then used to search for a user.
If the user is found, a session is created and set as cookie, then the user is redirected to the available authentication method page.
While the users continues and provides more information, the cookie is hydrated with this information until a final state is reached.
The communication from the browser to the server is done by NextJS Server Actions. The OIDC Auth request is always passed in the url to have a context to the ongoing authentication flow.
If enough user information is retrieved and the user is authenticated according to the policies, the flow is finalized by requesting a the callback url for the auth request and the user is redirected back to the application. The application can then request a token calling the /token endpoint of the Login app which is proxied to the ZITADEL API.
Implemented features
OIDC Standard
- Authorization Code Flow with PKCE
- AuthRequest
hintUserId - AuthRequest
loginHint - AuthRequest
prompt- Login
- Select Account
- Create
- None
- Consent
- Scopes
-
openid email profile address -
offline access -
urn:zitadel:iam:org:idp:id:{idp_id} -
urn:zitadel:iam:org:project:id:zitadel:aud -
urn:zitadel:iam:org:id:{orgid} -
urn:zitadel:iam:org:domain:primary:{domain}
-
- AuthRequest UI locales
- Multifactor
- Passkeys
- TOTP
- OTP via email
- OTP via SMS
- Passwordless
- Passkeys
- Security Prompts
- Setup Passkey as Passwordless method
- Setup TOTP as Multifactor
- Password Change
- Login
- Email Password
- Passkey
- IDPs
- GitHub
- GitLab
- Azure
- Apple
- Register
- Email Password
- Passkey
Self service
The self service part of the application allows to load the Login app without an OIDC flow. Authenticated users are directly able to self service their account.
- Change user information
- Password Change
- Setup Passkey
- Setup Multifactor
- Passkeys
- TOTP
- OTP via email
- OTP via SMS
- Setup Multifactor Passkey (U2F)
- Validate Account (email verification)
Setup
In order to run the new Login app, make sure to follow the instructions in the contribution guide.
How to setup domains for OIDC
When setting up the new Login app for OIDC, the domain must be registered on your instance and use https. To register your login domain on your instance, add your domain on your instances trusted domains.
OIDC Proxy
When setting up the new Login app for OIDC, ensure it meets the following requirements:
- The OIDC Proxy is deployed and running on HTTPS
- The OIDC Proxy sets
x-zitadel-public-hostwhich is the host, your Login app is deployed toex. login.example.com. - The OIDC Proxy sets
x-zitadel-instance-hostwhich is the host of your instanceex. test-hdujwl.zitadel.cloud.
You can review an example implementation of a middleware here.
Deploy to Vercel
To deploy your own version on Vercel, navigate to your instance and create a service user.
Create a personal access token (PAT) for the user and copy and set it as ZITADEL_SERVICE_USER_TOKEN, then navigate to Default settings and make sure it gets IAM_LOGIN_CLIENT permissions.
Finally set your instance url as ZITADEL_API_URL. Make sure to set it without trailing slash.
Also ensure your login domain is registered on your instance by adding it as a trusted domain.
If you want to enforce users to have their email verified, you can set the optional EMAIL_VERIFICATION variable to true in your environment and your users will be enforced to verify their email address before they can log in.