Using Passkeys in a Custom Login UI
Passkeys are a replacement for passwords that provide faster, easier, and more secure sign-ins to websites and apps even across multiple devices. Unlike passwords, passkeys are phishing-resistant and can improve the user experience and security at the same time. Passkeys and there underlying protocols are a standard defined by the FIDO Standard .
Register Passkey
Flow
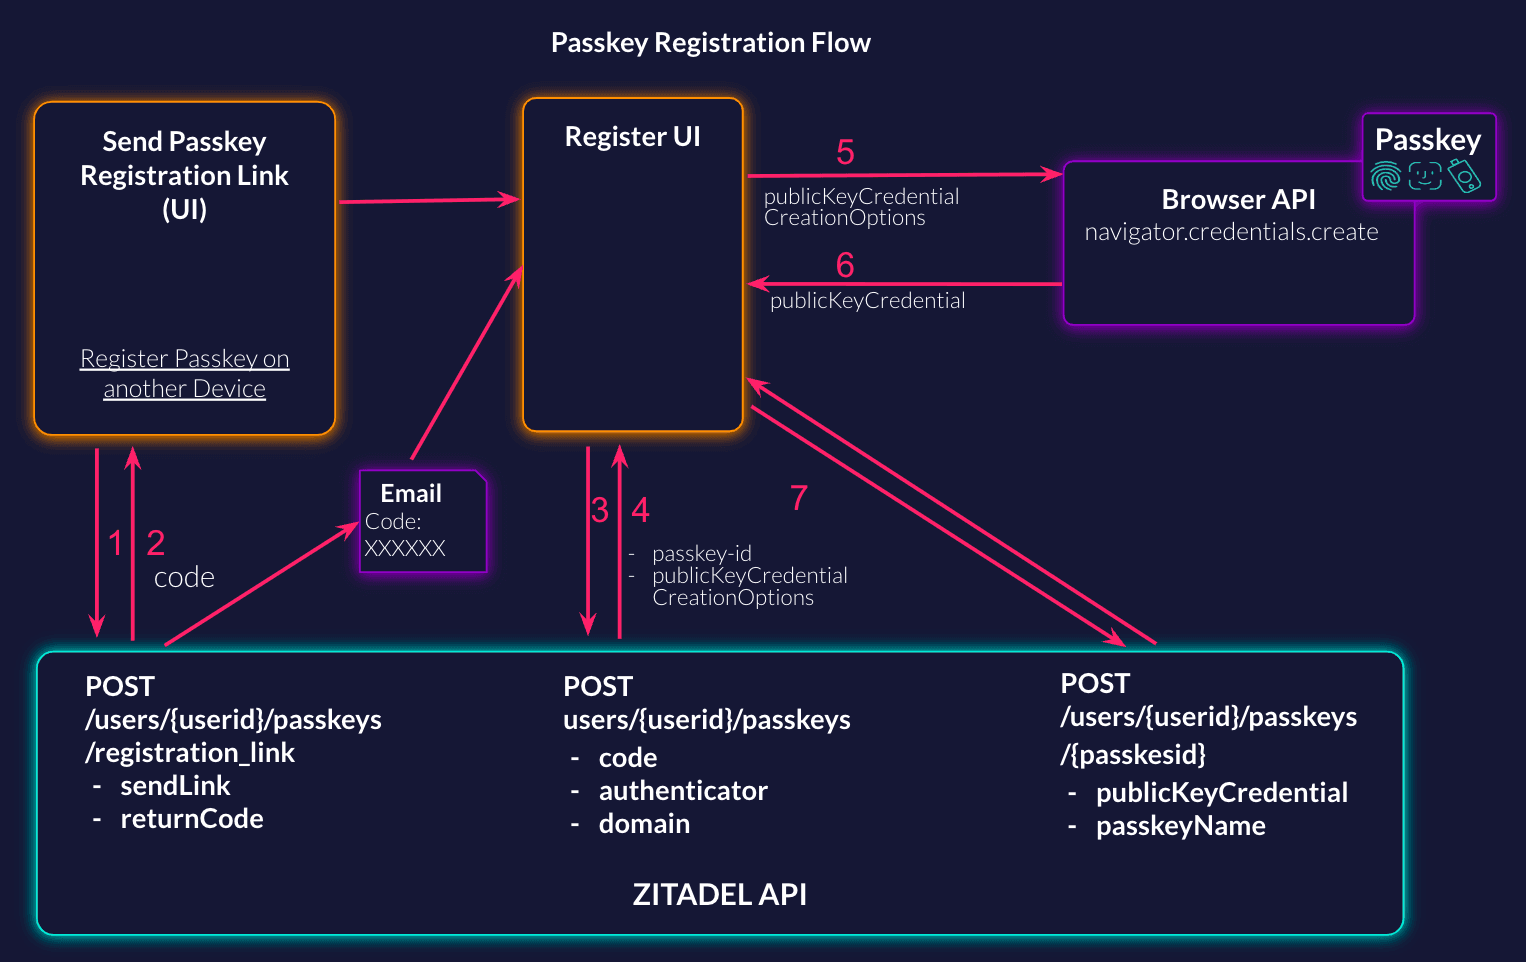
There are two options to onboard users with passkeys:
- You send the user a link (email, sms, ...) with an embedded code, so the user is able to register passkey on any capable device
- You start the passkey registration directly on the current device used by a user
Send Registration Link
When you want to send a link to your user, that enables them to register a new passkey device, you can choose if ZITADEL sends the code or ZITADEL can return the code in the API response. This way you can send a link through any channel of your choice (email, sms, phone, in-person, postal, ...).
If you asked ZITADEL to send the link to the user please make sure to populate the link with the needed values that point towards your registration UI.
More detailed information about the API: Send Registration Link Documentation
Request Example: Send either the sendLink or the returnCode (empty message) in the request body, depending on the use case you have.
curl --request POST \
  --url https://${CUSTOM_DOMAIN}/v2/users/$USER_ID/passkeys/registration_link \
  --header 'Accept: application/json' \
  --header 'Authorization: Bearer '"$TOKEN"''\
  --header 'Content-Type: application/json' \
  --data '{
   "sendLink": {
      "urlTemplate": "https://example.com/passkey/register?userID={{.UserID}}&orgID={{.OrgID}}&codeID={{.CodeID}}&code={{.Code}}"
   },
   "returnCode": {}
}'
Response Example: The code is only filled if returnCode has been requested in the Request.Passkey
{
	"details": {
		"sequence": "632",
		"changeDate": "2023-06-28T08:09:51.257699Z",
		"resourceOwner": "163840776835432705"
	},
	"code": {
		"id": "220526087715684609",
		"code": "2KEpIeQGSBBd"
	}
}
Start Passkey Registration
When starting the passkey registration you can optionally send the registration code from the step above to ZITADEL to pair it with a specific user.
By specifying the authenticator type you can choose if the passkey should be cross platform or not. Per default all types are allowed:
- PASSKEY_AUTHENTICATOR_UNSPECIFIED
- PASSKEY_AUTHENTICATOR_PLATFORM
- PASSKEY_AUTHENTICATOR_CROSS_PLATFORM
The API response will provide you the public key credential options, this will be used by the browser to obtain a signed challenge.
More detailed information about the API: Start Passkey Registration Documentation
Request Example: The code only has to be filled if the user did get a registration code.
curl --request POST \
  --url https://${CUSTOM_DOMAIN}/v2/users/$USER_ID/passkeys \
  --header 'Accept: application/json' \
  --header 'Authorization: Bearer '"$TOKEN"''\
  --header 'Content-Type: application/json' \
  --data '{
	"code": {
		"id": "220526087715684609",
		"code": "2KEpIeQGSBBd"
	},
  "authenticator": "PASSKEY_AUTHENTICATOR_UNSPECIFIED"
}'
Response Example:
{
	"details": {
		"sequence": "633",
		"changeDate": "2023-06-28T08:10:26.725981Z",
		"resourceOwner": "163840776835432705"
	},
	"passkeyId": "220526147258024193",
	"publicKeyCredentialCreationOptions": {
		"publicKey": {
			"attestation": "none",
			"authenticatorSelection": {
				"userVerification": "required"
			},
			"challenge": "JM1uLbVQR2xZJ210DA7E-3j0Cd9rHKUSmc8NyIJBtAY",
			"pubKeyCredParams": [
				{
					"alg": -7,
					"type": "public-key"
				},
				{
					"alg": -35,
					"type": "public-key"
				},
				{
					"alg": -36,
					"type": "public-key"
				},
				{
					"alg": -257,
					"type": "public-key"
				},
				{
					"alg": -258,
					"type": "public-key"
				},
				{
					"alg": -259,
					"type": "public-key"
				},
				{
					"alg": -37,
					"type": "public-key"
				},
				{
					"alg": -38,
					"type": "public-key"
				},
				{
					"alg": -39,
					"type": "public-key"
				},
				{
					"alg": -8,
					"type": "public-key"
				}
			],
			"rp": {
				"id": "example.domain.com",
				"name": "ZITADEL"
			},
			"timeout": 300000,
			"user": {
				"displayName": "Minnie Mouse",
				"id": "MjE4NjYyNTk2OTE4NjQwODk3",
				"name": "minni-mouse@mouse.com"
			}
		}
	}
}
Register new Passkey on current device
Now that you have started the registration within ZITADEL, you have to register the credentials in the browser. This requires a call to the browser api and looks something like the following. Make sure to send the public key credential creation options you got in the previous request from ZITADEL.
const credential = await navigator.credentials.create({
    publicKey: publicKeyCredentialCreationOptions
});
For more information about WebAuthN and registering credential flow, read the following guide: Registering a WebAuthN Credentials
Verify Passkey in ZITADEL
In the next request you have to verify the Passkey within ZITADEL. Include the public key credential you got from the browser in your request. You can give the Passkey a name, which makes it easier for the user to identify the registered authentication methods. Example: Google Pixel, iCloud Keychain, Yubikey, etc
More detailed information about the API: Verify Passkey Registration Documentation
Example Request:
curl --request POST \
  --url https://${CUSTOM_DOMAIN}/v2/users/$USER_ID/passkeys/$PASSKEY_ID \
  --header 'Accept: application/json' \
  --header 'Authorization: Bearer '"$TOKEN"''\
  --header 'Content-Type: application/json' \
  --data '{
  "publicKeyCredential": {
    "type": "public-key",
    "id": "pawVarF4xPxLFmfCnRkwXWeTrKGzabcAi92LEI1WC00",
    "rawId": "pawVarF4xPxLFmfCnRkwXWeTrKGzabcAi92LEI1WC00",
    "response": {
      "attestationObject": "o2NmbXRmcGFja2VkZ2F0dFN0bXSiY2FsZyZjc2lnWEcwRQIgRKS3VpeE9tfExXRzkoUKnG4rQWPvtSSt4YtDGgTx32oCIQDPey-2YJ4uIg-QCM4jj6aE2U3tgMFM_RP7Efx6xRu3JGhhdXRoRGF0YVikSZYN5YgOjGh0NBcPZHZgW4_krrmihjLHmVzzuoMdl2NFAAAAADju76085Yhmlt1CEOHkwLQAIKWsFWqxeMT8SxZnwp0ZMF1nk6yhs2m3AIvdixCNVgtNpQECAyYgASFYIMGUDSP2FAQn2MIfPMy7cyB_Y30VqixVgGULTBtFjfRiIlggjUGfQo3_-CrMmH3S-ZQkFKWKnNBQEAMkFtG-9A4zqW0",
      "clientDataJSON": "eyJ0eXBlIjoid2ViYXV0aG4uY3JlYXRlIiwiY2hhbGxlbmdlIjoiQlhXdHh0WGxJeFZZa0pHT1dVaUVmM25zby02aXZKdWw2YmNmWHdMVlFIayIsIm9yaWdpbiI6Imh0dHBzOi8vbG9jYWxob3N0OjgwODAifQ"
    }
  },
  "passkeyName": "Google Pixel"
}'
You have successfully registered a new passkey to the user. Next step is to authenticate the user with the new registered passkey.
Login with Passkey
Flow
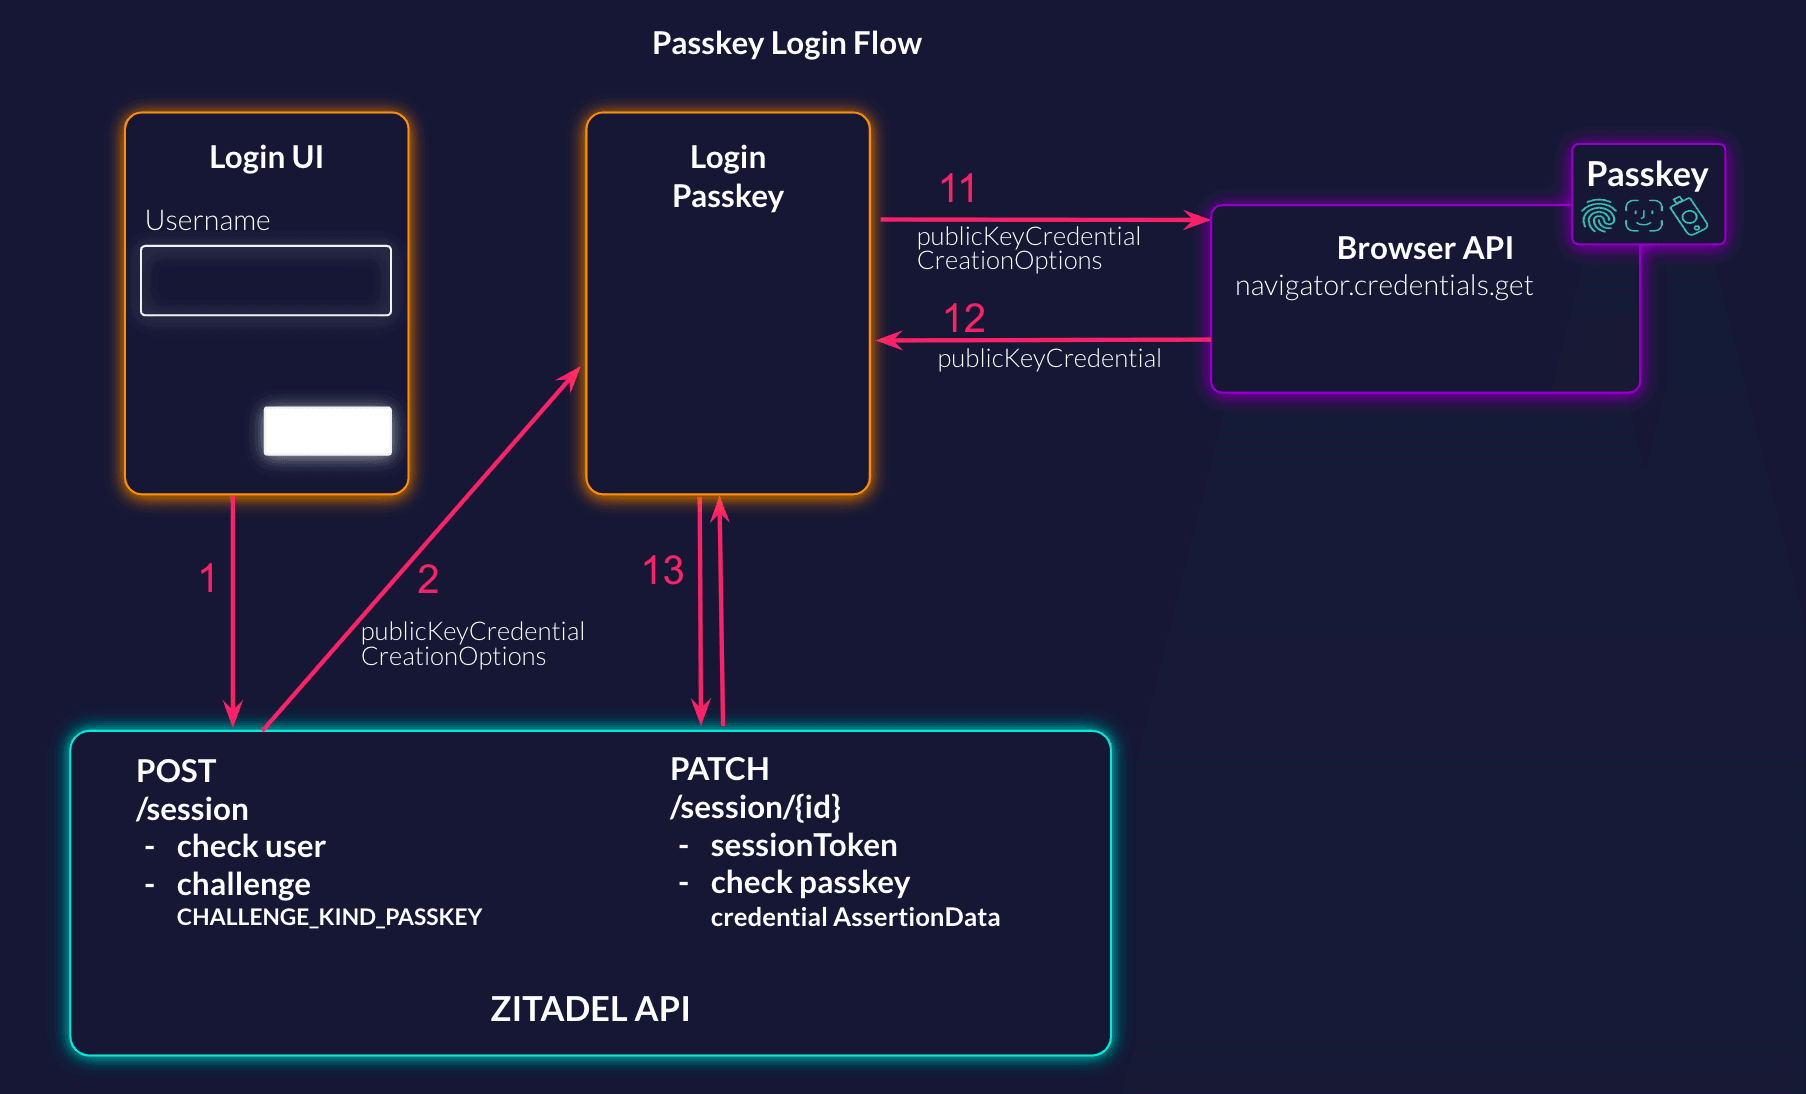
Create Session
First step is to ask the user for his username and create a new session with the ZITADEL API. When creating the new session make sure to include the challenge for passkey, resp. webAuthN with a required user verification and the domain of your login UI. The response will include the public key credential request options for the passkey in the challenges.
More detailed information about the API: Create Session Documentation
Example Request:
curl --request POST \
  --url https://${CUSTOM_DOMAIN}/v2/sessions \
  --header 'Accept: application/json' \
  --header 'Authorization: Bearer '"$TOKEN"''\
  --header 'Content-Type: application/json' \
  --data '{
  "checks": {
    "user": {
      "loginName": "minni-mouse@mouse.com"
    }
  },
  "metadata": {},
  "challenges": {
    "webAuthN": {
      "domain": "example.domain.com",
      "userVerificationRequirement": "USER_VERIFICATION_REQUIREMENT_REQUIRED"
    }
  }
}'
Example Response:
{
  "details": {
    "sequence": "2",
    "changeDate": "2023-06-27",
    "resourceOwner": "69629023906488334"
  },
  "sessionId": "d654e6ba-70a3-48ef-a95d-37c8d8a7901a",
  "sessionToken": "string",
  "challenges": {
    "webAuthN": {
      "publicKeyCredentialRequestOptions": {
        "publicKey": {
          "allowCredentials": [
            {
              "id": "ATmqBg-99qyOZk2zloPdJQyS2R7IkFT7v9Hoos_B_nM",
              "type": "public-key"
            }
          ],
          "challenge": "GAOHYz2jE69kJMYo6Laij8yWw9-dKKgbViNhfuy0StA",
          "rpId": "example.domain.com",
          "timeout": 300000,
          "userVerification": "required"
        }
      }
    }
  }
}
Signing in Browser
After starting the WebAuthN authentication on the side of ZITADEL you have to challenge the browser. To do this you need to call the browser API to get the credentials. Make sure to send the public key credential request options you got from ZITADEL.
const credential = await navigator.credentials.get({
    publicKey: publicKeyCredentialRequestOptions
});
Read the WebAuthN Guide for more information about "Authenticating with a WebAuthN Credential".
Update Session with WebAuthN
Now that you have successfully authenticated in the browser, you can update the session of the user. Fill the webAuthN checks with the credential assertion data you get from the browser.
More detailed information about the API: Update Session Documentation
Example Request:
curl --request PATCH \
  --url https://${CUSTOM_DOMAIN}/v2/sessions/218480890961985793 \
  --header 'Accept: application/json' \
  --header 'Authorization: Bearer '"$TOKEN"''\
  --header 'Content-Type: application/json' \
  --data '{
  "checks": {
    "webAuthN": {
      "credentialAssertionData": {}
    }
  }
}'
Was this page helpful?