Secure Logins and Resource Access with ZITADEL and OpenID Connect - Part 2

Developer Advocate
- 1. Introduction
- 2. Secure a Web Application Using Authorization Code (with PKCE)
- 3. Secure a Single Page Application (SPA) Using Authorization Code (with PKCE)
- 4. Closing Remarks
1. Introduction
We discussed the application types and the authentication flows that ZITADEL supports in Part 1 of this series. This post will cover how you can secure a Web Application and a Single Page Application (SPA) using the recommended Authorization Code with PKCE approach.
2. Secure a Web Application Using Authorization Code (with PKCE)
To proceed, you need to set up a couple of things in ZITADEL.
- If you don't have an instance yet, go ahead and create an instance as explained here.
- Also, create a new project by following the steps here.
Now let’s go ahead and create a web application in ZITADEL.
2.1 The OIDC Flow
The flow will be as follows:
- The user navigates to your web application and clicks on a link or button to access protected resources. This triggers a request to the protected resource, and the OIDC flow begins.
- The resource application server detects that the user is not currently authenticated, so it redirects the user to the ZITADEL authorization server's authorization endpoint, passing along the necessary parameters, including the client ID, redirect URI, and the request scope.
- The user authenticates themselves by entering their login credentials on the ZITADEL login page.
- ZITADEL verifies the user's credentials. If the credentials are valid, ZITADEL generates an authorization code and returns it to the web application via the redirect URI.
- The web application uses the authorization code and PKCE verifier to request an access token from ZITADEL.
- ZITADEL verifies the PKCE verifier, exchanges the authorization code for an access token, and returns them to the web application.
- The web application can now use the access token to access the user's resources.
2.2 Register/Create a Web Application in ZITADEL
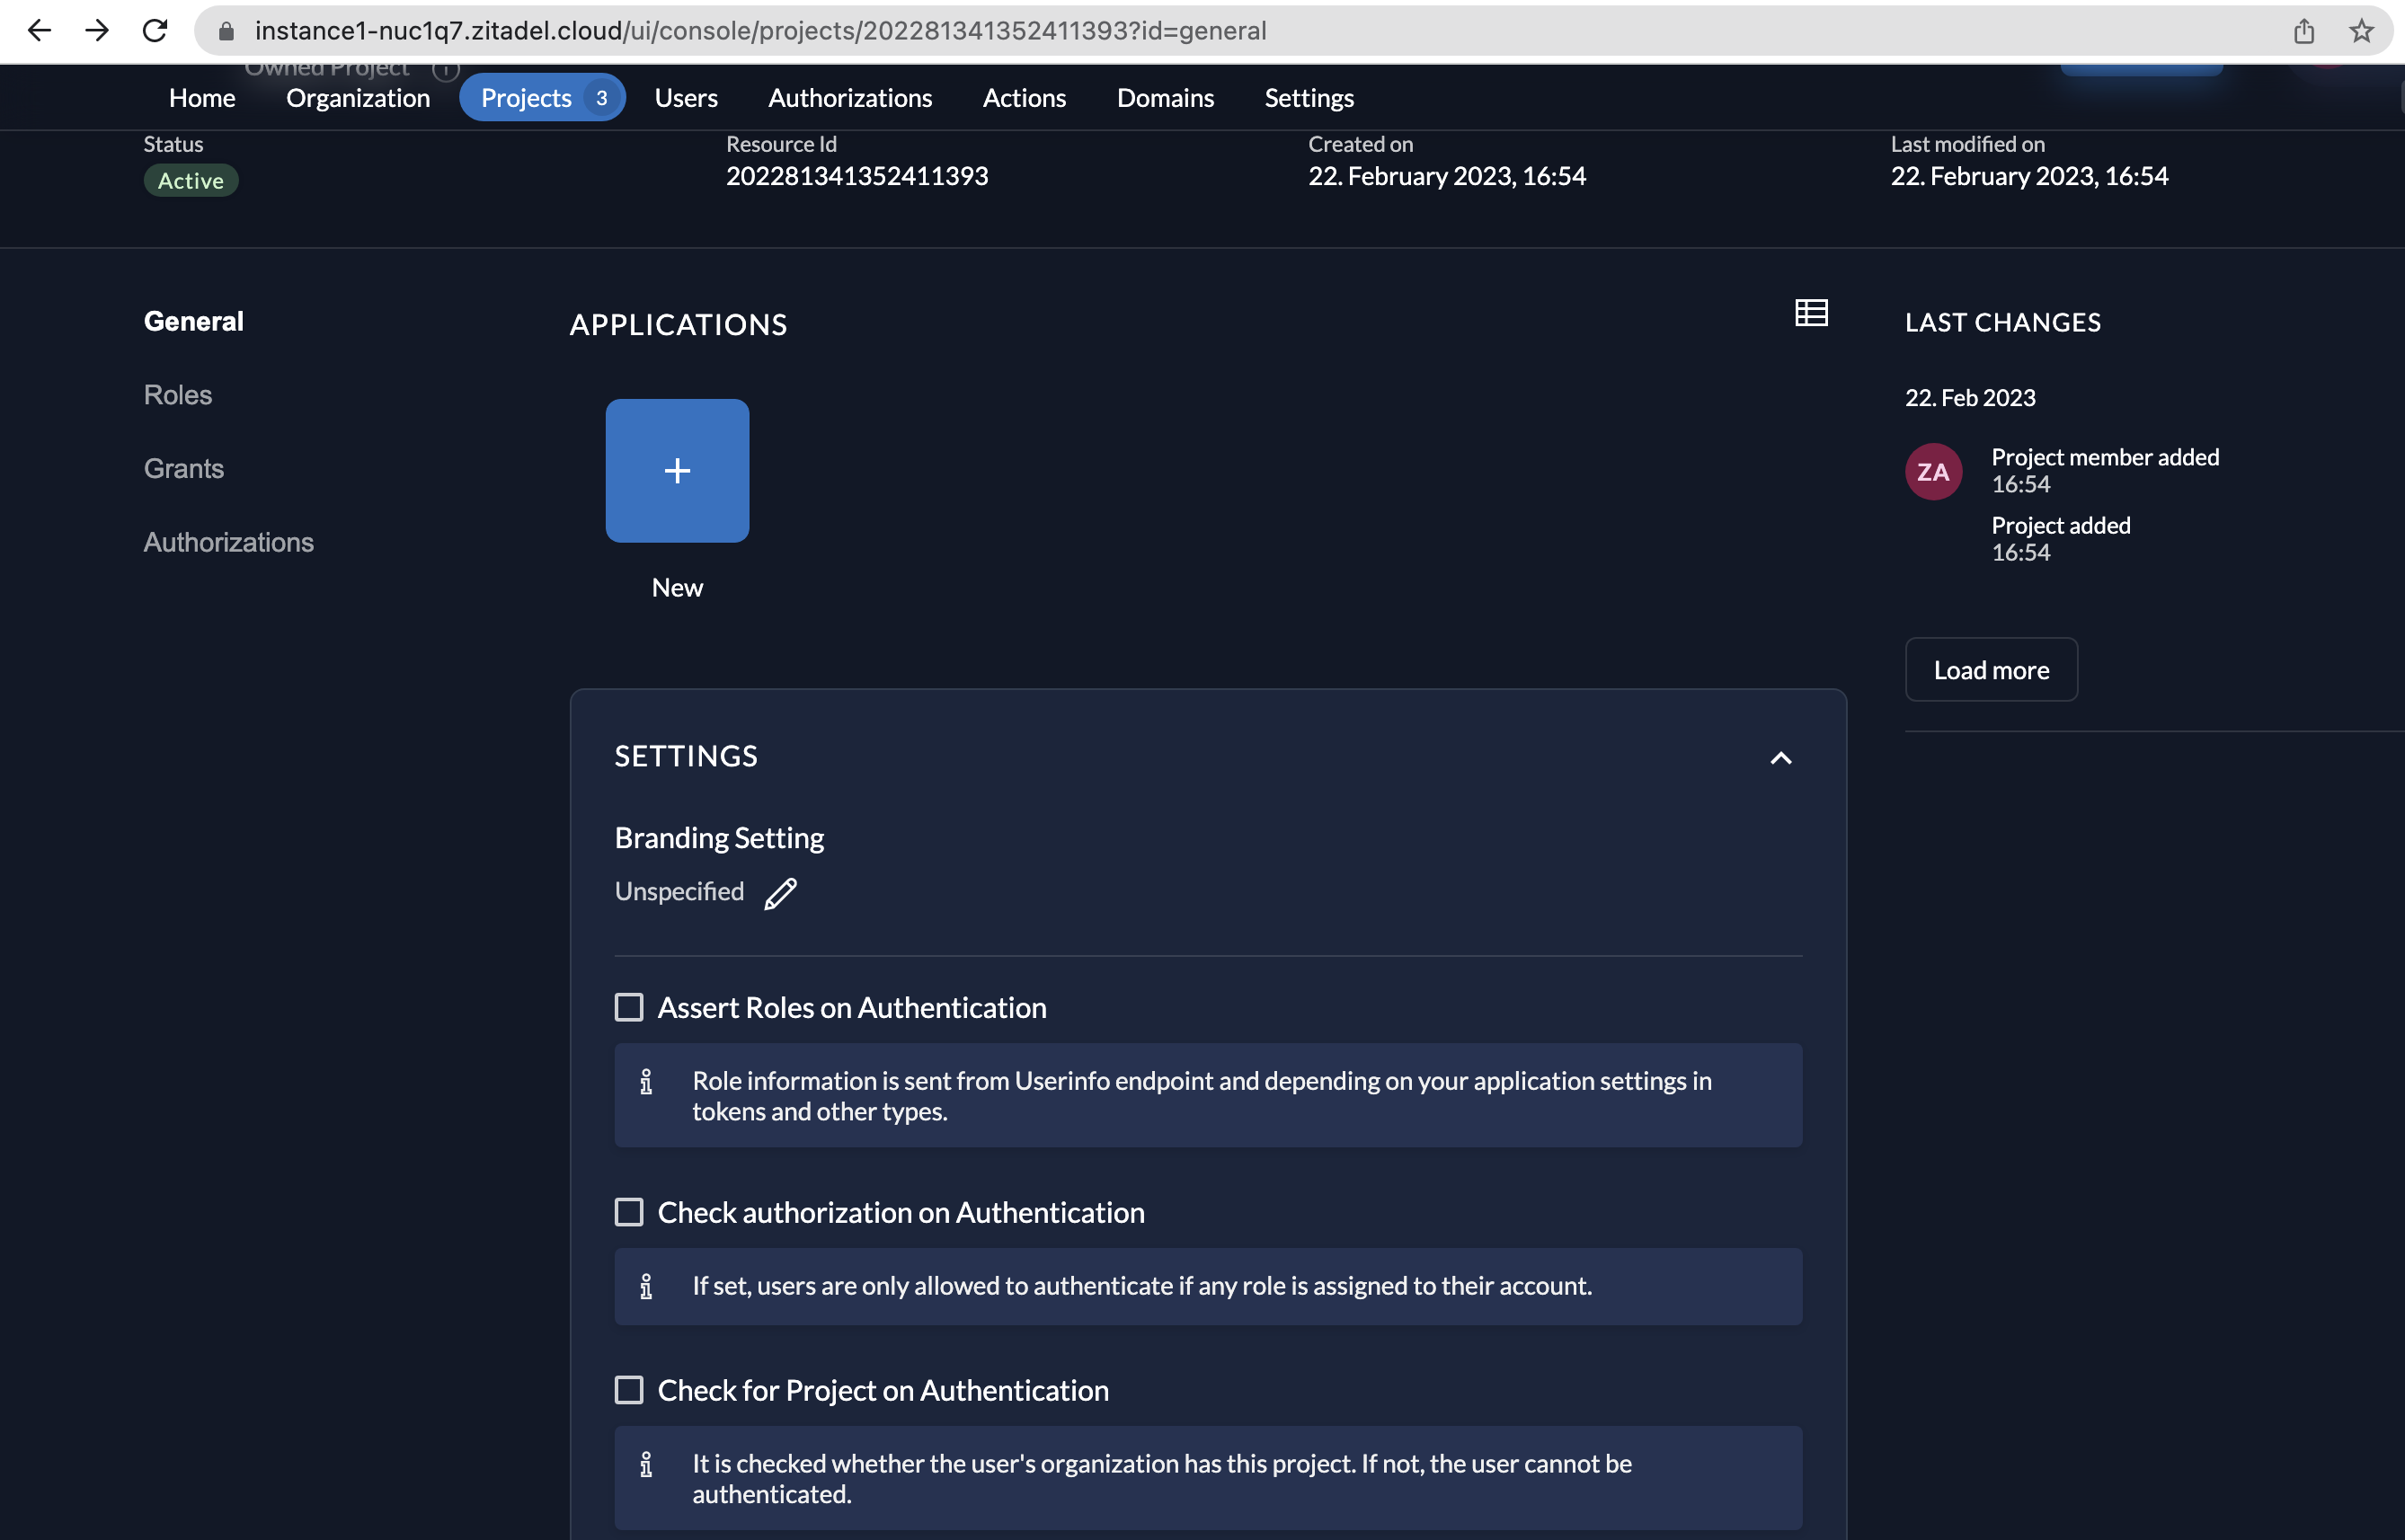
- After creating a project in your instance, go to applications to create an application as shown below.
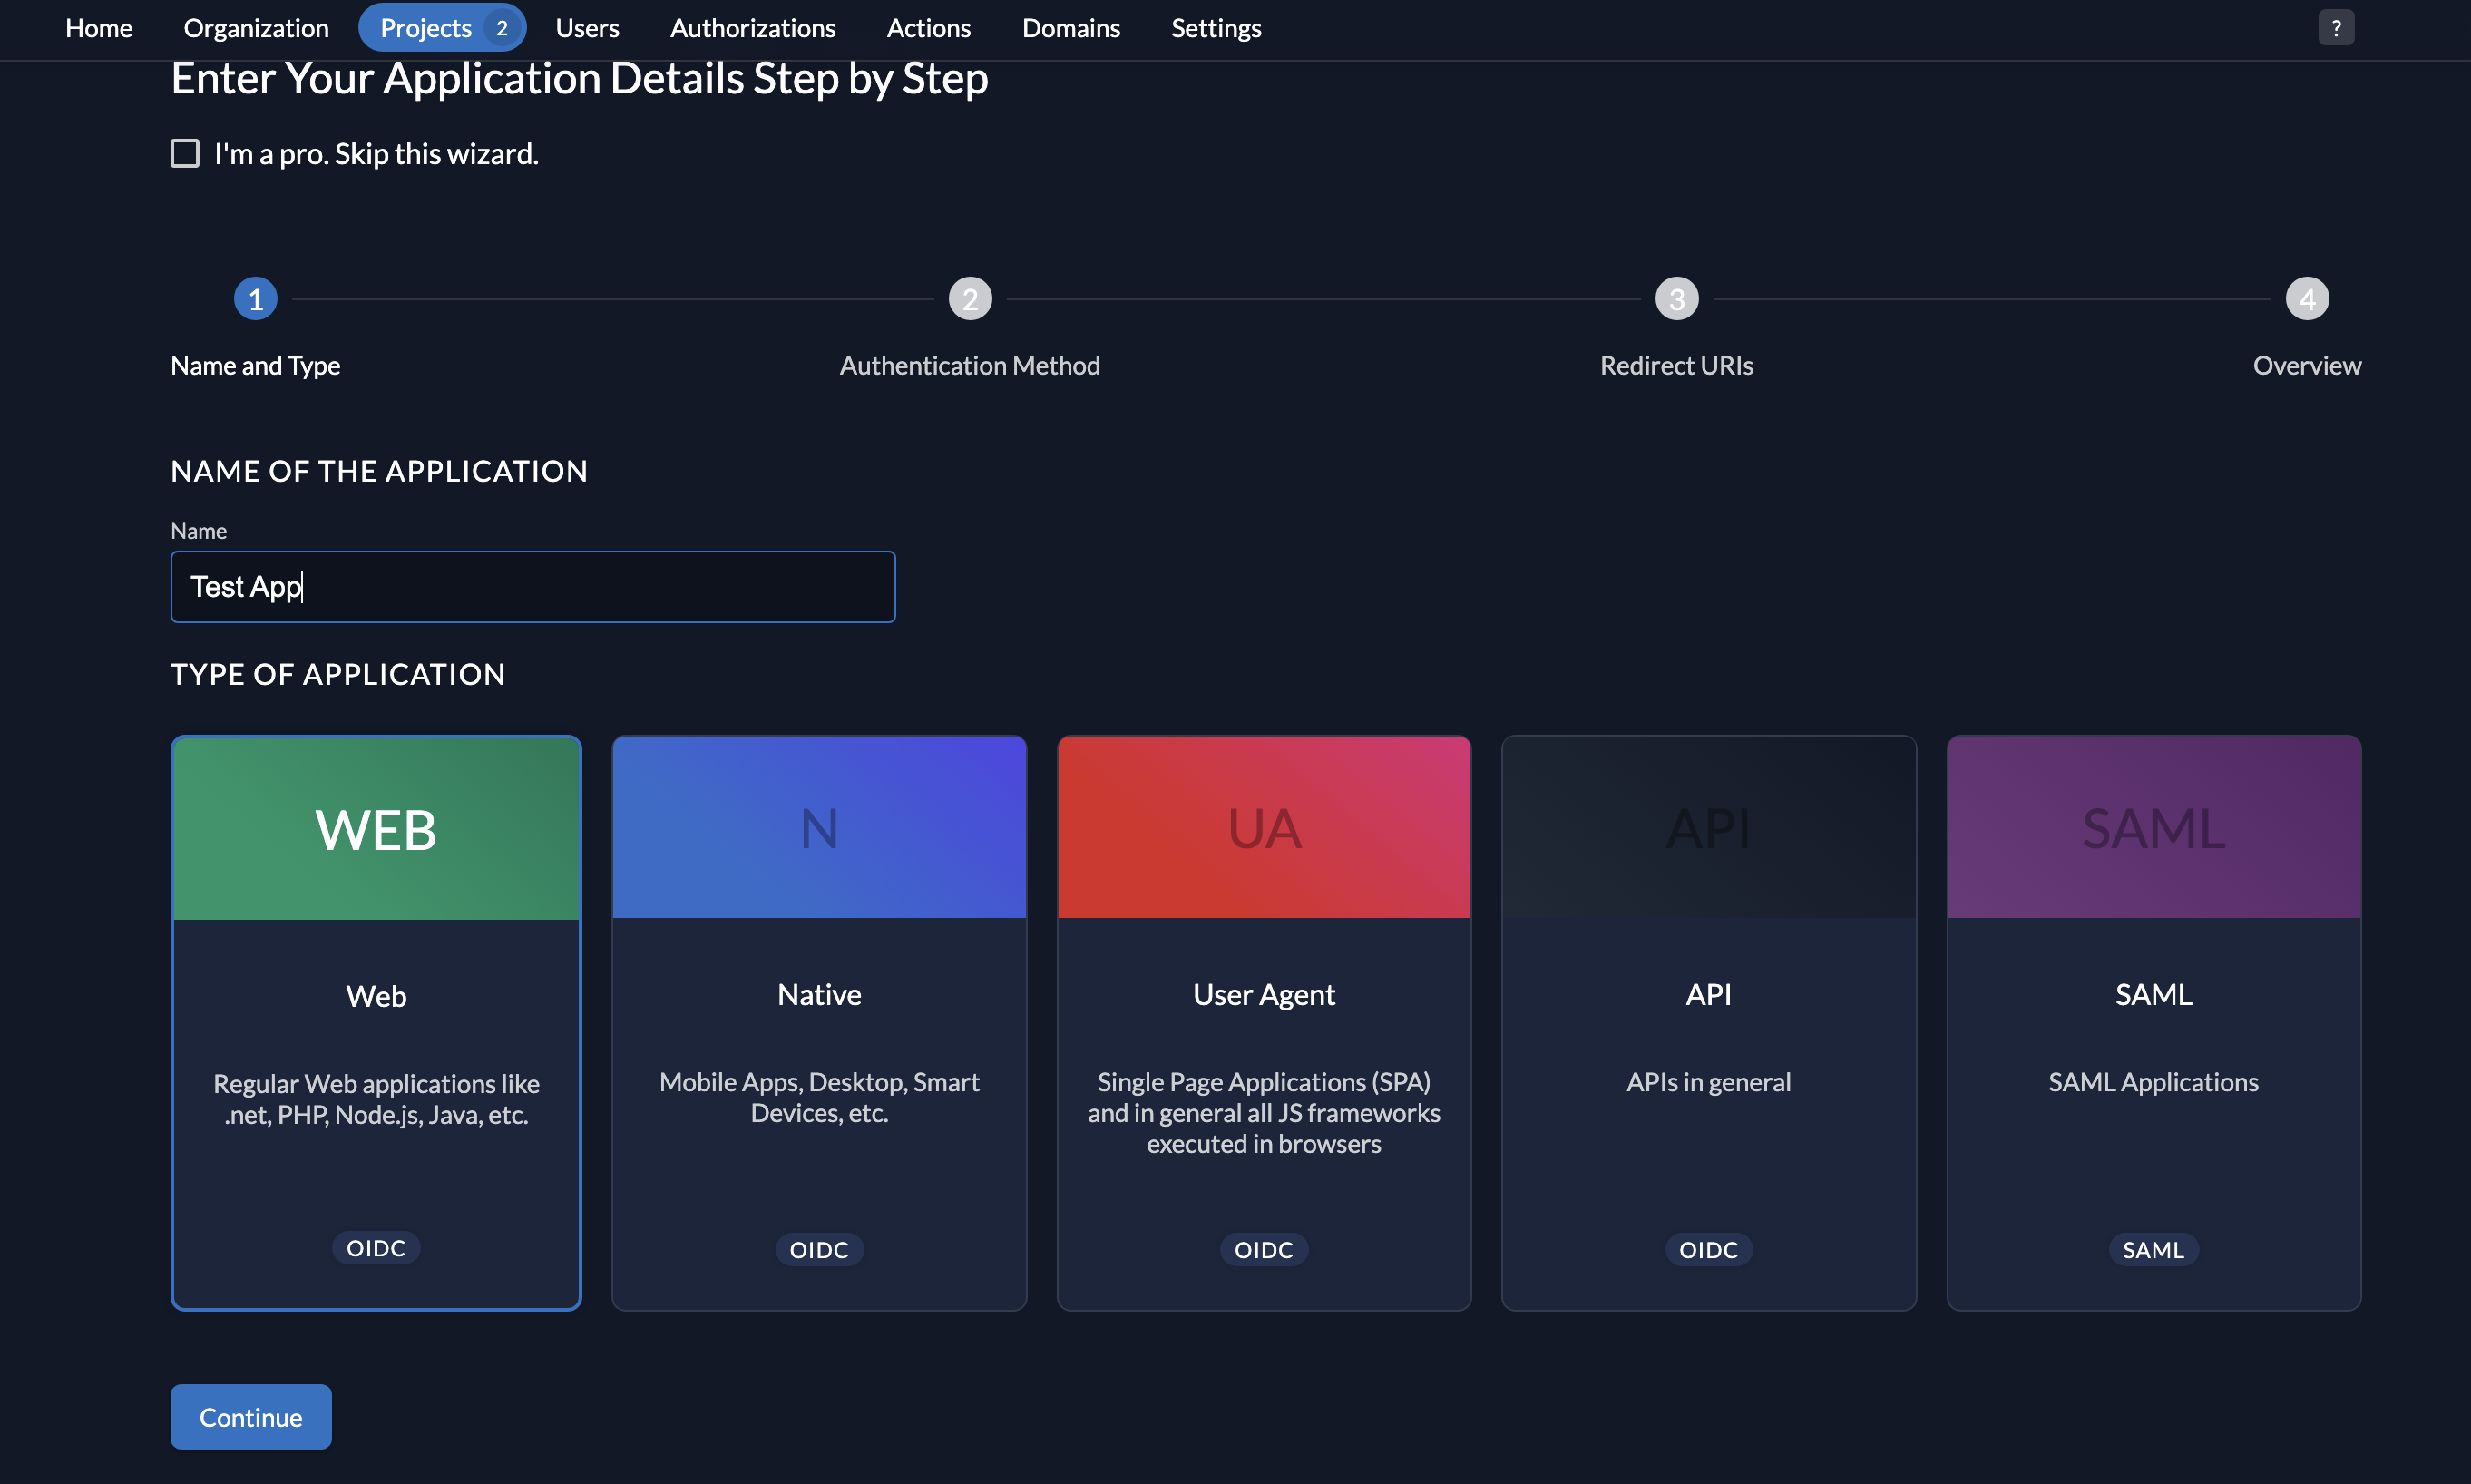
- Add a name to your application and select the type WEB.
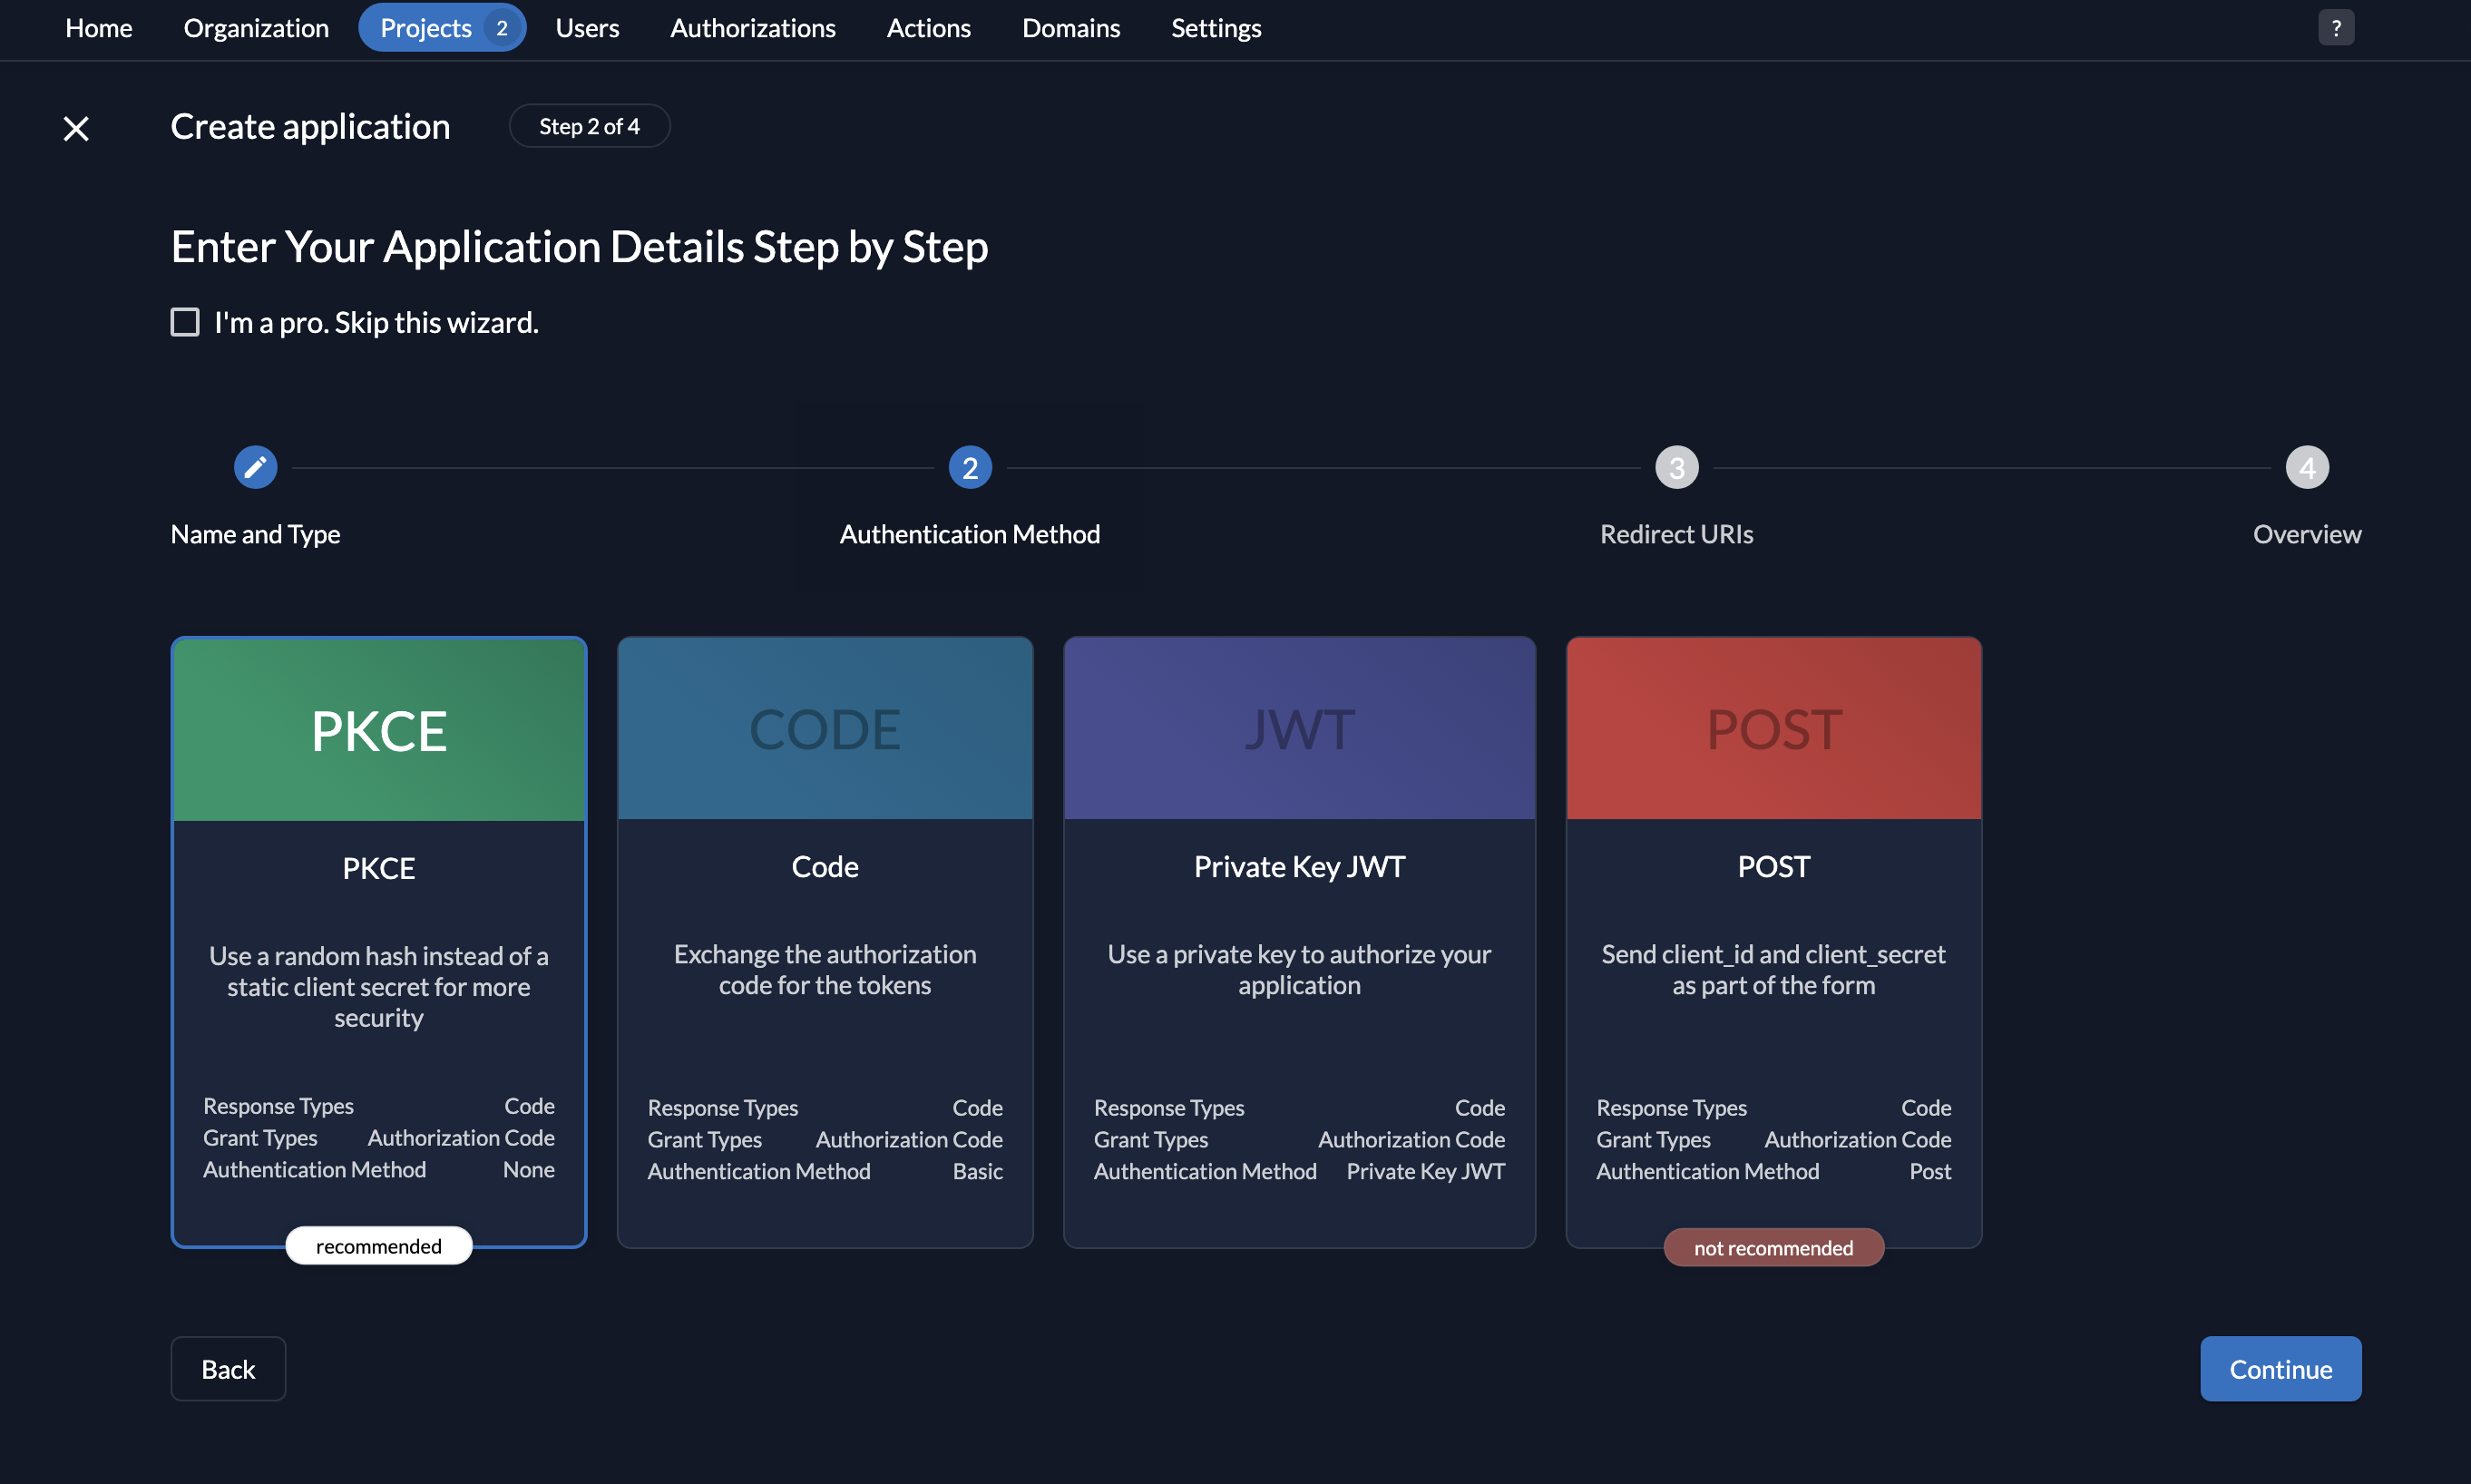
- Select PKCE.
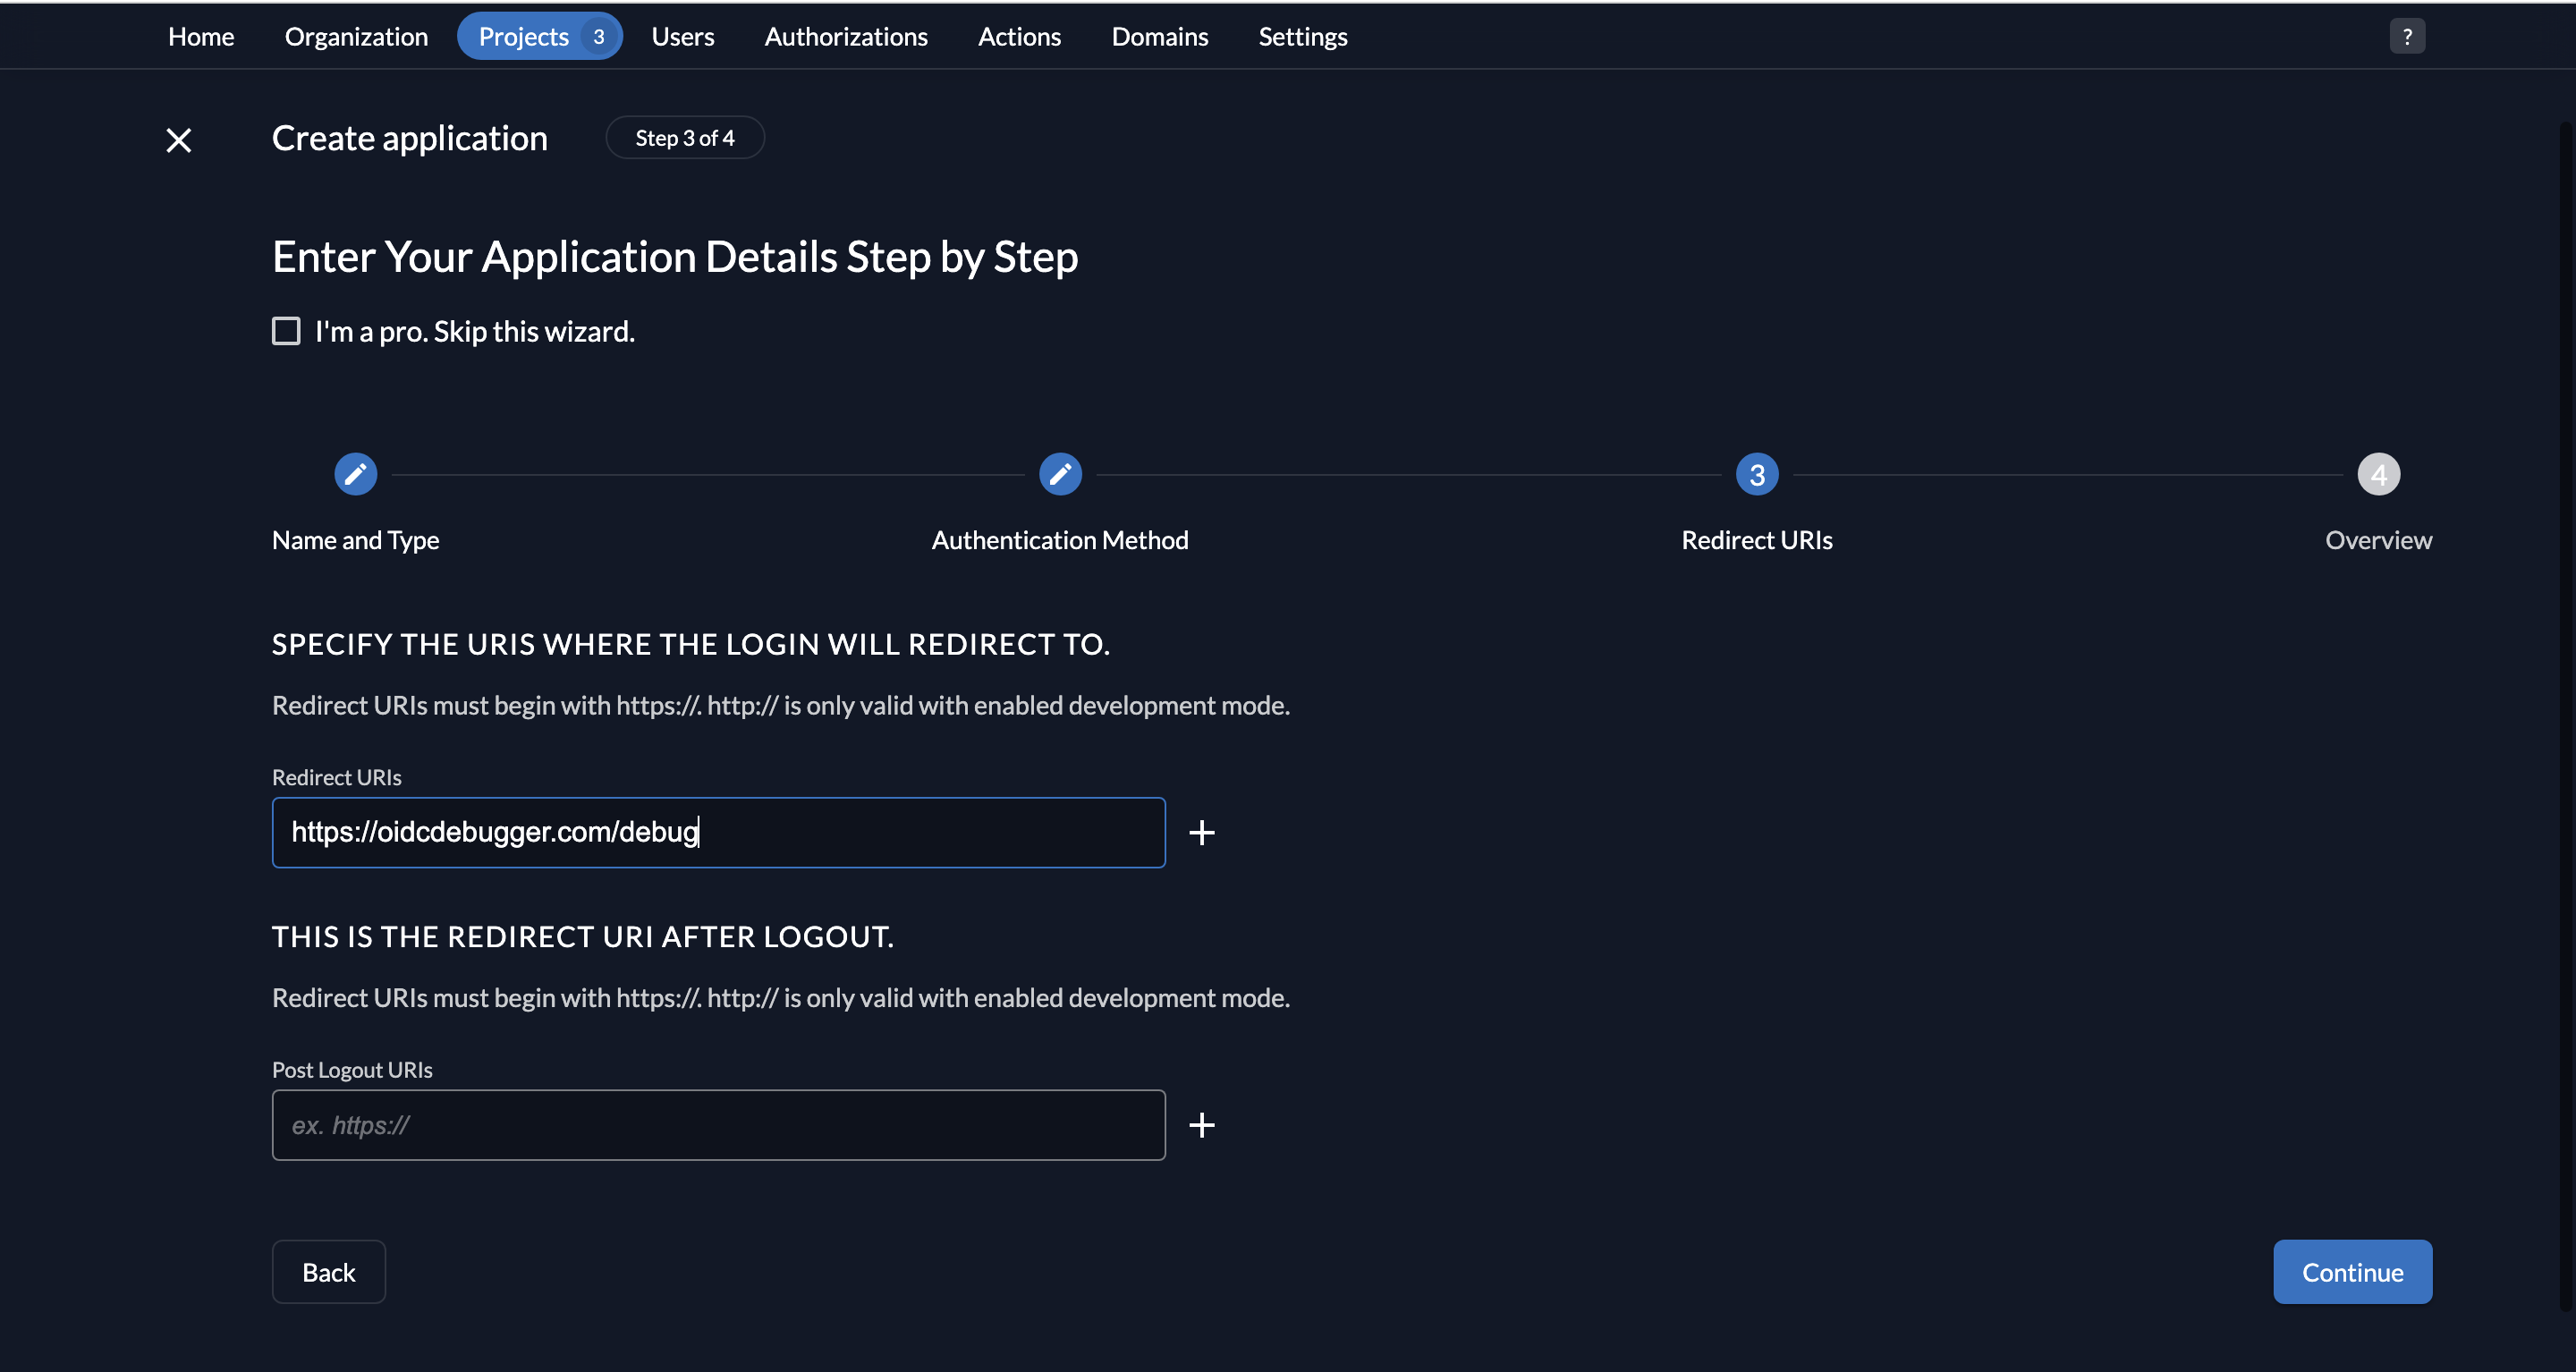
- Add a redirect URI where the user will be redirected after they log in. For this example, we will use the OIDC debugger web application as the sample web application. If you want to test out your tokens and don’t have a web client, this playground (among many others) is a great tool to use.
- Provide https://oidcdebugger.com/debug as the Redirect URI.
- Leave the Post Logout URI blank.
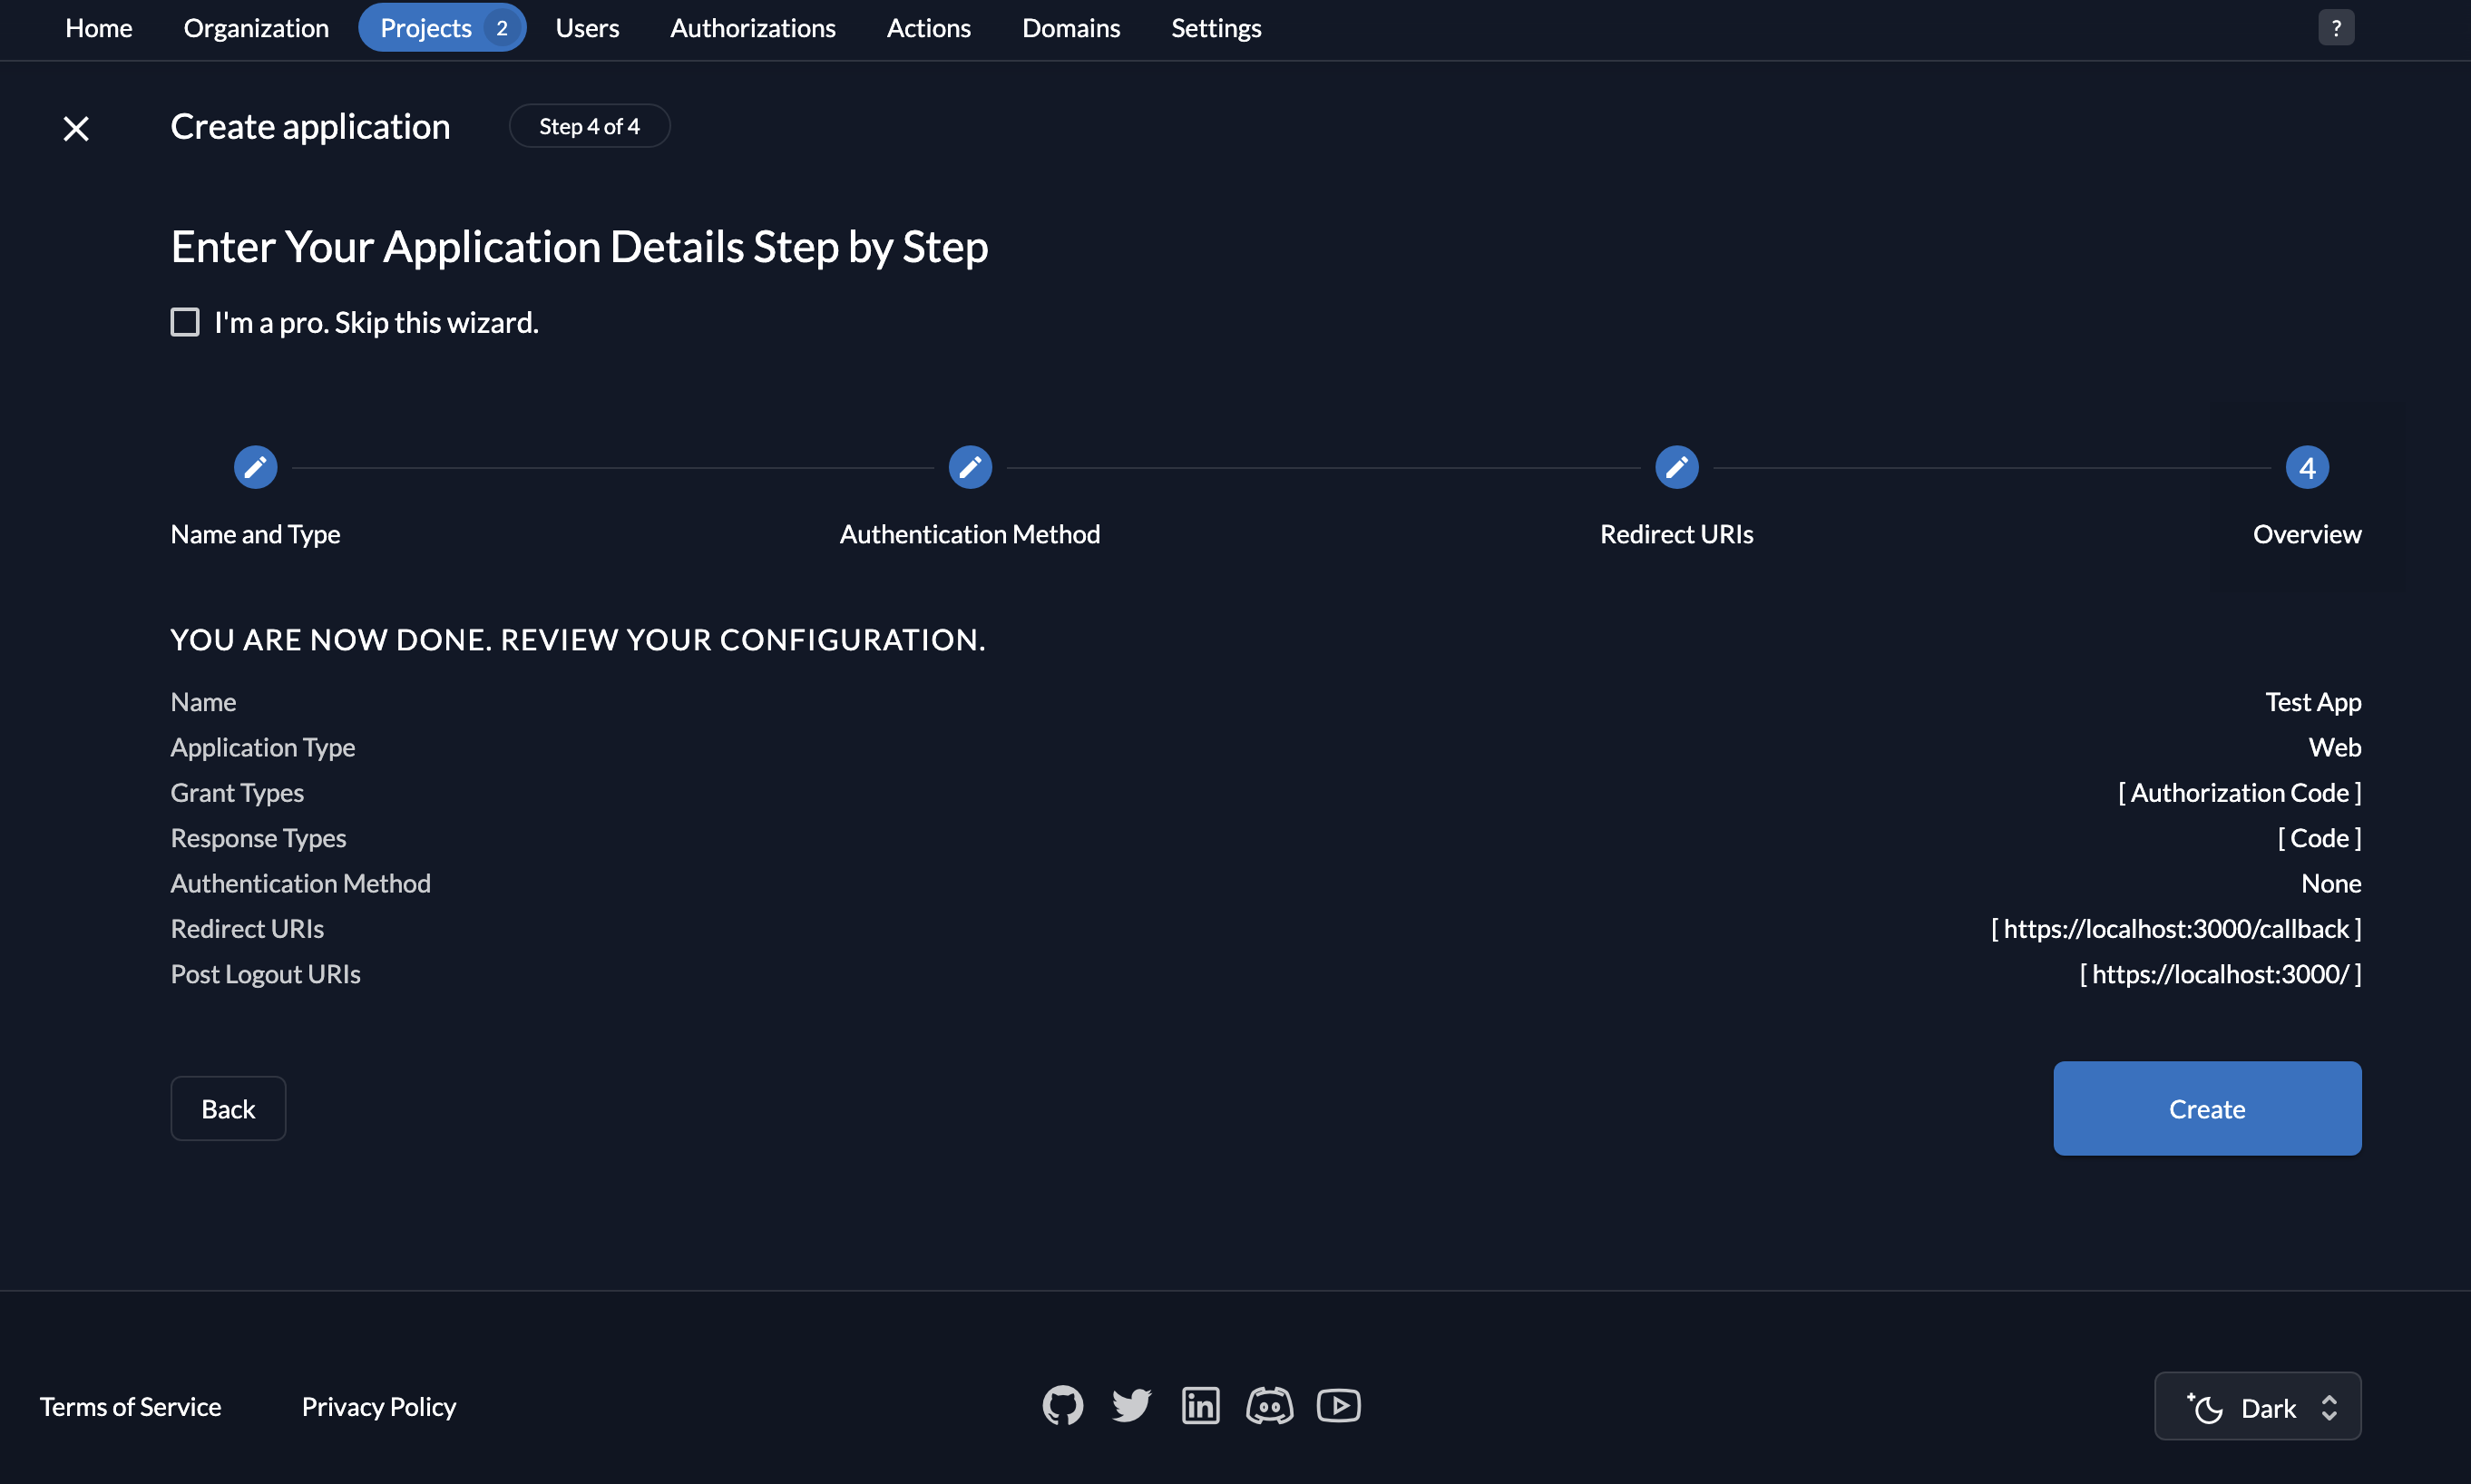
- Review the details you provided and click on the Create button.
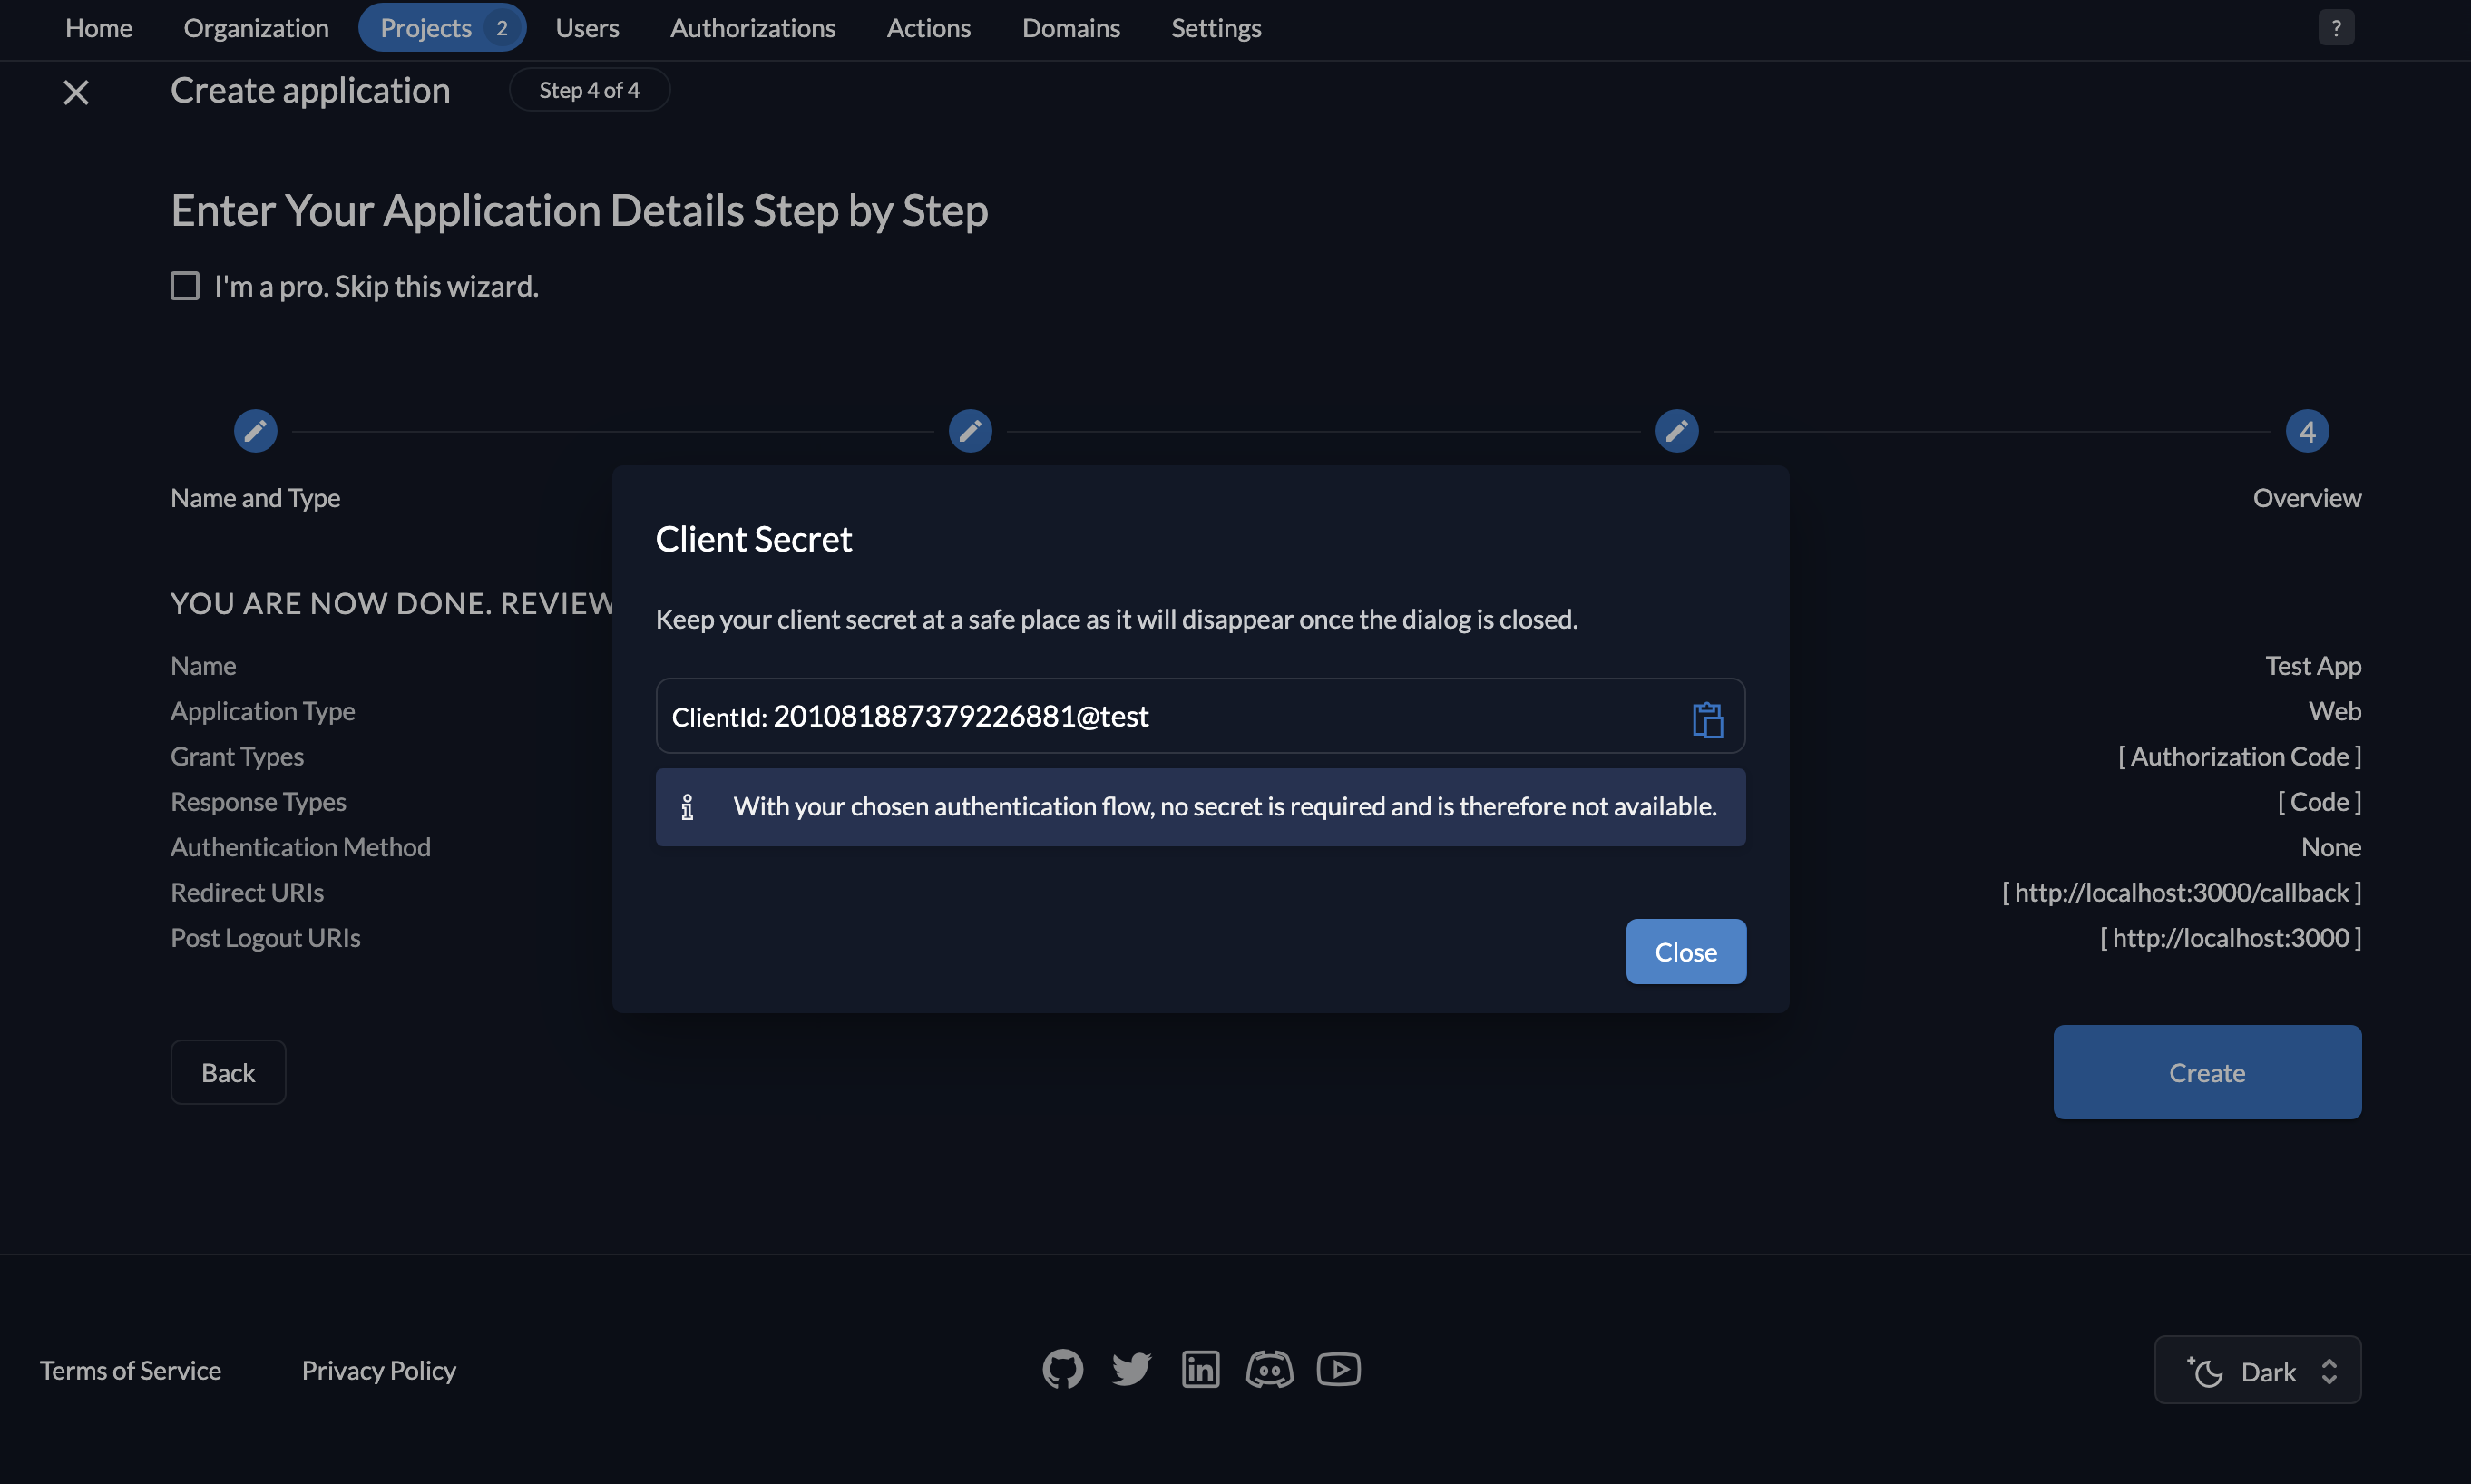
- You will see your client ID (no client secret because you don’t need one with the PKCE flow), which we will use later. Click on the Close button.
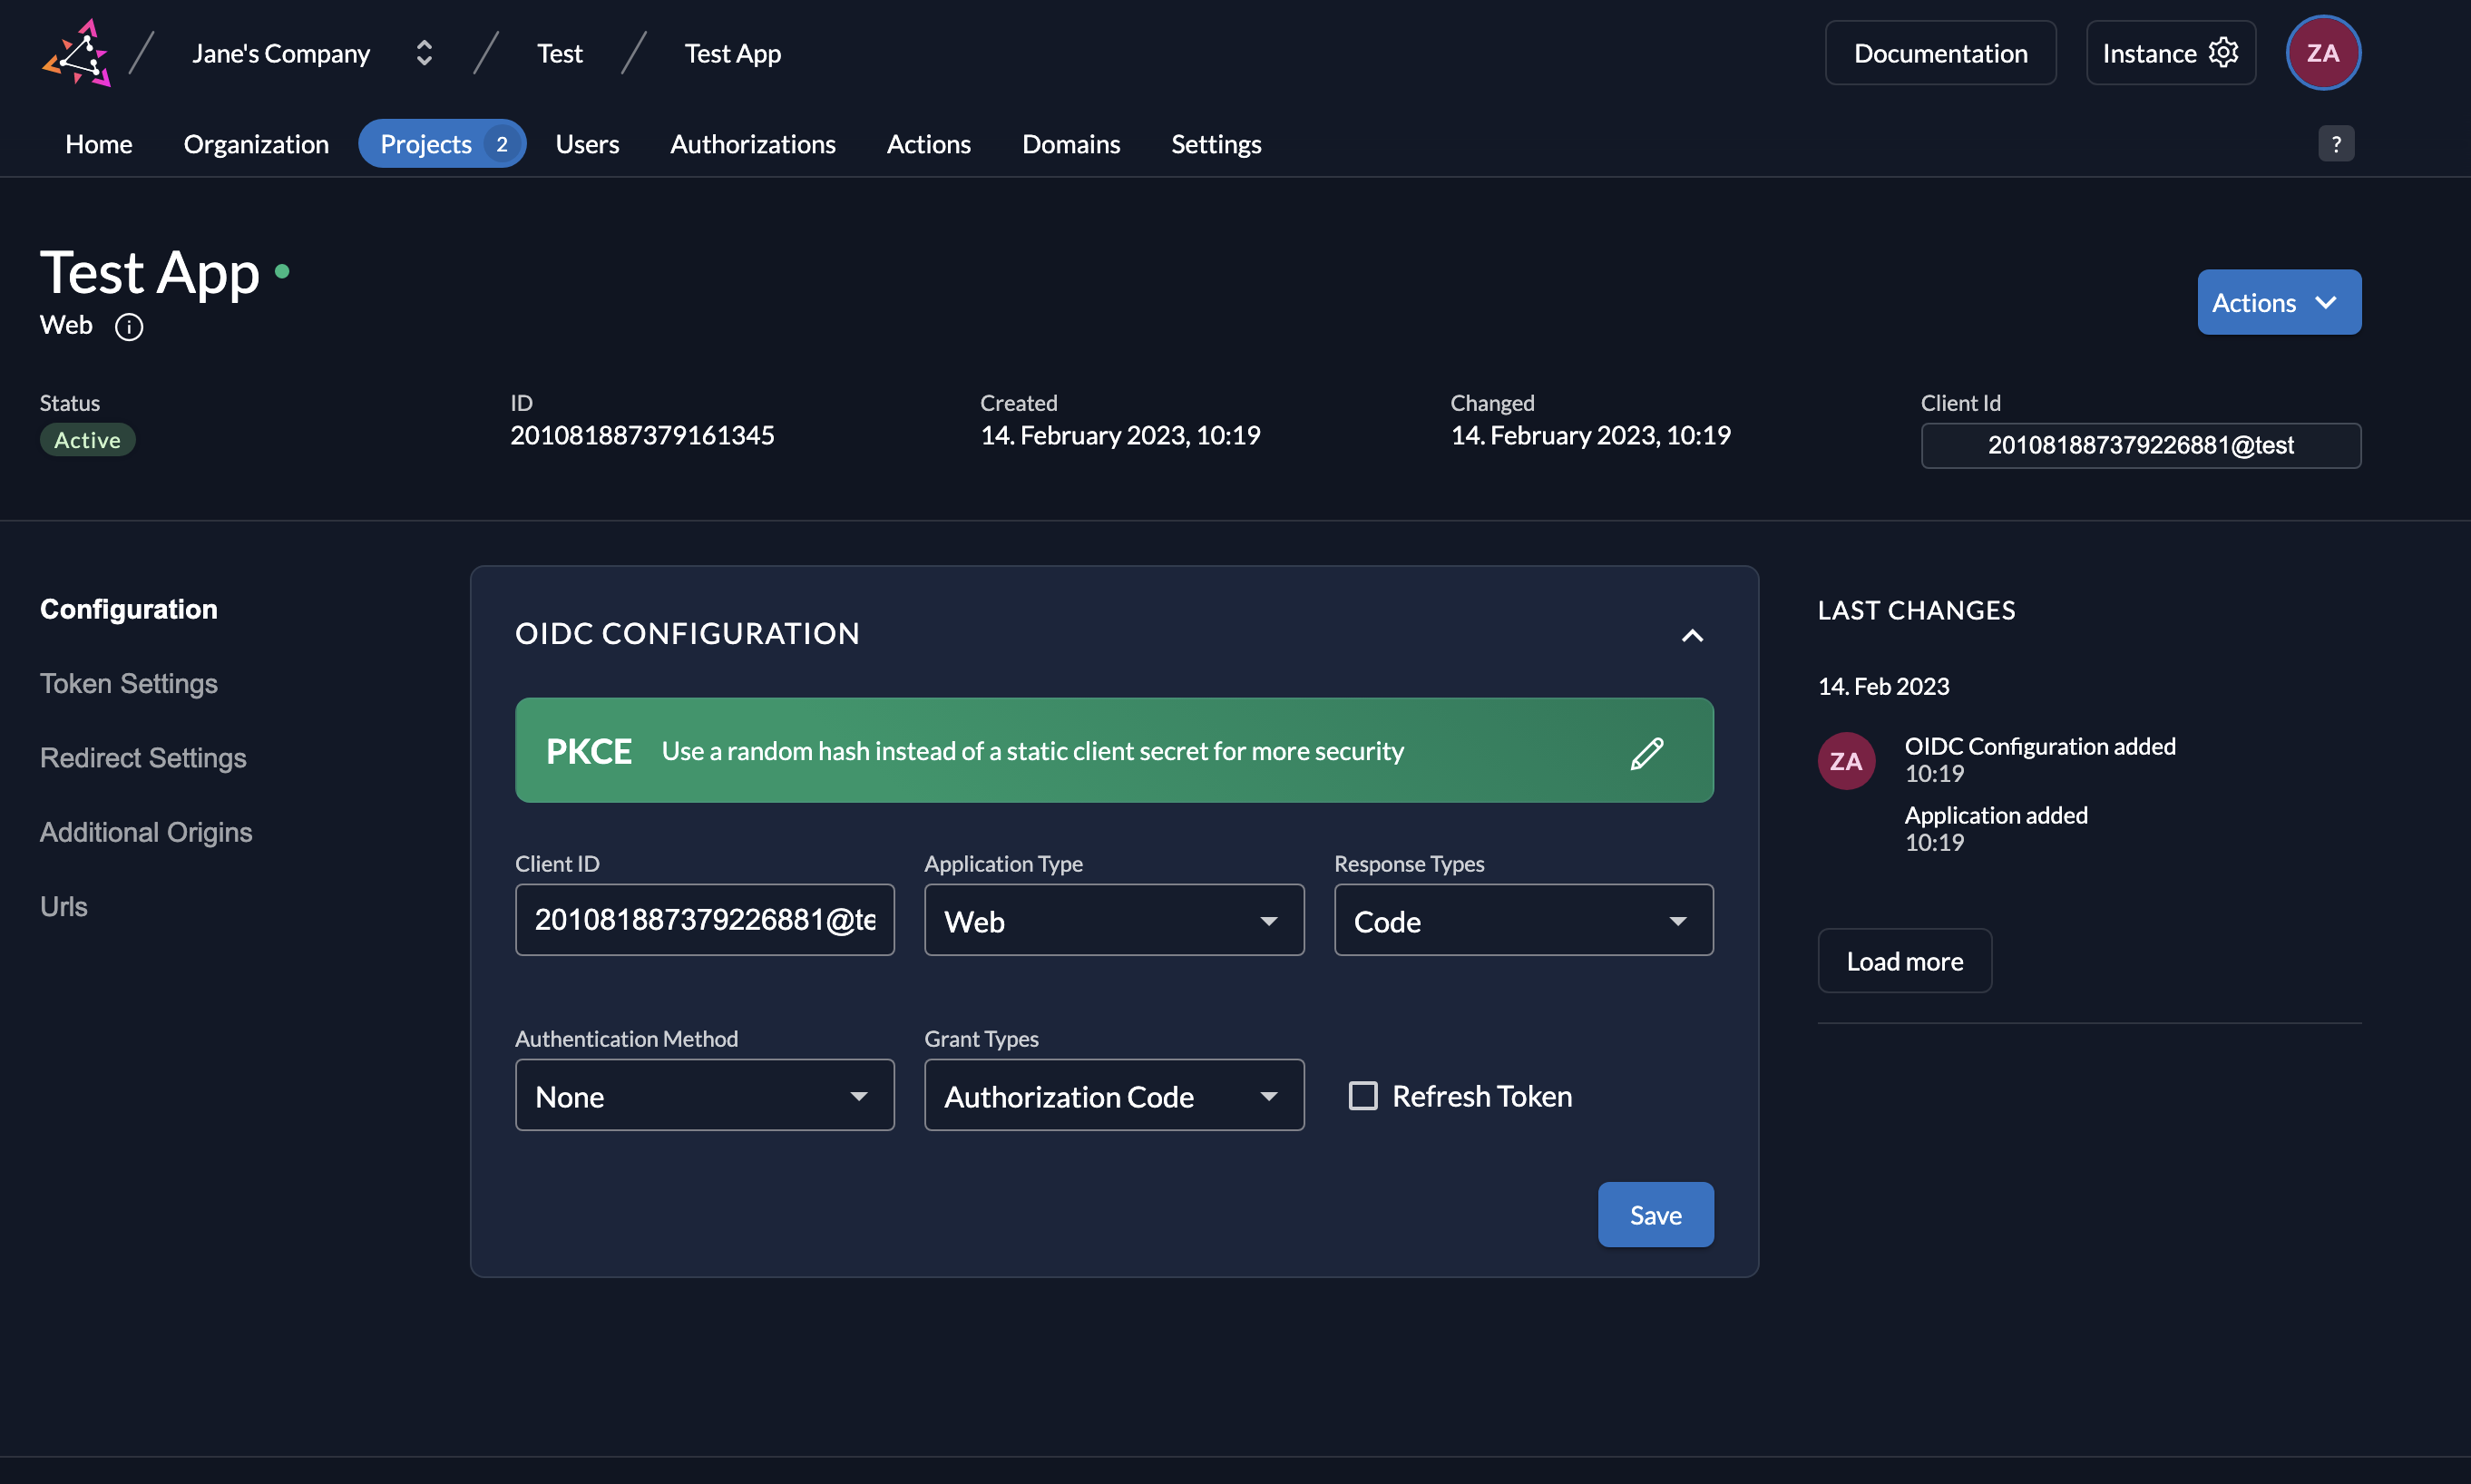
- And you will see the following screen. Click Save.
2.3 Test the Authentication and Authorization Flow
2.3.1 Call the Authorization Endpoint
To redirect the user to the ZITADEL authorization server's authorization endpoint, pass along the necessary parameters for the Authorization Code with PKCE flow, including:
- response_type=code: Indicates that the authorization server should return an authorization code.
- client_id: Identifies the web application to the authorization server.
- redirect_uri: Specifies the URL to which the authorization server should redirect the user after authentication.
- scope: Specifies the permissions the application is requesting.
- code_challenge: A cryptographic hash of a code verifier that the client generates.
- code_challenge_method: The method used to generate the code challenge (e.g. S256).
We will now send this GET request with the above parameters to the ZITADEL authorization endpoint via the OIDC Debugger. The OIDC debugger will behave as the client web application or relying party.
- Go to OIDC Debugger, where you will see the following screen:
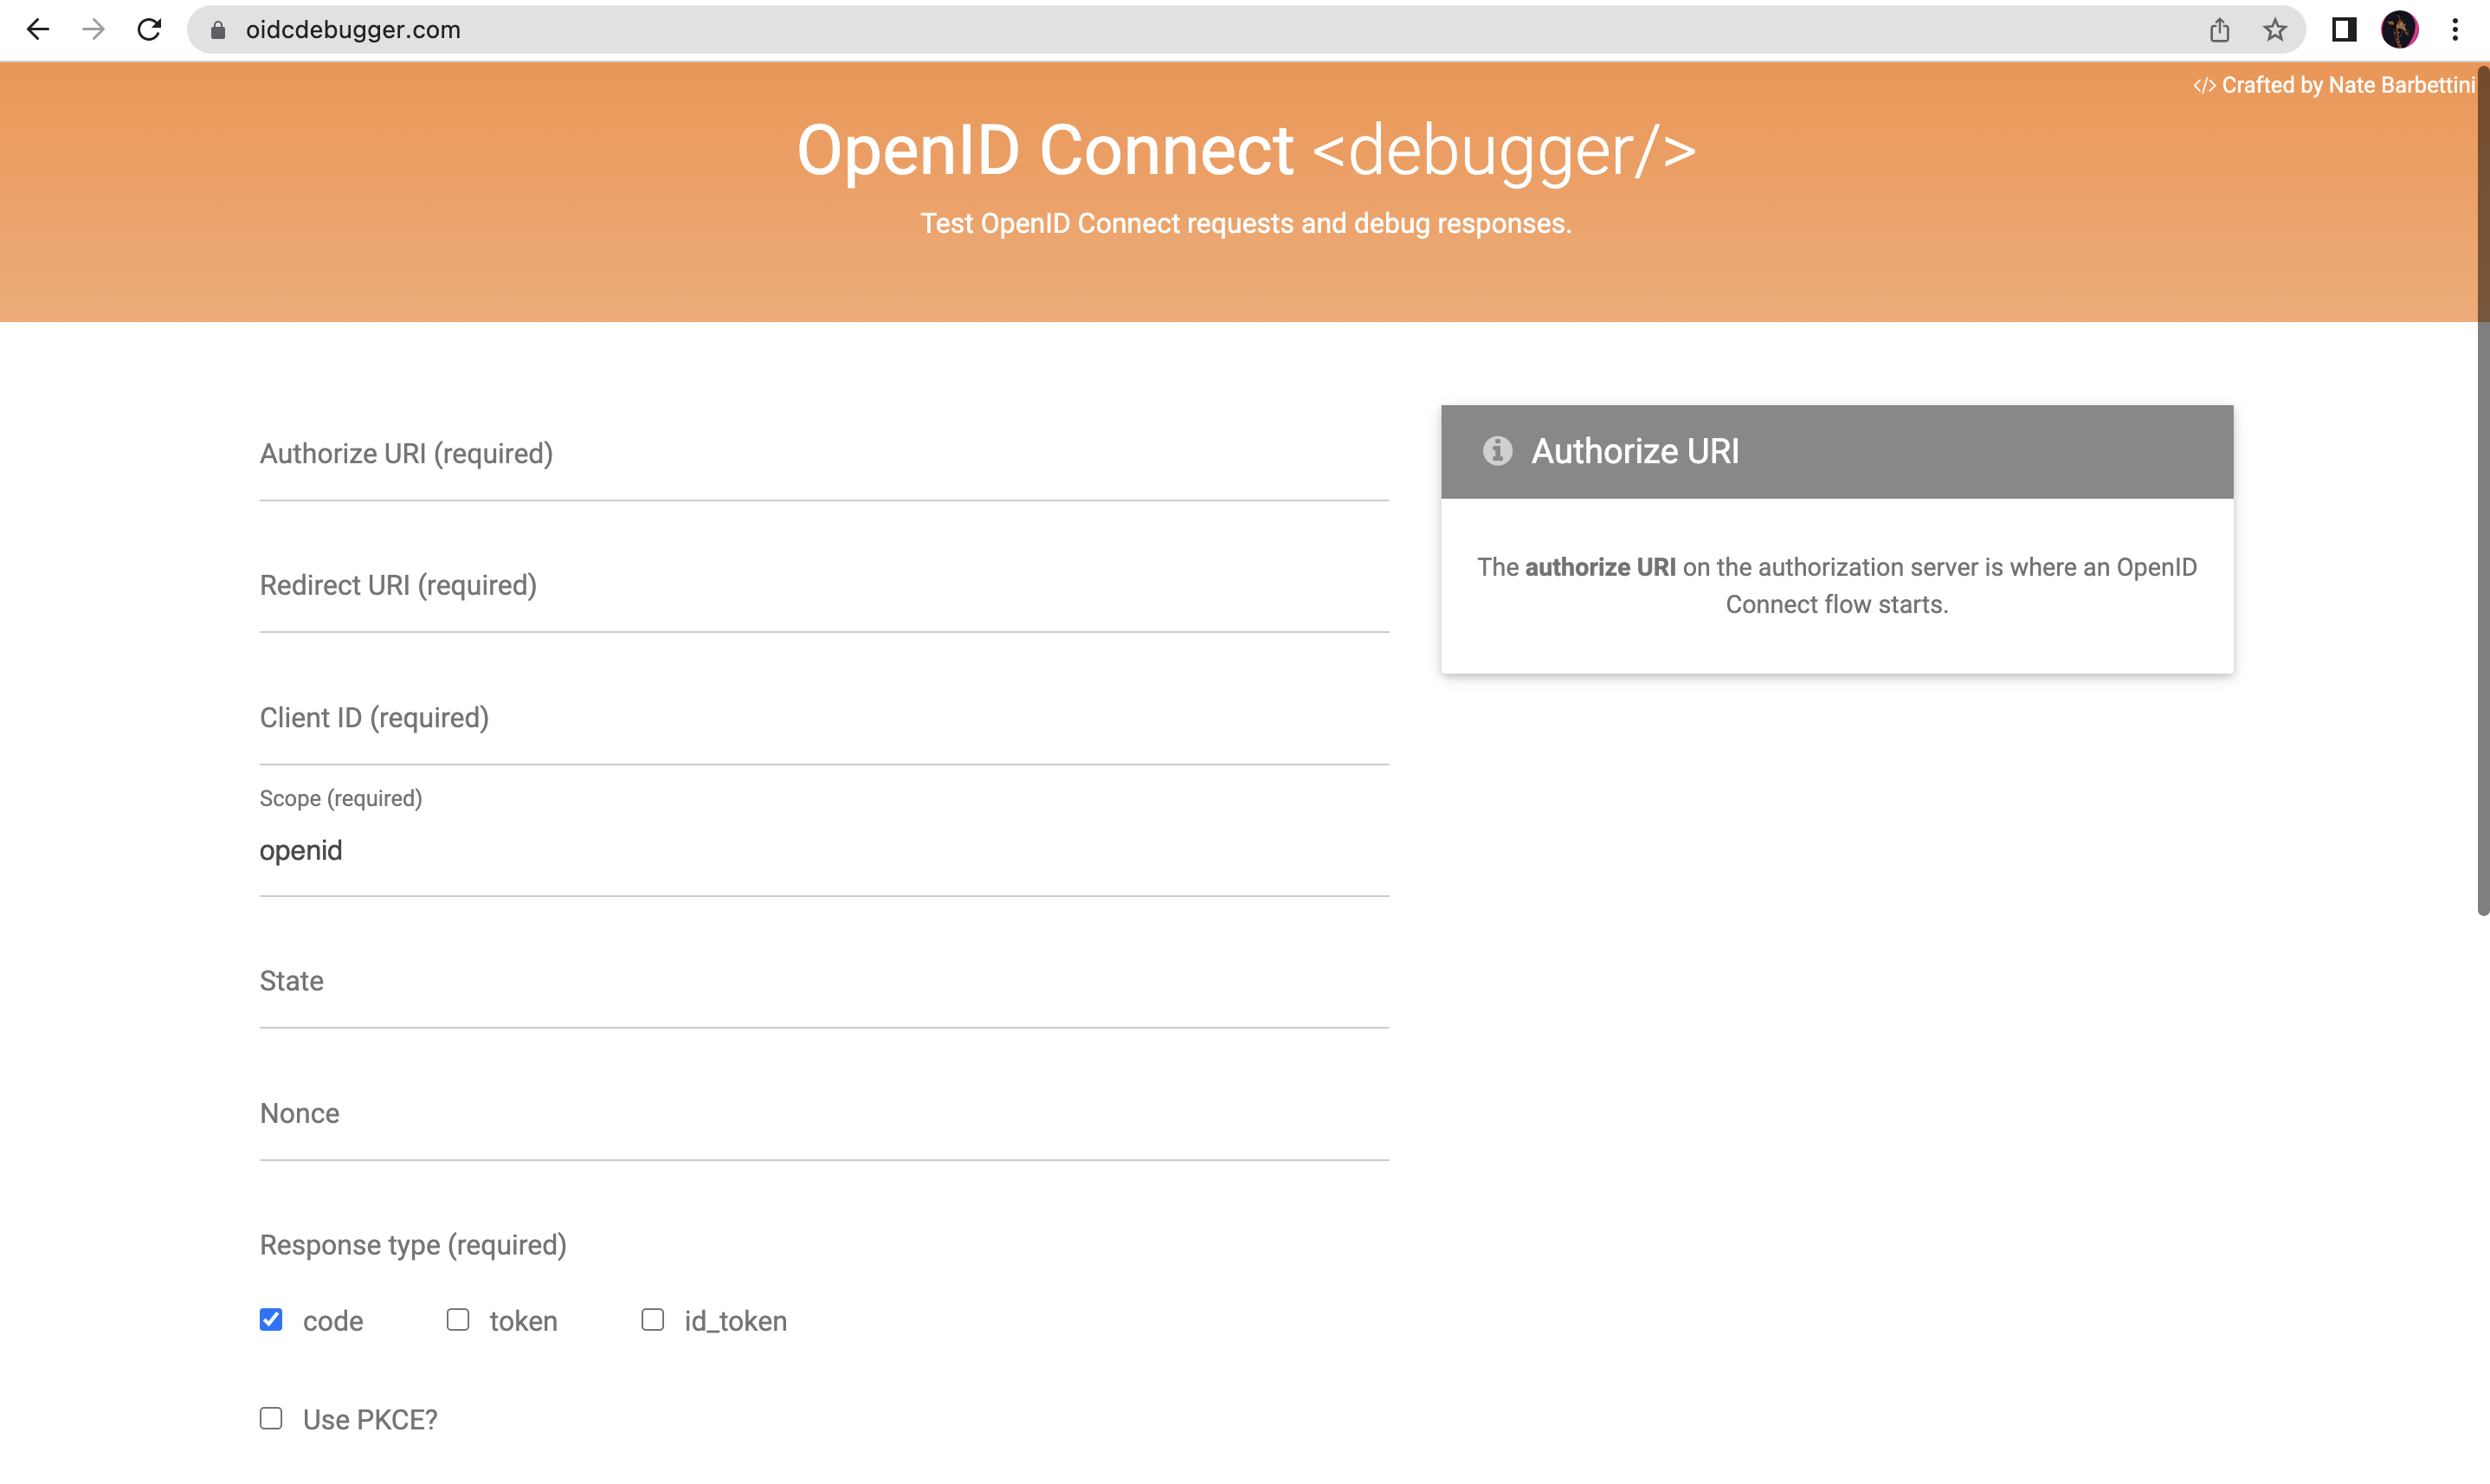
- To provide the required values, follow the steps below.
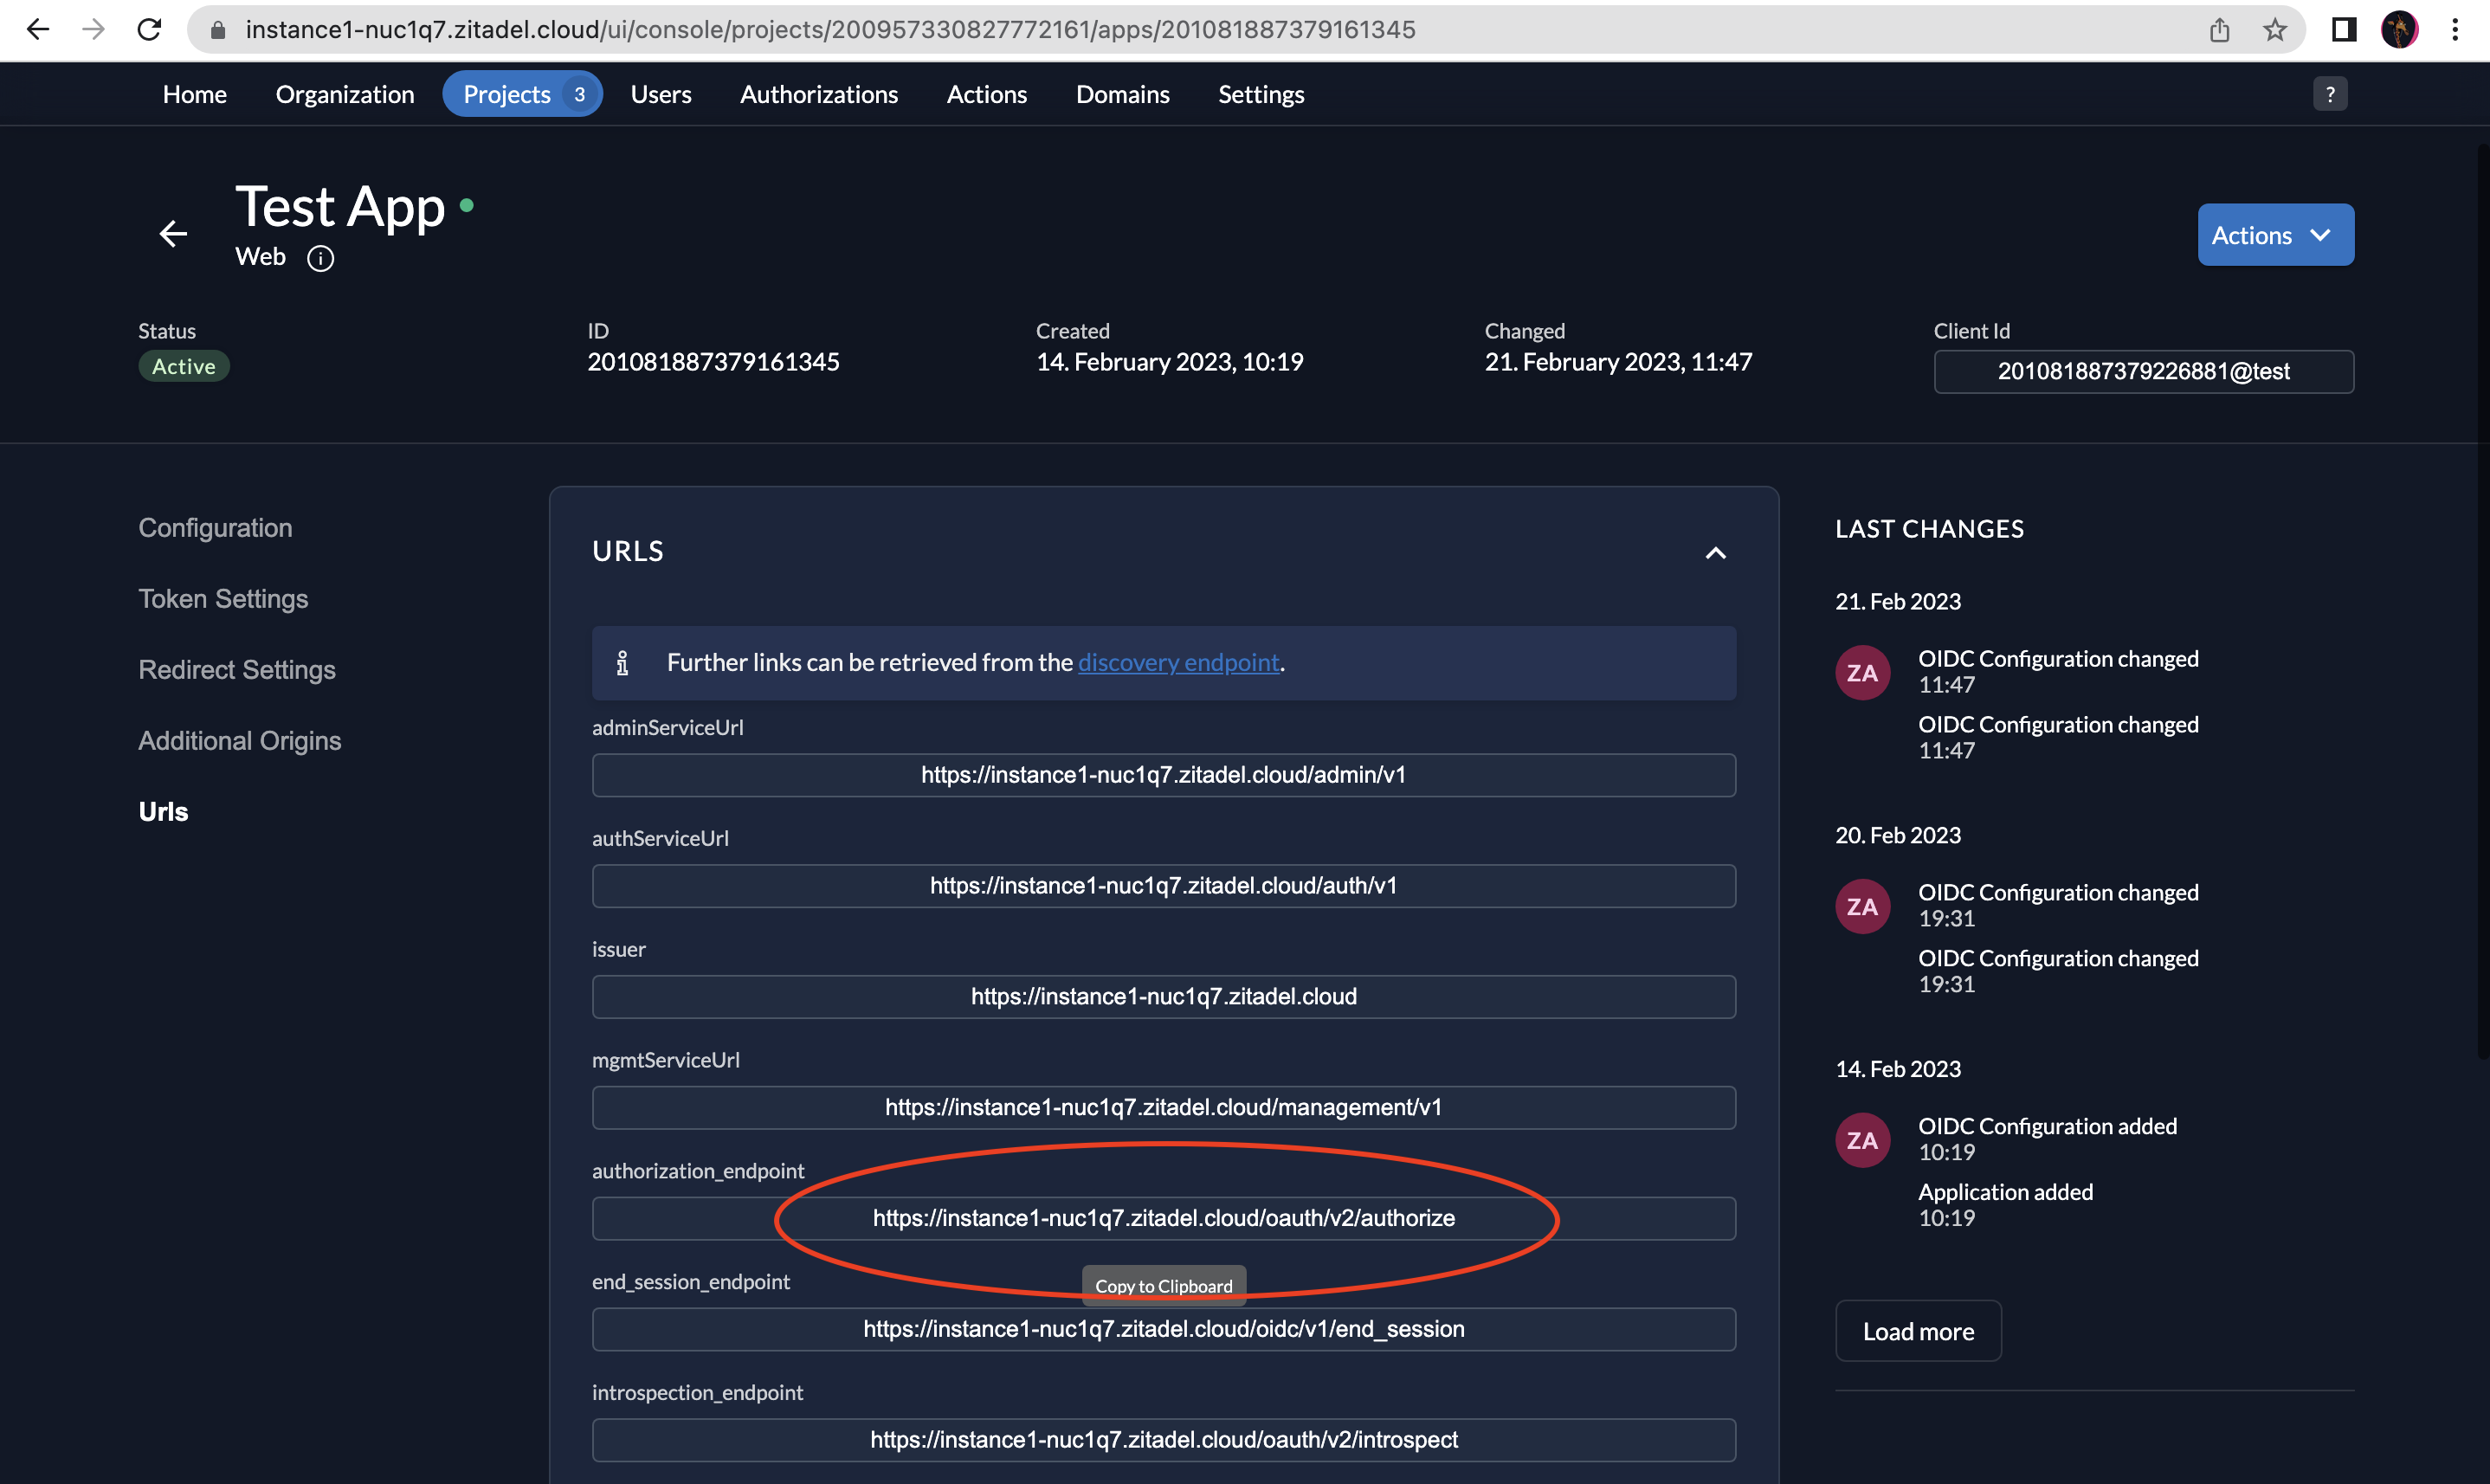
- Authorize URI: Go to the web application you created in ZITADEL and select URIs on the left menu and then copy the authorization_endpoint. Paste this on the Authorize URI field in the OIDC Debugger.
-
Redirect URI: https://oidcdebugger.com/debug
-
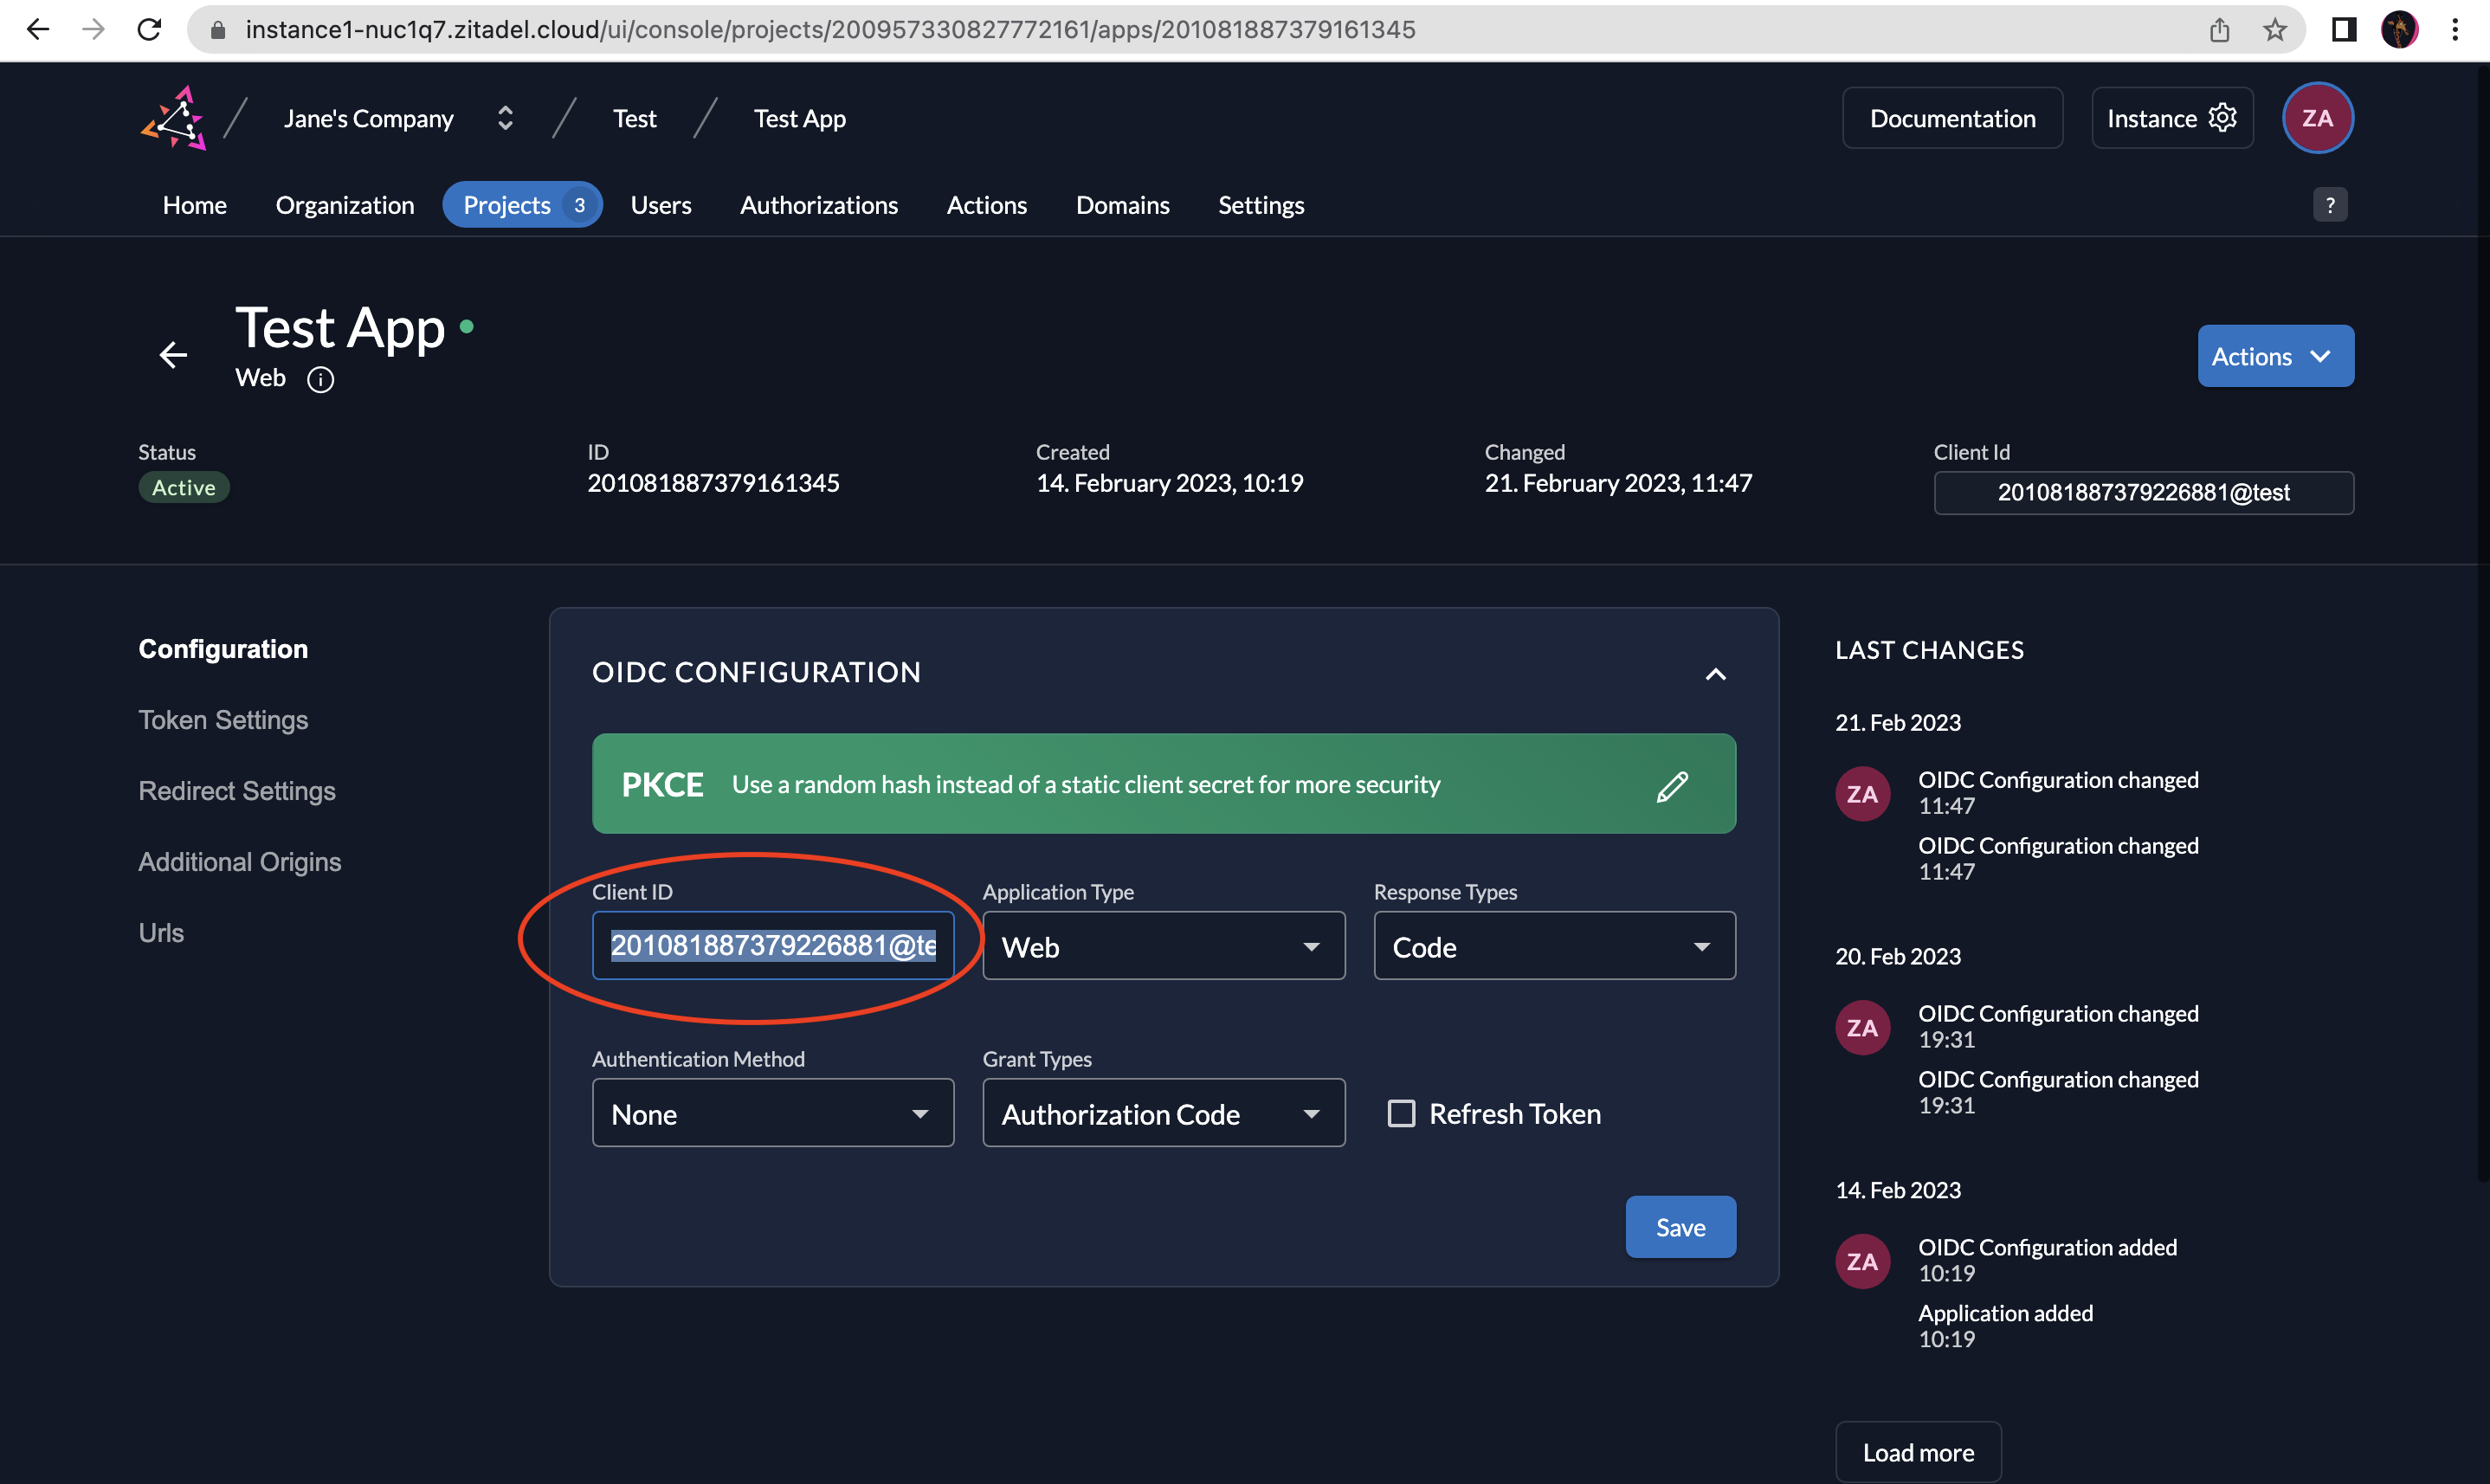
Client ID: Go to your application, select Configuration on the left menu, and then copy the Client ID. Paste this on the Client ID field.
- Scope: openid
- State: Use the generated state.
- Nonce: Use the generated nonce.
- Select the following checkboxes: code and Use PKCE?
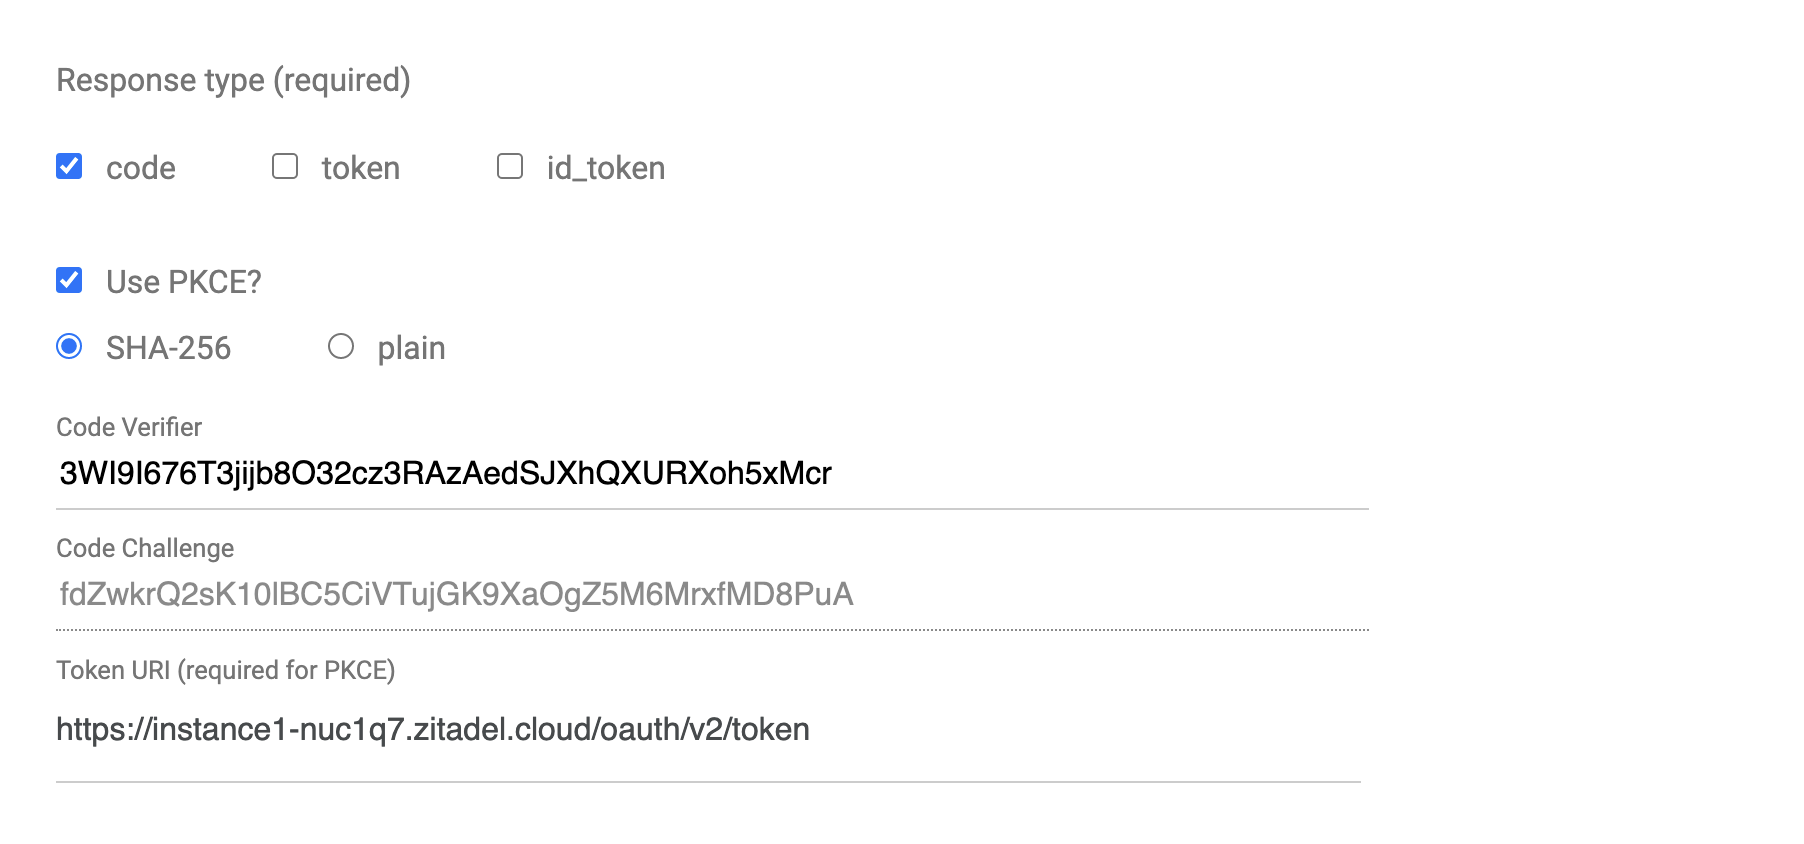
When you select Use PKCE? You will see the parameters related to PKCE. Select SHA-256. The Code Verifier and the Code Challenge will be generated for you. Note down the code verifier for later use. The Token URI is required for PKCE and will also be auto-filled for you based on the ZITADEL authorization endpoint you provided.
- Select query as the response mode. You will be able to see your request at the bottom.
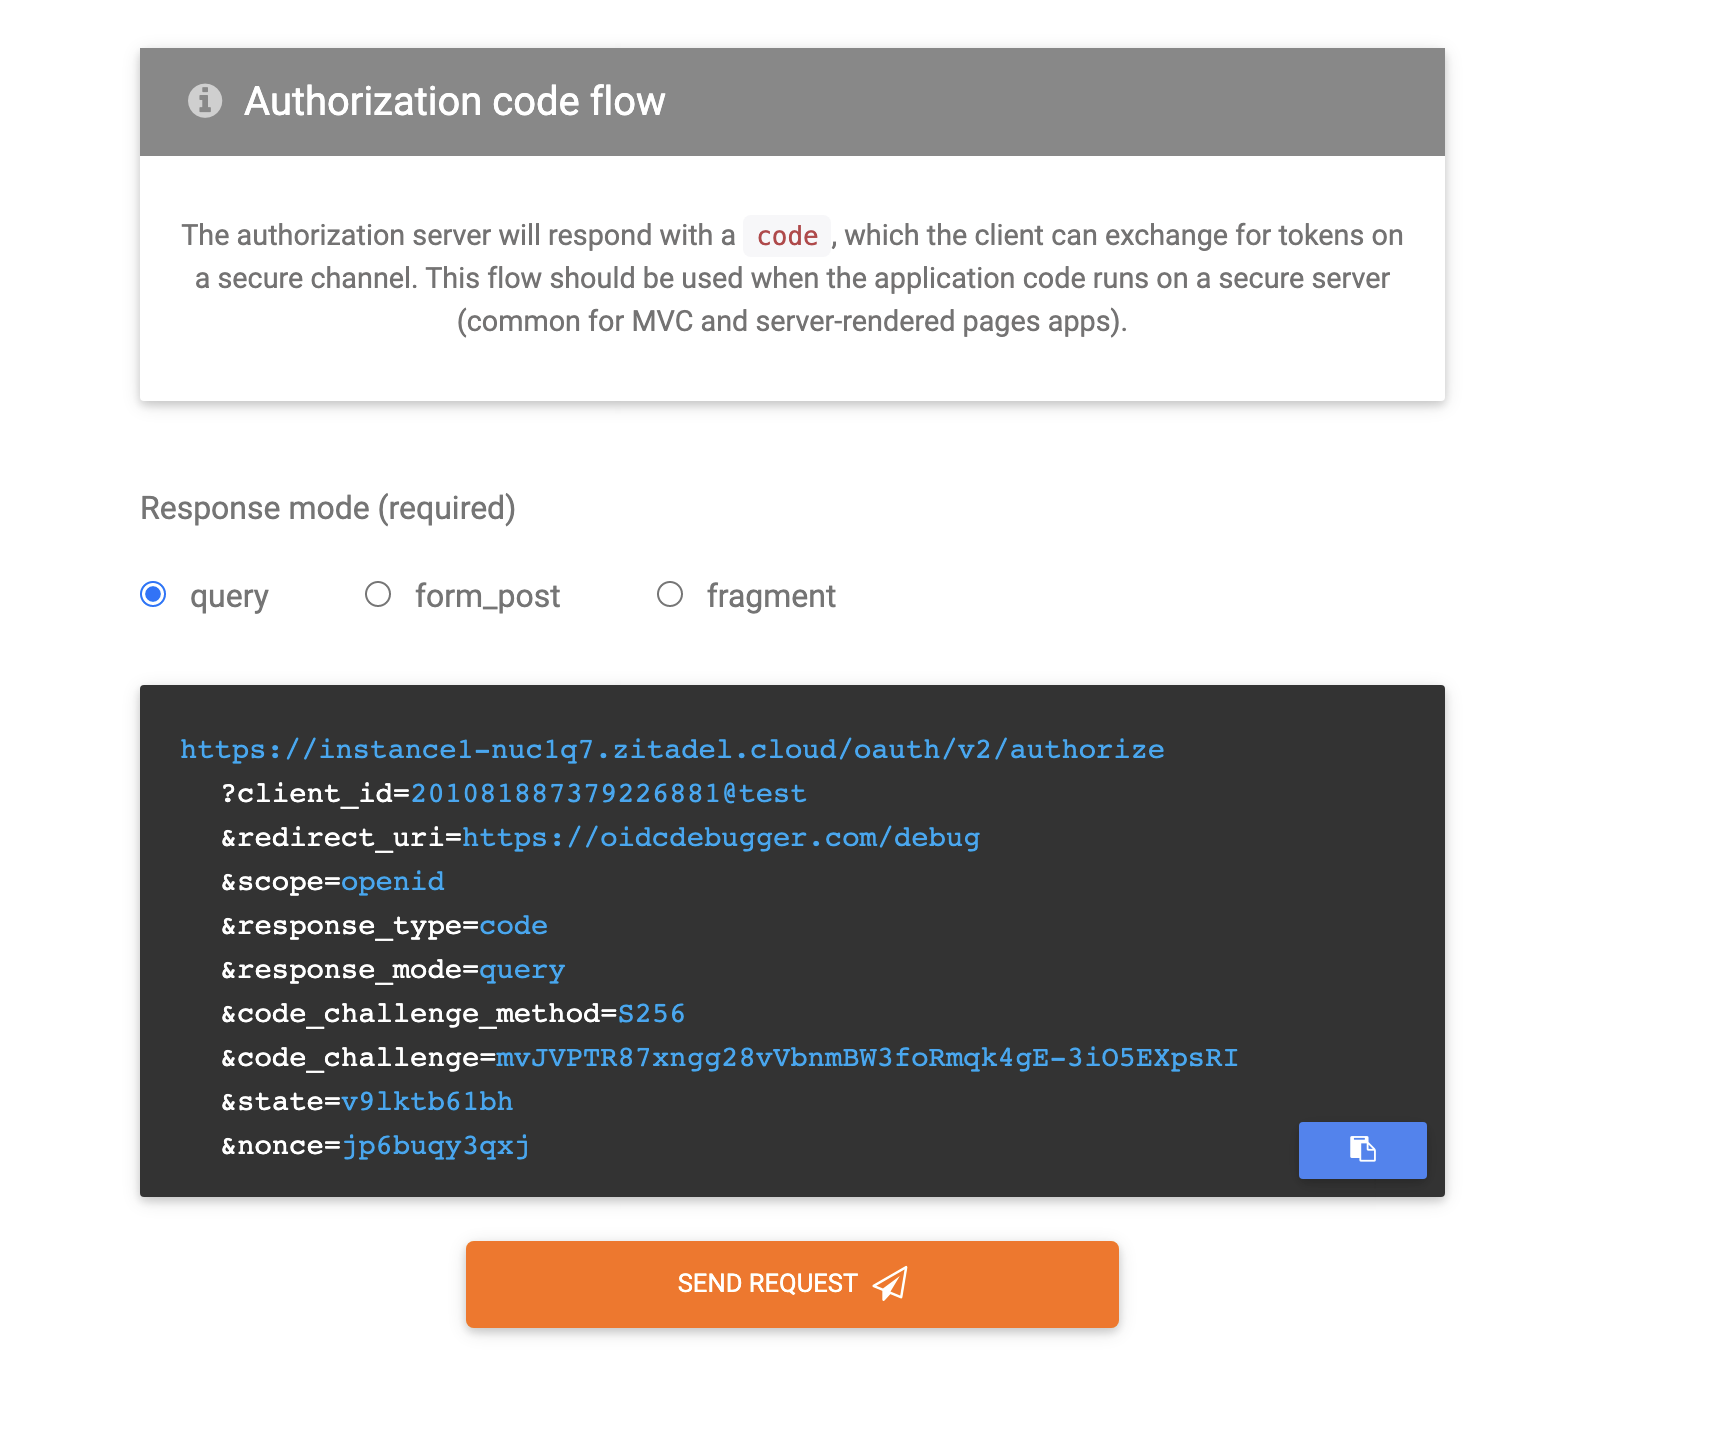
- Click Send Request to send the request.
2.3.2 Authenticate User and Get Authorization Code
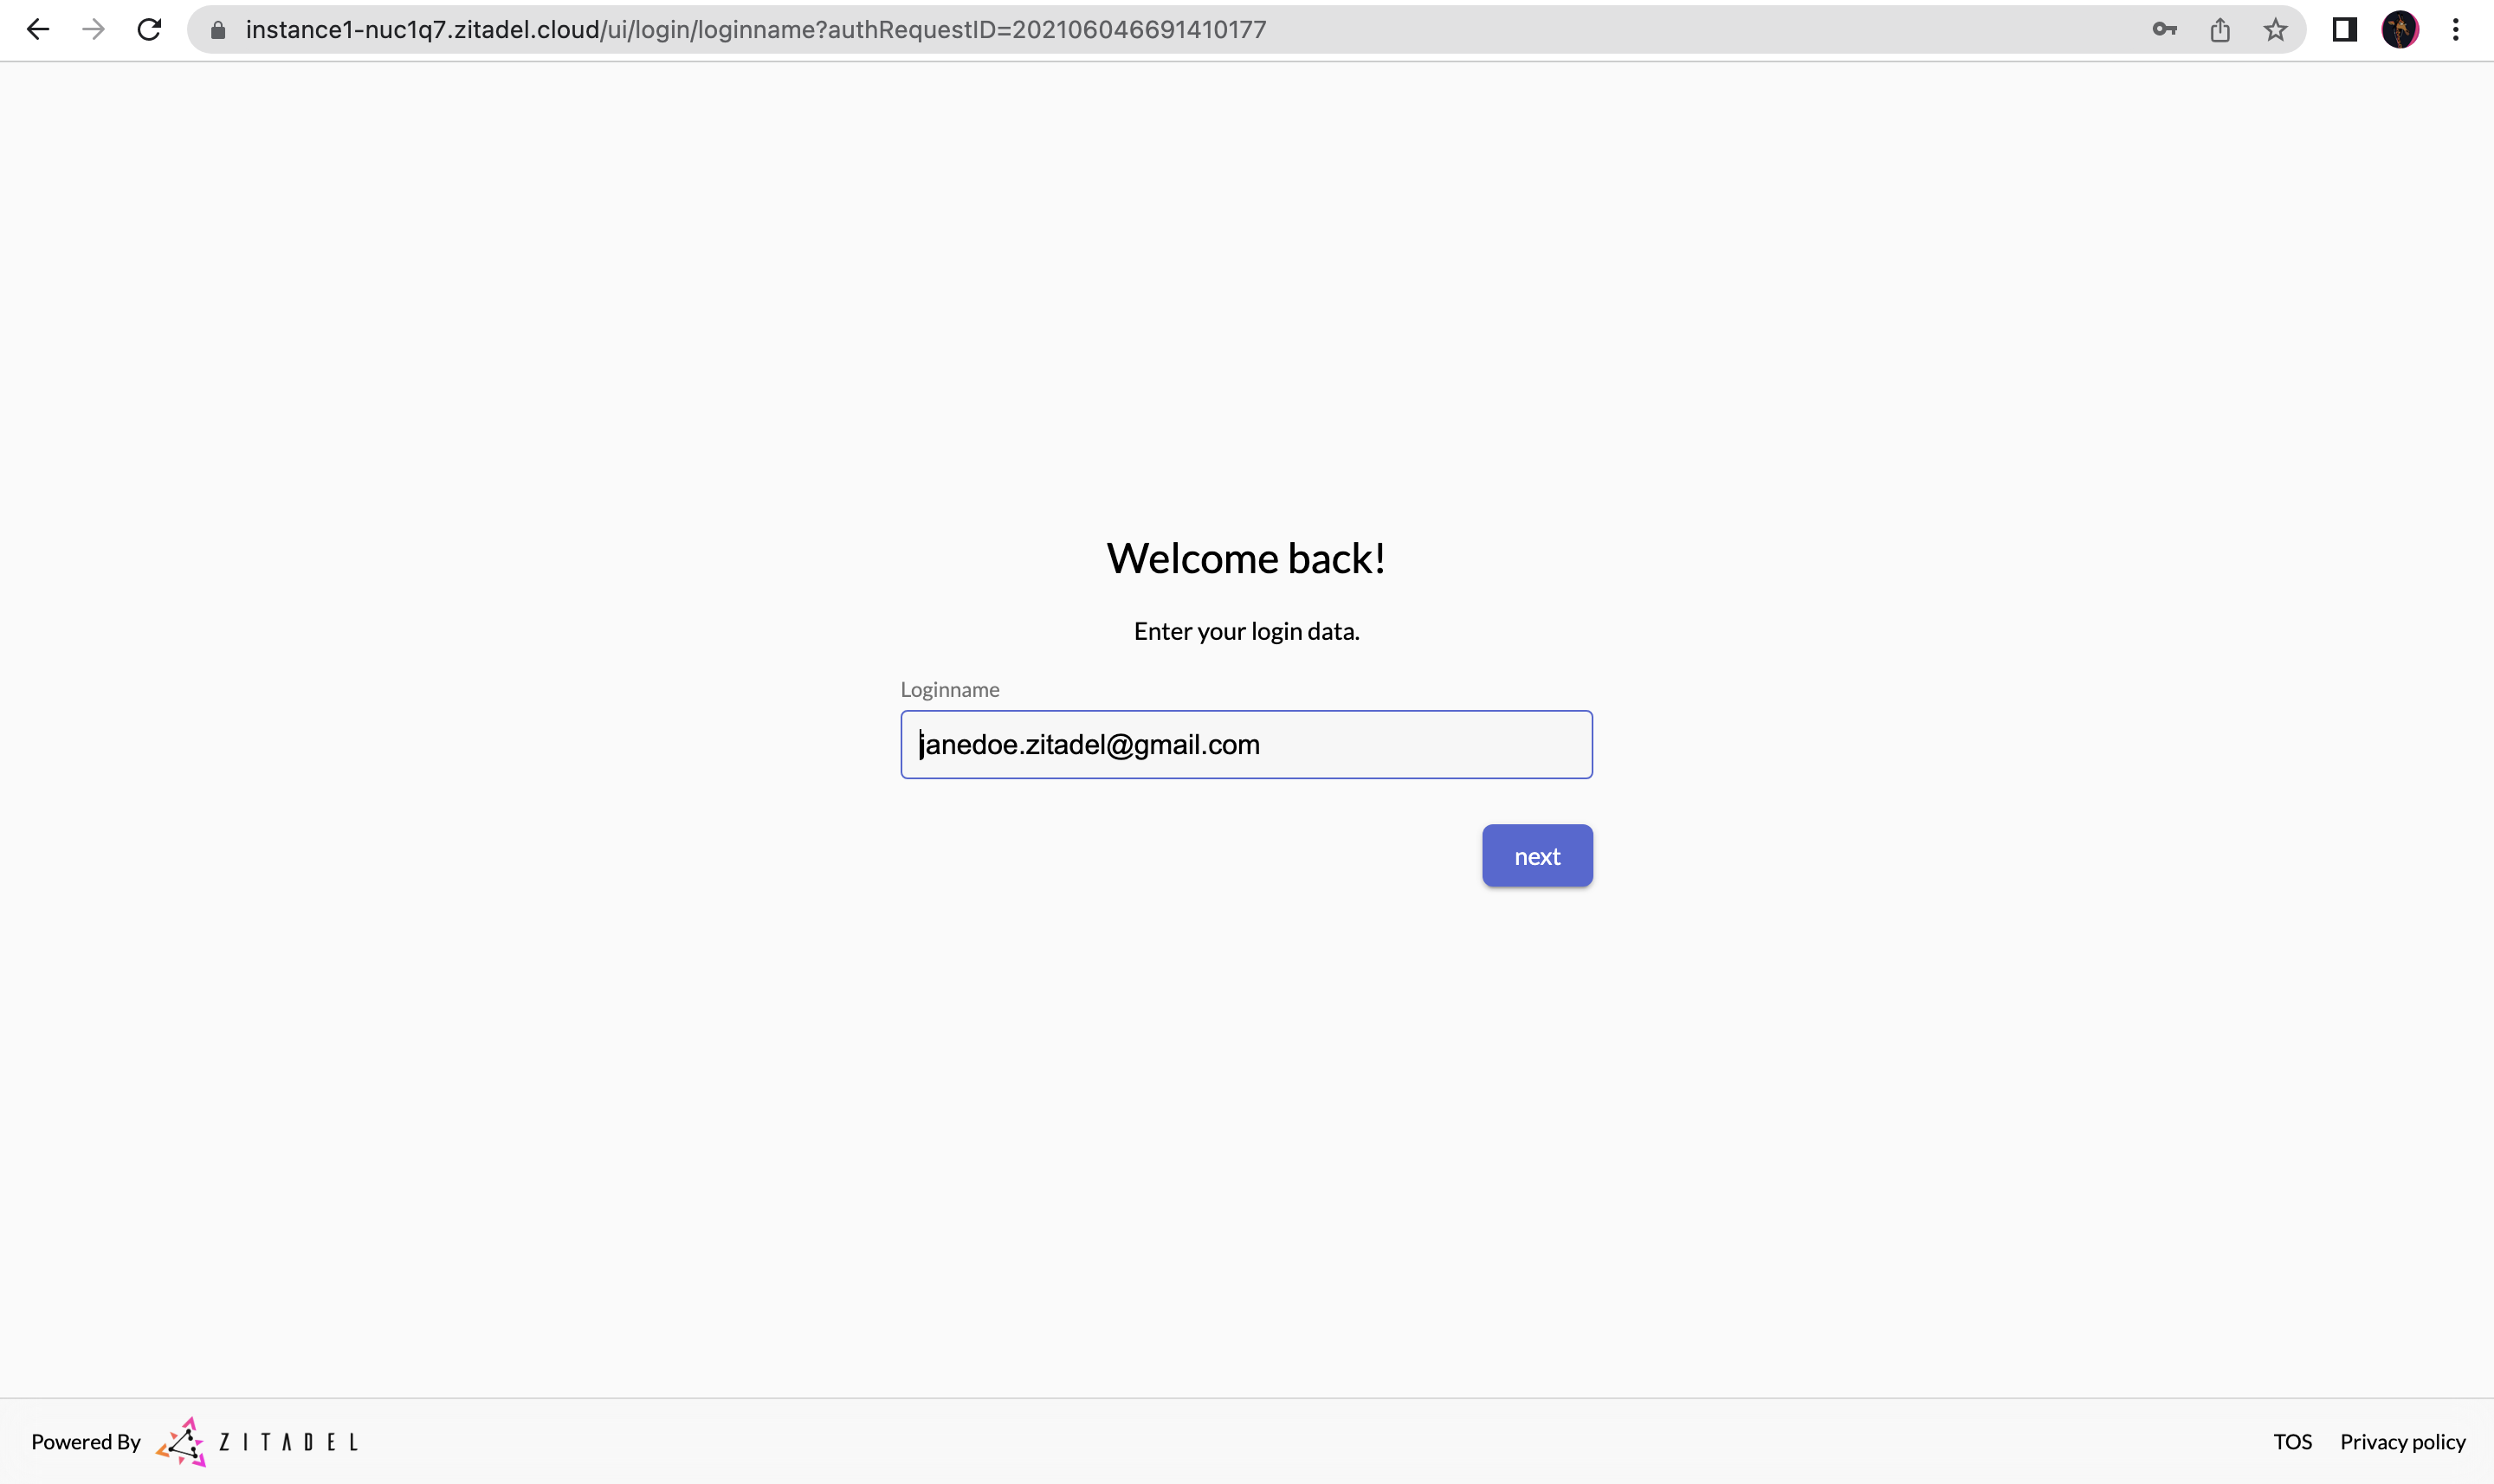
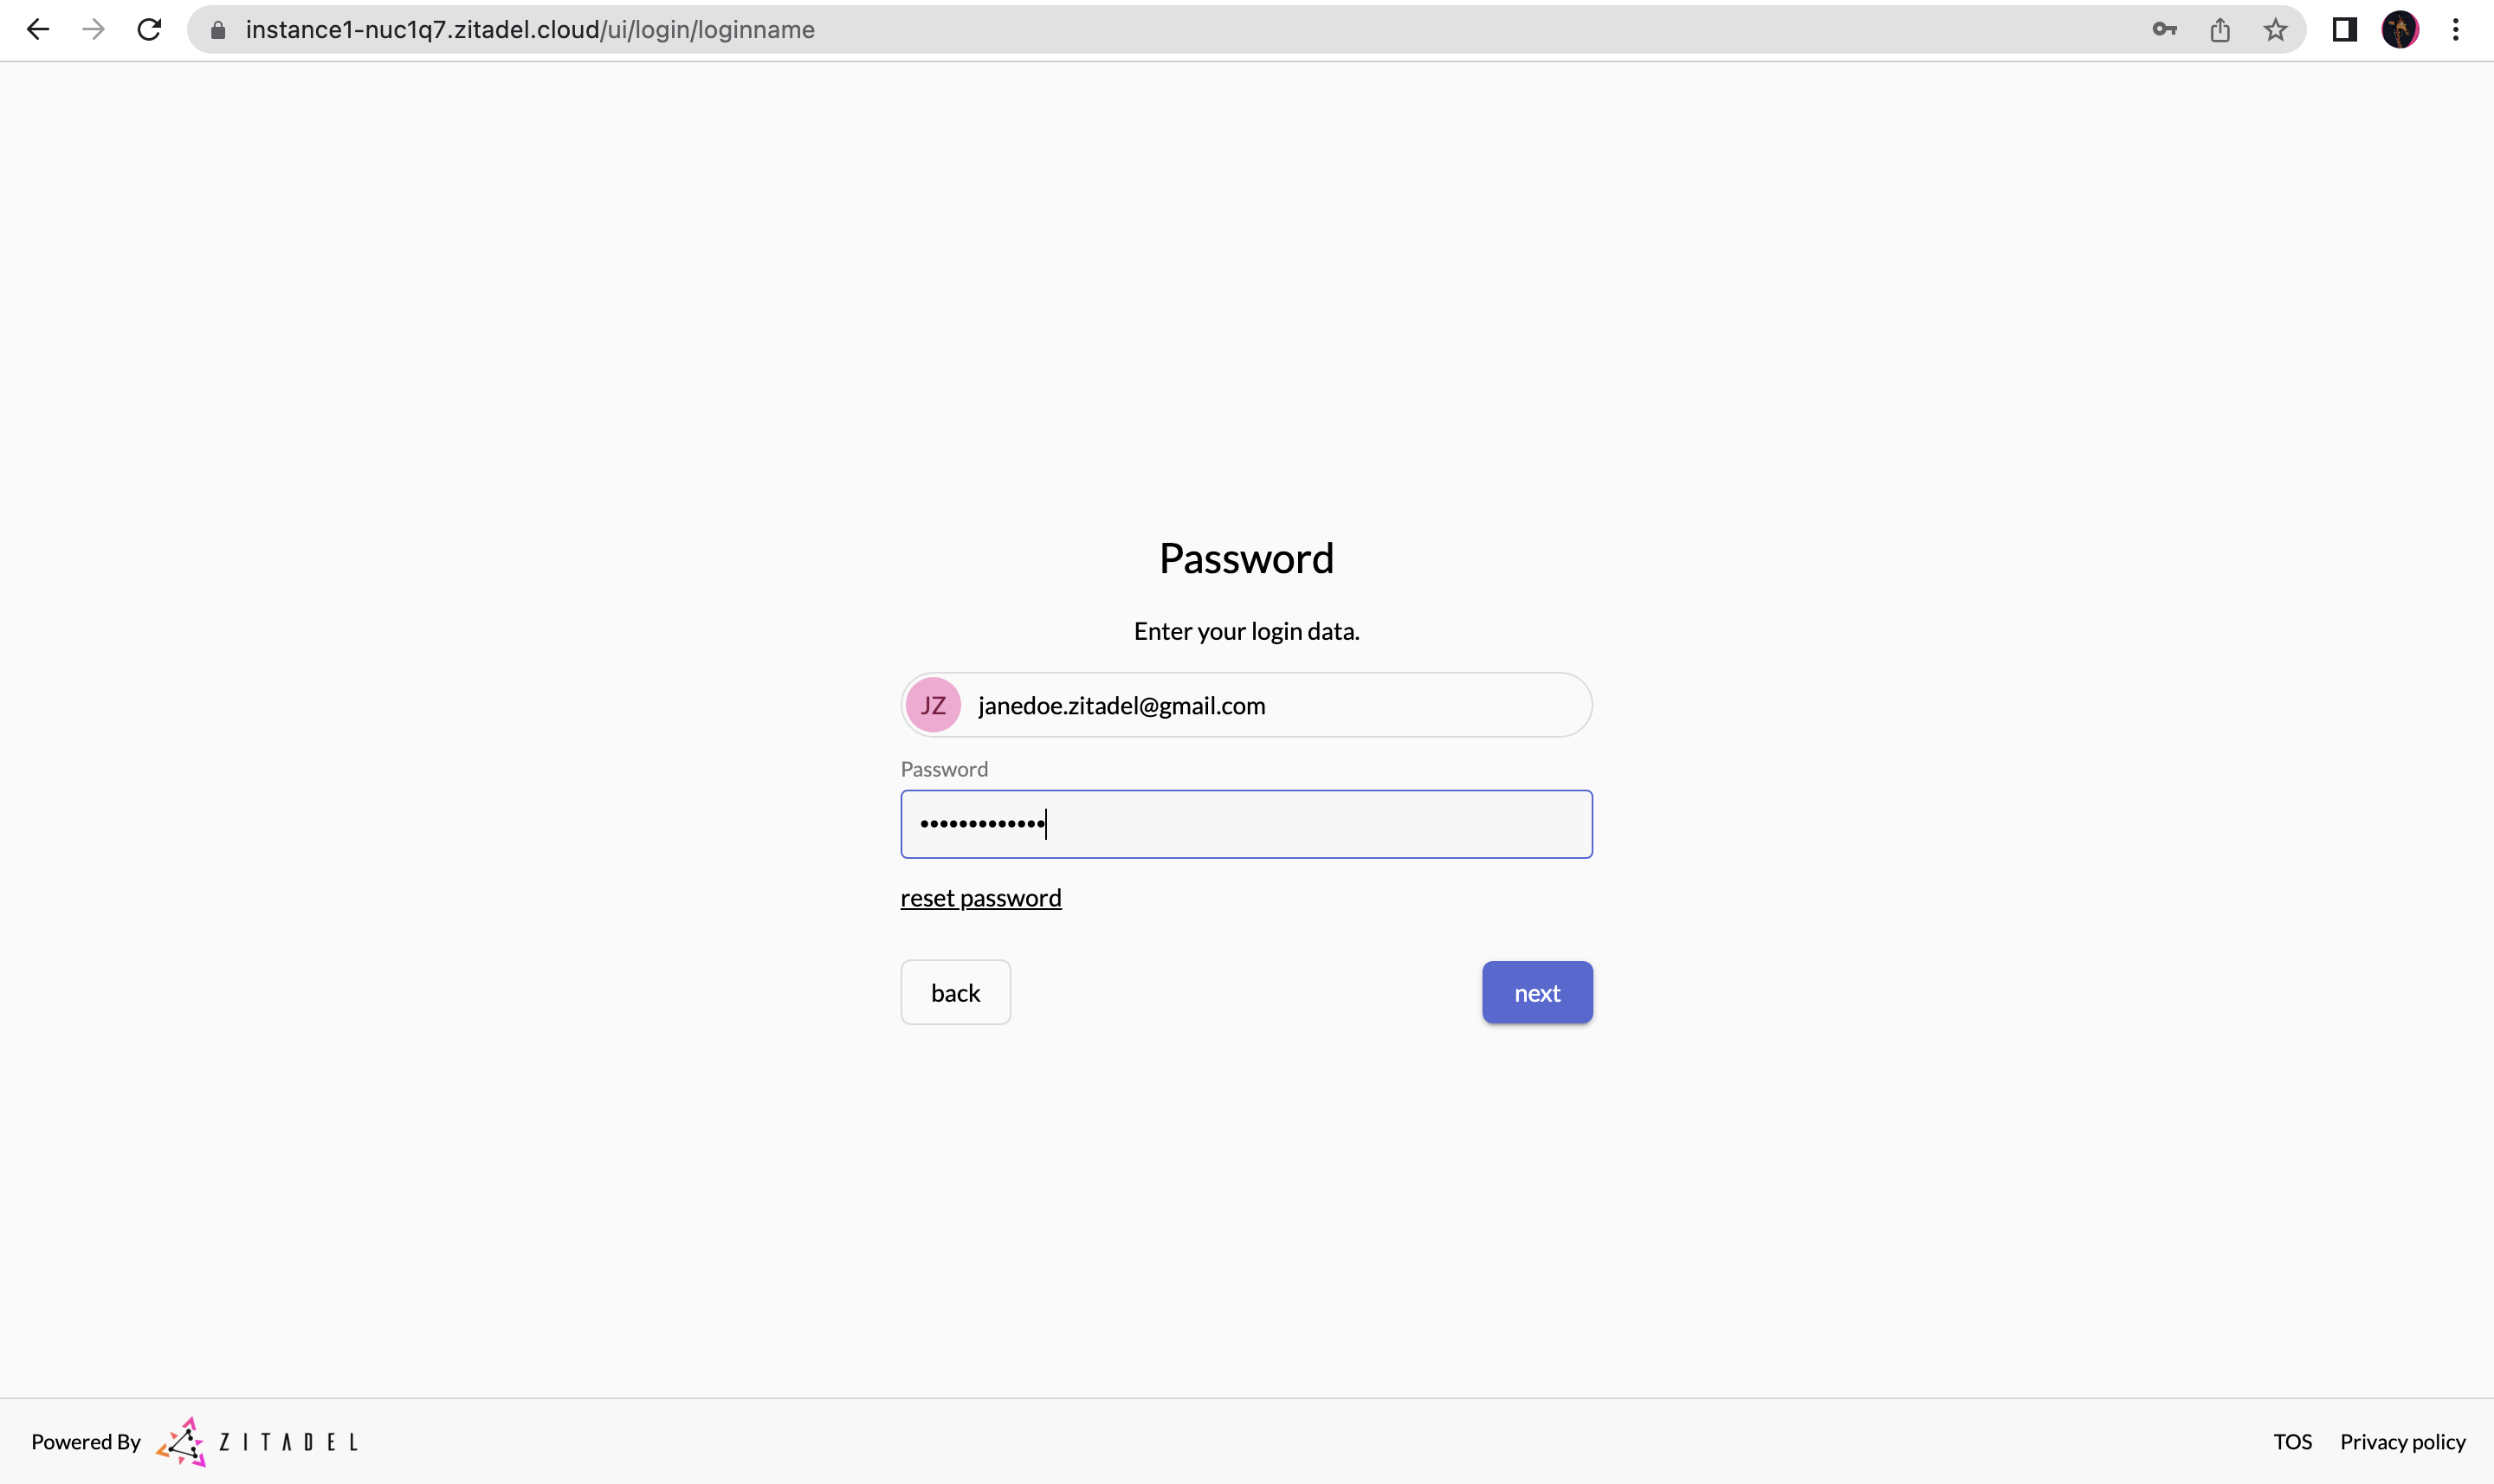
- Now the user will be redirected to ZITADEL for authentication. Enter the login name and password as shown in the following screens (multi-factor authentication was not enabled for this user).
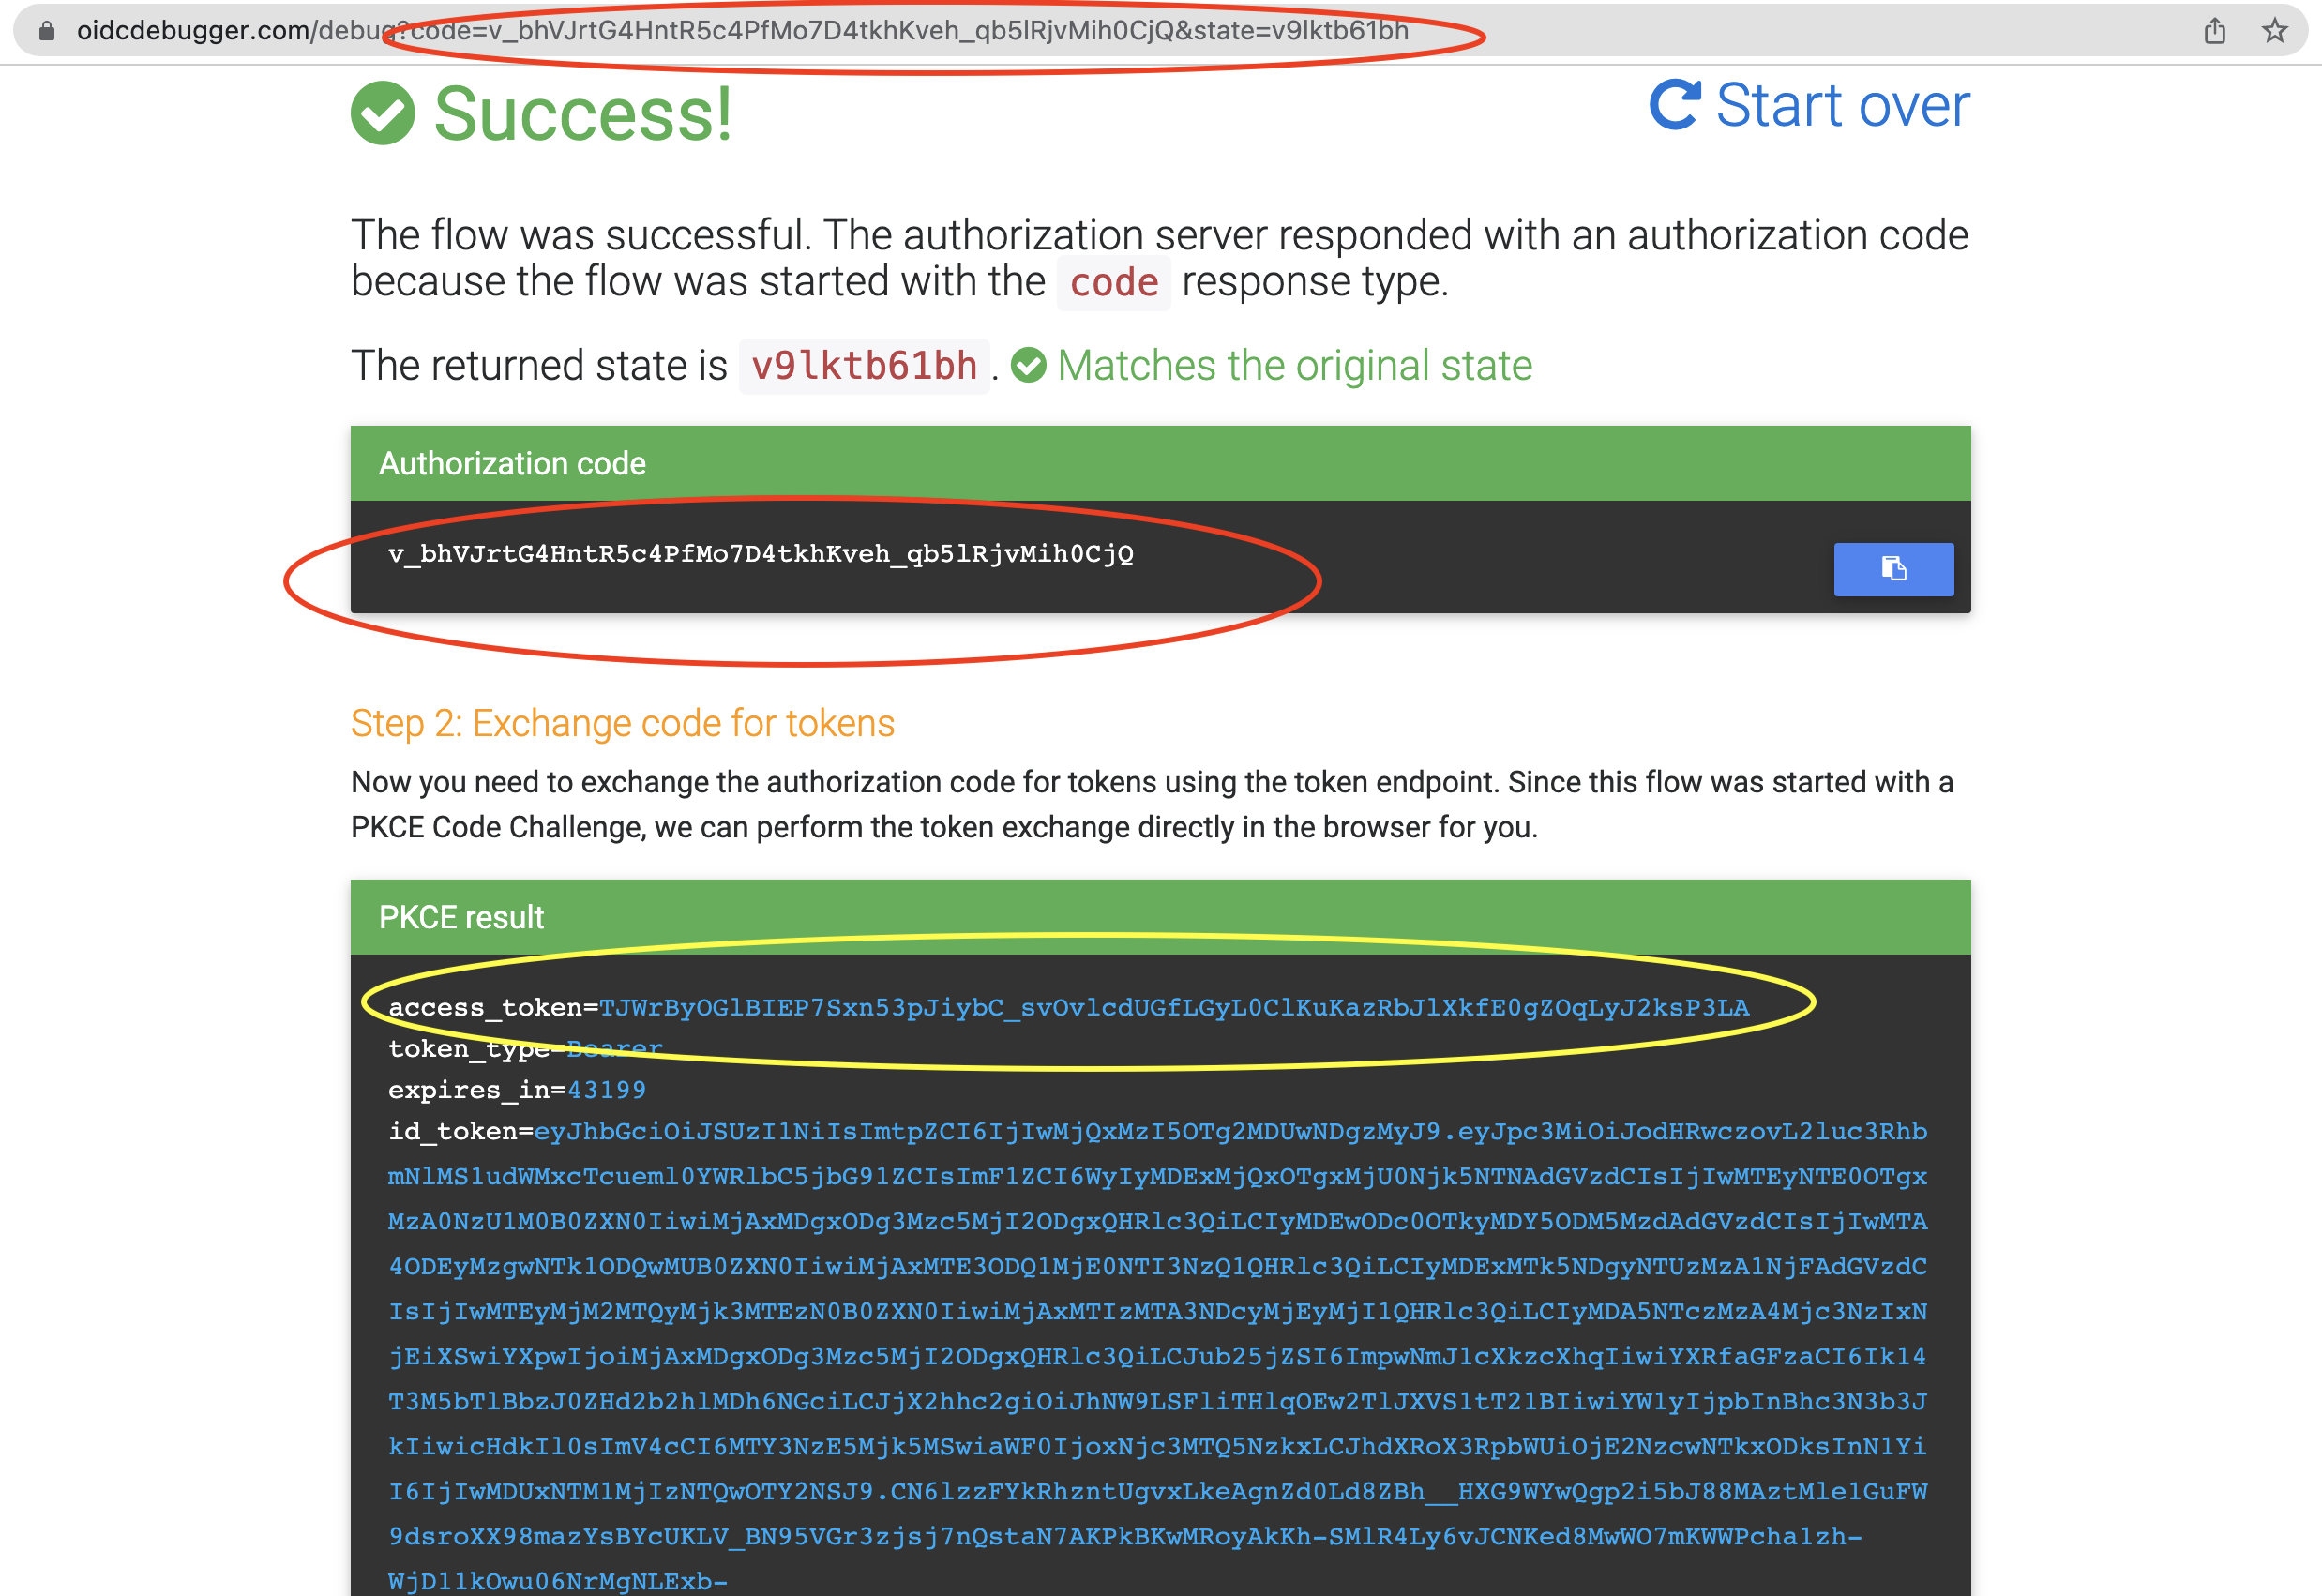
- If the authentication is successful, the user will be redirected to https://oidcdebugger.com/debug. There you will see the authorization code appended to the URL. The OIDC Debugger goes the extra step of making a back-channel request to the token endpoint for us to get the access token. So, you will see the response from the token endpoint too.
2.3.3 Exchange the Authorization Code for the Access Token
Even though the OIDC Debugger already called the ZITADEL token endpoint and exchanged the authorization code for the access token for us, let’s go ahead and see how we can make that request ourselves.
-
Note down your authorization code from the previous step. We will also need the code_verifier from previously.
-
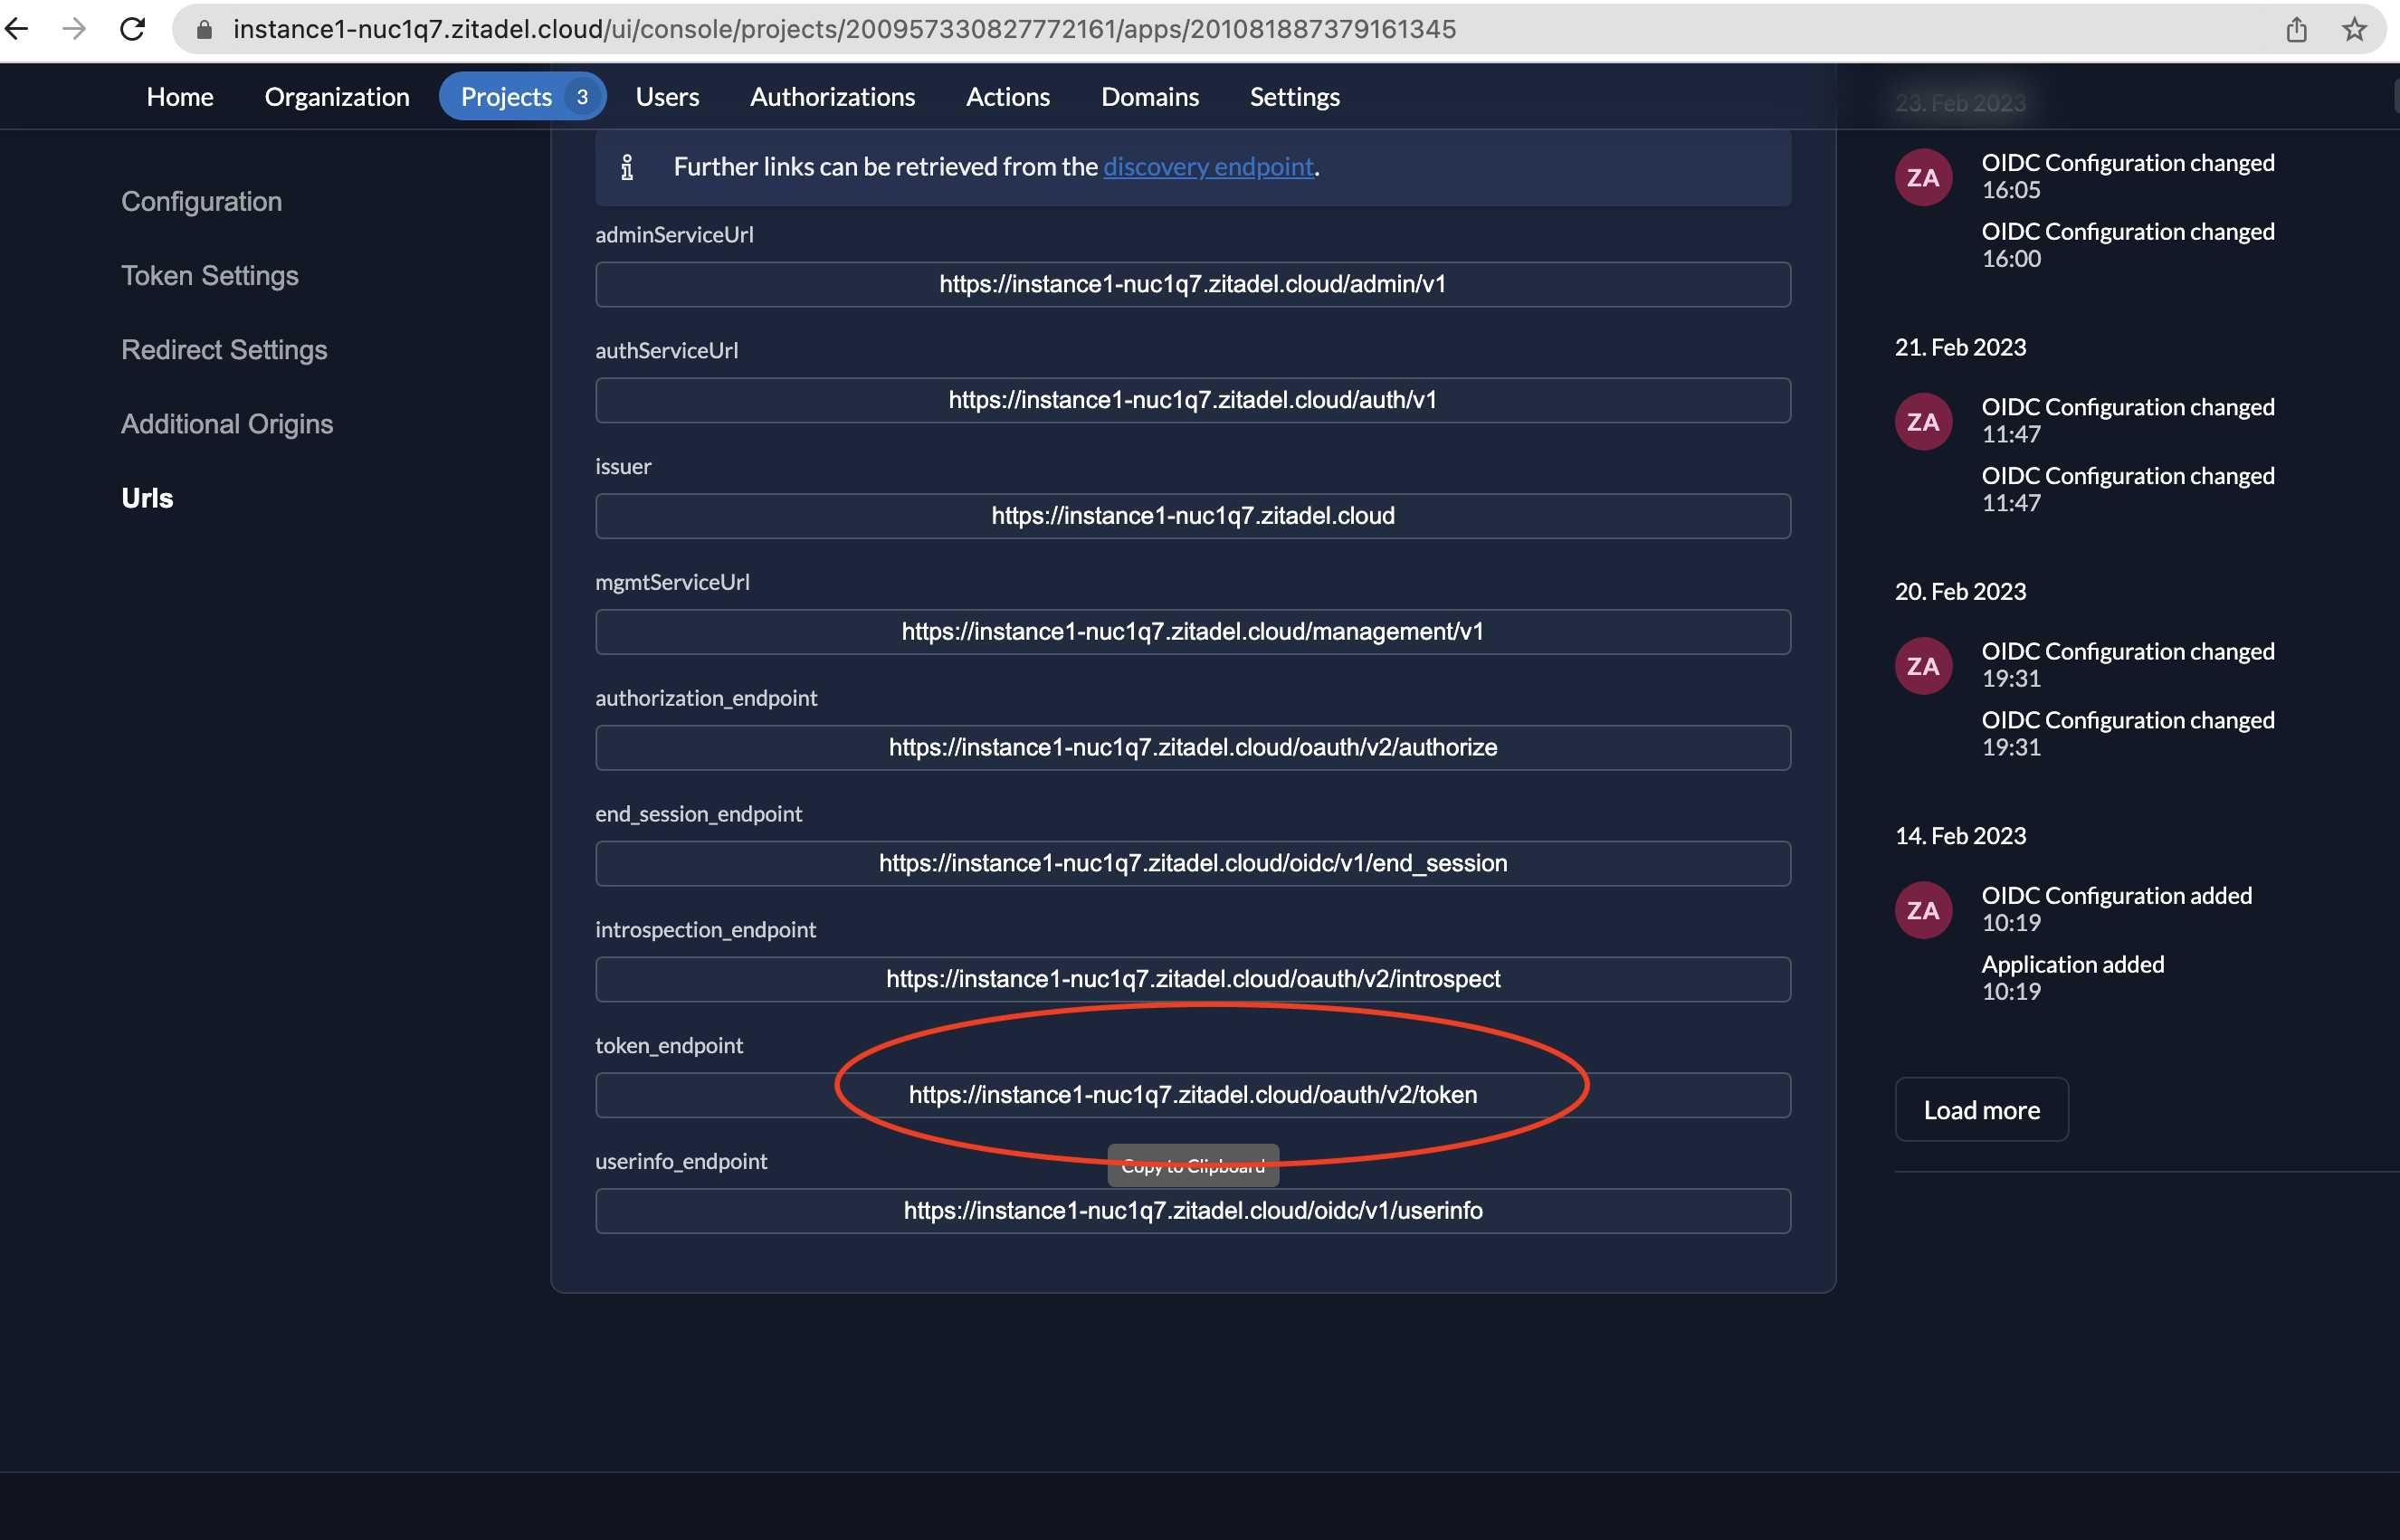
We are going to send a back-channel request to the token endpoint of your ZITADEL instance to exchange the authorization code for an access token. Go to your application and select URIs on the left menu and then copy the token_endpoint.
- The request will be sent to the token endpoint, typically with a request method of POST and the following parameters in the request body:
- grant_type=authorization_code (indicates that the server is exchanging an authorization code for an access token)
- code: The authorization code you received
- client_id: Identifies the web application to the authorization server
- redirect_uri: https://oidcdebugger.com/debug
- code_verifier: The code verifier used to generate the code challenge earlier, which was auto-generated by the OIDC Debugger
- Open your terminal to send a cURL request in the following format:
curl --request POST \
--url <YOUR_TOKEN_ENDPOINT>\
--header 'Content-Type: application/x-www-form-urlencoded' \
--data grant_type=authorization_code \
--data code=<YOUR_AUTHORIZATION_CODE> \
--data redirect_uri=https://oidcdebugger.com/debug \
--data client_id=<YOUR_CLIENT_ID> \
--data code_verifier=<YOUR_CODE_VERIFIER>
Here's an example of what the request looks like:
curl --request POST \
--url https://instance1-nuc1q7.zitadel.cloud/oauth/v2/token \
--header 'Content-Type: application/x-www-form-urlencoded' \
--data grant_type=authorization_code \
--data code=v_bhVJRTgqYWGmFCrxKnqBu_RD5rs2WoB--BvT_S5CfJeHRgbw \
--data redirect_uri=https://oidcdebugger.com/debug \
--data client_id=201081887379226881%40test \
--data code_verifier=3WI9I6J3hPKEqedZaEejJfzmHHCMVvDLVtdsdzTN6
- If ZITADEL validates the request and the access token is issued successfully, it will return the access token. The response from the ZITADEL token endpoint will be in the following format:
{"access_token":
"pf5nr0ZCNDeKSmCmuCm3X9D9Zgehgs9C98_YNtVxZVnsy4APWYnGkGdf1XpsuocFatK8rvc",
"token_type":"Bearer",
"expires_in":43199,
"id_token":"eyJhbGciOiJSUzI1NiIsImtpZCI6IjIwMjA5ODQ1MDc1NjUzNDUyOSJ9.eyJpc3MiOiJodHRwczovL2luc3RhbmNlMS1udWMxcTcueml0YWRlbC5jbG91ZCIsImF1ZCI6WyIyMDExMjQxOTgxMjU0Njk5NTNAdGVzdCIsIjIwMTEyNTE0OTgxMzA0NzU1M0B0ZXN0IiwiMjAxMDgxODg3Mzc5MjI2ODgxQHRlc3QiLCIyMDEwODc0OTkyMDY5ODM5MzdAdGVzdCIsIjIwMTA4ODEyMzgwNTk1ODQwMUB0ZXN0IiwiMjAxMTE3ODQ1MjE0NTI3NzQ1QHRlc3QiLCIyMDExMTk5NDgyNTUzMzA1NjFAdGVzdCIsIjIwMTEyMjM2MTQyMjk3MTEzN0B0ZXN0IiwiMjAxMTIzMTA3NDcyMjEyMjI1QHRlc3QiLCIyMDA5NTczMzA4Mjc3NzIxNjEiXSwiYXpwIjoiMjAxMDgxODg3Mzc5MjI2ODgxQHRlc3QiLCJhdF9oYXNoIjoiZ2R6YkdUNmc0ZDdiTFZSbmpVYjFidyIsImNfaGFzaCI6Ilp6VlpqY2ZGXzN3enVGYk10ai1LOVEiLCJhbXIiOlsicGFzc3dvcmQiLCJwd2QiXSwiZXhwIjoxNjc3MDA0MzM4LCJpYXQiOjE2NzY5NjExMzgsImF1dGhfdGltZSI6MTY3Njk2MDczMiwic3ViIjoiMjAwNTE1MzUyMjM1NDA5NjY1In0.xrJfMhitwPqJQED-TnMdv0K5rzT_HtR0rzqDd_bYbST1fWjczVosO5jVRSxNlaA5kXhaBwuIKCMLHLFZKztvCFhG2haMYs6FldB7iynBEyOUX-ZcPGiTuAfQVgqG-rWPVZj5MKHZLVwrFelKzX1TQ9dk2-avwxA9S-4-39Ai-Ac_ypbwobvBwTp056kLib6GfLzNJd_t0VxU_LtyV25WyipAlHYUTXVzgYHn1he_y1ZL4yOwPdGVIYBf5yOz_vMdfLVINtJq5G260TCCCZZo3UcPscmaet3JY5HczXAJJnsXpHpWibPgN1gw5ehaAB10ela8N4ZS-16a9ry2Wr6H-g"}
2.3.4 Access Protected Resources Using an Access Token
- The web application can now use the access token to access protected resources on behalf of the user, by including the token in the Authorization header of the API requests to the resource server. For example here is a possible format of the API request from the web application server to the protected resource server:
curl -H "Authorization: Bearer pf5nr0ZCNDeKSmCmuCm3X9D9Zgehgs9C98_YNtVxZVnsy4APWYnGkGdf1XpsuocFatK8rvc" https://protected.example.com/api/protected-data/ -k -v
- And here’s a potential response from the protected resource server:
HTTP/1.1 200 OK
Content-Type: application/json

{
  "user_id": "12345",
  "orders": [
    {
      "order_number": "54321",
      "items": [
        {
          "name": "Inflatable unicorn horn for cats",
          "price": 9.99
        },
        {
          "name": "Giant googly eyes for your car",
          "price": 14.99
        },
        {
          "name": "Squirrel in underpants air freshener",
          "price": 4.99
        },
        {
          "name": "Selfie toaster",
          "price": 19.99
        }
      ],
      "total": 49.96
    }
  ]
}
2.4 Validate the ID Token
2.4.1 Obtain the ID Token
As discussed in the previous post, if your client application requires authentication and would like to obtain information about the authenticated person, then it could do so with an ID token. The ID Token contains information about the end user; this information tells your client application that the user is authenticated and can also give you information like their username, email address, etc.
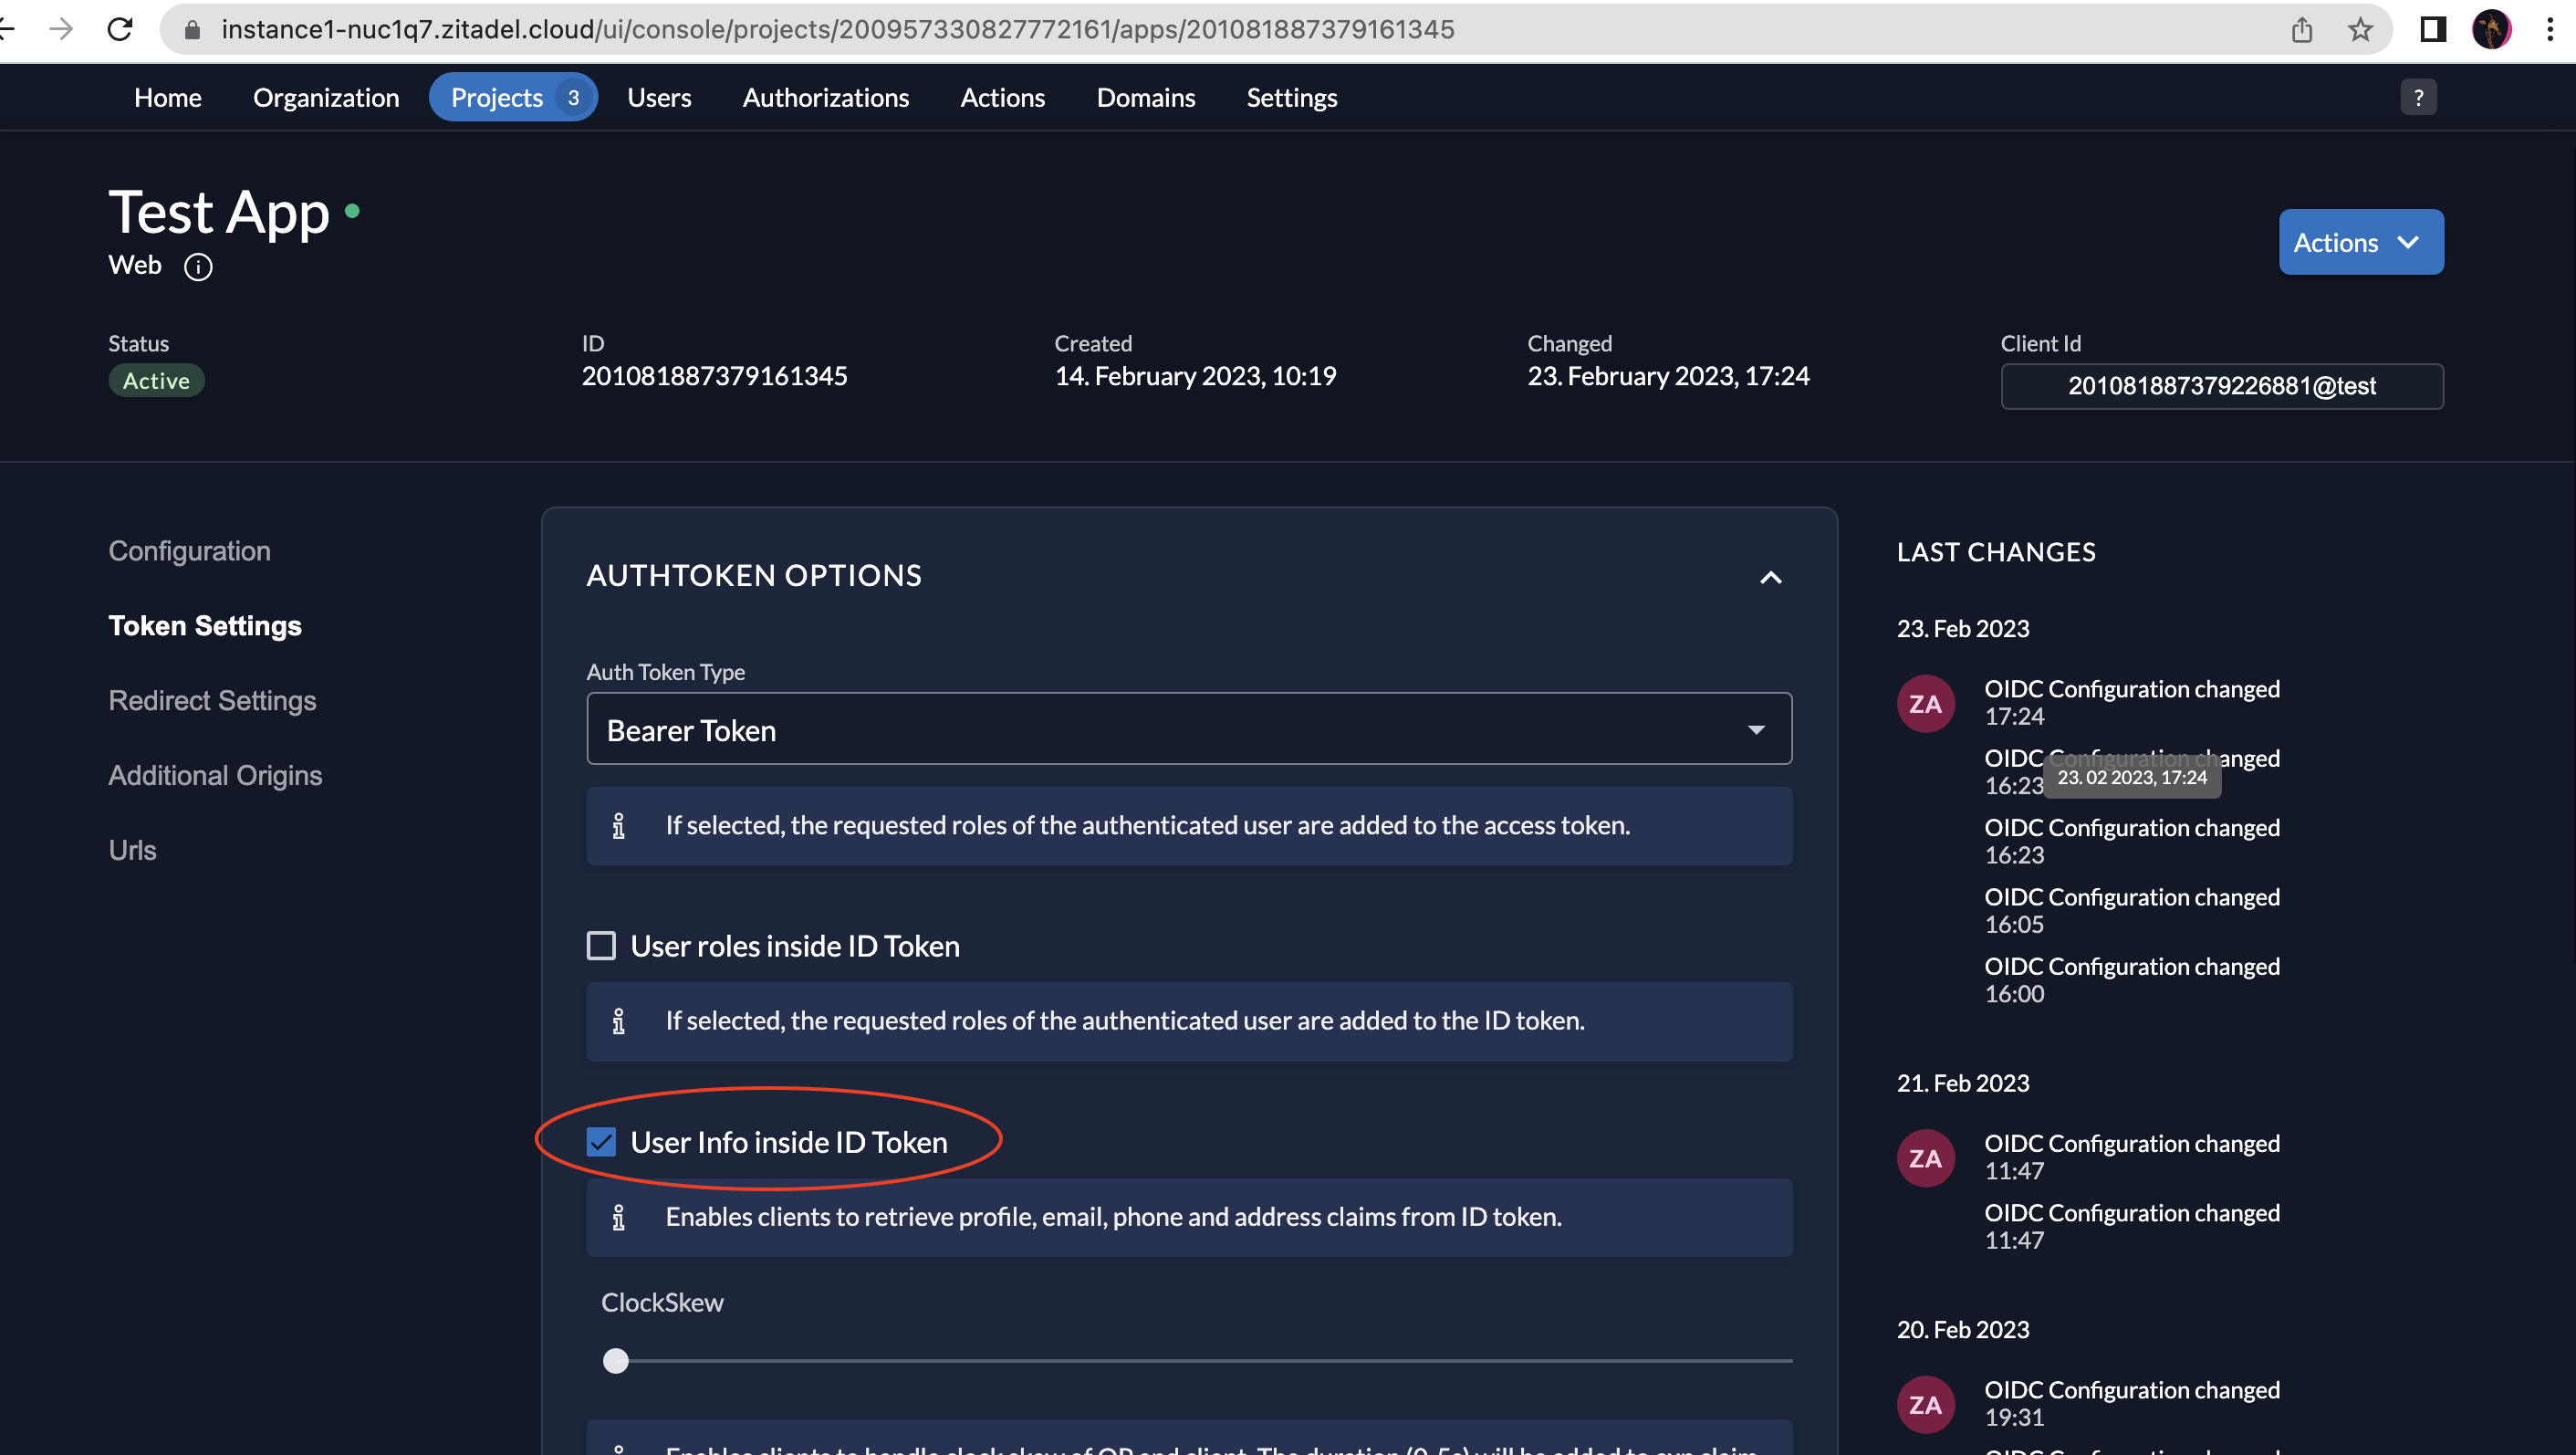
If you want to include certain information about the user in the ID token, you will have to enable this in your configuration.
- Go to your application and select Token Setting on the left menu and then select the User info inside ID Token checkbox as shown below.
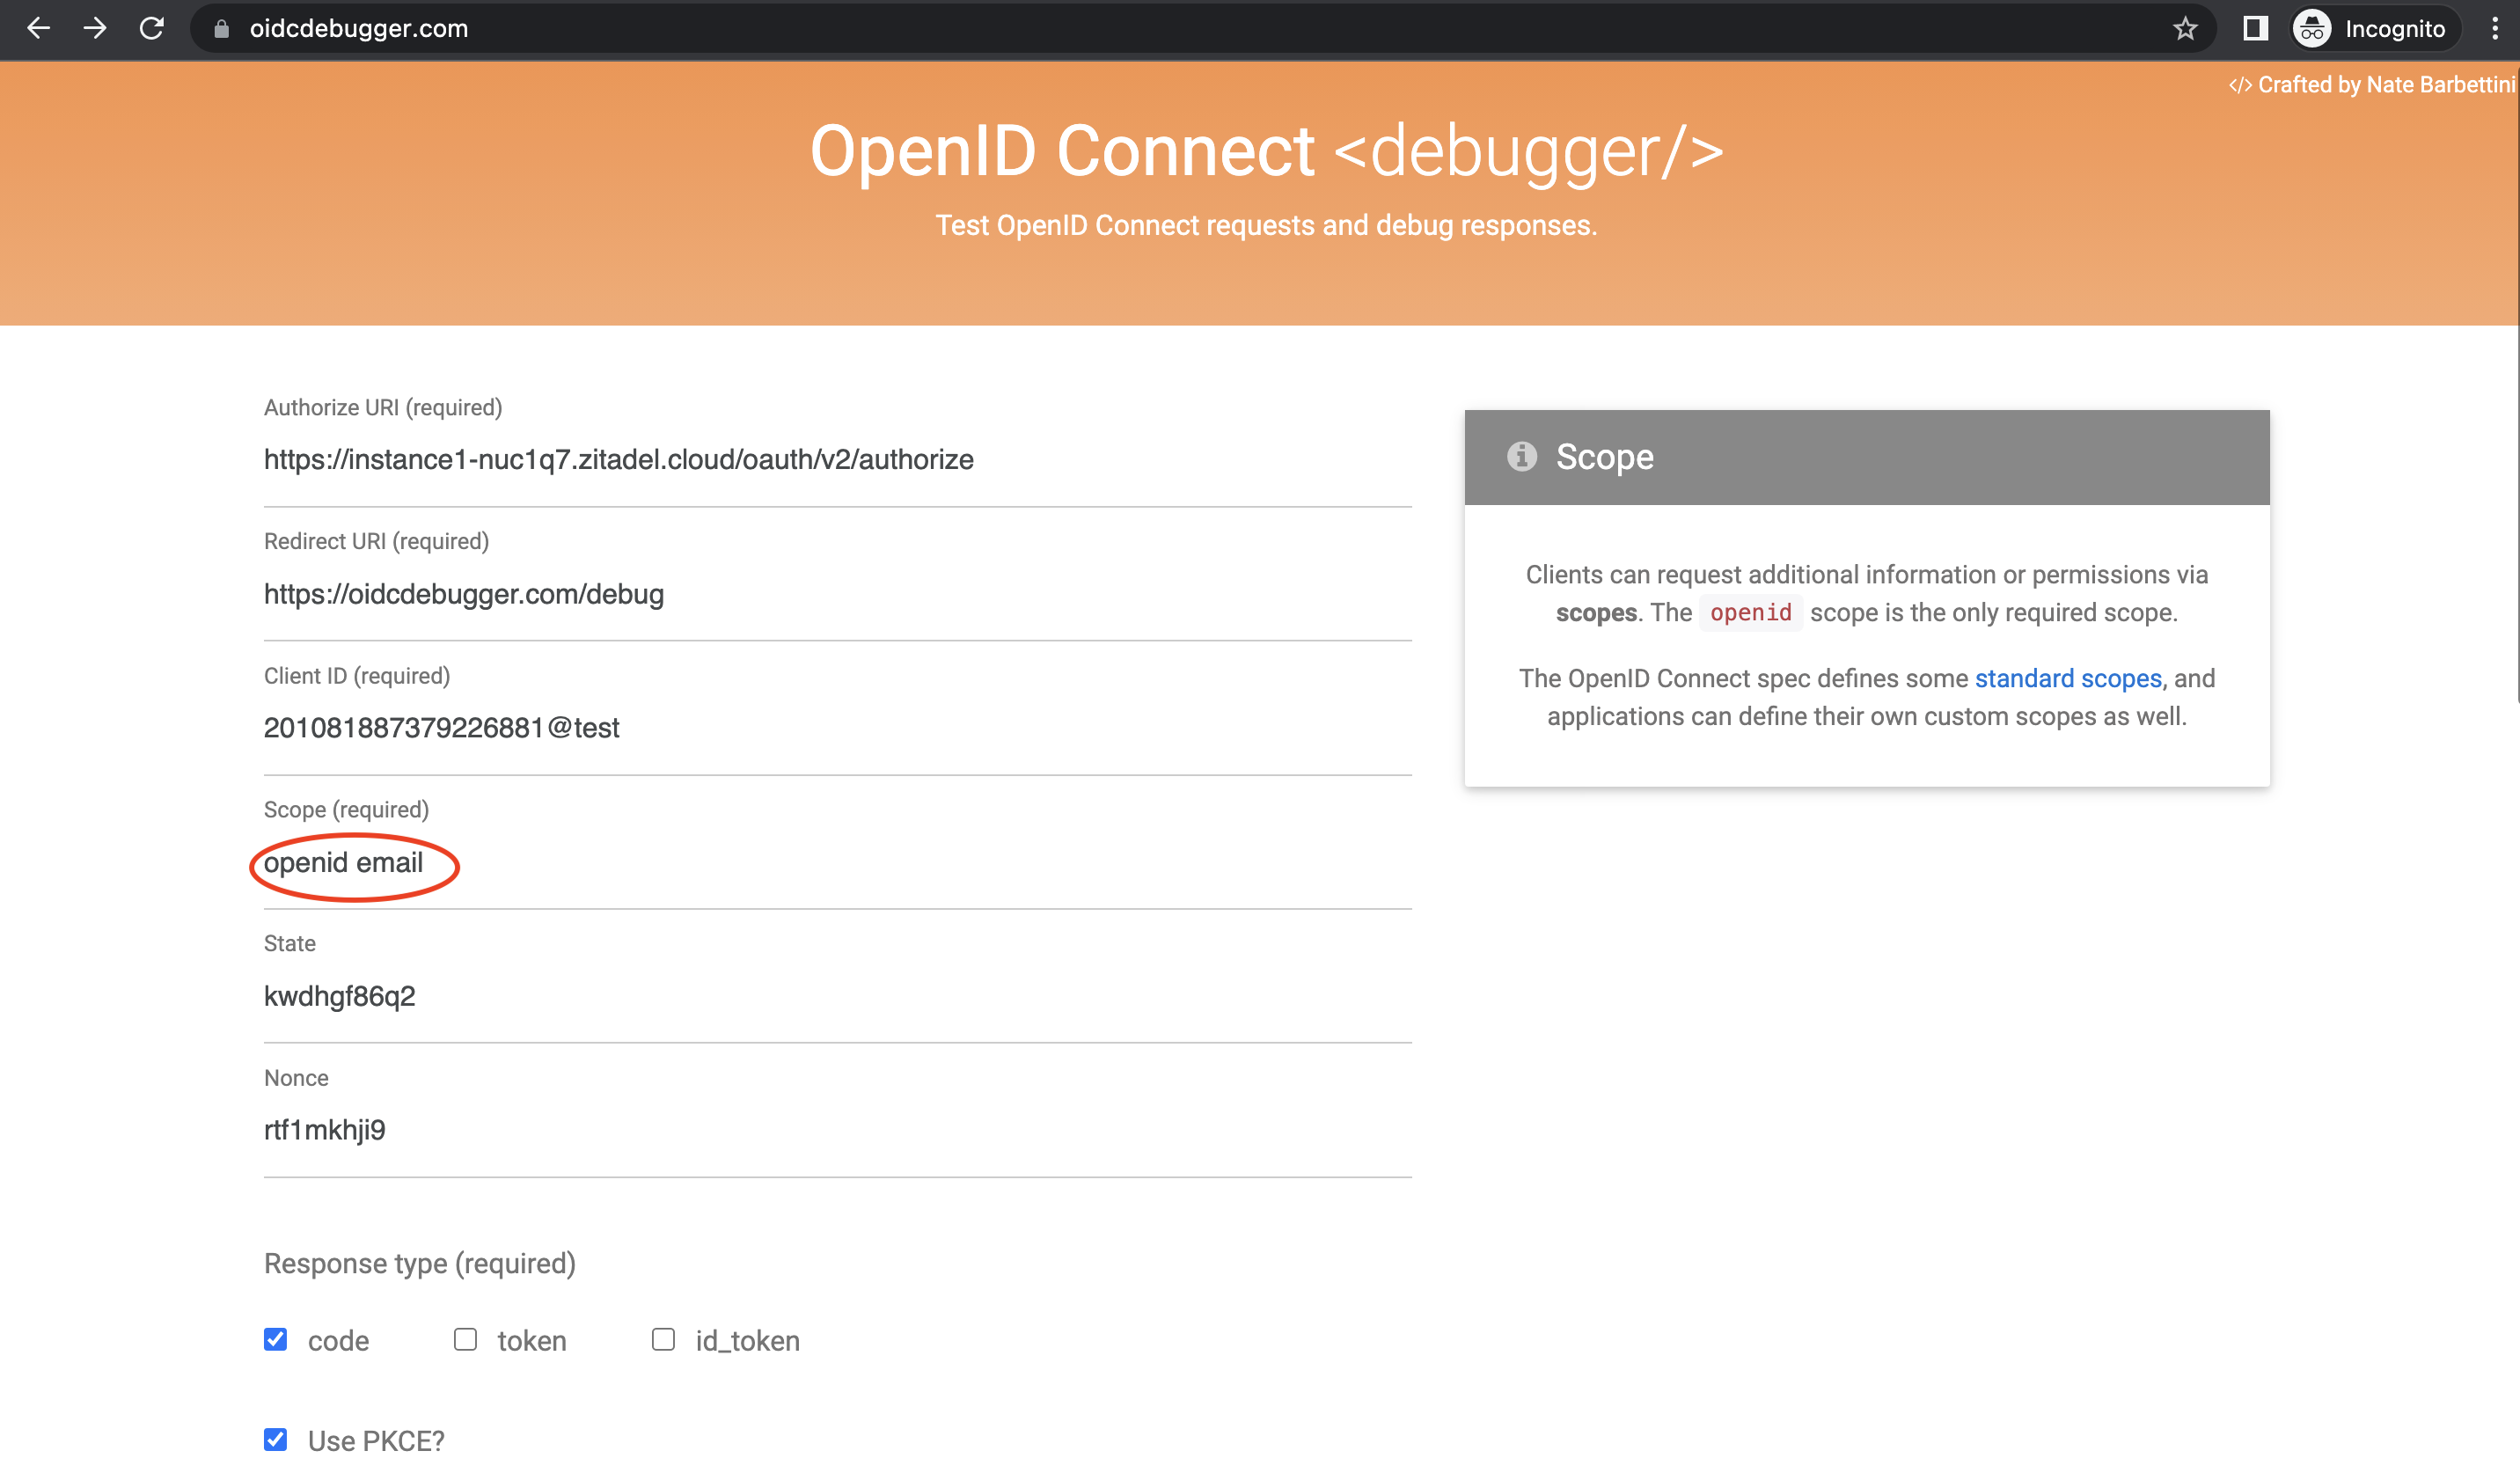
- And when you are sending your authorization request from the OIDC debugger (or via other means) add
emailto the scope along withopenidas shown below. You can also addprofileto get more information about the user. Let’s include justemailfor now.
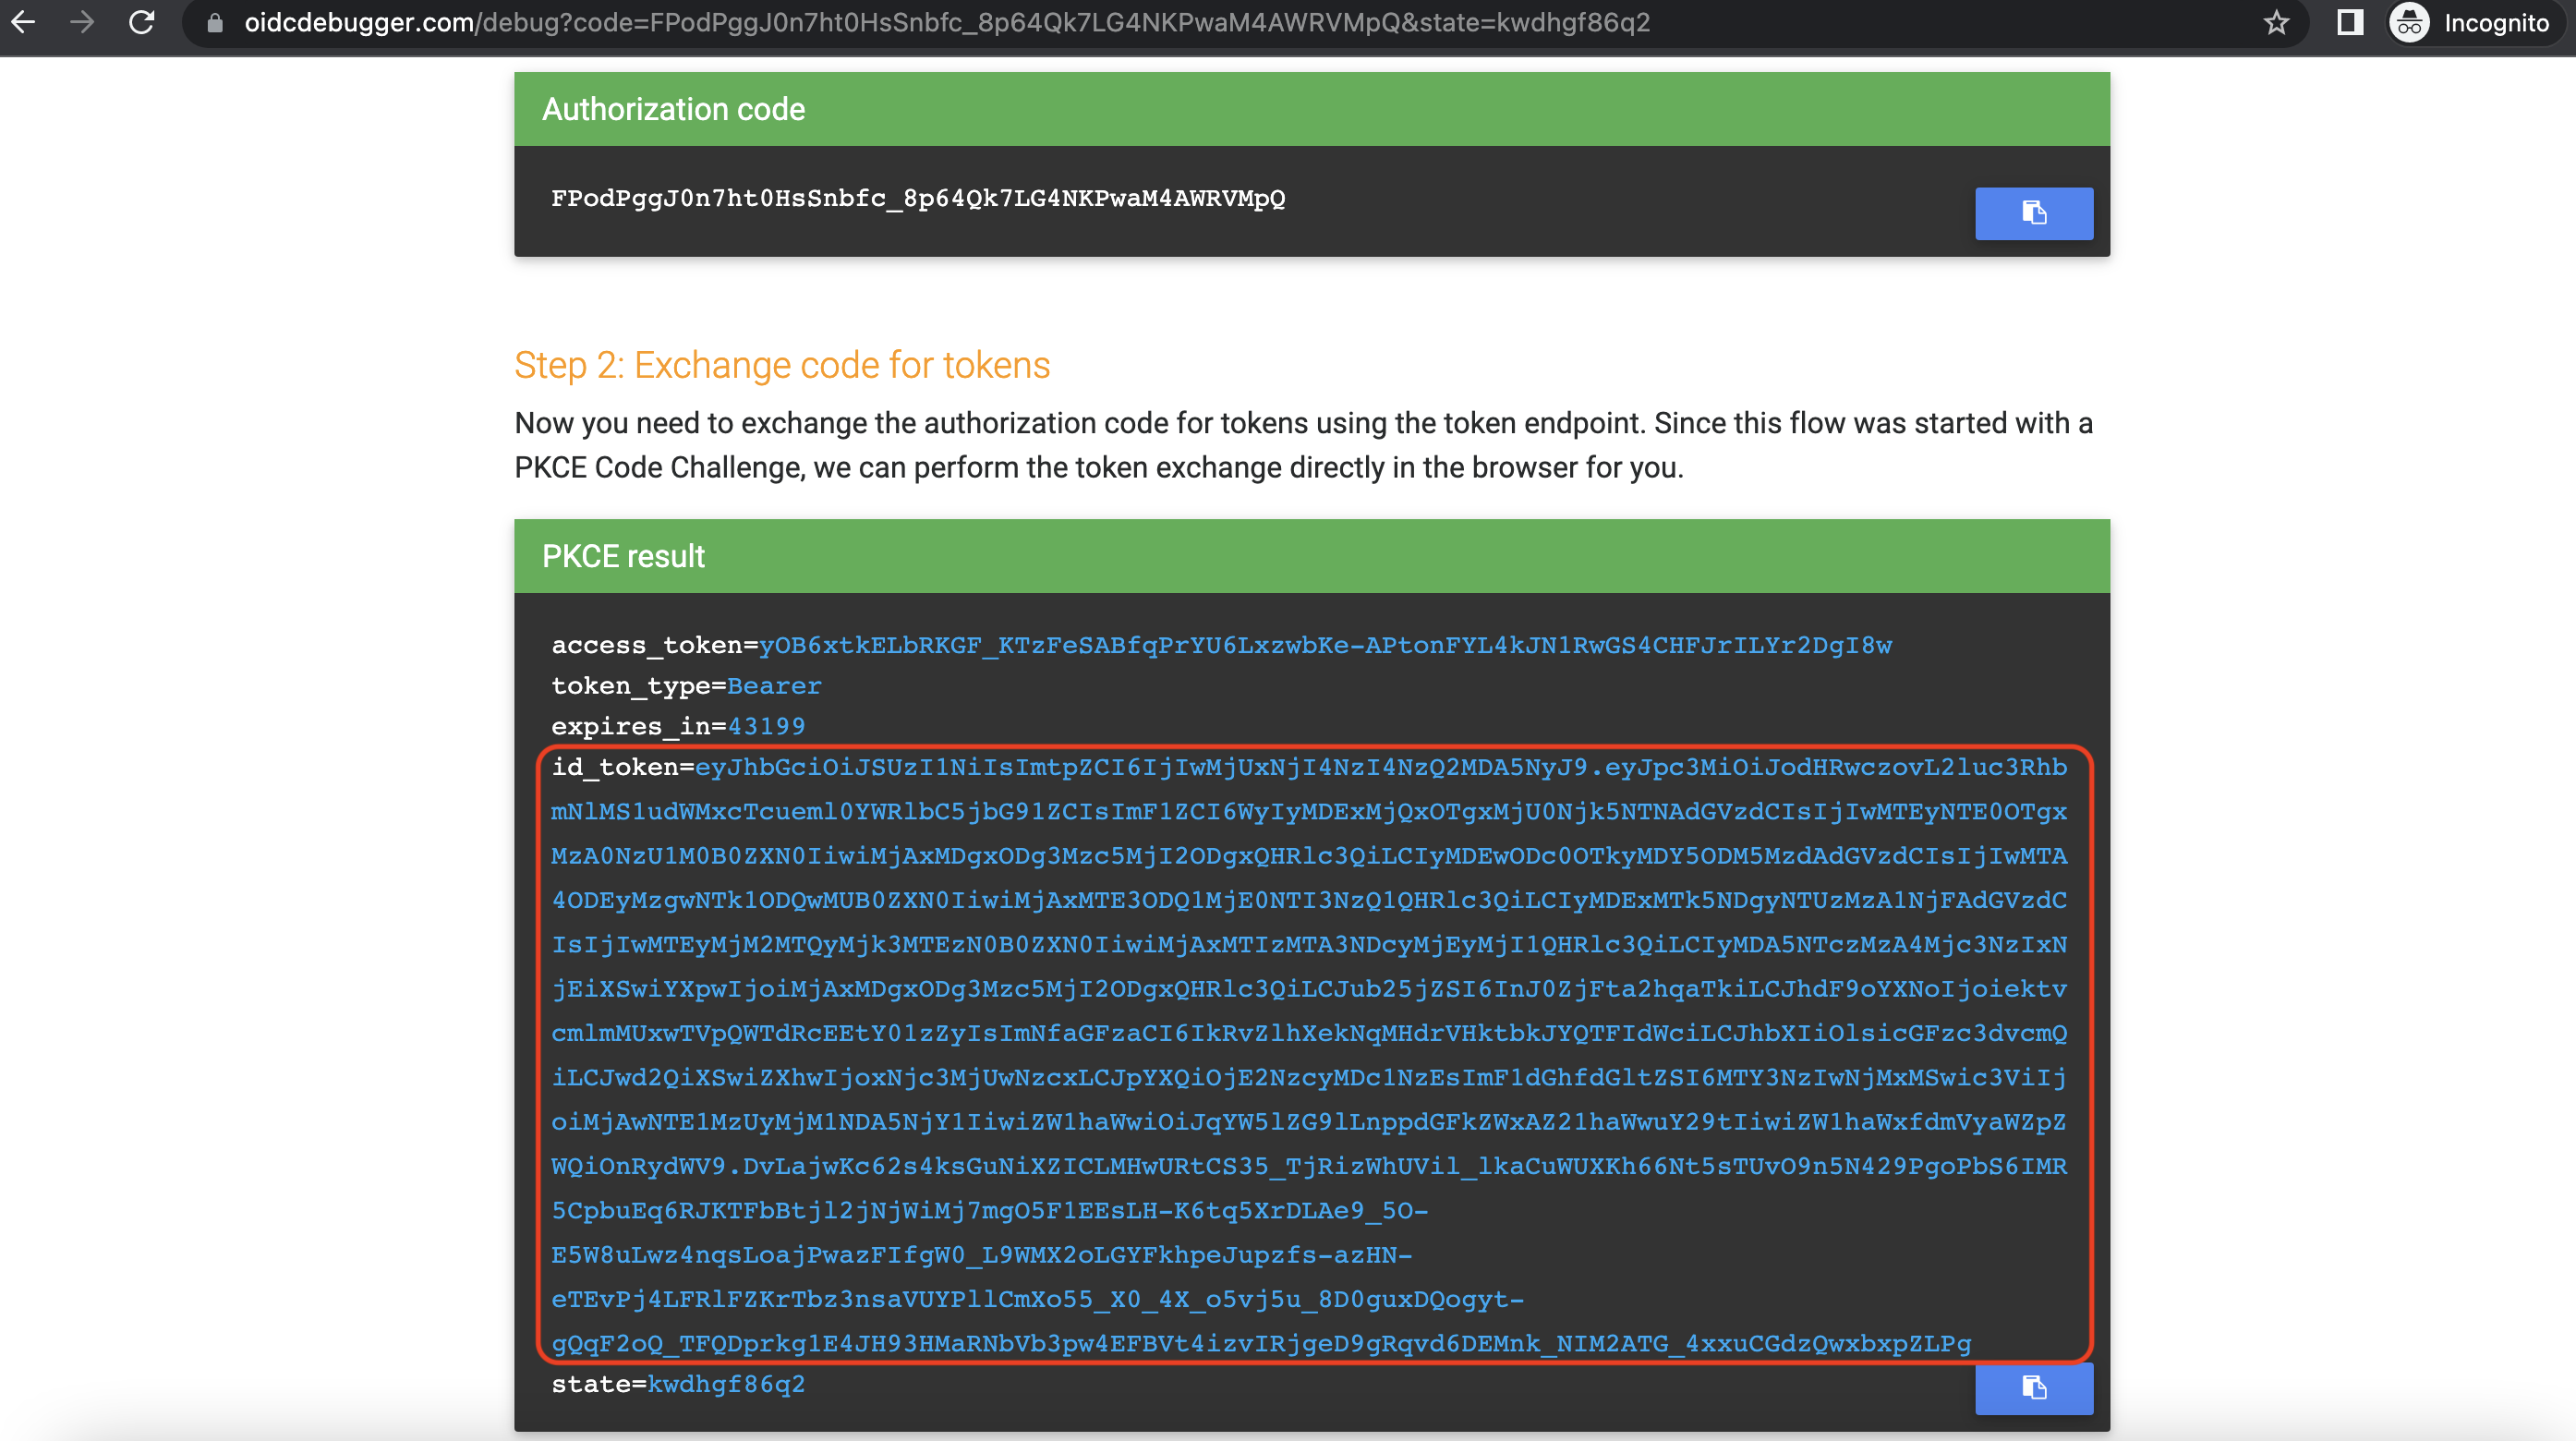
- Retrieve the access token and ID token as we did before. Copy the ID token.
- You can pass the ID Token to different components of your web application, and these components can use the token to confirm that the user is authenticated and also retrieve information about them.
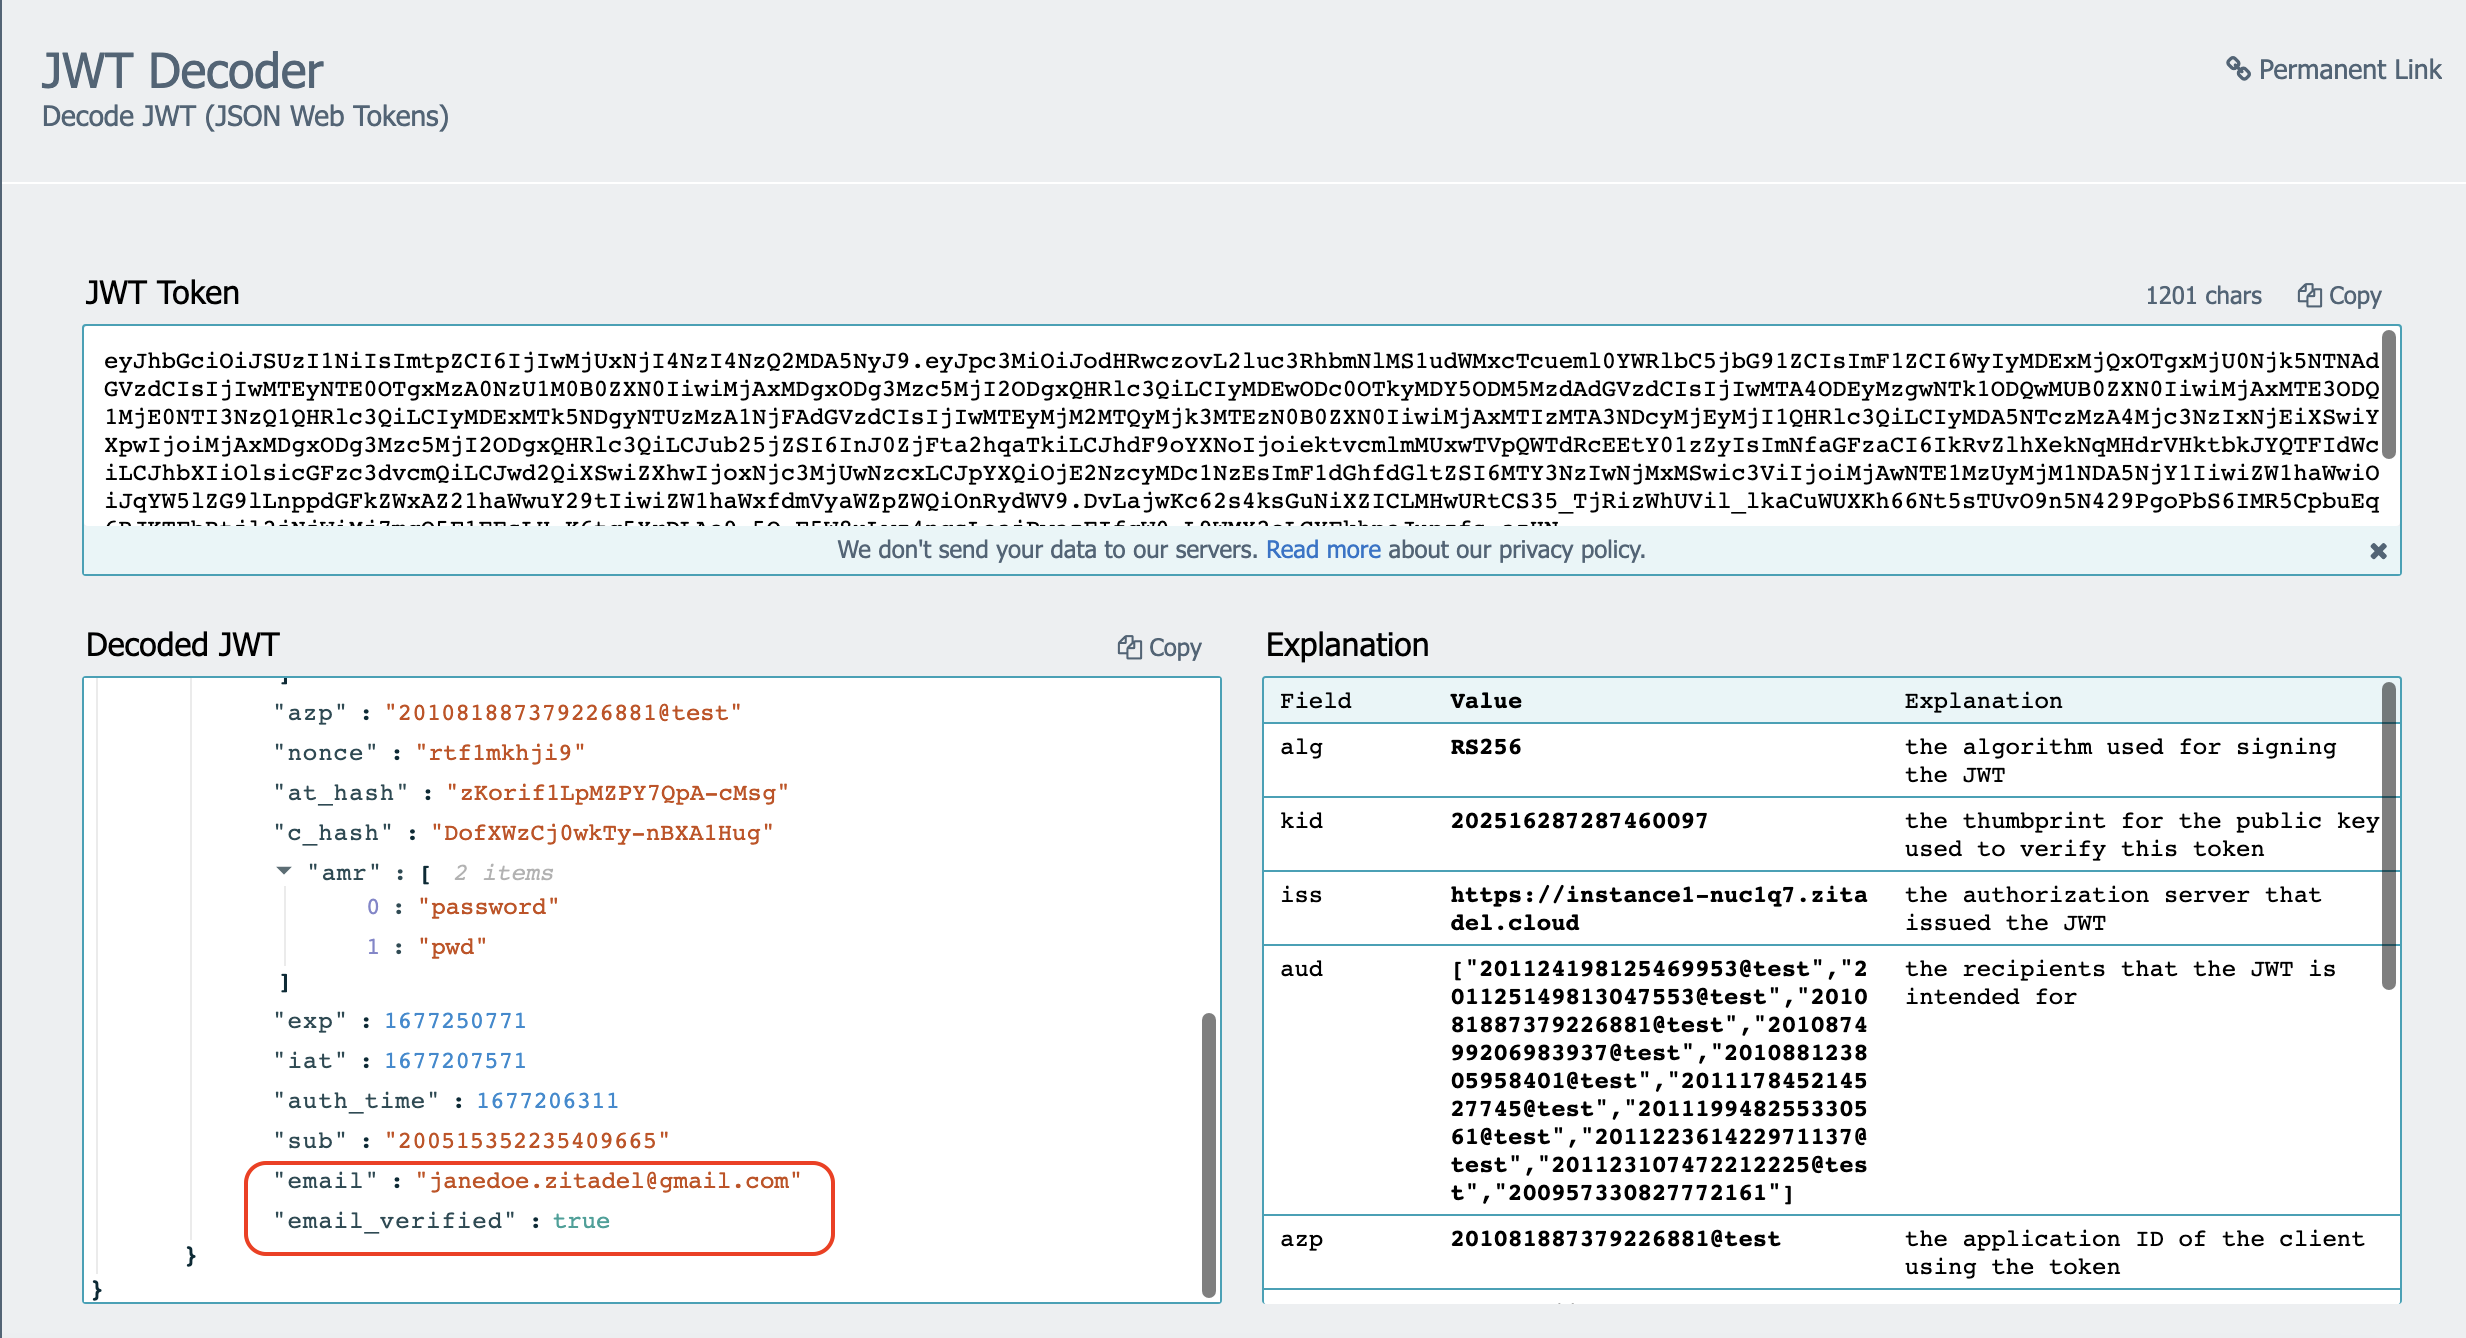
- Let’s decode the ID token, which is in JWT format and is signed using private JSON Web Keys (JWK), the specification for which you can find here.
- You can use a JWT library to decode your JWT in your web app. For now, use an online decoder, such as https://www.jstoolset.com/jwt and paste the copied ID token as shown below.
- In the decoded section, you will be able to see the user’s email address in addition to the other decoded details.
2.4.2 Validate the ID Token: Verify the Token Signature and Claims in the Application
You can verify the access or ID token's signature in your application by matching the key that was used to sign in with one of the keys that you retrieved from your ZITADEL Server's JWK endpoint. Each public key is identified by a kid attribute, which should correspond with the kid claim in the ID token header.
- To get your keys from the
jwks_uri, go to your application and select URLs on the left menu and then click on the discovery endpoint link as shown below.
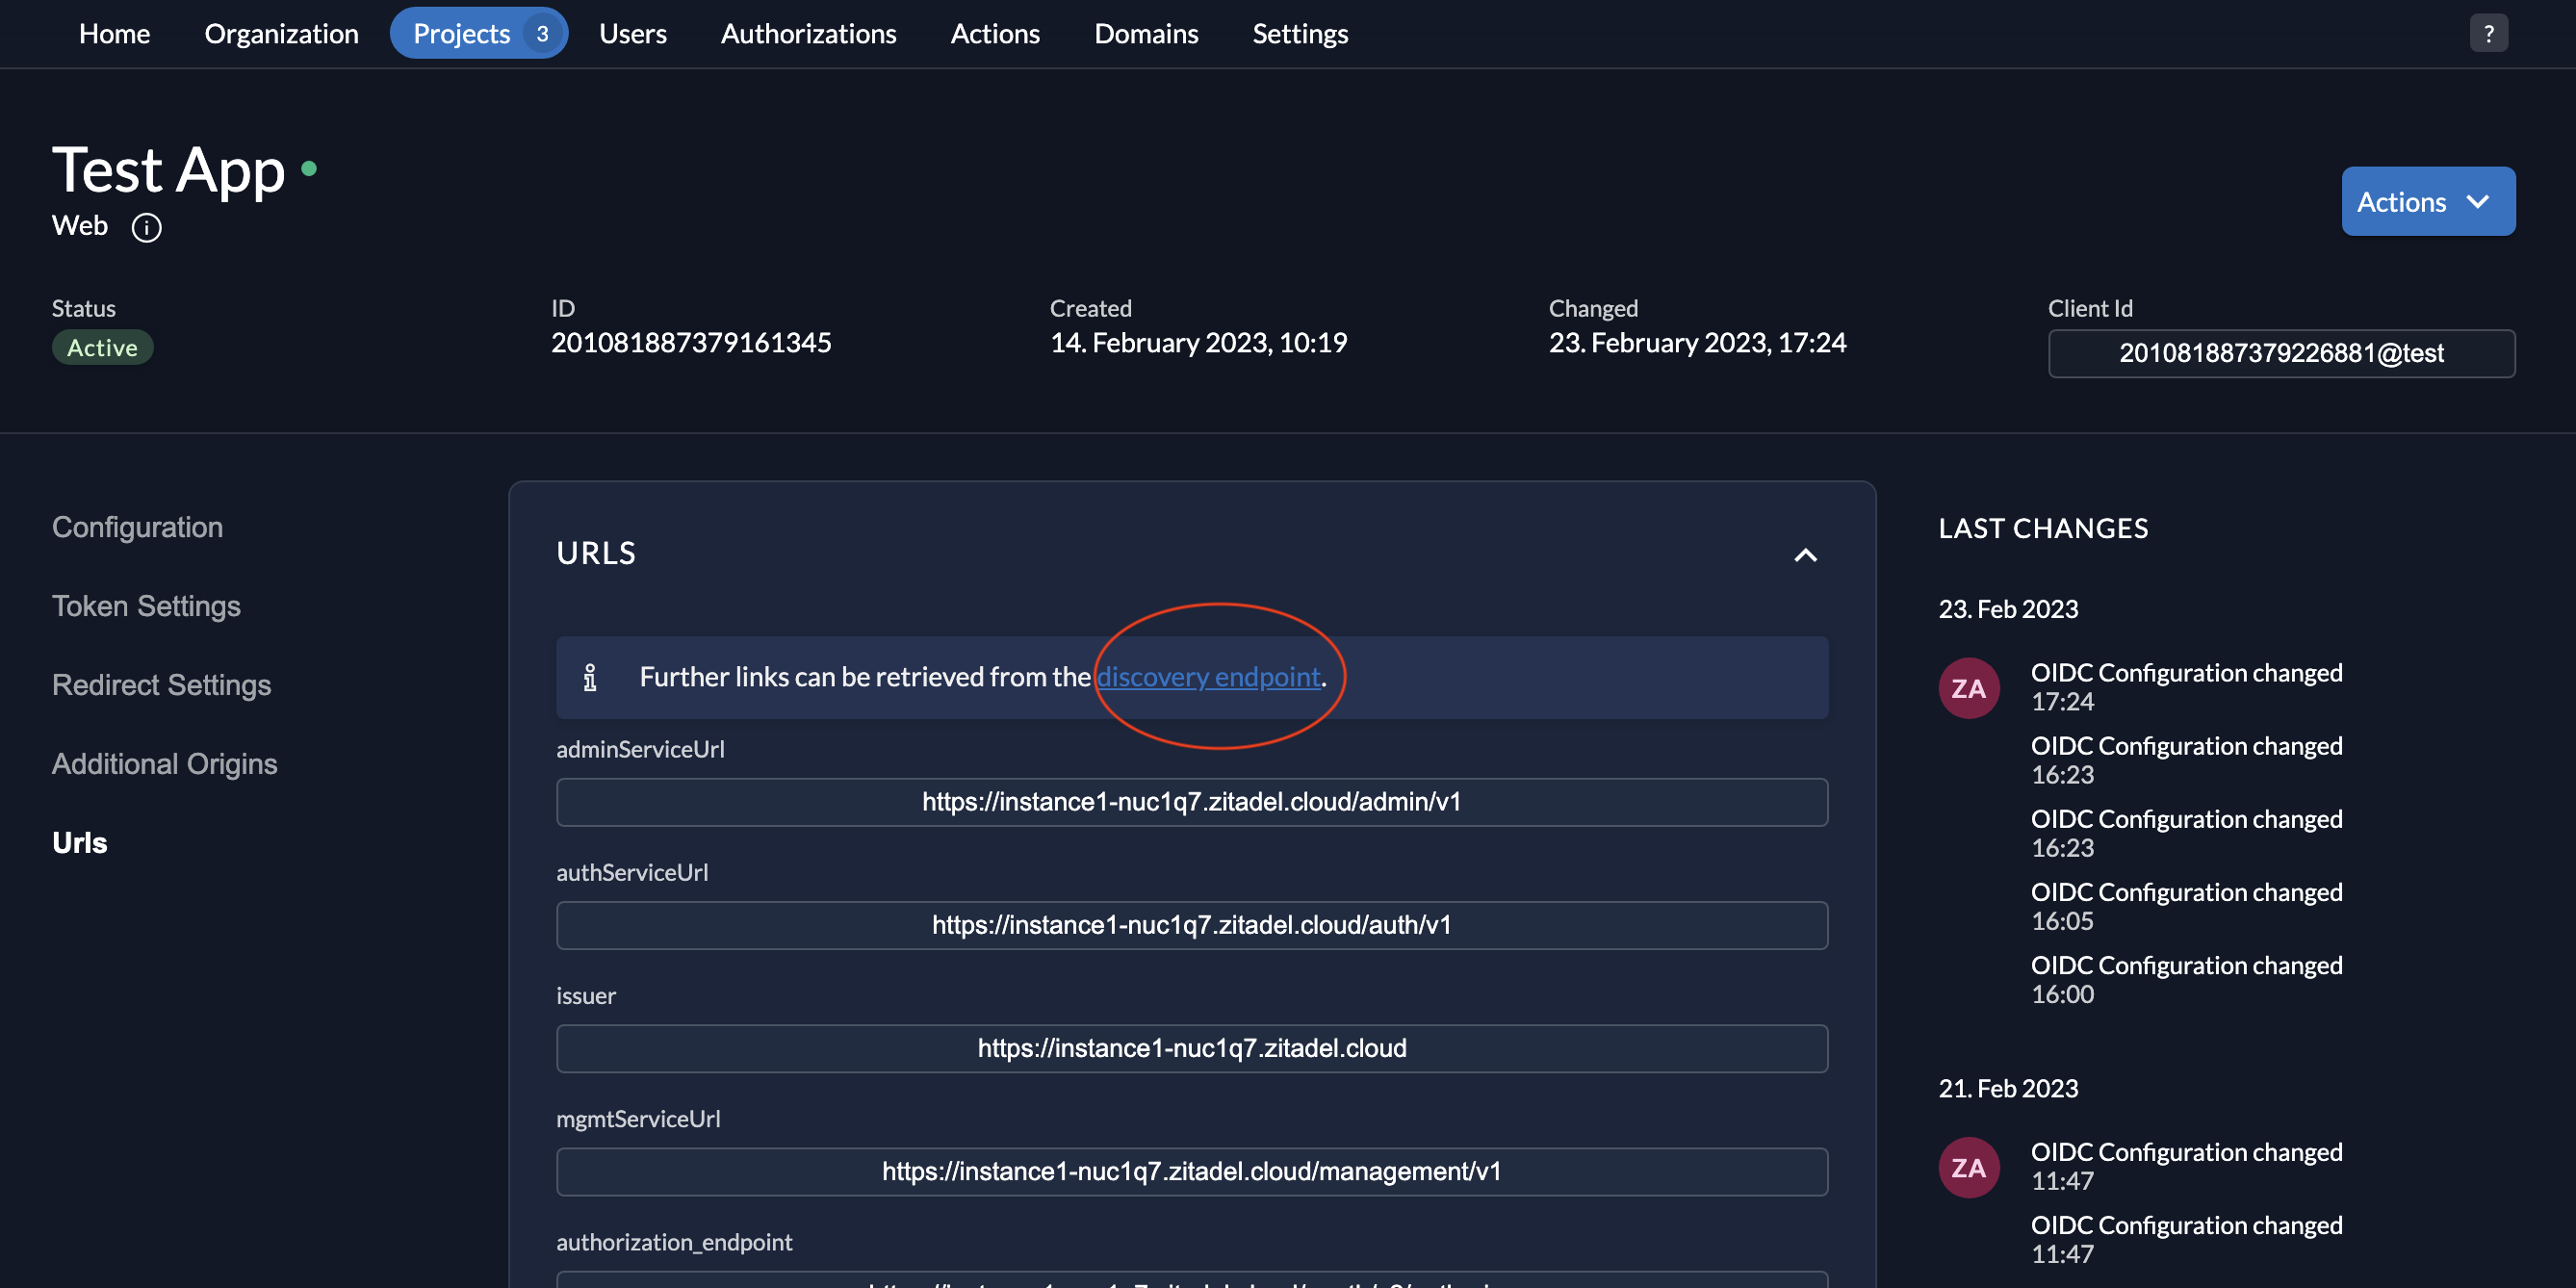
- You can then see the
jwks_urias shown below:

- Go to the
jwks_urito see if thekidclaims match. If they don’t, the signing keys may have changed. If this happens, try retrieving the keys again.

- You could also verify the following claims of the JWT in your application based on your requirements:
- The
iss(issuer) claim should be the ZITADEL issuer URL. - The
aud(audience) claim should match the Client ID that you used to request the ID Token. - The
iat(issued at time) claim indicates when this ID token was issued, expressed in Unix time. - The
exp(expiry time) claim is the time at which this token will expire., expressed in Unix time. This time should not have already passed. - The
nonceclaim value should match the nonce value that you passed when you requested the ID token.
3. Secure a Single Page Application (SPA) Using Authorization Code (with PKCE)
Let’s secure a React-based Single Page Application (SPA) using ZITADEL. The React application will allow users to securely log in to ZITADEL using Authorization Code (with PKCE) and will display the user’s information once they log in.
3.1 The OIDC Flow
The flow will be as follows:
- The user navigates to the React app (client) and clicks the "login" button.
- The app initiates the authorization process by redirecting the user’s browser to the authorization endpoint of the ZITADEL instance, along with the PKCE parameters (code challenge, and code challenge method).
- The user will see the ZITADEL login page, where the user can enter their credentials.
- After successful authentication, ZITADEL generates an authorization code and redirects the user back to the React app.
- The React app sends a request to the ZITADEL token endpoint, along with the authorization code and code verifier.
- ZITADEL verifies the code verifier to ensure that the authorization request is coming from the same client that initiated it. If it's valid, ZITADEL returns an access token to the React app.
- The React app uses the access token to make a request to the userinfo endpoint, which is protected.
- The userinfo endpoint returns information about the logged-in user, such as their name and email address.
- The React app displays this information to the user.
- When the user wants to log out, the React app sends a request to the ZITADEL logout endpoint, which clears the access token and ends the user's session.
- The user will be redirected to the login page of the app.
3.2 Create and Test the Single Page Application
You can follow this detailed step-by-step tutorial, which explains how you can set up ZITADEL to secure a Single Page Application and also includes the code for the React application with the functionality described above.
4. Closing Remarks
And with these examples, this post comes to an end. Hope you get to try out these examples with ZITADEL and the OpenID Connect Protocol. In the next part of this blog post, we will look into how ZITADEL can secure APIs with examples. By leveraging ZITADEL's secure and user-friendly authentication process, you can enhance the security and user experience of your applications.
In the meantime, do try out ZITADEL for FREE!
Thanks for reading!