Use ZITADEL as SSO provider for self-hosting

Technical Writer
In the current IT ecosystem, it's not uncommon to see businesses and organizations relying on all kinds of software systems to address their unique business challenges. While these systems help organizations by providing their expected value, they introduce a security challenge where users have to manage their passwords for each system separately.
Having a lot of passwords causes all sorts of problems, including increased customer support tickets to reset passwords, degraded user experience when logging into each system separately, and management challenges for corporate users if they have to be added or removed from multiple systems in the organization.
This is where single sign-on (SSO) comes to the rescue. SSO enables you to delegate the users' account creation and management to a central authentication server. Instead of separately managing a username and password for each application in your organization, your applications delegate the authentication to a trusted SSO server.
In this tutorial, you'll learn what benefits SSO brings to the table. You'll learn how to delegate access from a self-hosted Nextcloud service to ZITADEL as an SSO provider utilizing the OpenID Connect (OIDC) protocol.
Key Benefits of SSO
SSO is beneficial because it provides a better user experience. For instance, SSO makes it seamless for the user to access multiple systems smoothly and quickly without being interrupted by password logins. A side effect of this benefit is an increased software adoption rate, as onboarding any new software application will be a matter of integrating it with the SSO server.
In addition, password reset tickets are a significant support cost. By reducing the number of systems that require separate passwords, you'll decrease the number of password reset tickets (which, in turn, reduces cost).
SSO also provides higher security. Storing user accounts and passwords centrally enables you to harden them in one place—the SSO server. Moreover, you'll be able to easily revoke or grant users access by managing them from a single system rather than multiple scattered systems.
This is why you'll see SSO being widely used both internally on corporations and externally on software-as-a-service (SaaS) systems like Slack (which uses Google as an SSO provider).
How to Integrate ZITADEL SSO OIDC with Self-Hosted Nextcloud
Now that you know what SSO is and why you would want to use it, it's time to implement it using ZITADEL and the Nextcloud self-hosted service. The final architecture will look like this:
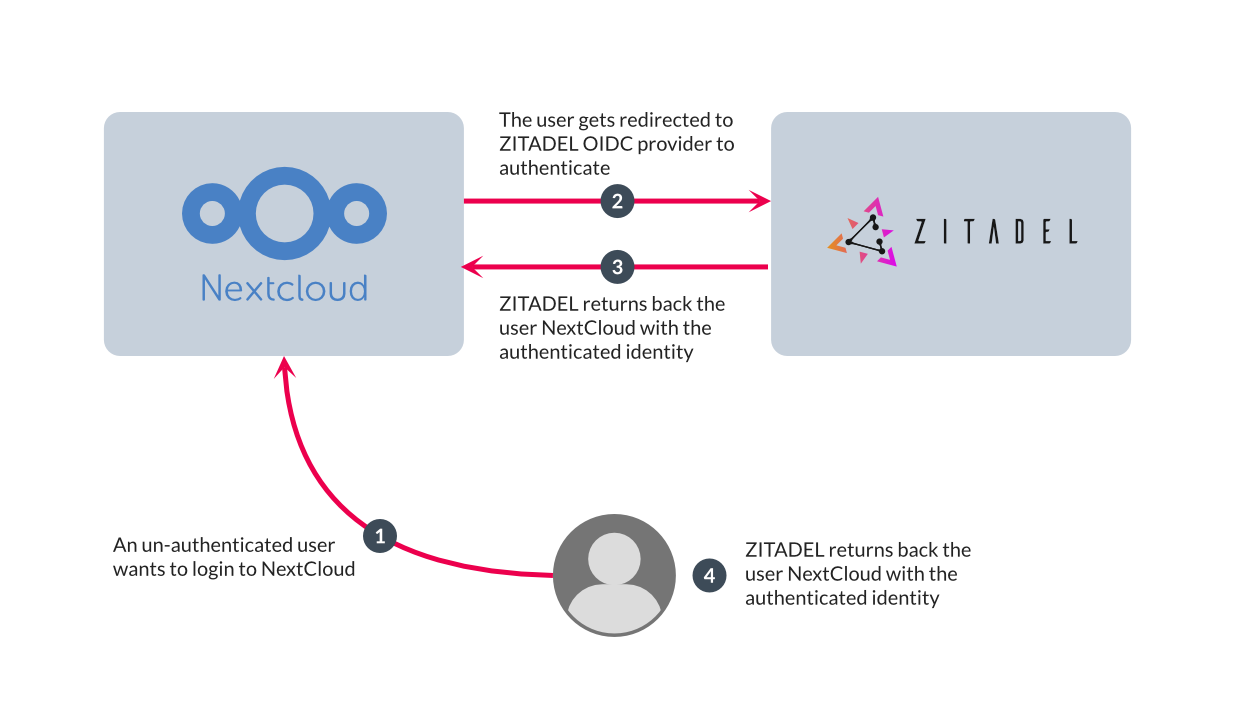
There are two major stages in this tutorial: creating a ZITADEL account and configuring Nextcloud as an OIDC client, and then creating a self-hosted Nextcloud container and integrating that into ZITADEL.
Create a ZITADEL Account and Configure Nextcloud as an OIDC Client
To begin, you’ll need to set up your self-hosted ZITADEL instance. Fortunately, you can do this easily using Docker.
To begin, use ZITADEL's Docker Compose guide to set up Docker. During the set up, you should receive another email from ZITADEL. Open the email and click Finish Initialization. You'll receive a prompt to create a new password for your ZITADEL instance. Create it and then select Next.
Please note: The password you created earlier differs from the password you just created. The password you specified earlier in this tutorial is for the ZITADEL customer portal, and the password you just created here is for the ZITADEL instance.
Select Skip to skip creating multifactor authentication and navigate back to the instance overview page.
In the instance UI console, click on the Projects tab. Then click Create New Project to set up a new OIDC provider:

Give your project a name (here, it's "my-first-zitadel-project") and click Continue. ZITADEL will now create your project and redirect you to the project settings page.
After you've created your ZITADEL project, you'll need to create an OIDC client app for the Nextcloud app you'll create later. In ZITADEL, an application represents a software that initiates the authorization flow, such as web and mobile apps. To start, click New to create a new application and fill in your application details. Here, the name is "cloud-next-app", and the application type is "Web" since Nextcloud runs as a web application.
Once filled out, select Continue. You'll be prompted to choose an authentication method: select CODE. PKCE is recommended for mobile and static clients. Then select Continue.
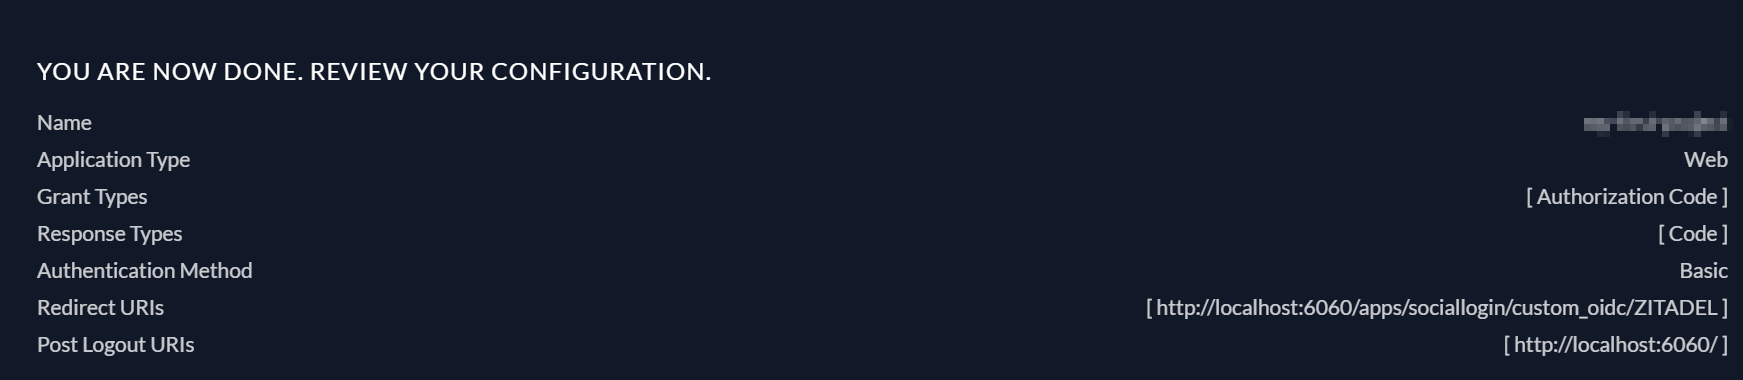
Now you need to define the redirect URLs for the Nextcloud application (which you'll configure later).
For Redirect URIs, put <http://localhost:6060/apps/sociallogin/custom_oidc/ZITADEL> and select +. For Post Logout URIs, put <http://localhost:6060/>; then hit + > Continue. You should see a confirmation screen with your options. Review them and click Create:
At this point, you'll be presented with a ClientId and ClientSecret. Please take note of them as you'll need them later:
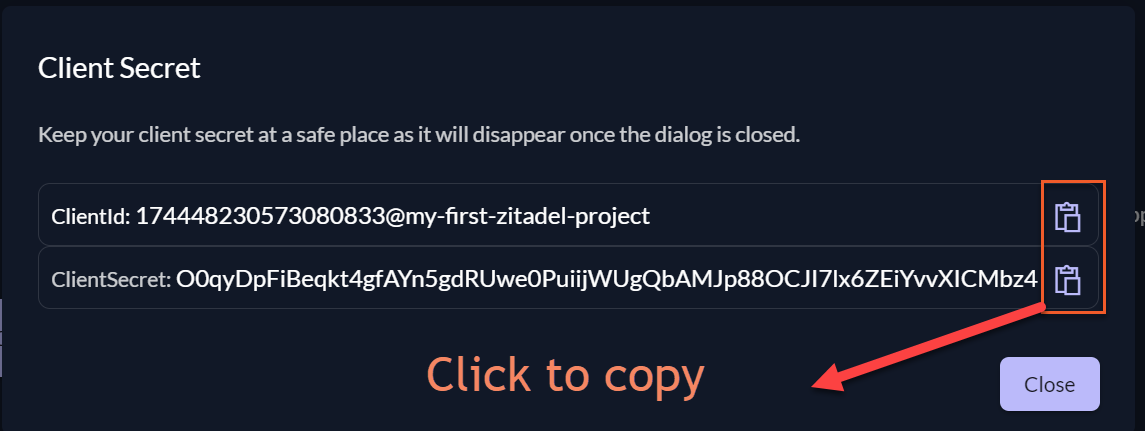
Once noted, select Close and then Redirect Settings on the left-hand side of your screen.
Since you'll deploy Nextcloud locally on a Docker container without HTTPS, you need to indicate to ZITADEL that this configuration is meant for development mode. Enable the Development Mode and click Save:
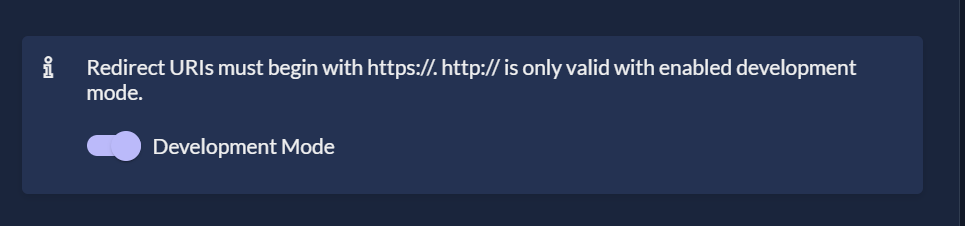
** Please note:** In a real production scenario, you should not use this. Your application should be hosted using HTTPS.
In the final step of this stage, you need to copy the base address of your ZITADEL instance. This address will be used by the OIDC client (Nextcloud, in this case) to perform the authentication.
Click Urls on the left of the current page and take note of the authServiceUrl. In this instance, it's https://my-first-zitadel-instance-l8ehm3.zitadel.cloud.
At this point, you've successfully set up ZITADEL as your OIDC server.
Create a Self-Hosted Nextcloud Container and Integrate to ZITADEL
In order to create a self-hosted Nextcloud container and integrate it with ZITADEL, you need to install Nextcloud as a hosted Docker container and set up your admin user.
To do this, go to Get Docker to download and install Docker according to your current operating system. Please refer to the official Docker documentation for more information. If you already have Docker installed, you can skip this step.
** Please note:** In a real production scenario, you'll host the Nextcloud container in a cloud provider, Kubernetes cluster, or any production-grade deployment.
In the command terminal, type docker run -d -p 6060:80 nextcloud to download and run the Nextcloud Docker image. This will map port 6060 in your computer to port 80 Nextcloud Docker container, where the web application runs.
In the command terminal, type docker container ls to verify that the Docker container is running. You should see something like this:

Open a browser window and navigate to http://localhost:6060/ to access Nextcloud. Since this is a first-time setup, you need to create an admin username and password. Fill out these details and scroll down and click Install. Nextcloud will take a few seconds to prepare your application.
You should receive a prompt asking if you want to add some recommended apps to Nextcloud. Go ahead and click Cancel. Then an introductory splash window to Nextcloud will pop up. Close it by clicking X at the top right inside the browser window. Then you should see the Nextcloud dashboard.
Since an OIDC login isn't available by default in Nextcloud, you need to add an app to your self-hosted Nextcloud service in order to enable it. You can think of apps in Nextcloud similar to extensions in Chrome since they add additional functionalities to your application.
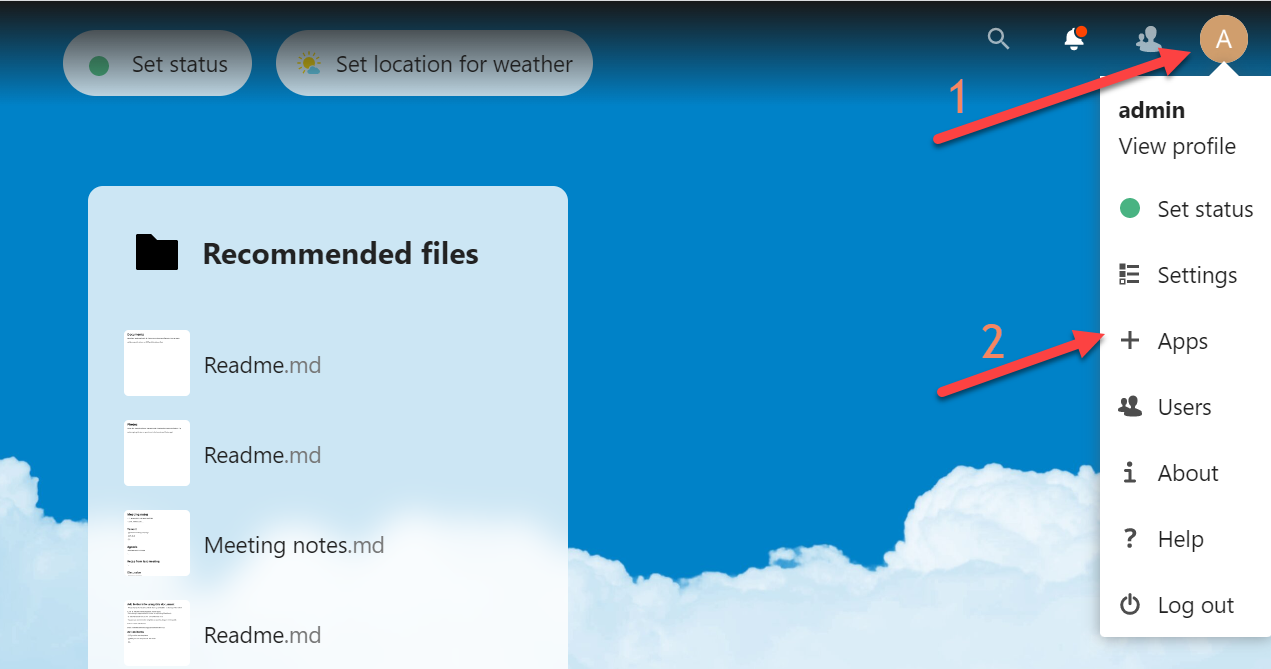
Click the icon in the top-right corner of your dashboard and then click + Apps:
In the left menu, click Social & communication to find apps in that category. From there, search for an app called Social login, click Download, and then click Enable. In a few seconds, this action installs the Social login app in your Nextcloud self-hosted instance and enables Nextcloud to log in via OIDC.
Click on the top-right icon in the dashboard and then click Settings.
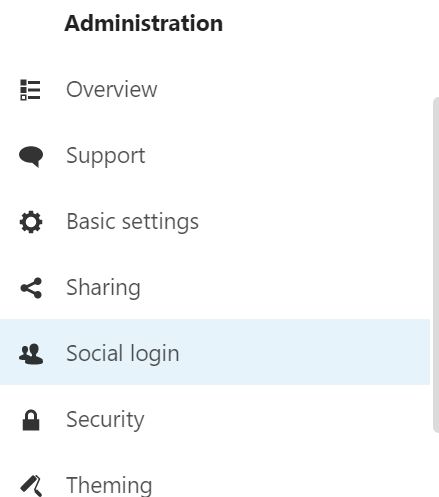
On the left of the screen, you should see a Social login tab under the Administration section. This means that the Social login app was successfully installed to your Nextcloud instance:
After you've added the Social login application to your Nextcloud instance, it's time to configure it to use ZITADEL as an OIDC provider. Click on Social login; then next to Custom OpenID Connect, click the + sign. This will enable you to add a custom OIDC provider (which, in this case, is ZITADEL).
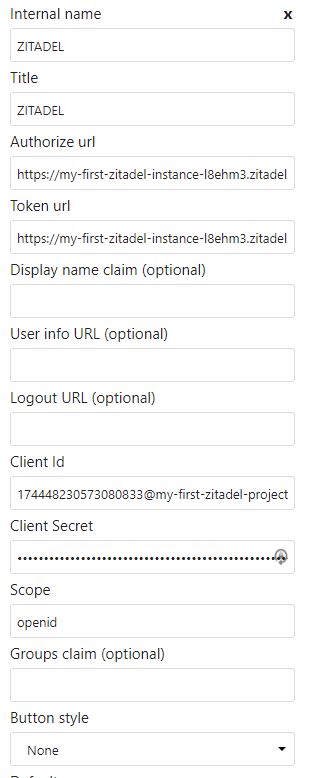
Fill in the following details and leave any unmentioned field as it is:
- Internal name: This is the internal provider's name within Nextcloud, and it's not visible externally (in this example, ZITADEL was used).
- Title: This is the provider name exposed externally during the login process (again, ZITADEL was used).
- Authorize url: This represents the authorization endpoint URL. It consists of the ZITADEL instance URL you noted earlier with
/oauth/v2/authorize(https://my-first-zitadel-instance-l8ehm3.zitadel.cloud/oauth/v2/authorize). - Token url: This represents the token endpoint URL. It consists of the ZITADEL instance URL you noted with the
/oauth/v2/token(here, it'shttps://my-first-zitadel-instance-l8ehm3.zitadel.cloud/oauth/v2/token). - Client Id: This is the OIDC client ID you noted previously.
- Client Secret: This is the OIDC client secret you also noted earlier.
- Scope: Type "openid" to indicate that it is an OIDC protocol.
- Default group: Select admin. This means that the authenticated user from ZITADEL will have admin permissions. In a real-world scenario, you'd assign the authenticated users less powerful permission.
Then hit Save.
After configuring ZITADEL as an OIDC provider, it's time to test it. In the Nextcloud dashboard, click the icon in the top-right corner and then click Log out to log out from the current admin user session, and you'll be automatically redirected to the login page.
You should now see a new button that says Log in with ZITADEL. Click on it and enter the ZITADEL login name you noted previously; then click Next.
Next, enter the ZITADEL instance password (not the customer portal password) and click Next. ZITADEL should redirect you to the Nextcloud dashboard.
Congratulations! You've managed to access your self-hosted Nextcloud instance using ZITADEL as an OIDC provider.
Conclusion
In this tutorial, you learned what an SSO is and how it benefits businesses by improving user experience, reducing costs, and contributing to IT security. You also learned how to set up your self-hosted ZITADEL instance as an OIDC provider. Then, you learned how to set up a Nextcloud self-hosted instance, and you delegated its access to ZITADEL.
ZITADEL is an open source identity management platform that provides you with a wide range of features like OpenID Connect, SAML 2.0, OAuth 2, FIDO2, OTP, and an unlimited audit trail. With ZITADEL, you can solve all your authentication and authorization needs. Check out our repo and give us a GitHub star. We appreciate the feedback.
This article was contributed by Mohammed Osman.