Use OIDC Authorize Request to Customize User Login

Technical Writer
One of the critical challenges in designing software systems is identity management. User accounts need to be created, maintained, and promptly secured to ensure the safe and continuous functionality of critical business systems. However, doing so is easier said than done.
With the current diverse digital ecosystem, which includes various terminals, such as mobiles, IoT devices, smartwatches, and web applications, creating a unified security standard is imperative.
OpenID Connect (OIDC) protocol addresses this challenge by providing a means for both verifying users and defining their permissions. It makes it easier for application developers to implement robust identity management.
In this article, you'll learn what OIDC is and develop a high-level overview of its working mechanisms. You'll also learn about the value it adds to your business. In addition, you'll learn about the options OIDC provides to help you customize the user login to improve security and user experience.
What Is OIDC
Before discussing OIDC, it's vital to distinguish two security concepts: authentication and authorization.
Authentication is the process of verifying who the user is. Authorization is the process of verifying what the user can do.
You can think of authentication and authorization as a gym membership card with several subscription levels. When you present the membership card to the receptionist, they need to do two things:
- Ensure that the card is real and that you have permission to access the facility (ie to authenticate you).
- Ensure that you can access the specific gym features based on your subscription level. For example, you may only be allowed to access the training area but not the sauna (ie to authorize you).
OIDC protocol does the same thing but in the digital world. It helps you to authenticate and authorize users and applications attempting to access your resources.
To achieve that, the OIDC protocol utilizes two security tokens:
- Access token: a time-limited JWT or opaque token that can be used to authenticate and authorize the user.
- ID token: or a JWT token containing a set of claims (ie user characteristics). You can use these claims to add relevant information indicating which resources the user can access (among others). That is to authorize the user.

Overview of the OIDC Protocol
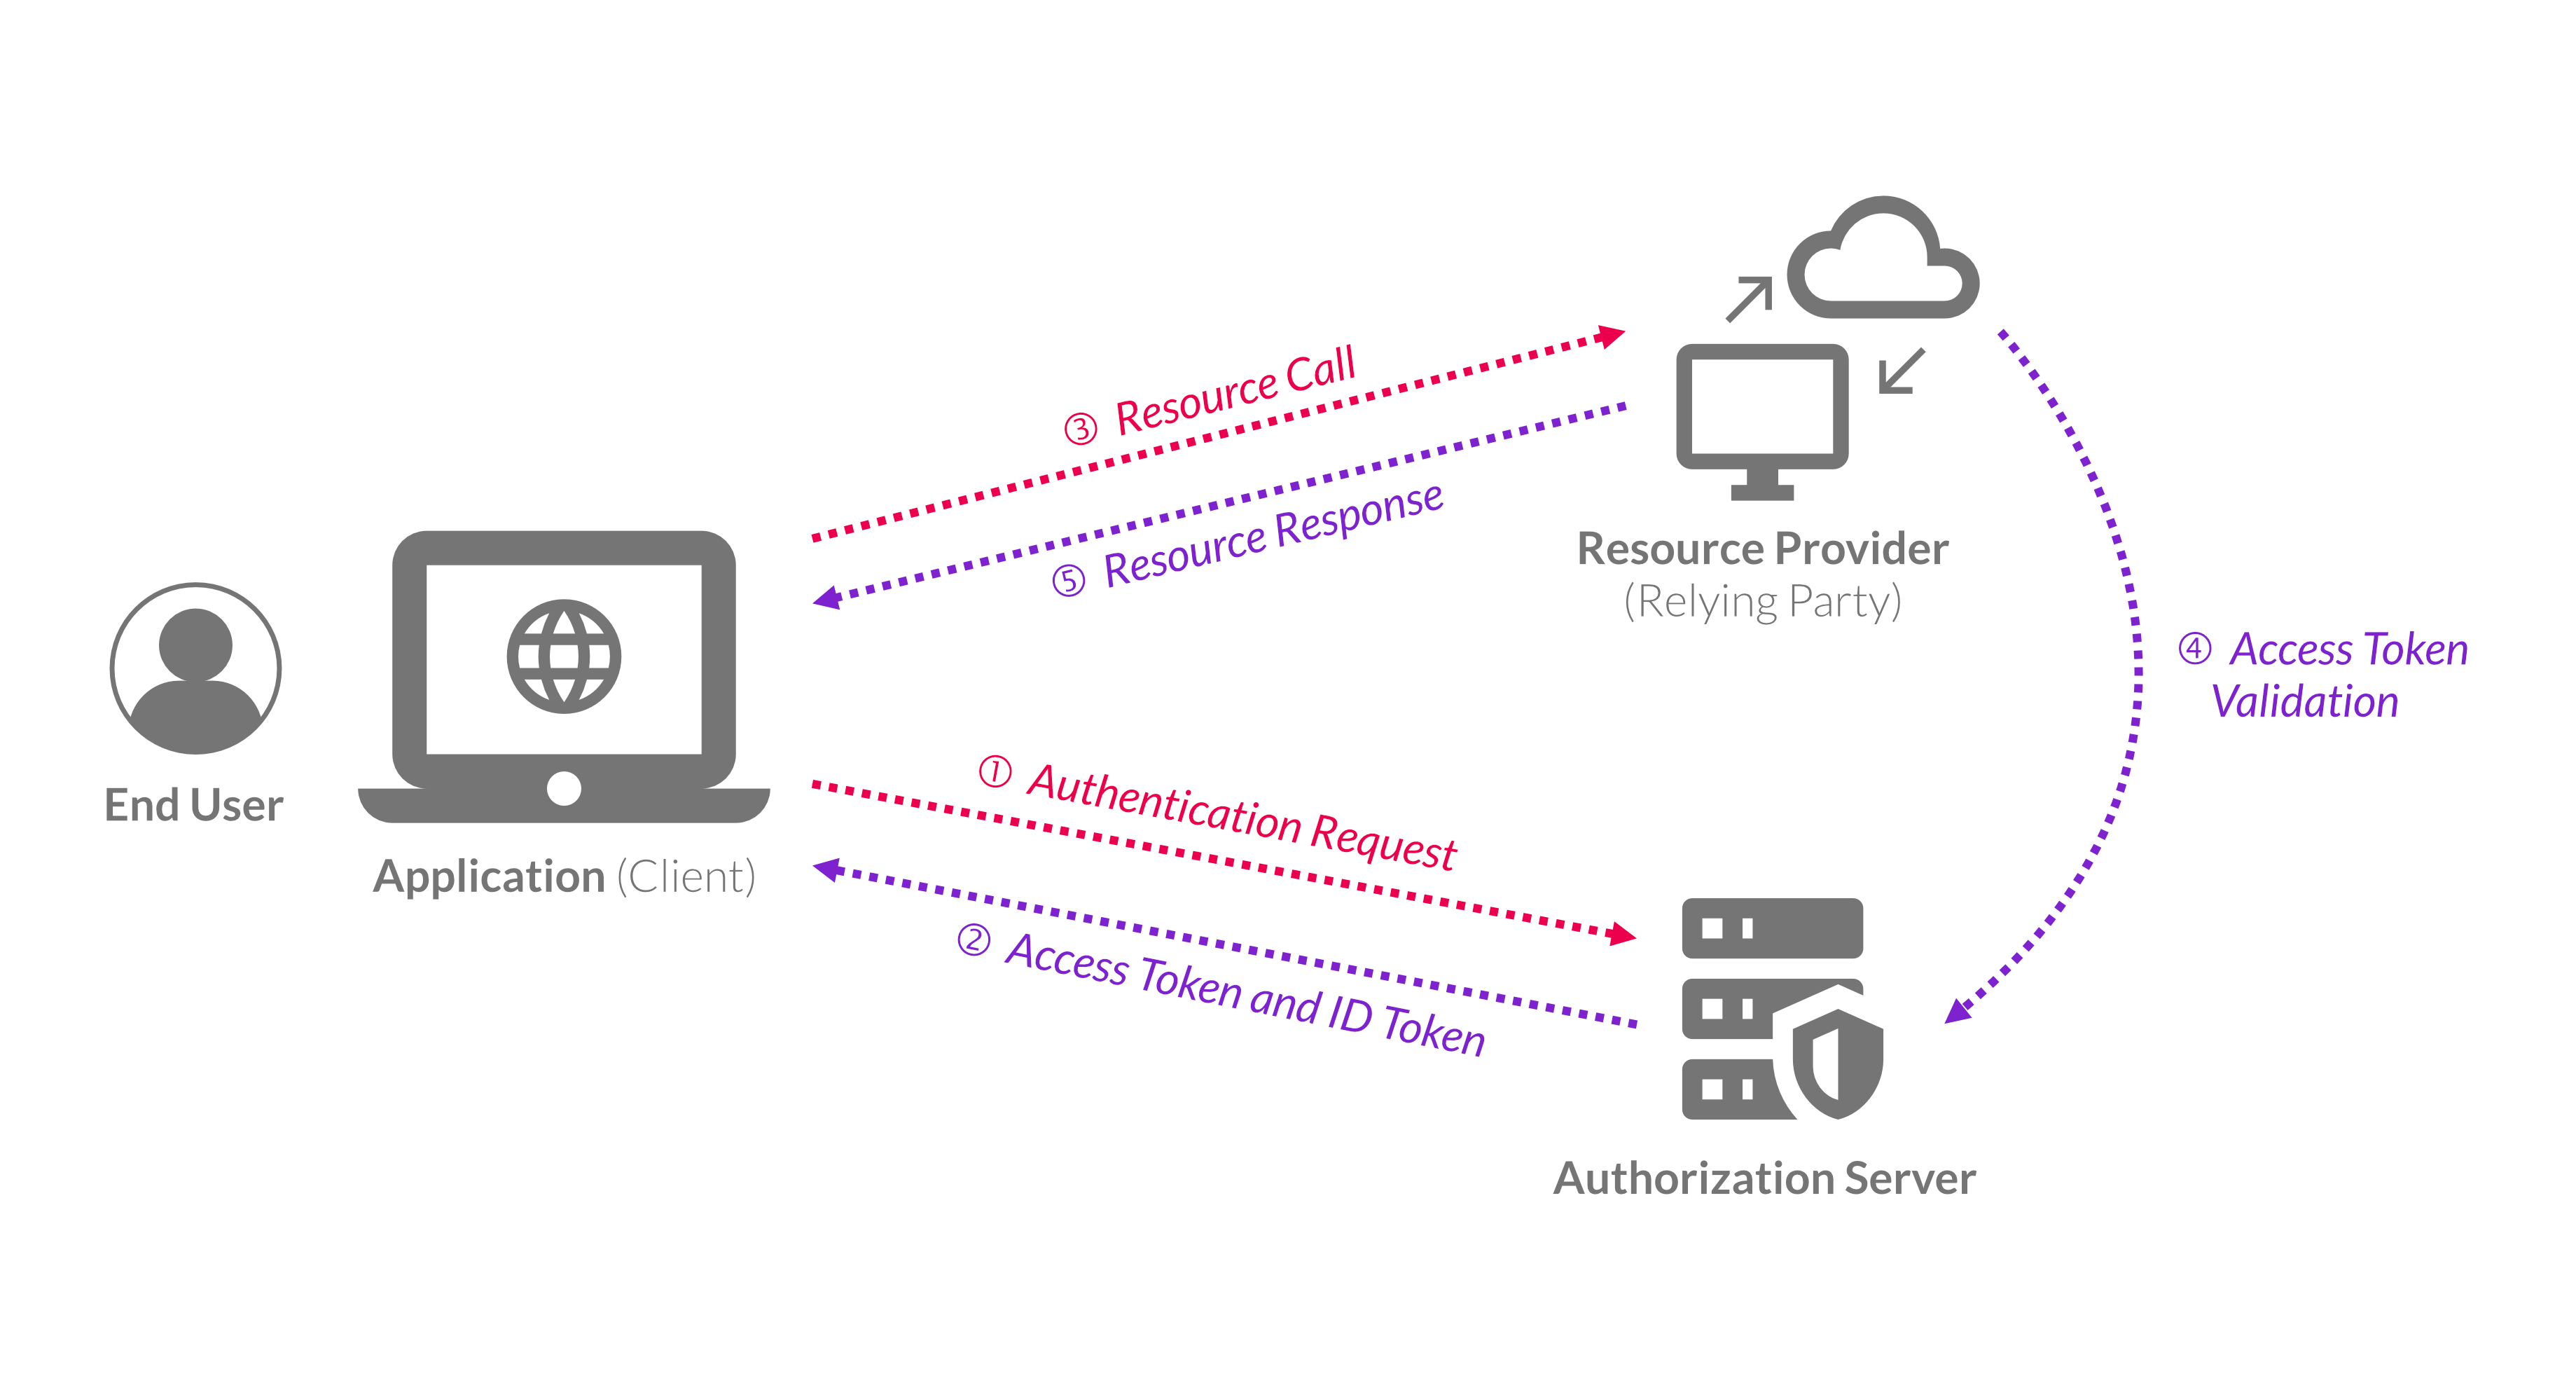
Before explaining the typical OIDC protocol flow, it's important to explain what makes up the flow, which is mainly the resource provider and the authorization server.
The resource provider, where the data resides (denoted as "Resource Provider" in the previous visual), trusts (or considers the access tokens issued from the authorization server as a valid authentication method) the authorization server.
Note: You'll also hear tech people say that the end-user identity is "federated" to an external party, the authorization server also known as the OpenID Provider (OP).
For instance, imagine a scenario where the end user wants to authorize the application (client) to access their data in the resource provider. Here, the authorization flow takes place like this:
- The client application that wants to access the data in the resource provider redirects the end user to the authorization server with an authorization request to log in.
- The authorization server validates the end-user login request and returns the access token and ID token to the client application.
- The client application uses the access token to authenticate and authorize against the resource provider.
- The resource provider validates the access token with the authorization server.
- If the access token is valid, the resource provider returns the response to the client application.
For more details about the inner workings of OIDC, check out this video.
Why OIDC
Now that you know how OIDC works, it's important to look at the benefits it can offer:
Single Sign-On
One of the key benefits of the OIDC protocol is that it enables single-sign-on (SSO). SSO is the process of authenticating the user against the authorization server and then signing in the user to all relevant applications that trust that authorization server. This is commonly used in enterprises where employees need access to several systems, such as HR, accounting, and training systems.
Rather than having the employee create an account for each system separately (with separate passwords for each), the user can log in once to the authorization server. After that, the user will automatically be logged into all relevant systems. This improves user experience and reduces password recovery requests.
Ubiquitous Technology Access
The OIDC protocol supports a wide range of flows (ie versions) that enable you to use the protocol for various scenarios, including APIs, web applications, mobile applications, and devices.
Centralized Credentials Store
In OIDC, all credentials are stored in a secure, centralized location: the authorization server. This cuts down on maintenance costs that would otherwise be required to maintain multiple credentials stores.
How to Customize User Login with OIDC
Whenever your application sends an authorization request to the authorization server, it must provide a set of required parameters to specify the authorization request details. These parameters are as follows:
scope: This must be at leastopenidto indicate that it is an OIDC protocol. It's also possible to send other scopes like profile or email. If theopenidscope is missing in the request, its behavior is unspecified.response_type: The authorization flow to be used. The authorization flow indicates what type of client is requesting the tokens.client_id: A client identifier at the authorization server end.
redirect_uri: A redirection URL to which the authentication response will be sent.
Besides these parameters, there are other optional parameters you can use. These optional OIDC parameters enable you to further customize and secure the login experience. These include the following:
-
prompt: This parameter is a case-sensitive list of ASCII string values that indicates whether the authorization server should prompt the end user to authenticate again and consent. It supports the following values:-
none: The authorization server must not display authentication or consent user interface pages (also called silent authentication). The authorization server will return an error message if the end user is not already authenticated. -
login: The authorization server should trigger the end user to authenticate again with credentials via a UI prompt. It will return an error if it cannot authenticate the end user. -
consent: The authorization server should get the end-user consent before returning data to the client. If it cannot get the consent, it must return an error. -
select_account: The authorization server should prompt the end user to choose a user account. This is helpful if the end user has more than one account at the authorization server. If it cannot get an account chosen by the end user, it must return an error. -
login_hint: This parameter hints to the authorization server about the login identifier the end user may use. A typical value to use in thelogin_hintis the email address, the user name or the login name. Passing thelogin_hinteither prefills the email box in the sign-in form or selects the correct user session (if the user has multiple sign-ins, similar to what you can have in Gmail). -
max_age: This specifies the maximum allowed time in seconds since the end user was actively authenticated by the authorization server. The end user will be prompted to reauthenticate if this time is exceeded. -
state: The main objective of thestateparameter is to protect against cross-site request forgery (CSRF) attacks. This is done by using a unique and hard-to-guess value and associating it with each authentication request. Later, you can protect against the attack by verifying that the value in the response matches the value you had in the request. -
nonce: This is a string value used to associate a client session with the ID token to prevent replay attacks. Thenoncewill be included in the response from the authorization server. This enables the applications to correlate the ID token response with the initial authorization request. -
ui_locales: This specifies the end user's preferred language, represented by a space-separated list of language tags. The list is ordered by preference. For example, the valueen-US fr arrepresents a preference for American English, French, and Arabic. -
display: This is an ASCII string value that dictates how the authorization server displays the authentication and consent dialog to the end user. The following values are supported:page: The authorization server should display the dialog with a full user-agent page view. This is the default behavior if thedisplayparameter value is not specified.popup: The authorization server should display the dialog with a pop-up user-agent window.touch: The authorization server should display the dialog consistent with a device that uses a touch interface.wap: The authorization server should display the dialog consistent with a "feature phone"–type display.id_token_hint: This is the ID token previously issued by the authentication server being used as a hint about the end user's current or past authenticated session. If the user is logged in, it returns a positive answer. Otherwise, it will return an error.
-
Conclusion
In this article, you learned that OIDC is a protocol that enables you to federate the user authentication and authorization to an external authorization server, which simplifies your workload. You also learned about the SSO, ubiquitous access, and centralized security benefits that the OIDC protocol brings to the table.
In the end, you learned how to use several parameters to improve user login, such as the prompt parameter to control the reauthentication experience and the display parameter to control the login form view.
ZITADEL is an open-source identity management platform that provides you with a wide range of features like OpenID Connect, SAML2.0, OAuth2, FIDO2, OTP, and unlimited audit trail. With ZITADEL you can solve all of your authentication and authorization needs. Check out our repo and give us a GitHub star, we appreciate the feedback.
This article was contributed by Mohammed Osman.