Increase Your SPA Security with Cloudflare Workers

Technical Writer
A single-page application (SPA) is an approach to website implementation that aims to provide a better and faster user experience without necessarily hitting the server every time a user interacts with the site. The SPA pattern is a popular approach to designing websites and web apps, with many prominent sites—including Airbnb, Facebook, Gmail, Jira, LinkedIn, and Netflix—utilizing it.
Security issues are not unique to SPA websites, but this type of solution poses several security drawbacks that aren't present in typical server side websites—that is, a website that loads new pages when you click a link. This is due to the architectural pattern of SPAs, where they sometimes use access tokens to incorporate secure API endpoints in an insecure environment known as the browser. This exposes the site to some security issues, such as cross-site scripting (XSS) attacks, cross-site request forgery (CSRF), and session tracking and authentication.
In this article, you'll learn about single-page applications, some security issues associated with the approach, and how to improve the security of any SPA site using Cloudflare Workers and ZITADEL.
Security Concerns
Let's look at some of the specific security concerns that hackers might exploit in a site that uses the SPA approach.
Cross-Site Scripting Attacks
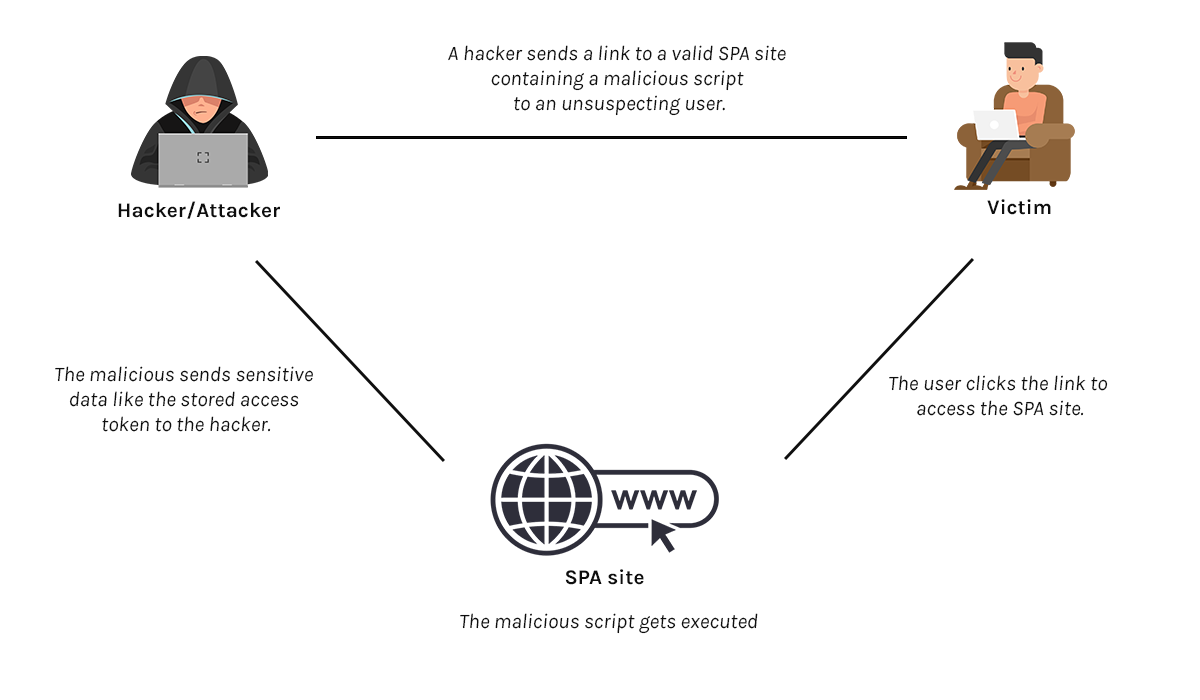
Cross-site scripting, or XSS for short, is a web security vulnerability where hackers inject malicious client-side scripts into the application (in this case the SPA). Using this technique, hackers can steal an access token that was kept in the browser storage. The extracted access token can then be used by the attacker to access resources through the API endpoints. As long as the access token is valid the malicious actor will be able to access any resources that the original user of the token had permissions for.
Additionally, when content security policy (CSP) settings are not properly set, hackers can use the stolen token on an external system.
Cross-Site Request Forgery
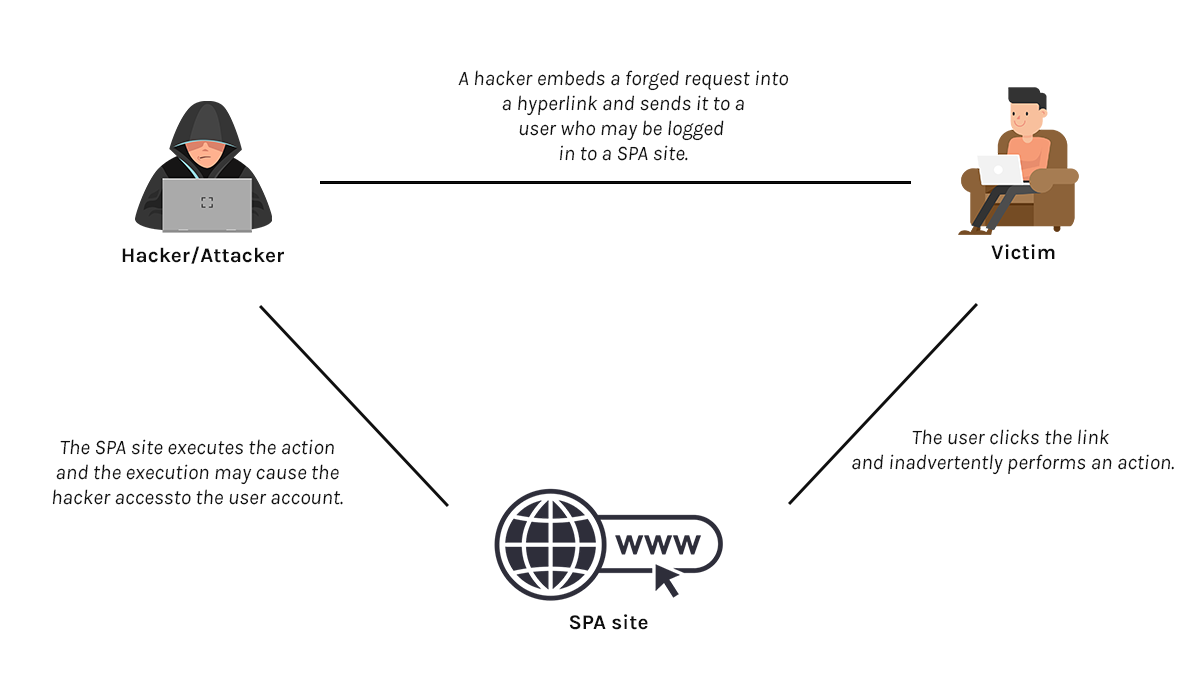
Cross-site request forgery (CSRF) is also known as a one-click attack or session riding and is occasionally abbreviated XSRF. Regardless of what it's called, it's an online security vulnerability where a user is deceived into doing an unwanted activity on a site that they are logged in.
For instance, a hacker may send a user an email that asks them to change their password and provides them with a malicious link through which to do so. The link contains a hidden trigger, such as a hidden form request. When the user follows the link and changes their password, the hidden form request is made along with the submitted password.
As a result, the hacker might be able to access the application API endpoints using the stolen password or other sensitive information. If the compromised user has a privileged position inside the application, the hacker may ultimately gain control of all the data and functionality of the application.
Session Tracking and Authentication
A single-page application is made up of two primary parts, the frontend systems and API endpoint (backend) systems:
- The frontend systems can consist of websites built with HTML, CSS, and JavaScript, as well as assets that load on the browser, such as photos and JavaScript libraries.
- The backend systems are made up of one or more API endpoints that handle business logic and data processing.
Similar to the conventional multipage approach, an SPA must be secure; however, to achieve an optimal level of security, the web server employs session cookies—a server-specific cookie to proxy the API endpoints. Although session cookies are also vulnerable to cyberattacks, when configured correctly, they can be more secure and offer fewer security risks. Let's take a look at a few additional security measures that can further secure your SPA.
SPA Security Tips
Following are some tips for improving your SPA security:
Don't Store Tokens in the Browser
As discussed in the previous sections of this article, SPAs operate primarily in an unverified environment. Storing sensitive information, such as the token from an SSO provider like ZITADEL, can have serious security implications. It is highly recommended that you only use cookie-based sessions.
Although cookie-based sessions can't offer your SPA hundred-percent security from attackers, they're a much better practice than browser storage. Additionally, some attributes may be added to your cookie-based sessions to ensure that your SPA has sufficient security.
One attribute is secure HTTP (HTTPS). If this attribute is enabled, it blocks scripts from non-HTTPS sources (ie those that are not secure) from accessing the backend server, even if they have access to the cookie.
The SameSite attribute gives the browser instructions on how to manage cookies. This attribute has three different options, with each option having distinct behaviors:
- Lax: This is the default SameSite option if the SameSite attribute isn't set. This option only grants access to the backend server if the domain in the URL bar is the same as the cookie domain (first-party only).
- Strict: This option only grants access to the backend server if the domain in the URL bar is the same as the cookie domain and the request isn't coming from an external (third-party) site.
- None: This option grants access to the backend server from any domain, regardless of the source (third-party or first-party site).
Properly configuring the CORS headers in your SPA may also help shield against unwanted attacks, especially CSRF attacks.
Rely on Cookies from a Proxy Instead of Storing SSO Tokens
Instead of storing sensitive information in the browser storage, a better and securer option is to utilize cookies from a proxy, such as Cloudflare Workers.
A proxy, in this context, is a server application that acts as an intermediary between the backend servers and the frontend server:
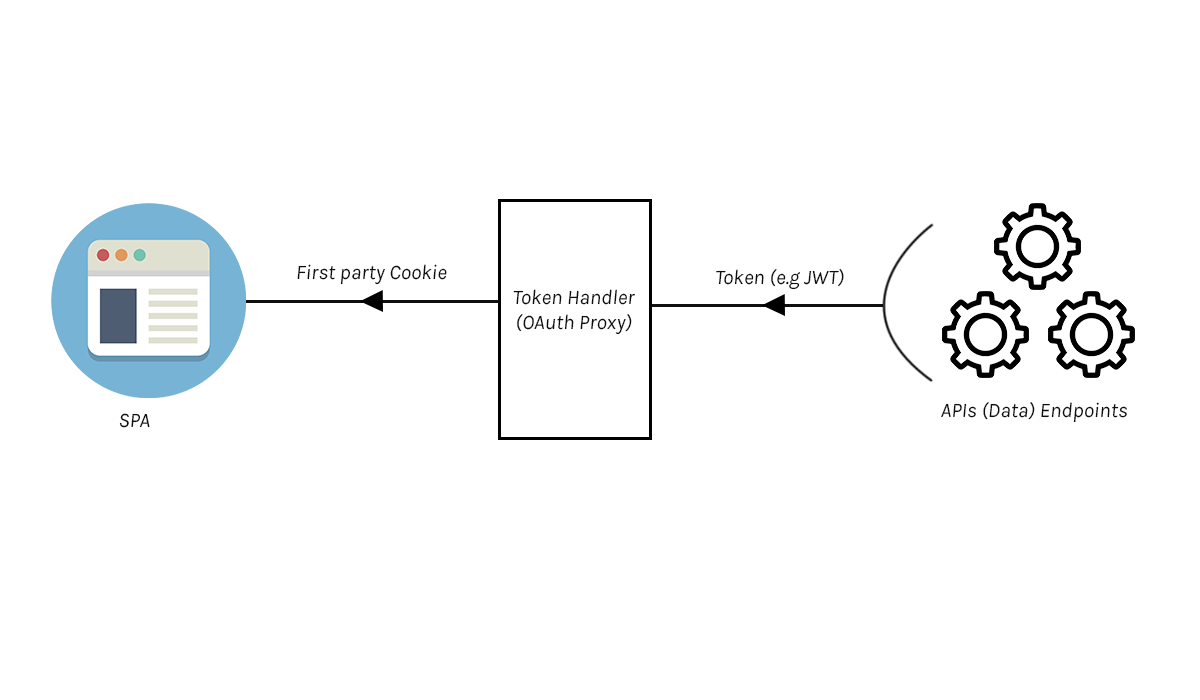
This technique of utilizing cookies from a proxy rather than directly from the token is referred to as the backend for frontend (BFF) approach. In this method, the frontend receives a secure cookie from the token handler (proxy module), and the token is completely concealed from the browser, making it impossible for an attacker to access it. Additionally, the security of the SPA is strengthened, and any security issue that may occur will be from the backend server (API endpoints).
An example of a proxy module is Cloudflare Workers, and you can leverage Curity's Cloudflare Workers OAuth Proxy Module to integrate Cloudflare Workers into your SPA.
How to Secure an SPA Using React and ZITADEL.
In this section, you'll walk through how to set up a secured SPA using React and ZITADEL.
Prerequisites
You'll need a few things to follow along with this tutorial:
- ZITADEL account.
- Cloudflare Workers account and Cloudflare subdomain.
- npm or Yarn installed in your environment.
Create a React SPA
Run npx create-react-app <NAME-OF-REACT-APP> to initialize a new React application. However, you can use an existing React application if you have one.
You also need to install an OAuth/OpenID Connect client to connect your react SPA with ZITADEL. Run the command npm install oidc-react to install the client library.
Set Up Your Cloudflare Workers
The first thing to do in this step is to install Wrangler, which is a CLI for building Cloudflare Workers. Wrangler enables you to initialize, develop, and publish your Workers projects.
Use either of the following commands to install Wrangler:
- If you're using npm, use the command
npm install -g wrangler. - If you're using Yarn, use the command
yarn global add wrangler.
Please note: Wrangler requires Node.js v16.13.0 or higher.
The next step is to authenticate Wrangler.
Run wrangler login, and your browser will launch. You'll be routed to a screen requesting that you log into the Cloudflare dashboard. After you log in, Wrangler will ask whether it has permission to modify your Cloudflare account. Scroll down and click Allow to proceed.
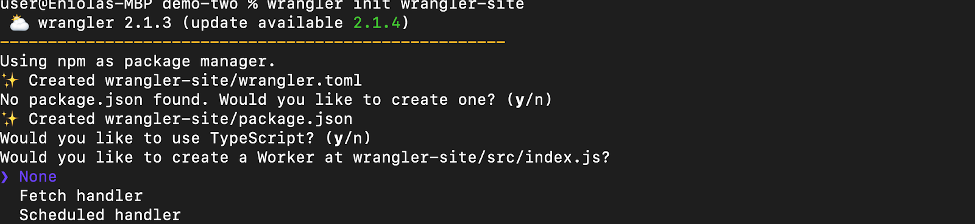
Change the directory (cd) to your react app directory, and use the following command to start a new Wrangler project:
`wrangler init <YOUR_WORKER>`;
The value of <YOUR_WORKER> can be any name you decide.
In your terminal, you'll be asked the following questions:
- "Would you like to use git to manage this Worker? (y/n)": Indicate
y. - "No package.json found. Would you like to create one? (y/n)": Indicate
y. - "Would you like to use TypeScript? (y/n)": Indicate
nto continue with JavaScript. - "Would you like to create a Worker at demo_one/src/index.js?": Select None.
Create a ZITADEL Application and Set Up SSO
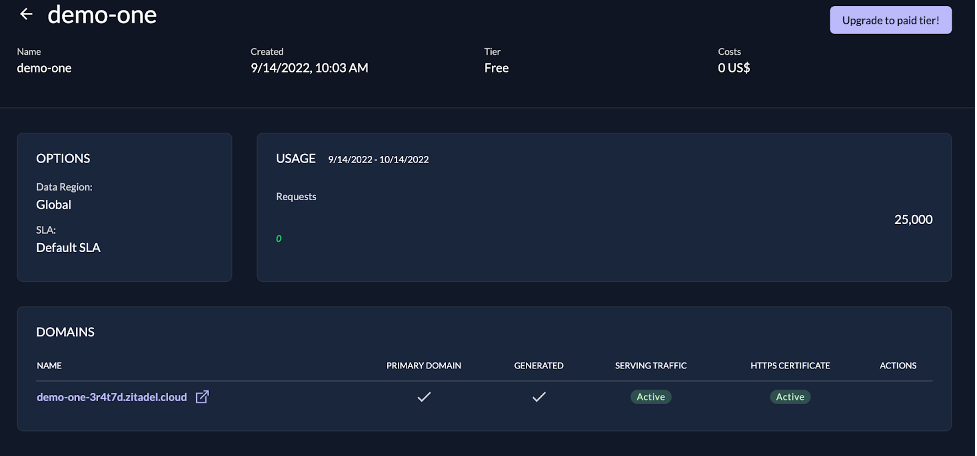
Log into your ZITADEL Cloud account and click New at the top right to create a new instance. You can select either a free instance or a premium (pay-as-you-go) instance for this tutorial.
Follow the prompts to create the instance and log into the instance once it has been created. It will look like the following screenshot:
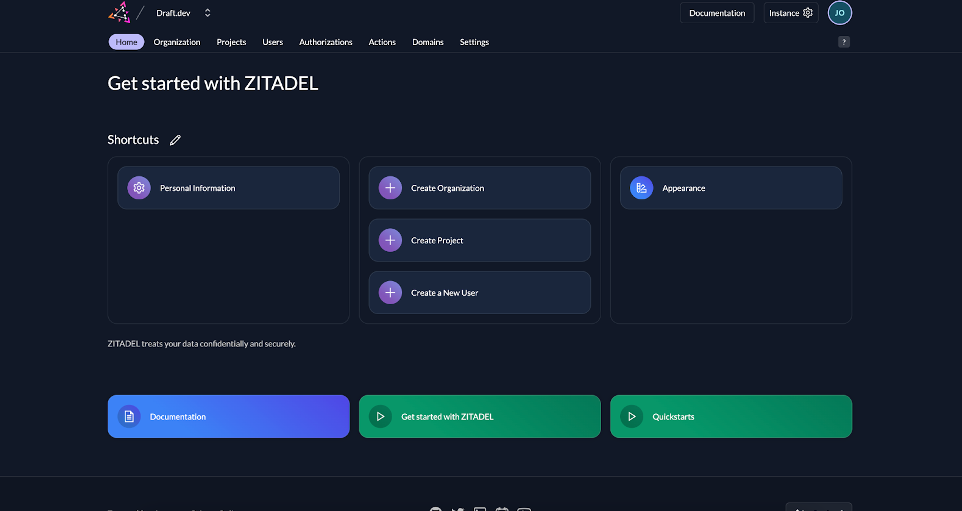
Click the domain link to access the console:
Click the Create Project button and insert your project name.
Once the project has been created, click the + button to create an application.
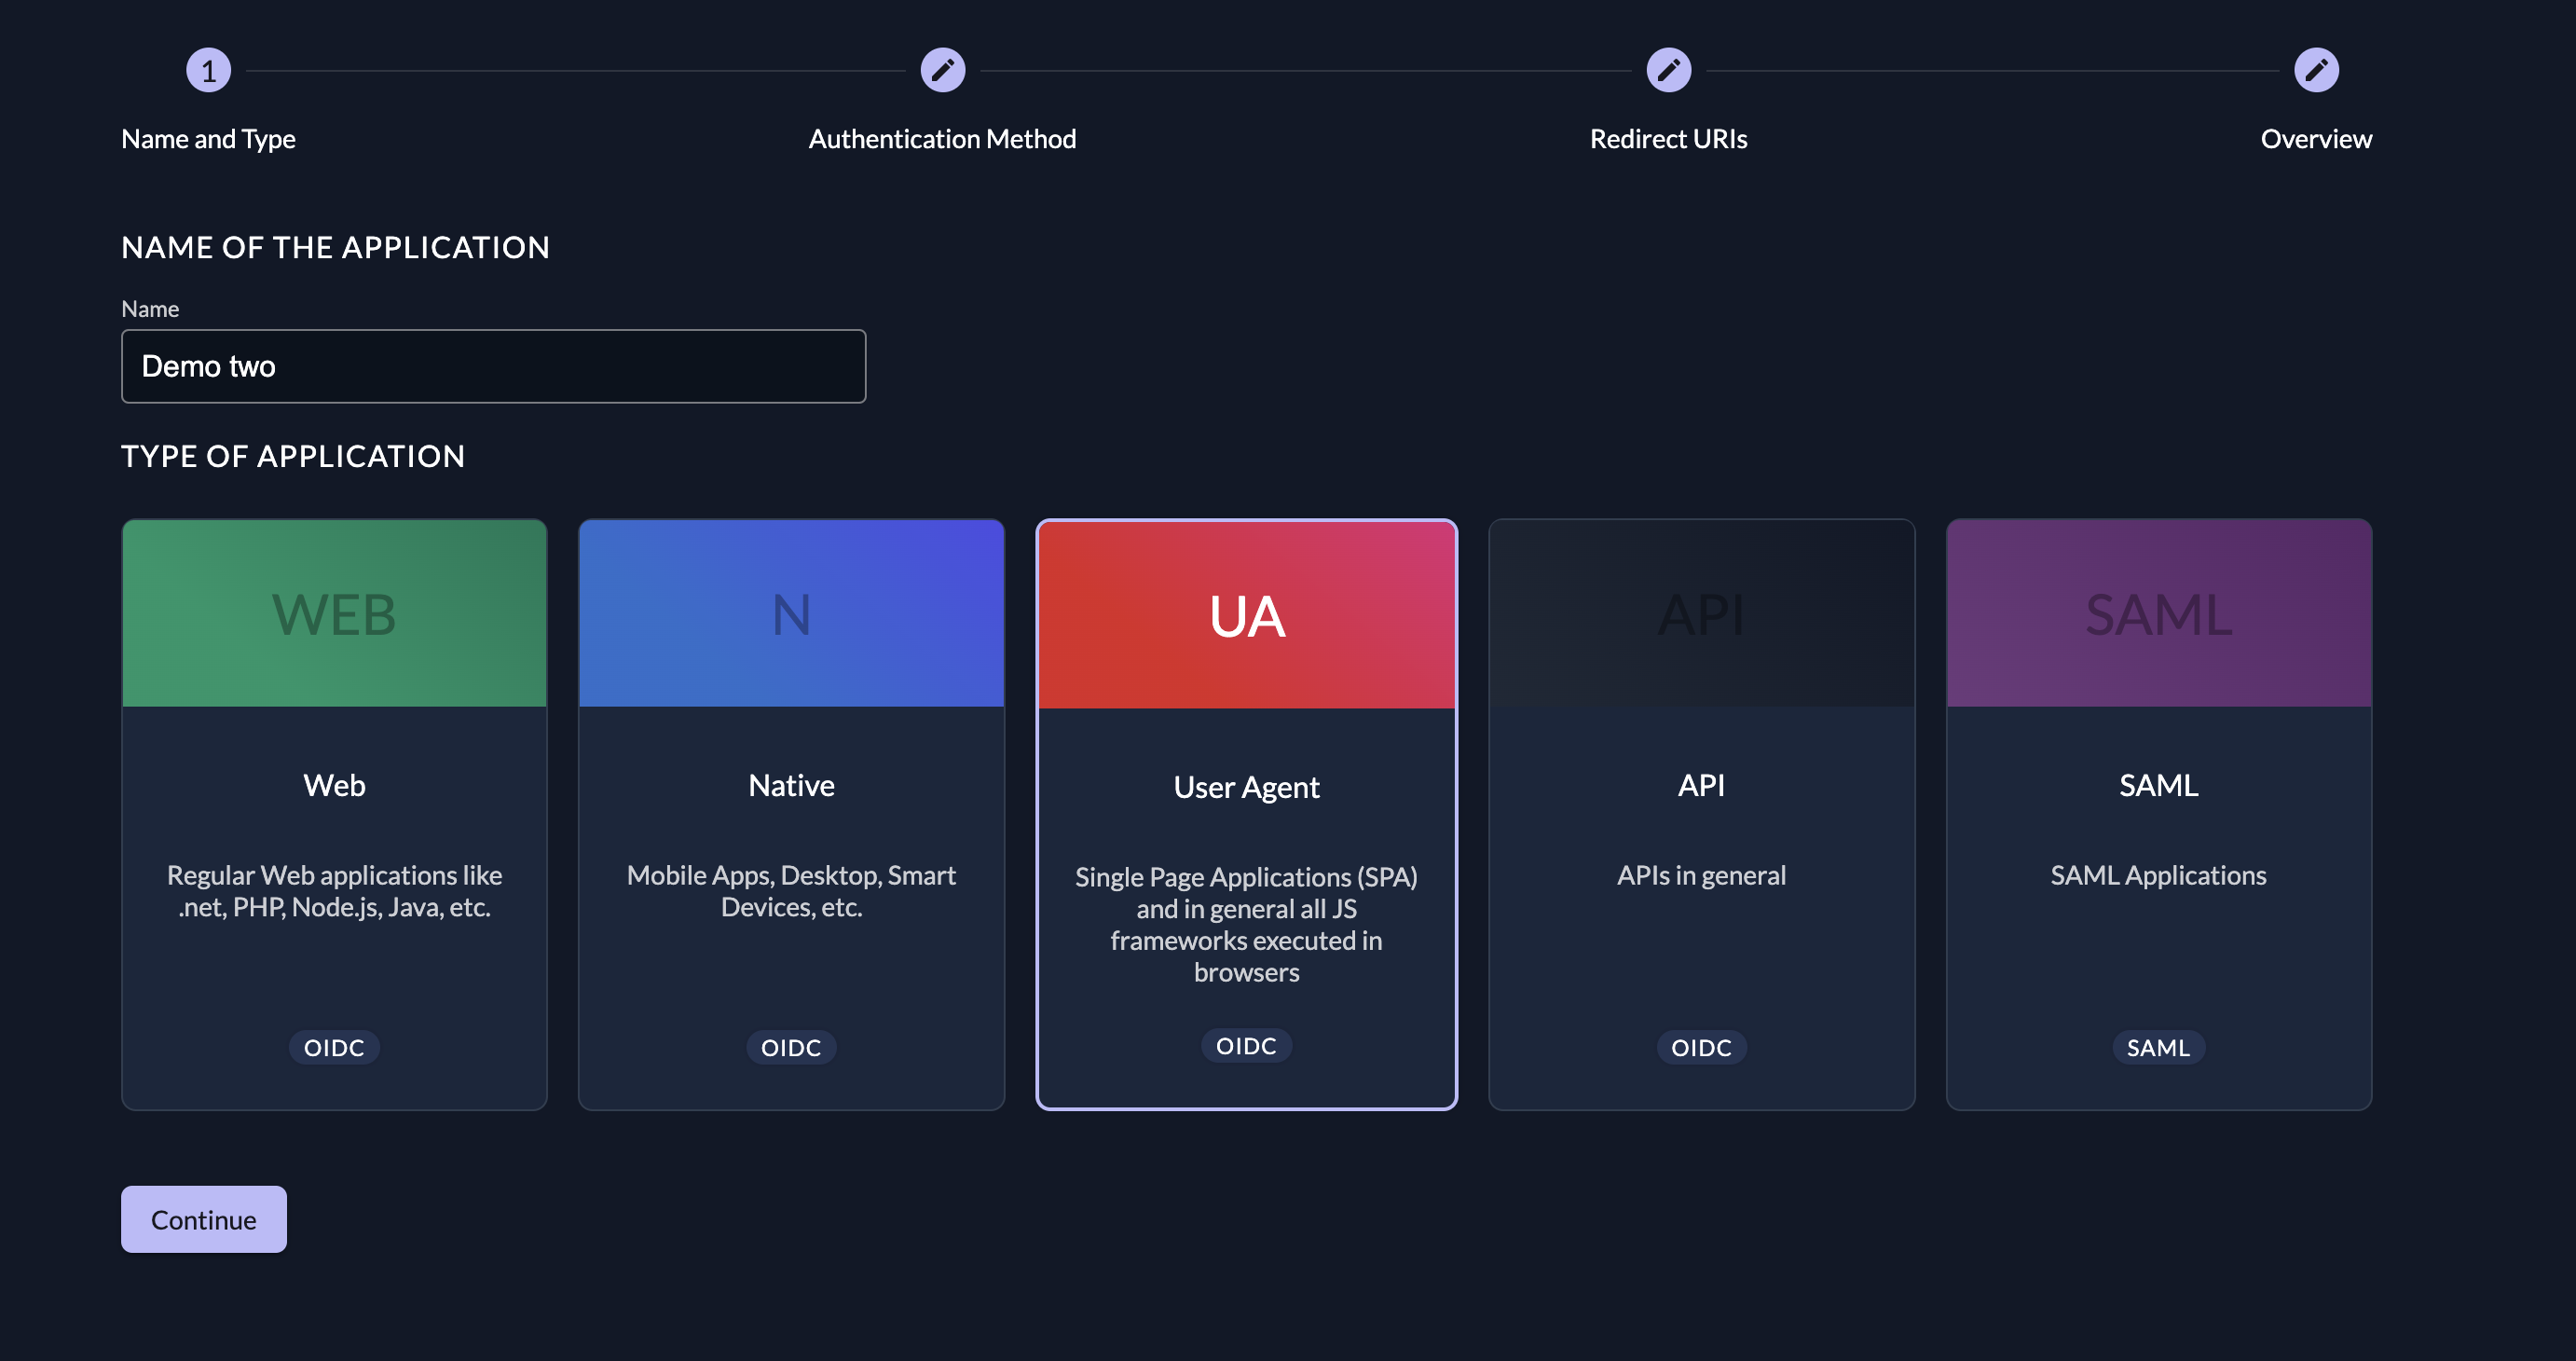
Fill in the application details as required by the form wizard:
- Insert your application name and select the User Agent option:
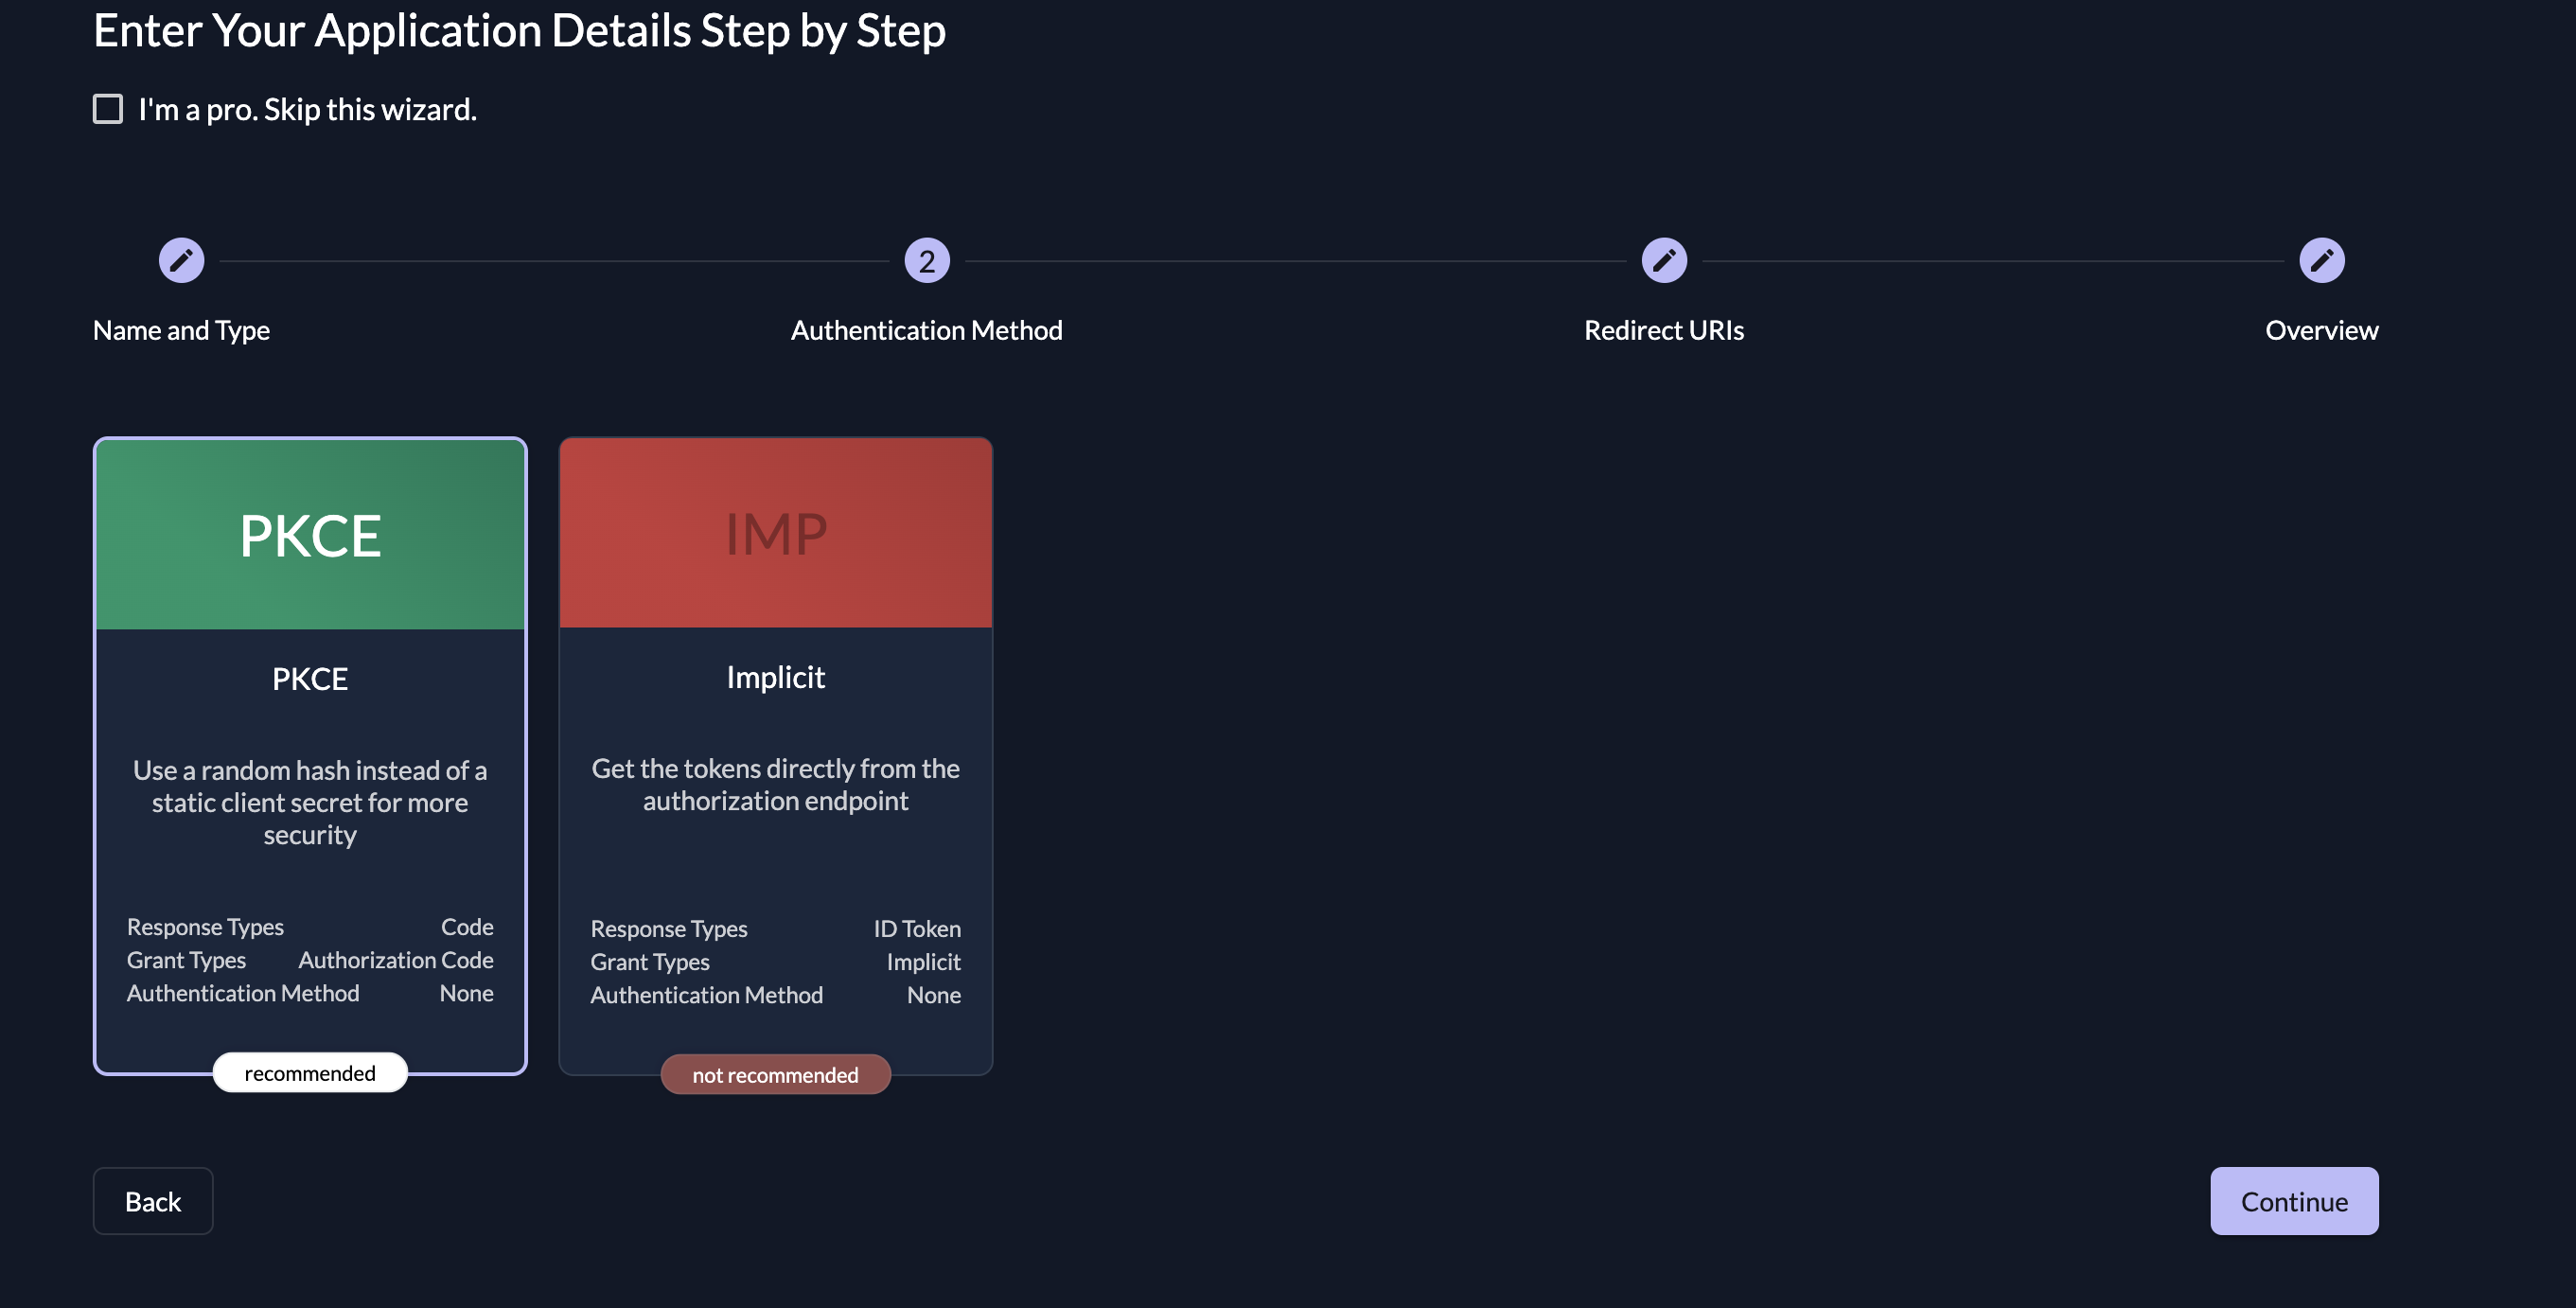
- Select the PKCE option:
- Insert your SPA dashboard URL (such as
http://localhost:3000/dashboard) in the Redirect URIs section and set the Post Logout URIs tohttp://localhost:3000:
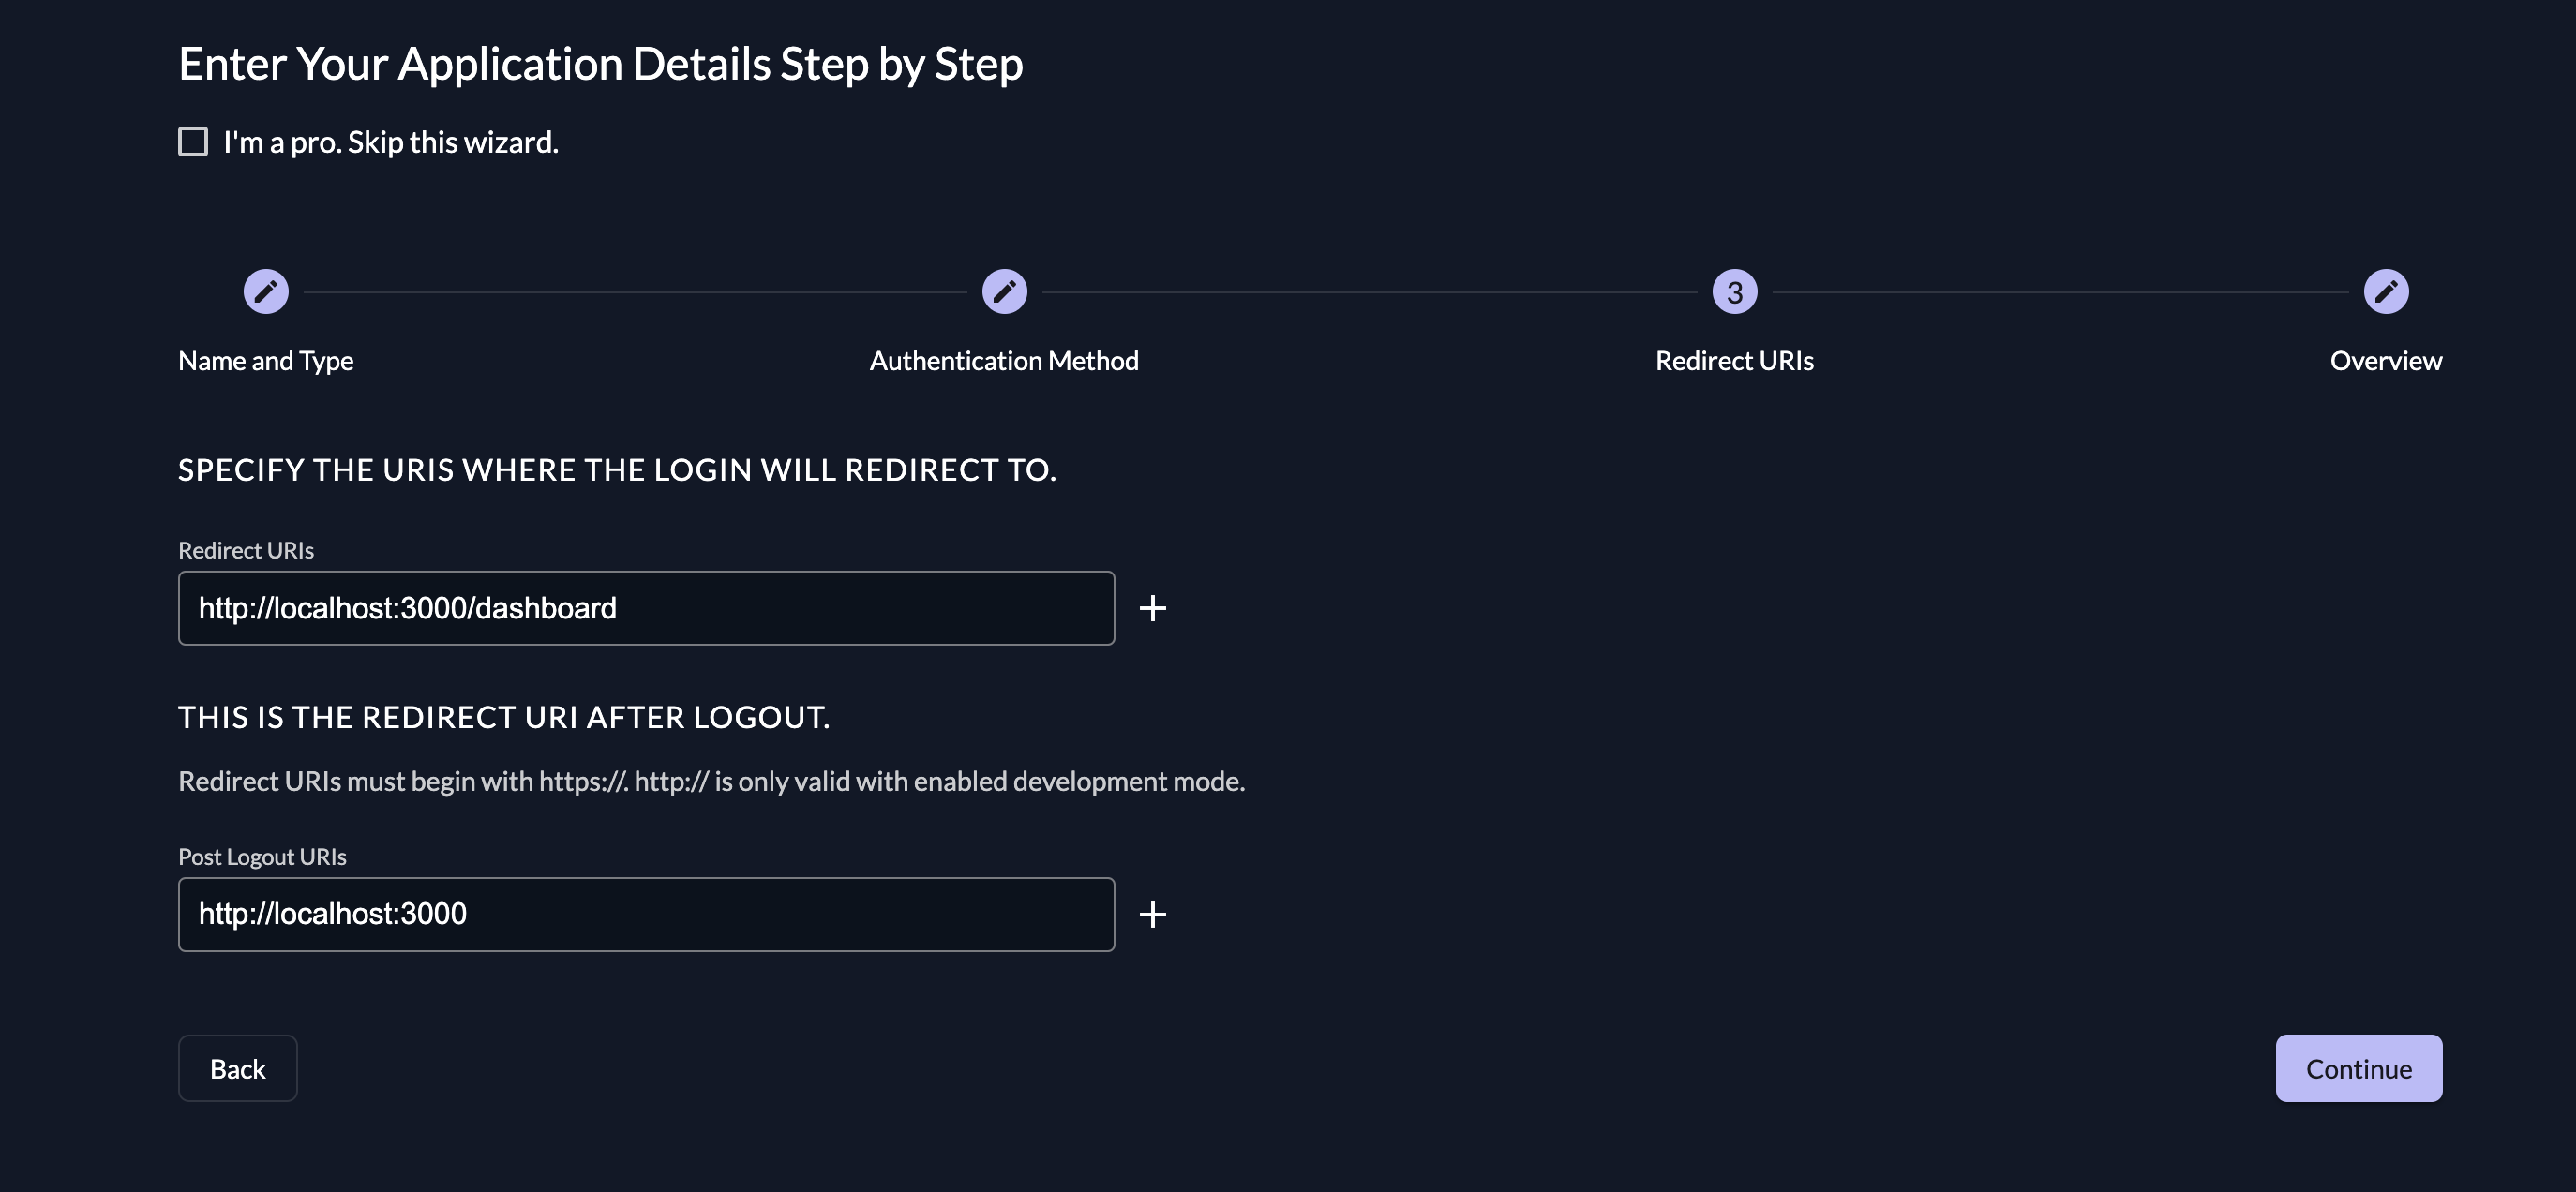
Please note: You'll need to enable development mode in your project's Redirect Settings for these URLs to work.
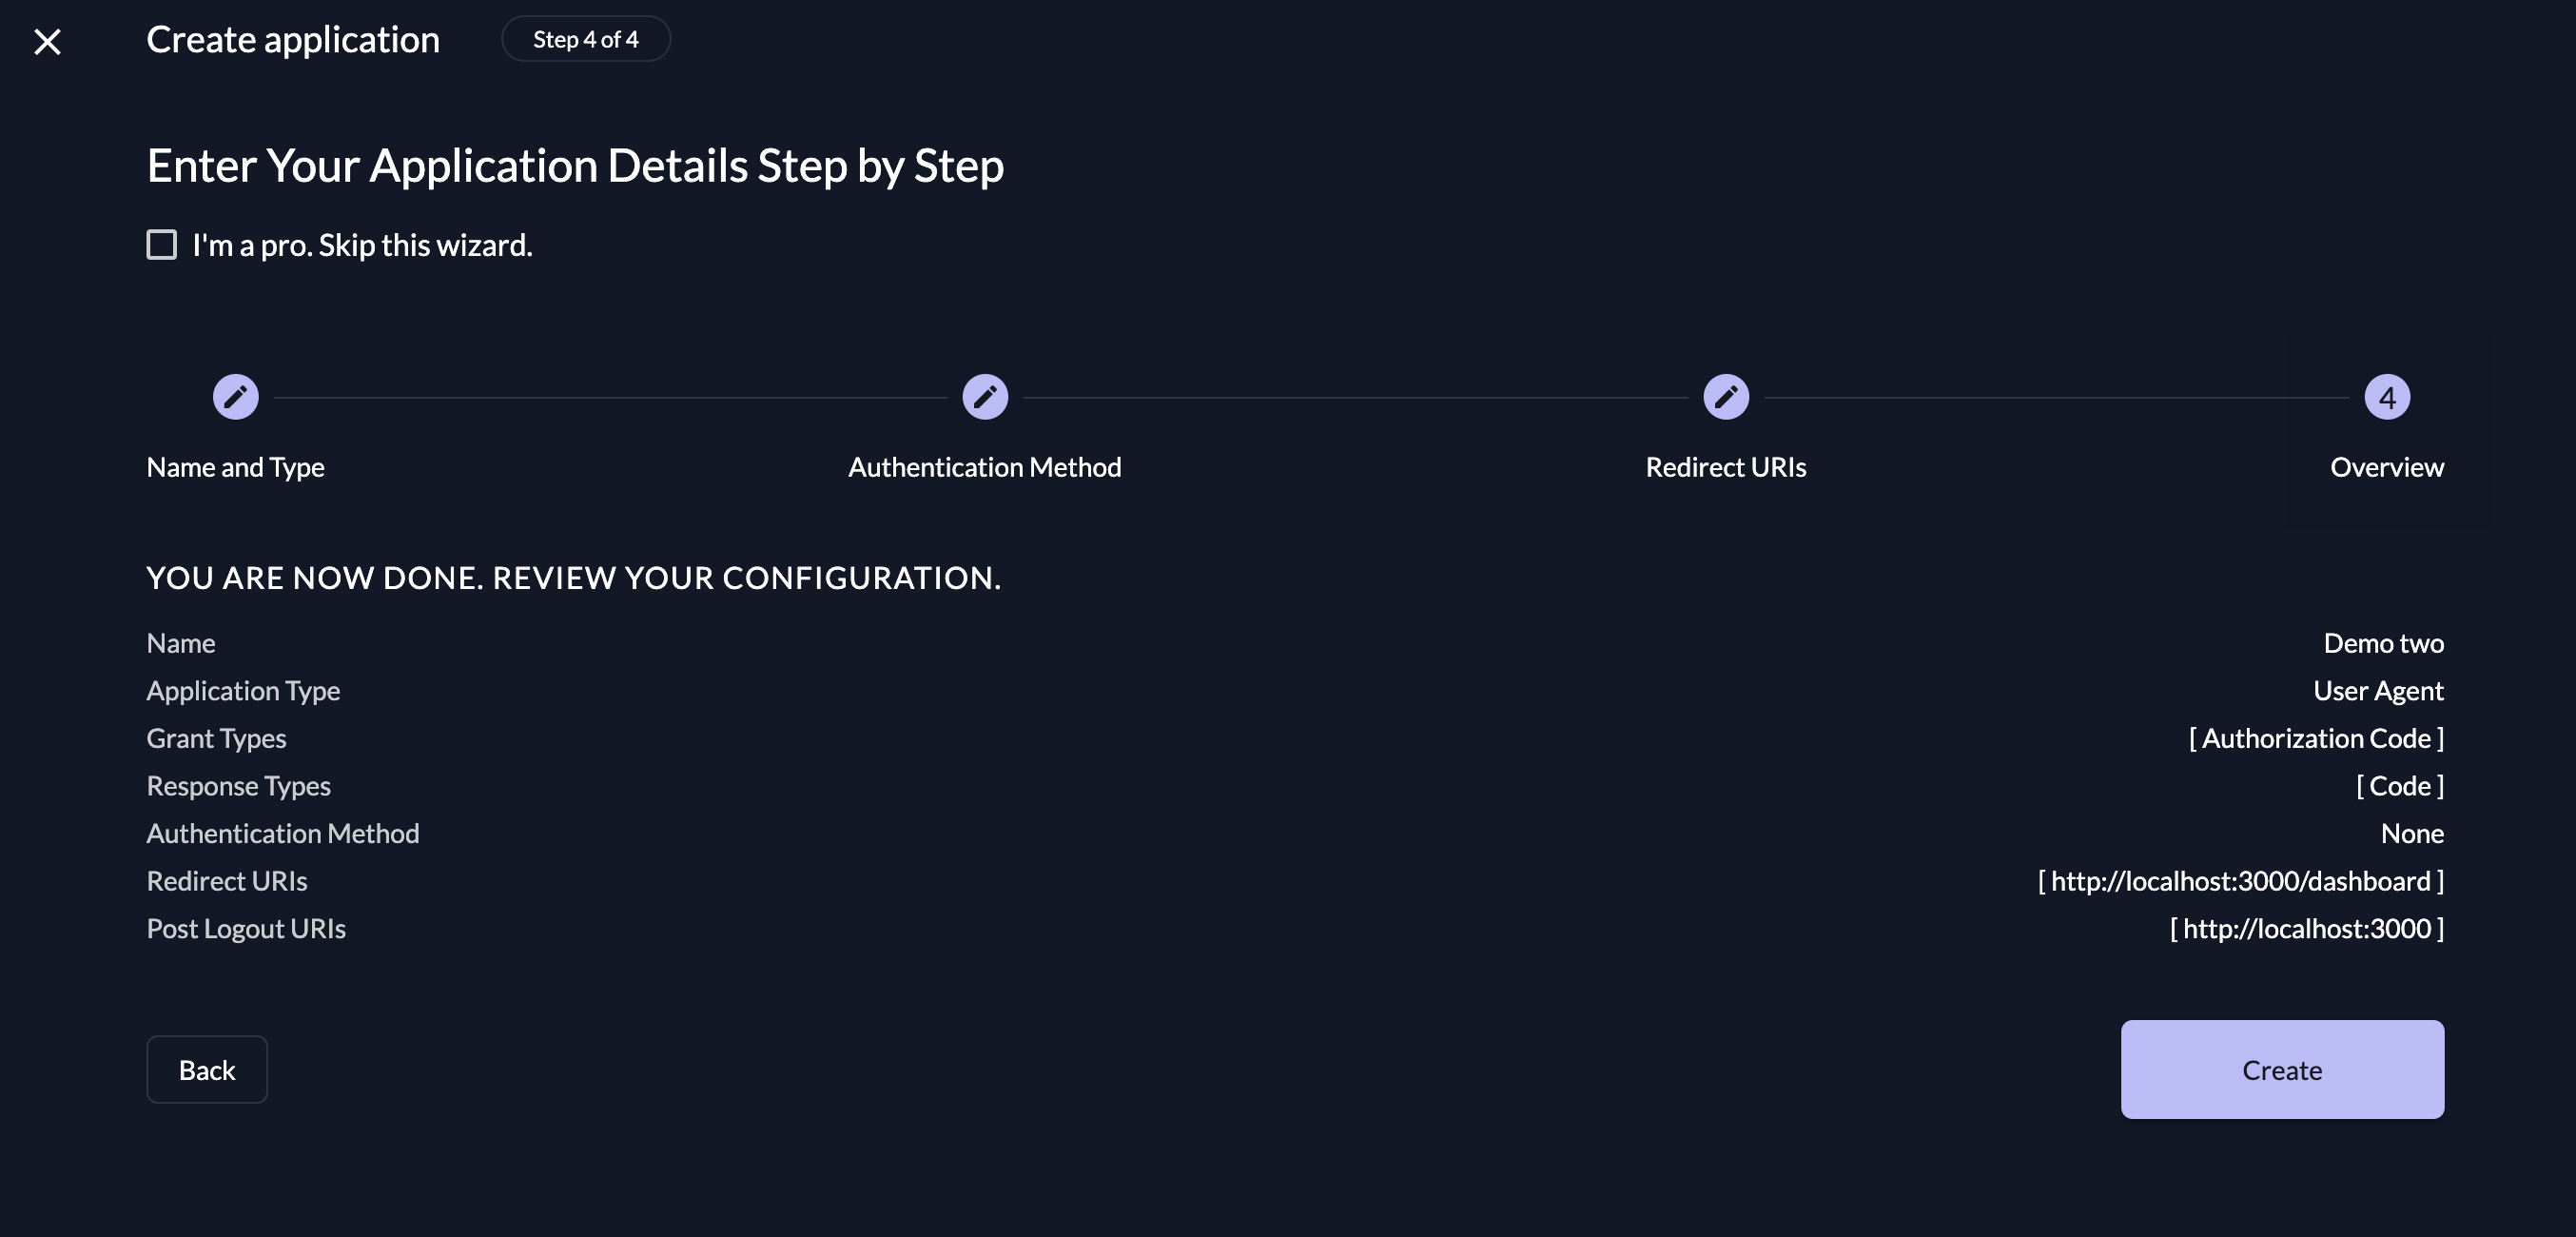
- Review your selections and click the Create button at the bottom right:
Configure SPA with ZITADEL Authentication
Go back to your SPA and create a new file with the name of your choice. Import the AuthProvider component from the installed oidc package to the new file:
`import { AuthProvider } from "oidc-react";`
Create a constant variable containing an object with the required parameters:
const oidcConfig = {
    onSignIn: async (response: any) => {
      alert(
        "You logged in :" +
          response.profile.given_name +
          " " +
          response.profile.family_name
      );
      window.location.hash = "";
    },
    authority: "https:/[your-domain]-[random-string].zitadel.cloud", // replace with your instance
    clientId: "YOUR-CLIENT-ID",
    responseType: "code",
    redirectUri: "YOUR-REDIRECT-URL",
    scope: "openid profile email",
  };
YOUR-CLIENT-ID should be replaced with the generated client ID of your ZITADEL application. To locate this, navigate to the Project tab of your ZITADEL console and select Configuration:
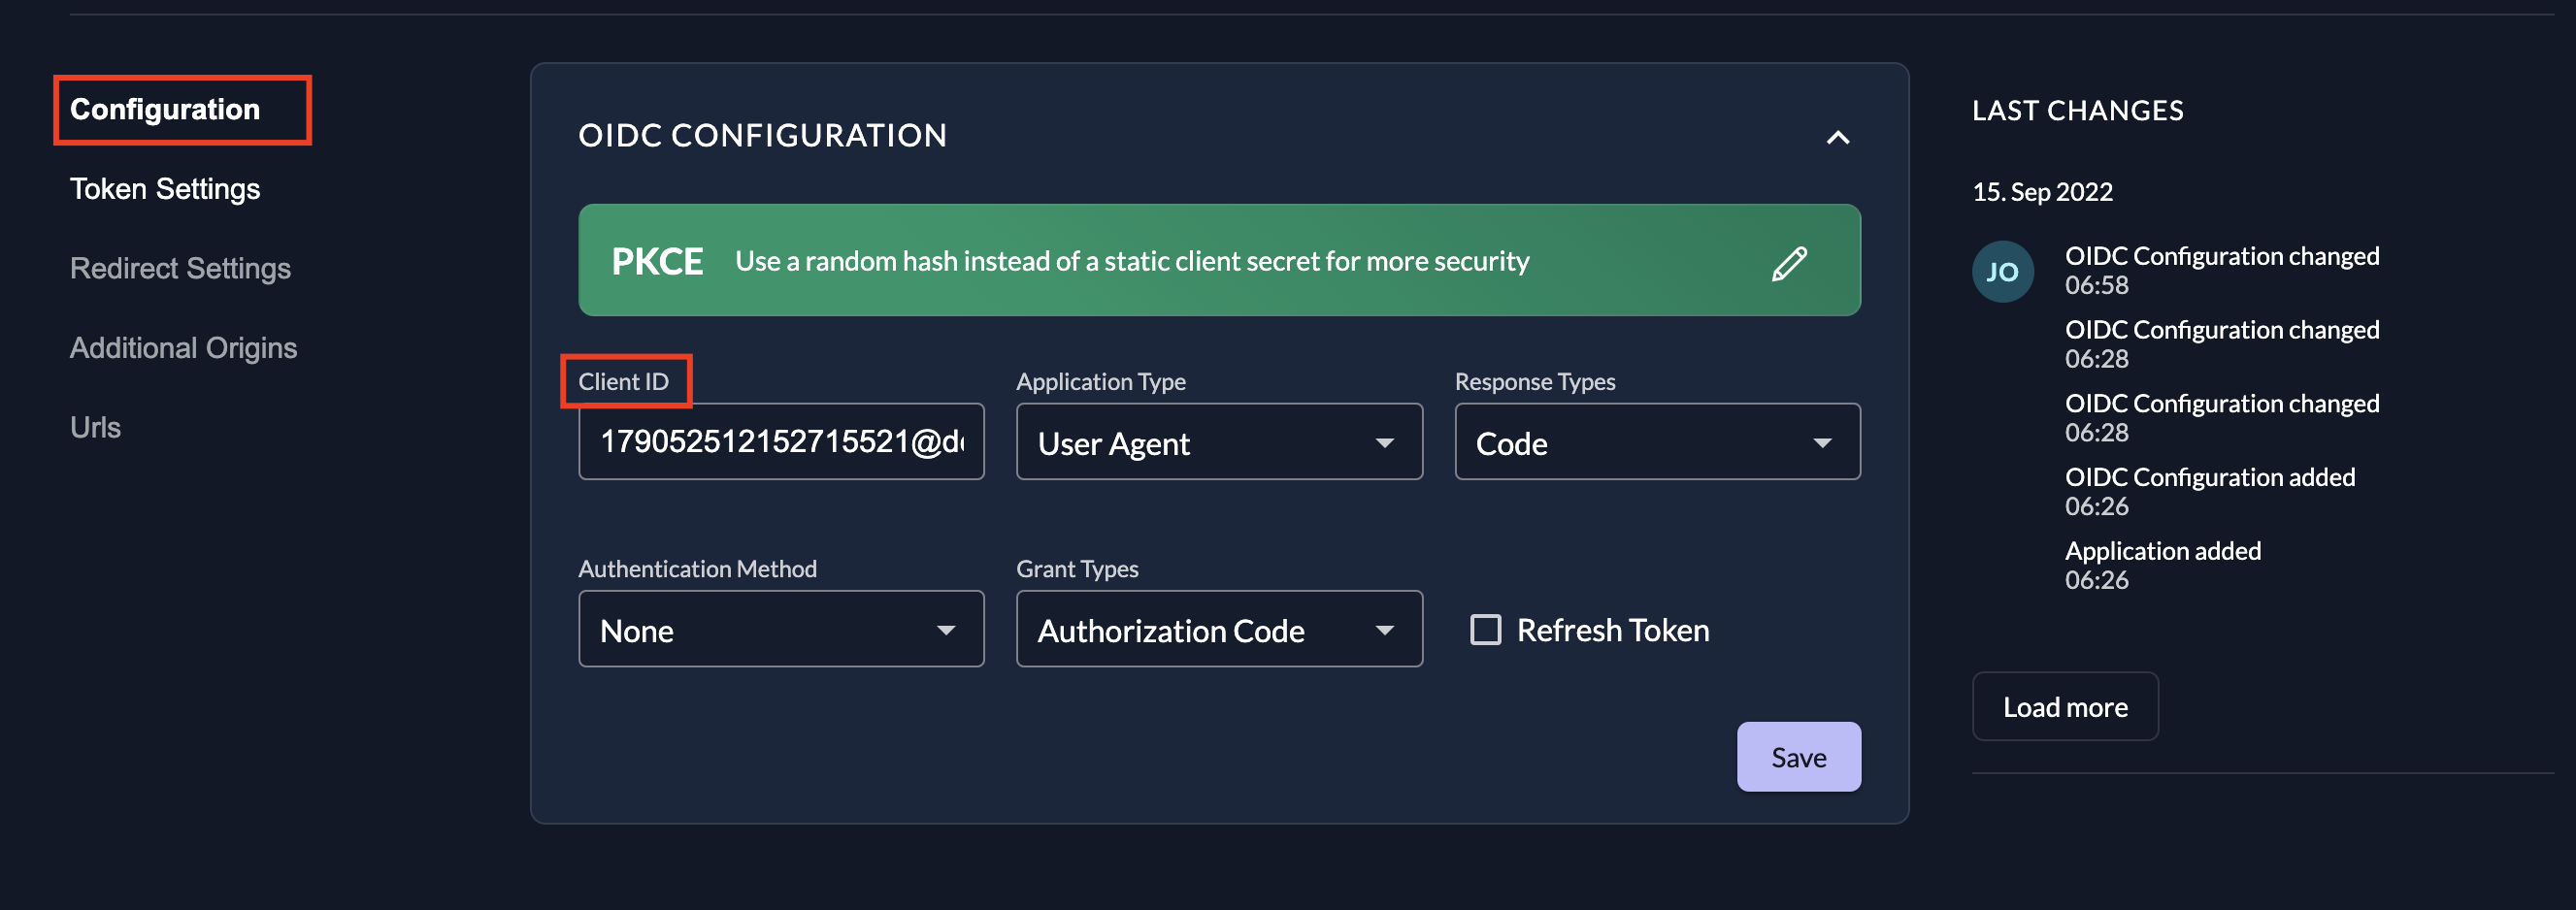
YOUR-REDIRECT-URL should be replaced with the redirect URL you specified when creating the application. If you need to be reminded, you can select Redirect Settings on the project tab to see your redirect URL.
Wrap the authenticated components/sections in the AuthProvider component and pass the constant variable as a prop using the JSX Spread operator:
function Dashboard() {
  return (
    <AuthProvider {...oidcConfig}>
      <div className="App">
        <header className="App-header">
          <p>Welcome Back</p>
        </header>
      </div>
    </AuthProvider>
  );
}

export default Dashboard;
Install React Router into your React application by running npm i react-router-dom@latest, and then set up the router in the App.js file by importing the react-router-dom components with the command import { BrowserRouter, Routes, Route } from "react-router-dom";.
Import the dashboard, home, and other created components into the App.js file:
import Dashboard from 'path/to/file/Auth'
import Home from "path/to/file/Home";
Use the imported components:
function App() {
  return (
    <BrowserRouter>
      <Routes>
          <Route path="/" element={<Home />} />
          <Route path="/dashboard" element={<Dashboard />} />
      </Routes>
    </BrowserRouter>
  );
}

export default App;
Publish Your Application Using Workers
Change the directory (cd) into your React application and create a file called wrangler.toml with the following contents:
name = "<NAME-OF-REACT-APP>"
account_id = '<YOUR_CLOUDFLARE_ACCOUNT_ID>'
usage_model = 'bundled'
compatibility_date = "2022-09-19"
workers_dev = true
main = "<FOLDER-NAME-OF-THE-WORKER-SITE>/index.js"
[site]
bucket = 'build'
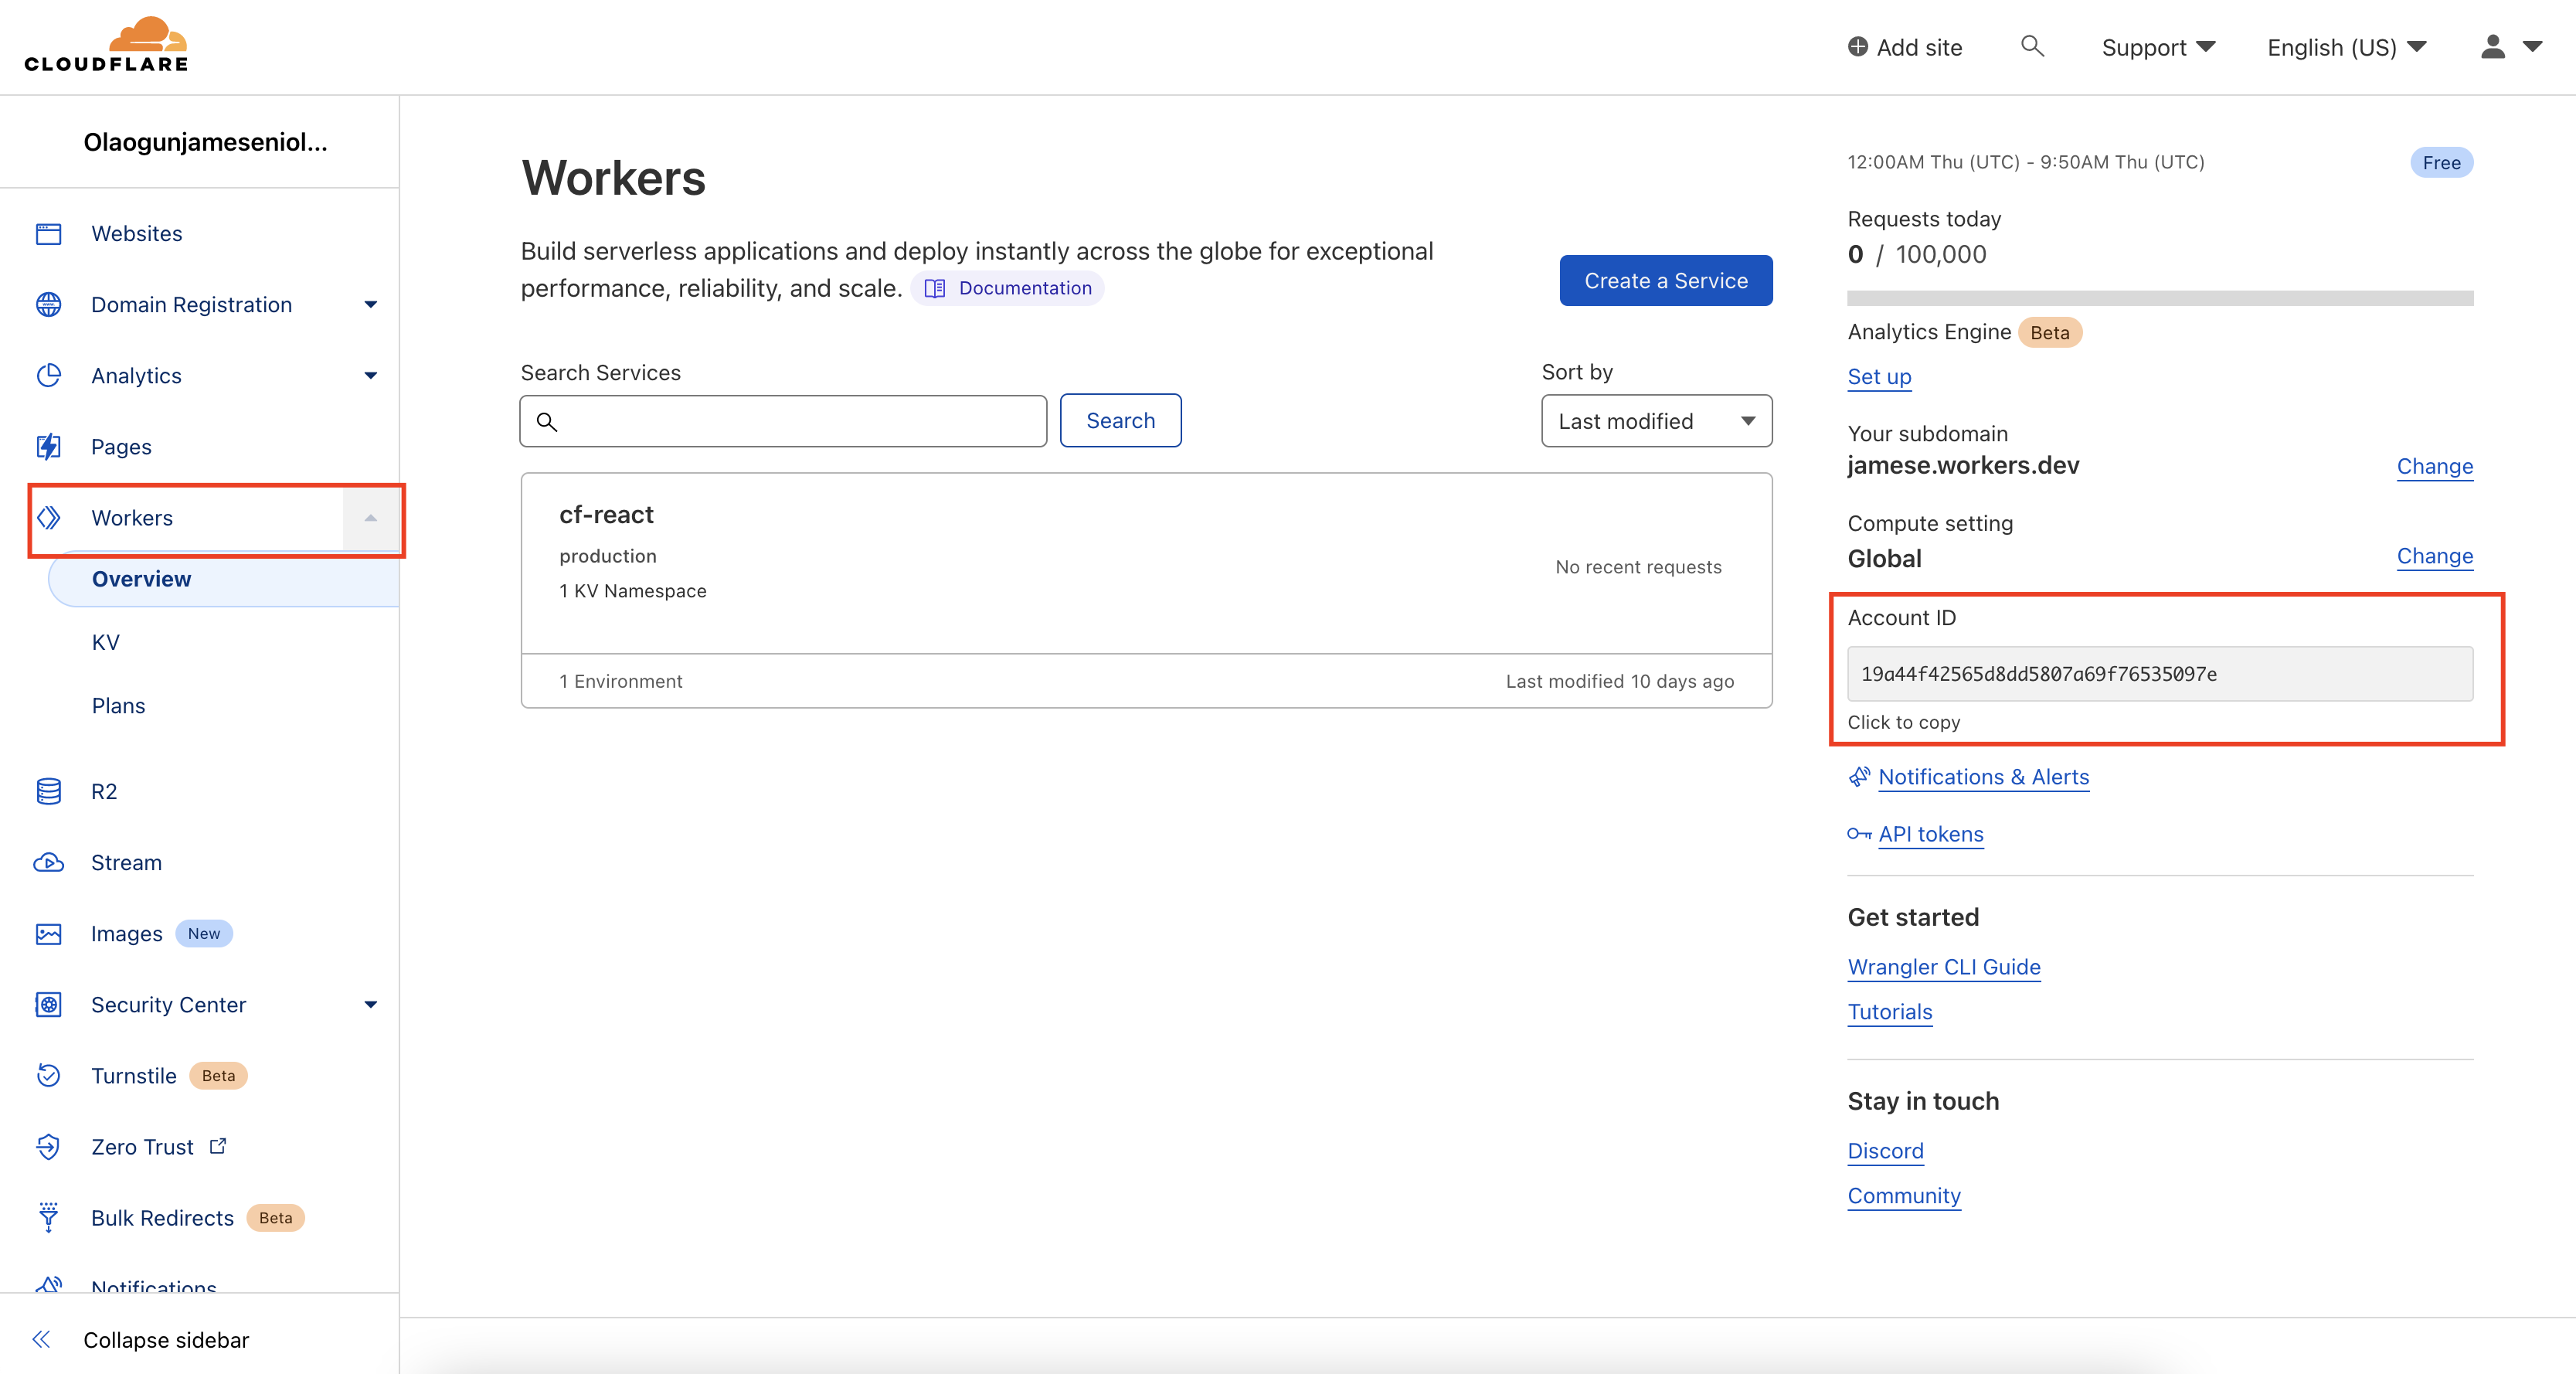
To get your <YOUR_CLOUDFLARE_ACCOUNT_ID>, log into your Cloudflare Workers account, click on Workers on the sidebar, and copy your Account ID from the right side of the page:
Change the directory into <FOLDER-NAME-OF-THE-WORKER-SITE> and create a file named index.js; then paste in the following code snippet:
import { getAssetFromKV, mapRequestToAsset} from "@cloudflare/kv-asset-handler";

/**
 * The DEBUG flag will do two things that help during development:
 * 1. we will skip caching on the edge, which makes it easier to
 *    debug.
 * 2. we will return an error message on exception in your Response rather
 *    than the default 404.html page.
 */

const DEBUG = false;

addEventListener("fetch", (event) => {

  try {
    event.respondWith(handleEvent(event));
  } catch (e) {
    if (DEBUG) {
      return event.respondWith(
        new Response(e.message || e.toString(), {
          status: 500,
        })
      );
    }
    event.respondWith(new Response("Internal Error", { status: 500 }));
  }
});

async function handleEvent(event) {
  const url = new URL(event.request.url);
  let options = {};
  /**
   * You can add custom logic to how we fetch your assets
   * by configuring the function `mapRequestToAsset`
   */
  options.mapRequestToAsset = (req) => {
    // First let's apply the default handler, which we imported from
    // '@cloudflare/kv-asset-handler' at the top of the file. We do
    // this because the default handler already has logic to detect
    // paths that should map to HTML files, for which it appends
    // `/index.html` to the path.
    req = mapRequestToAsset(req);
    // Now we can detect if the default handler decided to map to
    // index.html in some specific directory.
    if (req.url.endsWith("/index.html")) {
      // Indeed. Let's change it to instead map to the root `/index.html`.
      // This avoids the need to do a redundant lookup that we know will
      // fail.
      return new Request(`${new URL(req.url).origin}/index.html`, req);
    } else {
      // The default handler decided this is not an HTML page. It's probably
      // an image, CSS, or JS file. Leave it as-is.
      return req;
    }
  };
  try {
    if (DEBUG) {
      // customize caching
      options.cacheControl = {
        bypassCache: true,
      };
    }
    return await getAssetFromKV(event, options);
  } catch (e) {
    // Fall back to serving `/index.html` on errors.
    return getAssetFromKV(event, {
      mapRequestToAsset: (req) =>
        new Request(`${new URL(req.url).origin}/index.html`, req),
    });
  }
}
The previous code snippet is required for an SPA made with React, Vue.js, or Angular. It monitors the Cloudflare Workers for any incoming requests and serves the corresponding asset from Workers KV.
Change the directory back into the root of the React app and run the command npm install @cloudflare/kv-asset-handler.
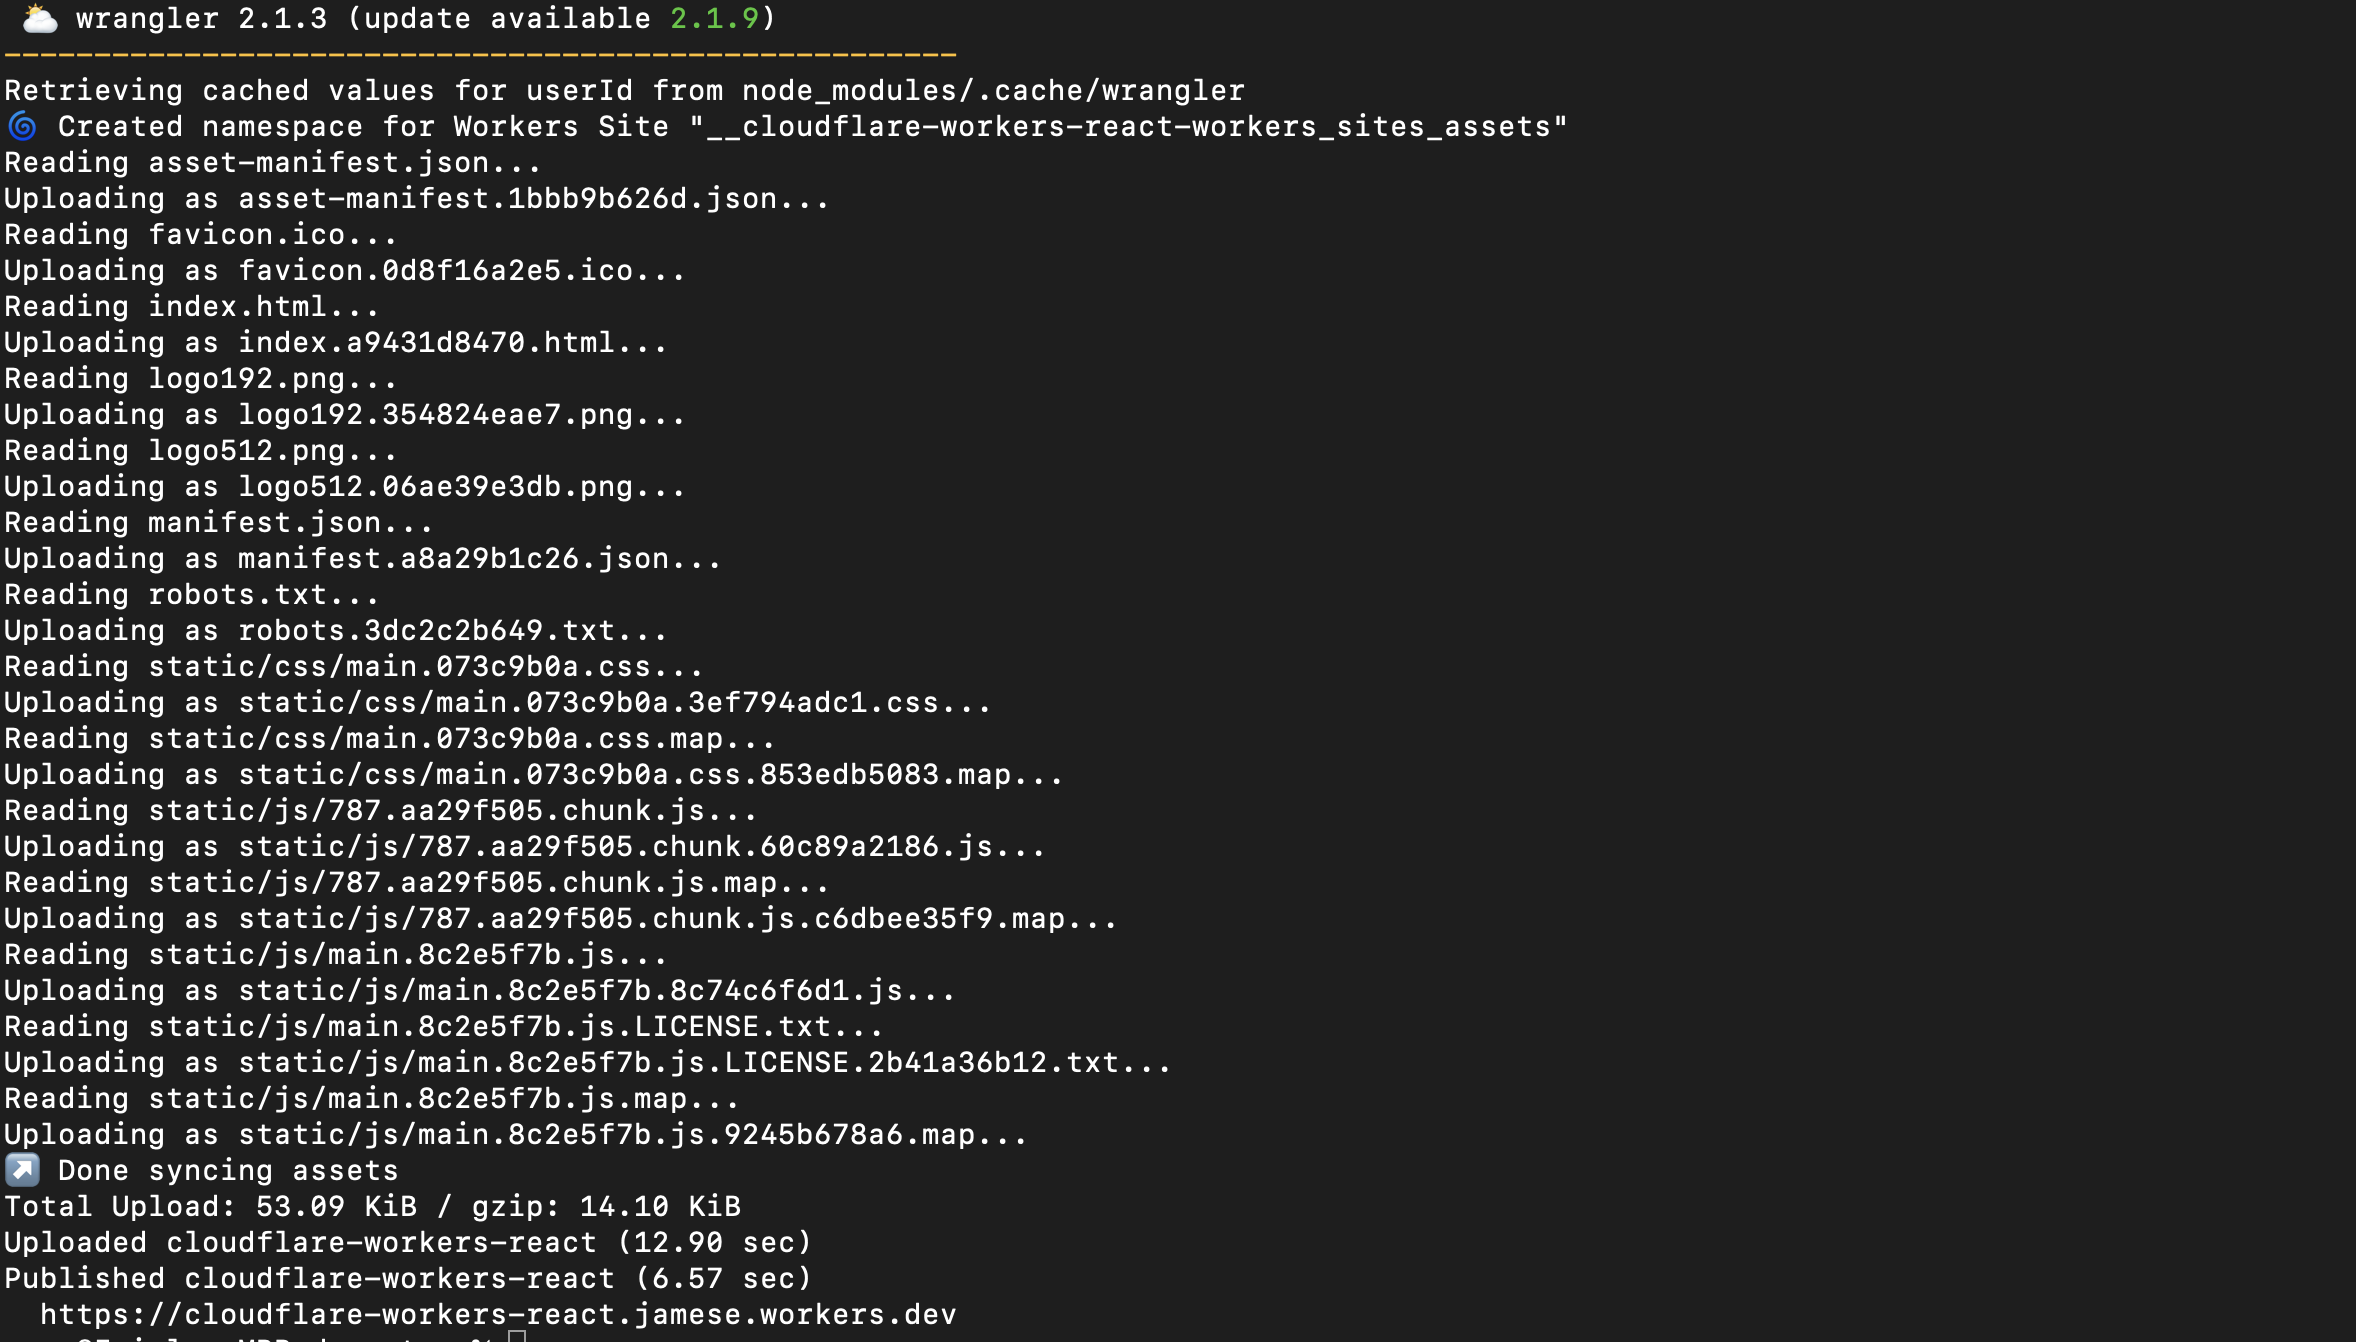
Build your application by running the npm run build command, and then publish your application to Cloudflare Workers by running wrangler publish:
To access the application, open your browser and go to https://<workers-name>.<cloudflare-subdomain>/, where <workers-name> is the <NAME-OF-REACT-APP> and <cloudflare-workers-subdomain> is your Cloudflare Workers subdomain.
You can see all the code used in this tutorial in this GitHub repo.
Conclusion
This article provided a basic overview of single-page applications as well as the security issues associated with SPAs. You've also seen how you can set up a secured SPA using React and ZITADEL. With ZITADEL, you can seamlessly scaffold your application access-control level (ACL) and assign roles to your users using ZITADEL's role-based access control (RBAC).
ZITADEL is an open source identity management platform that provides you with a wide range of features like OpenID Connect, SAML 2.0, OAuth 2, FIDO2, OTP, and an unlimited audit trail. With ZITADEL, you can solve all your authentication and authorization needs. Check out our repo and give us a GitHub star. We appreciate the feedback.
This article was contributed by James Olaogun.