Secure Java Spring Boot API Application with ZITADEL
This integration guide shows you how to integrate ZITADEL into your Java Spring Boot API. It demonstrates how to secure your API using OAuth 2 Token Introspection.
At the end of the guide you should have an API with a protected endpoint.
This documentation references our example on GitHub. You can either create your own application or directly run the example by providing the necessary arguments.
Set up application
Before we begin developing our API, we need to perform a few setup steps in the ZITADEL Console. You'll need to provide some information about your app. We recommend creating a new app to start from scratch. Navigate to your Project, then add a new application at the top of the page. Select the API application type and continue.
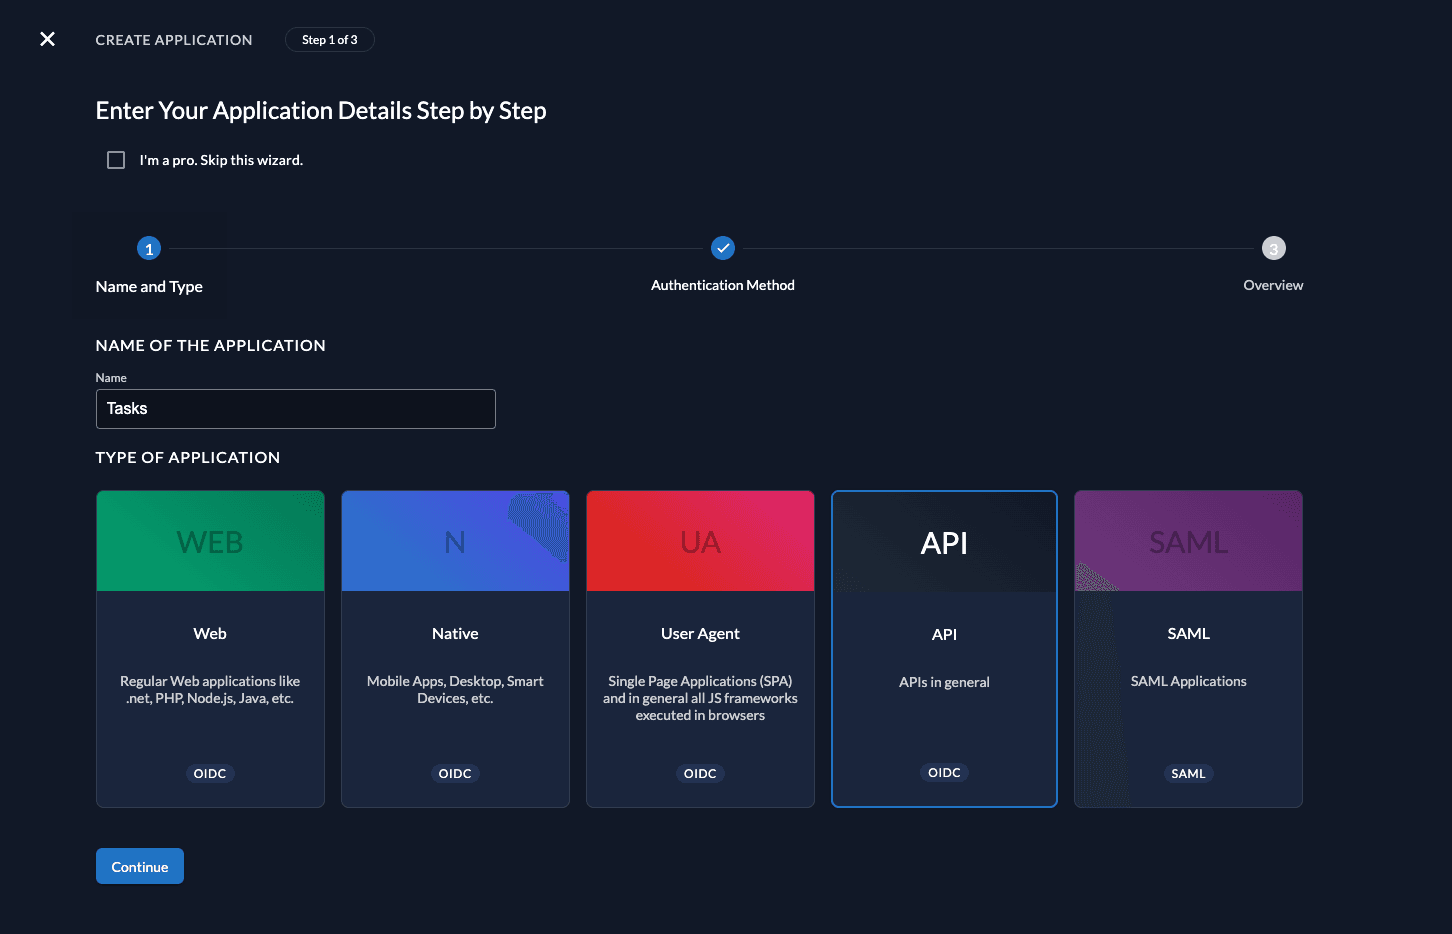
Select Basic Auth for authenticating at the Introspection Endpoint.
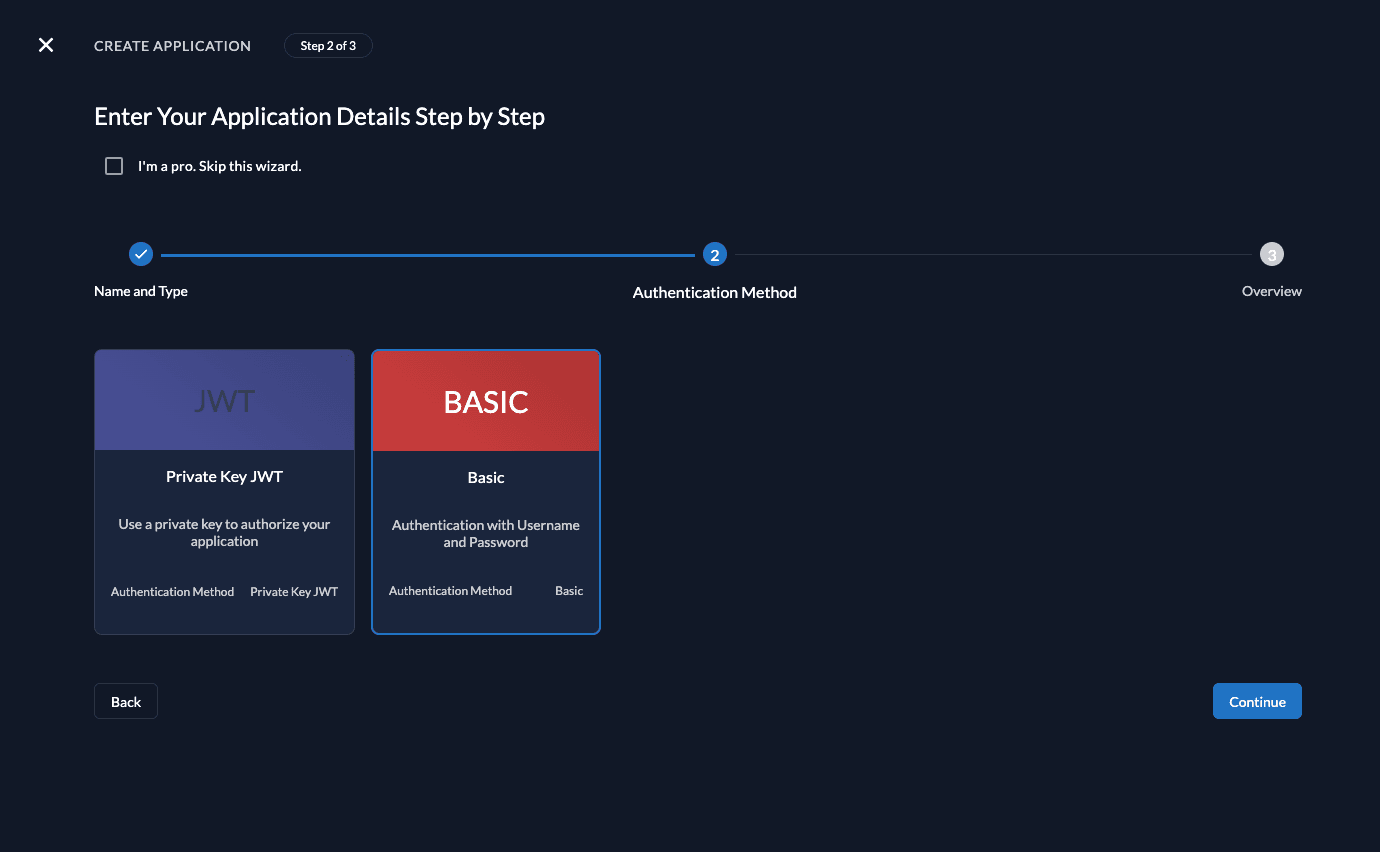
After successful creation of the app, a pop-up will appear displaying the app's client ID. Copy the client ID and secret, as you will need it to configure your Java application.
Spring Setup
Now that you have configured your web application on the ZITADEL side, you can proceed with the integration of your Spring application. This guide will reference the example repository and explain the necessary steps taken in there. If your starting from scratch, you can use the Spring Initializer with the following setup as a base.
Support class
To be able to take the most out of ZITADELs RBAC, we first need to create a CustomAuthorityOpaqueTokenIntrospector, that will
customize the introspection behavior and map the role claims (urn:zitadel:iam:org:project:roles)
into Spring Security authiorities, which can be used later on to determine the granted permissions.
So in your application, create a support/zitadel package and in there the CustomAuthorityOpaqueTokenIntrospector.java:
package demo.app.support.zitadel;import java.util.Collection;import java.util.HashMap;import java.util.HashSet;import org.springframework.security.core.GrantedAuthority;import org.springframework.security.core.authority.SimpleGrantedAuthority;import org.springframework.security.oauth2.core.DefaultOAuth2AuthenticatedPrincipal;import org.springframework.security.oauth2.core.OAuth2AuthenticatedPrincipal;import org.springframework.security.oauth2.server.resource.introspection.OpaqueTokenIntrospector;public class CustomAuthorityOpaqueTokenIntrospector implements OpaqueTokenIntrospector { public static final String ZITADEL_ROLES_CLAIM = "urn:zitadel:iam:org:project:roles"; public CustomAuthorityOpaqueTokenIntrospector(OpaqueTokenIntrospector delegate) { this.delegate = delegate; } private OpaqueTokenIntrospector delegate; public OAuth2AuthenticatedPrincipal introspect(String token) { OAuth2AuthenticatedPrincipal principal = this.delegate.introspect(token); return new DefaultOAuth2AuthenticatedPrincipal( principal.getName(), principal.getAttributes(), extractAuthorities(principal)); } private Collection<GrantedAuthority> extractAuthorities(OAuth2AuthenticatedPrincipal principal) { var authorities = new HashSet<GrantedAuthority>(); HashMap<String, Object> claims = principal.getAttribute(ZITADEL_ROLES_CLAIM); if (claims == null) { return authorities; } claims.keySet().forEach(role -> { authorities.add(new SimpleGrantedAuthority("ROLE_" + role)); }); return authorities; }}Application server settings
As we have now our support class, we can now create and configure the application server itself.
In a new config package, create the WebSecurityConfig.java.
This class will take care of the authorization by require the calls on /api/tasks to be authorized. Any other endpoint will be public by default.
It will also use the just created CustomAuthorityOpaqueTokenIntrospector for the introspection call:
package demo.app.config;import lombok.RequiredArgsConstructor;import org.springframework.beans.factory.annotation.Autowired;import org.springframework.context.annotation.Bean;import org.springframework.context.annotation.Configuration;import org.springframework.security.config.annotation.method.configuration.EnableMethodSecurity;import org.springframework.security.config.annotation.web.builders.HttpSecurity;import org.springframework.security.config.http.SessionCreationPolicy;import org.springframework.security.oauth2.server.resource.introspection.OpaqueTokenIntrospector;import org.springframework.security.web.SecurityFilterChain;import demo.app.support.zitadel.CustomAuthorityOpaqueTokenIntrospector;/** * Configuration applied on all web endpoints defined for this * application. Any configuration on specific resources is applied * in addition to these global rules. */@Configuration@RequiredArgsConstructor@EnableMethodSecurityclass WebSecurityConfig { @Autowired private OpaqueTokenIntrospector introspector; /** * Configures basic security handler per HTTP session. * <p> * <ul> * <li>Stateless session (no session kept server-side)</li> * <li>CORS set up</li> * <li>Require authentication for the /api/tasks paths</li> * <li>access token converted into Spring token</li> * </ul> * * @param http security configuration * @throws Exception any error */ @Bean public SecurityFilterChain filterChain(HttpSecurity http) throws Exception { http .csrf(c -> c.disable()) .sessionManagement(smc -> { smc.sessionCreationPolicy(SessionCreationPolicy.STATELESS); }) .authorizeHttpRequests(arc -> { arc.requestMatchers("/api/tasks").authenticated(); arc.anyRequest().permitAll(); }) .oauth2ResourceServer(rs -> rs.opaqueToken(a -> a.introspector(this.introspector()))); return http.build(); } private OpaqueTokenIntrospector introspector() { return new CustomAuthorityOpaqueTokenIntrospector(introspector); }}For the authorization (and the server in general) to work, the application needs some settings, so please provide the following to your application.yml (resources folder):
server: port: 18090 servlet: context-path: / error: include-stacktrace: neverspring: jackson: serialization: write-dates-as-timestamps: false deserialization: # deals with single and multi-valued JWT claims accept-single-value-as-array: true security: oauth2: resourceserver: opaquetoken: introspection-uri: '<api-introspection-uri>' client-id: '<the-api-client-id>' client-secret: '<the-api-client-secret>'logging: level: root: info demo: debug org: springframework: web: info security: debugNote that the introspection-uri, client-id and client-secret are only placeholders. You can either change them in here using the values provided by ZITADEL
or pass them later on as arguments when starting the application.
Create example API
Create a api package with a ExampleController.java file with the content below. This will create an API with three endpoints / methods:
/api/healthz: can be called by anyone and always returnsOK/api/tasks (GET): requires authorization and returns the available tasks/api/tasks (POST): requires authorization with grantedadminrole and adds the task to the list
If authorization is required, the token must not be expired and the API has to be part of the audience (either client_id or project_id).
For tests we will use a Personal Access Token or the Java Spring web example.
package demo.app.api;import org.springframework.http.HttpStatus;import org.springframework.http.MediaType;import org.springframework.security.access.prepost.PreAuthorize;import org.springframework.security.web.servletapi.SecurityContextHolderAwareRequestWrapper;import org.springframework.web.bind.annotation.GetMapping;import org.springframework.web.bind.annotation.PostMapping;import org.springframework.web.bind.annotation.RequestBody;import org.springframework.web.bind.annotation.RestController;import org.springframework.web.server.ResponseStatusException;import java.util.ArrayList;import java.util.Arrays;import jakarta.servlet.http.HttpServletResponse;@RestControllerclass ExampleController { private ArrayList<String> tasks = new ArrayList<>(); @GetMapping("/api/healthz") Object healthz() { return "OK"; } @GetMapping(value = "/api/tasks", produces = MediaType.APPLICATION_JSON_VALUE) @PreAuthorize("isAuthenticated()") Object tasks(SecurityContextHolderAwareRequestWrapper requestWrapper) { if (this.tasks.size() > 0 || !requestWrapper.isUserInRole("ROLE_admin")) { return this.tasks; } return Arrays.asList("add the first task"); } @PostMapping(value = "/api/tasks", consumes = MediaType.APPLICATION_JSON_VALUE, produces = MediaType.APPLICATION_JSON_VALUE) @PreAuthorize("hasRole('admin')") Object addTask(@RequestBody String task, HttpServletResponse response) { if (task.isBlank()) { throw new ResponseStatusException(HttpStatus.BAD_REQUEST, "task must not be empty"); } this.tasks.add(task); return "task added"; }}Test API
In case you've created your own application and depending on your development setup you might need to build the application first:
mvn clean package -DskipTestsYou will need to provide the introspection-uri ($CUSTOM_DOMAIN/oauth/v2/introspect), the client-id and client-secret previously created:
java \
  -Dspring.security.oauth2.resourceserver.opaquetoken.introspection-uri=<see configuration above> \
  -Dspring.security.oauth2.resourceserver.opaquetoken.client-id=<see configuration above> \
  -Dspring.security.oauth2.resourceserver.opaquetoken.client-secret=<see configuration above> \
  -jar api/target/api-0.0.2-SNAPSHOT.jar
This could look like:
java \
  -Dspring.security.oauth2.resourceserver.opaquetoken.introspection-uri=https://my-domain.zitadel.cloud/oauth/v2/introspect  \
  -Dspring.security.oauth2.resourceserver.opaquetoken.client-id=243861220627644836@example \
  -Dspring.security.oauth2.resourceserver.opaquetoken.client-secret=WJKLF3kfPOi3optkg9vi3jmfjv8oj32nfiäohj!FSC09RWUSR \
  -jar web/target/web-0.0.2-SNAPSHOT.jar
Public endpoint
Now you can call the API by browser or curl. Try the healthz endpoint first:
curl -i http://localhost:18090/api/healthzit should return something like:
HTTP/1.1 200
Vary: Origin
Vary: Access-Control-Request-Method
Vary: Access-Control-Request-Headers
X-Content-Type-Options: nosniff
X-XSS-Protection: 0
Cache-Control: no-cache, no-store, max-age=0, must-revalidate
Pragma: no-cache
Expires: 0
X-Frame-Options: DENY
Content-Type: text/plain;charset=UTF-8
Content-Length: 2
Date: Mon, 15 Jan 2024 09:07:21 GMT

OK
Task list
and the task list endpoint:
curl -i http://localhost:18090/api/tasksit will return:
HTTP/1.1 401
Vary: Origin
Vary: Access-Control-Request-Method
Vary: Access-Control-Request-Headers
WWW-Authenticate: Bearer
X-Content-Type-Options: nosniff
X-XSS-Protection: 0
Cache-Control: no-cache, no-store, max-age=0, must-revalidate
Pragma: no-cache
Expires: 0
X-Frame-Options: DENY
Content-Length: 0
Date: Mon, 15 Jan 2024 09:07:55 GMT
Get a valid access_token for the API. You can either achieve this by getting an access token with the project_id in the audience (e.g. by using the Spring Boot web example) use a PAT of a service account.
If you provide a valid Bearer Token:
curl -i -H "Authorization: Bearer ${token}" http://localhost:18090/api/tasksit will return an empty list:
HTTP/1.1 200
Vary: Origin
Vary: Access-Control-Request-Method
Vary: Access-Control-Request-Headers
X-Content-Type-Options: nosniff
X-XSS-Protection: 0
Cache-Control: no-cache, no-store, max-age=0, must-revalidate
Pragma: no-cache
Expires: 0
X-Frame-Options: DENY
Content-Type: application/json
Transfer-Encoding: chunked
Date: Mon, 15 Jan 2024 09:15:10 GMT

[]
Try to add a new task
Let's see what happens if you call the tasks endpoint:
curl -i -X POST -H "Authorization: Bearer ${token}" -H "Content-Type: application/json" --data 'my new task' http://localhost:18090/api/tasksit will complain with a permission denied (missing admin role):
HTTP/1.1 403
Vary: Origin
Vary: Access-Control-Request-Method
Vary: Access-Control-Request-Headers
WWW-Authenticate: Bearer error="insufficient_scope", error_description="The request requires higher privileges than provided by the access token.", error_uri="https://tools.ietf.org/html/rfc6750#section-3.1"
X-Content-Type-Options: nosniff
X-XSS-Protection: 0
Cache-Control: no-cache, no-store, max-age=0, must-revalidate
Pragma: no-cache
Expires: 0
X-Frame-Options: DENY
Content-Length: 0
Date: Mon, 15 Jan 2024 09:24:39 GMT
Add administrator role
So let's create the role and grant it to the user. To do so, go to your project in ZITADEL Management Console
and create the role by selecting Roles in the navigation and then clicking on the New Role button.
Finally, create the role as shown below:

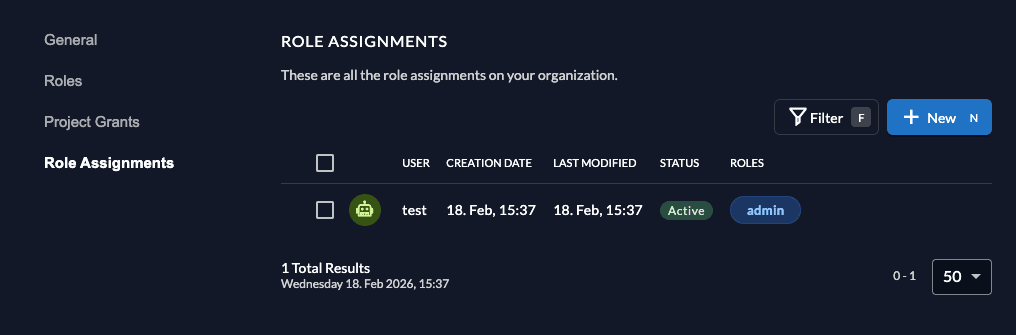
After you have created the role, let's grant it to the user who requested the tasks.
Click on Role Assignments in the navigation and create a new one by selecting the user and the admin role.
After successful creation, it should look like:
So you should now be able to add a new task:
curl -i -X POST -H "Authorization: Bearer ${token}" -H "Content-Type: application/json" --data 'my new task' http://localhost:18090/api/taskswhich will report back the successful addition:
HTTP/1.1 200
Vary: Origin
Vary: Access-Control-Request-Method
Vary: Access-Control-Request-Headers
X-Content-Type-Options: nosniff
X-XSS-Protection: 0
Cache-Control: no-cache, no-store, max-age=0, must-revalidate
Pragma: no-cache
Expires: 0
X-Frame-Options: DENY
Content-Type: application/json
Content-Length: 10
Date: Mon, 15 Jan 2024 09:26:11 GMT

task added
Let's now retrieve the task list again:
curl -i -H "Authorization: Bearer ${token}" http://localhost:18090/api/tasksAs you can see your new task is listed:
HTTP/1.1 200
Vary: Origin
Vary: Access-Control-Request-Method
Vary: Access-Control-Request-Headers
X-Content-Type-Options: nosniff
X-XSS-Protection: 0
Cache-Control: no-cache, no-store, max-age=0, must-revalidate
Pragma: no-cache
Expires: 0
X-Frame-Options: DENY
Content-Type: application/json
Transfer-Encoding: chunked
Date: Mon, 15 Jan 2024 09:26:48 GMT

["my new task"]
Was this page helpful?