Set up OneLogin as a SAML Identity Provider in ZITADEL
This guides shows you how to connect OneLogin as an identity provider in ZITADEL.
In ZITADEL you can connect an Identity Provider (IdP) like OneLogin to your instance and provide it as default to all organizations. Also, you can register the IdP to a specific organization only. If you allow so, your organizations members can do the same in self-service.
OneLogin SAML settings
You need access to a OneLogin admin portal with permission to create and configure SAML applications.
We’ll first configure OneLogin sufficiently to export IdP metadata, which we then import into ZITADEL. After the ZITADEL SAML provider exists, we’ll return to OneLogin and finish the SAML settings using the ZITADEL URLs.
Create a new SAML application for ZITADEL
- Sign in to the OneLogin admin portal.
- Go to Applications > Applications (or Apps > Add Apps, depending on your UI).
- Click Add App.
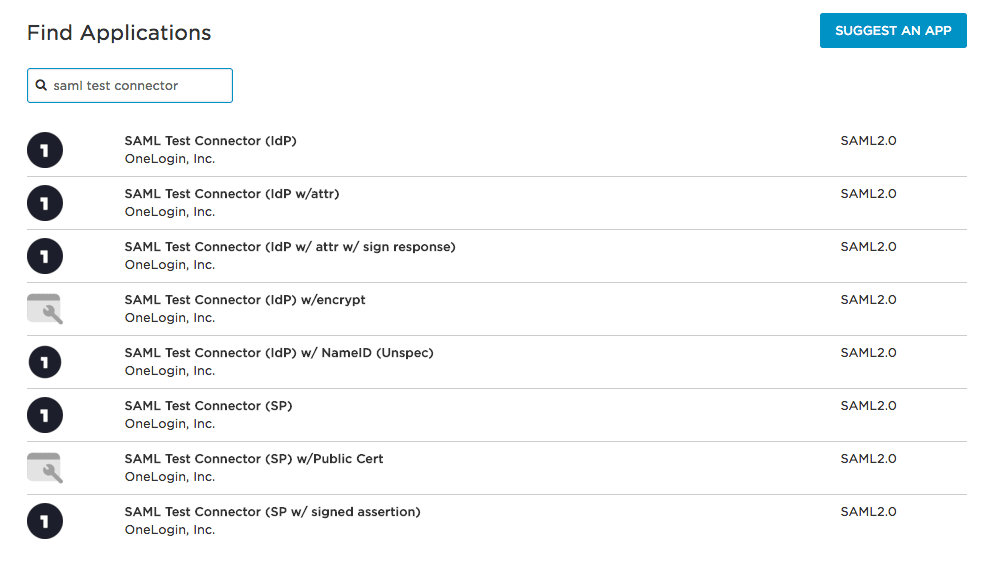
- In Find Applications, search for:
- SAML Test Connector (IdP w/ attr) (recommended), or
- SAML Custom Connector (Advanced) if you prefer a more generic connector.
- Select the connector and set:
- Display Name – for example:
ZITADEL SAML. - Any optional icon or description you like.
- Display Name – for example:
- Click Save to create the application.
Export OneLogin IdP metadata
Now export OneLogin IdP metadata so ZITADEL can trust OneLogin as an identity provider.
- In the OneLogin admin portal, open the ZITADEL SAML application.
- To export the full metadata XML:
- In the top-right corner, open the More Actions menu.
- Select SAML Metadata to download the metadata XML file.
- Alternatively, you can copy the Issuer URL, open it in a browser, and save the XML response. This URL often serves as an IdP metadata endpoint.
Keep either:
- the IdP Metadata URL (Issuer URL that returns XML), or
- the IdP metadata XML file,
ready for the ZITADEL setup steps.
ZITADEL settings
Go to the IdP providers overview
Go to the settings page of your instance or organization and choose "Identity Providers".
In the table you can see all the providers you have configured. Also, you see all provider templates that are available.
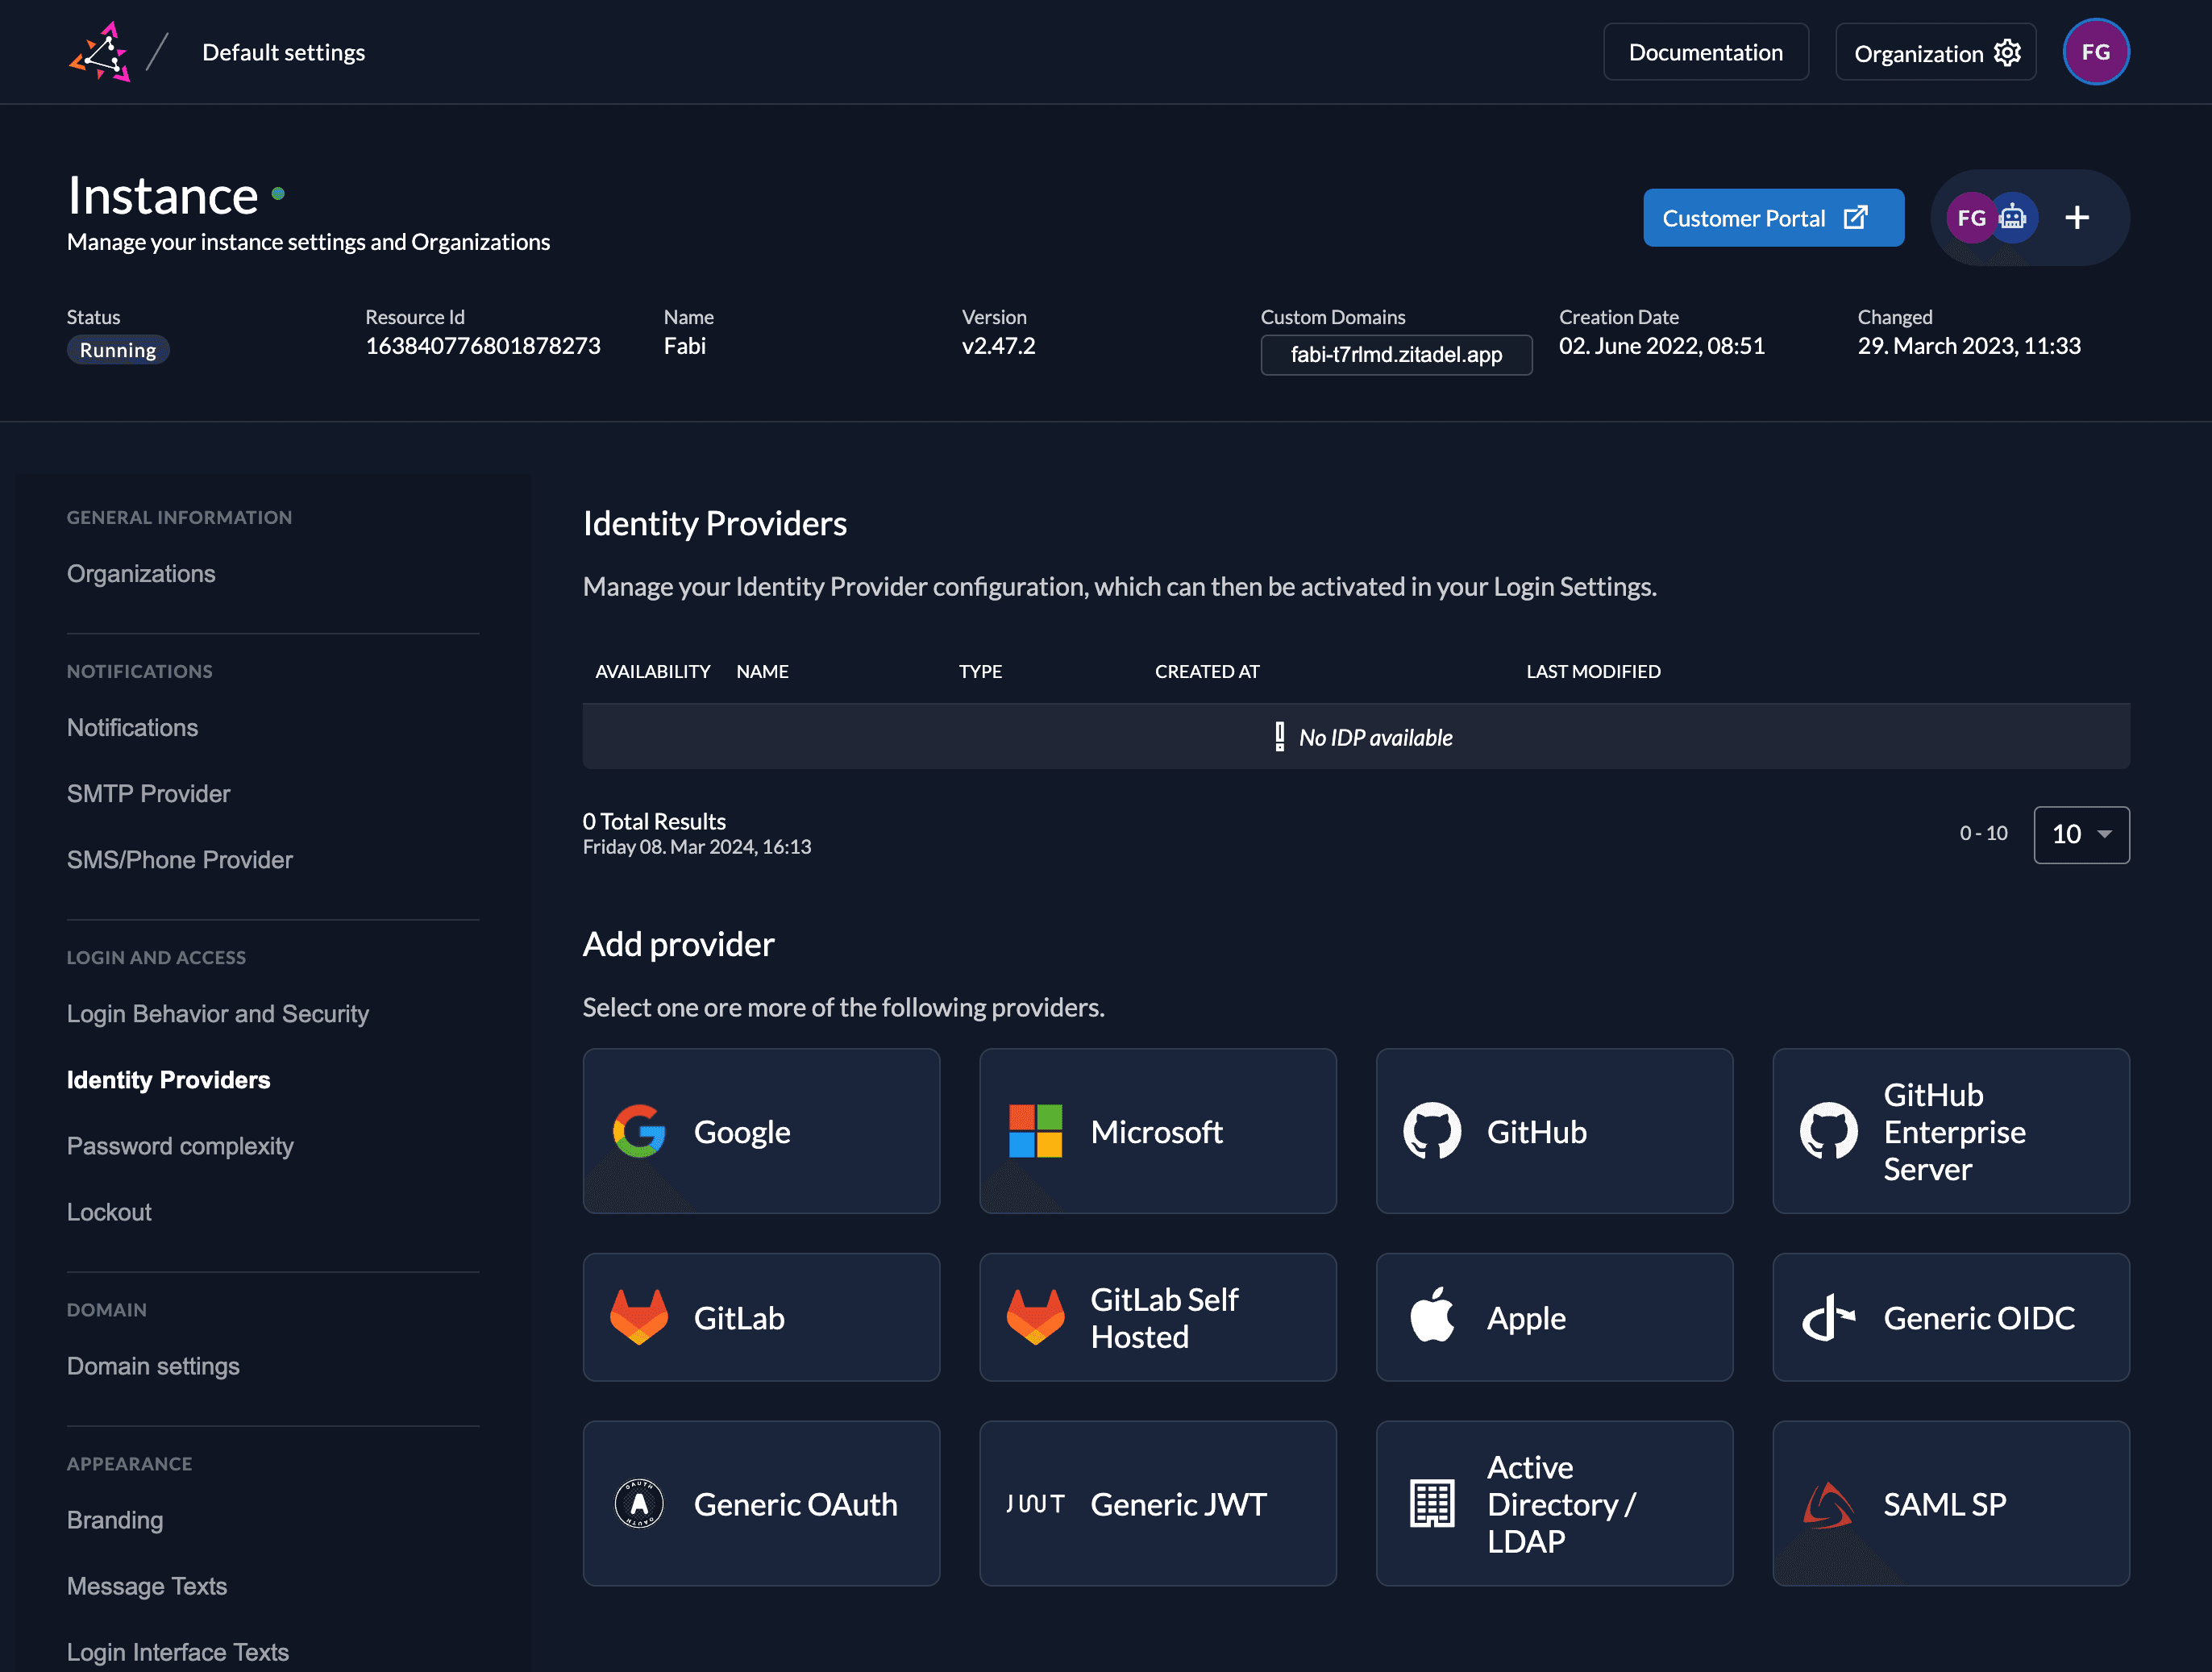
Select the SAML Provider template.
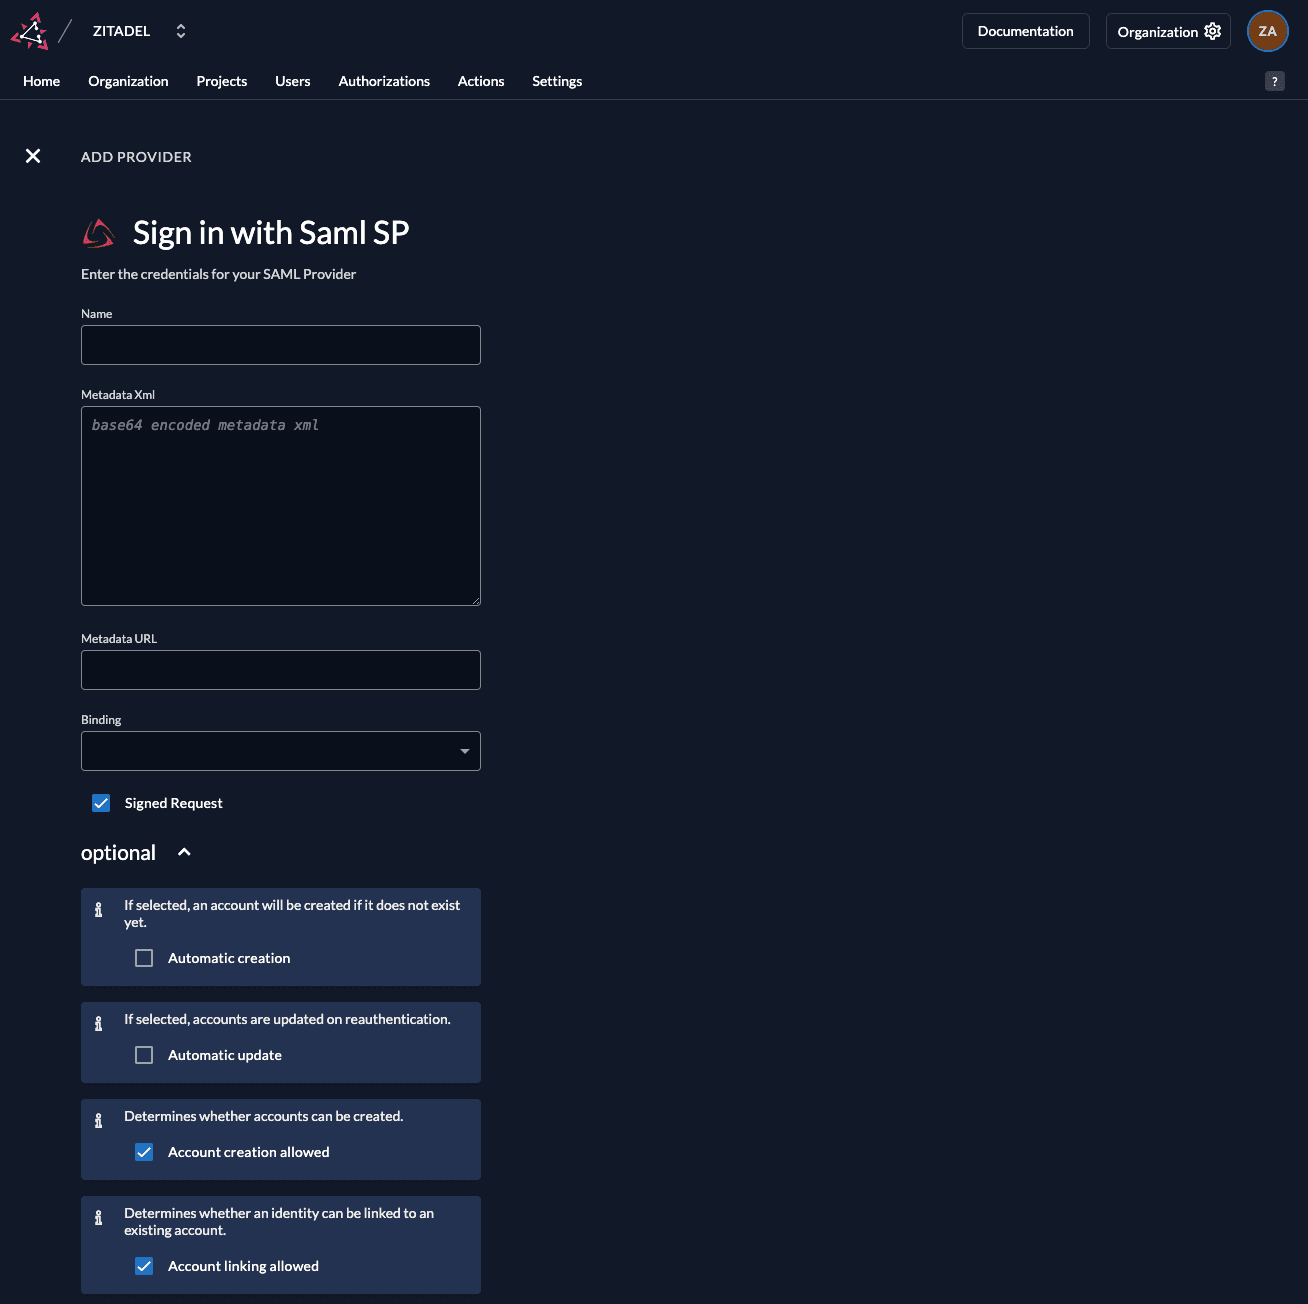
Create a new SAML Service Provider
The SAML provider template has everything you need preconfigured. Add the metadata XML or the URL to the metadata which is accessible by your ZITADEL instance. All the necessary settings are contained in the metadata which has to be exchanged between the Service Provider and the Identity Provider.
Automatic creation: If this setting is enabled the user will be created automatically within ZITADEL, if it doesn't exist.
Automatic update: If this setting is enabled, the user will be updated within ZITADEL, if some user data is changed withing the provider. E.g if the lastname changes on the OneLogin, the information will be changed on the ZITADEL account on the next login.
Account creation allowed: This setting determines if account creation within ZITADEL is allowed or not.
Account linking allowed: This setting determines if account linking is allowed. When logging in with a OneLogin, a linkable ZITADEL account has to exist already.
Either account creation or account linking have to be enabled. Otherwise, the provider can't be used.
After saving, open the newly created OneLogin SAML provider in ZITADEL. In the details view you will find the ZITADEL Service Provider URLs, such as:
- ZITADEL Metadata URL
- ZITADEL ACS Login Form URL (for Login V1 and standard login flows)
- ZITADEL Single Logout URL
- ZITADEL ACS Intent API URL (for Login V2 and programmatic SAML flows)
For a typical browser-based login using the ZITADEL hosted login V2 you will use the:
- ZITADEL ACS Intent API URL, and
- ZITADEL Metadata URL.
You’ll need these URLs in the next step when finishing the OneLogin configuration.
Complete OneLogin configuration with ZITADEL URLs
Now that ZITADEL is configured, return to OneLogin and finish the SAML configuration of the ZITADEL app.
-
In the OneLogin admin portal, open the ZITADEL SAML application.
-
Go to the Settings tab (or the section where SAML SP settings such as ACS and Audience are set up).
-
Fill in the SAML settings using the values from the ZITADEL SAML provider:
-
ACS (Consumer) URL / SAML Consumer URL Set this to the ZITADEL ACS Intent API URL.
-
Recipient (if present as a separate field) Set this to the ZITADEL ACS Intent API URL as well.
-
Audience / SP Entity ID / SAML Audience Set this to the ZITADEL Metadata URL.
-
Single Logout URL (optional but recommended) Set this to the ZITADEL Single Logout URL.
-
ACS (Consumer) URL Validator (if present) For testing, you can use a permissive value like
.*, then tighten it later to match the exact ACS URL.
-

- Save your changes.
Optional: Import ZITADEL SP metadata Some OneLogin SAML connectors provide an Upload Metadata or Upload metadata file option. In that case you can:
- Download the SP metadata XML from the ZITADEL Metadata URL, and
- Upload the XML file in OneLogin instead of manually filling in ACS and Audience. This will automatically populate many of the SAML settings and certificates.
- Assign users or groups to the ZITADEL SAML application in OneLogin (for example via the Users or Access tab), so they can use it for SSO.
Configure SAML attributes in OneLogin
To provision users correctly in ZITADEL, configure which attributes OneLogin sends in the SAML assertion.
-
In the OneLogin admin portal, open the ZITADEL SAML application.
-
Go to the Parameters tab.
-
Add or edit parameters so that at least the following are sent and included in the SAML assertion:
email→ mapped to the user’s email address (for example Email).firstName→ mapped to the user’s first name (for example First Name).lastName→ mapped to the user’s last name (for example Last Name).
-
Ensure the NameID is set to a unique identifier (commonly the user’s email address), if your OneLogin connector requires it.
-
Save your changes.
These attributes are later available in ZITADEL’s IdP information and can be mapped to ZITADEL user fields via Actions V2.
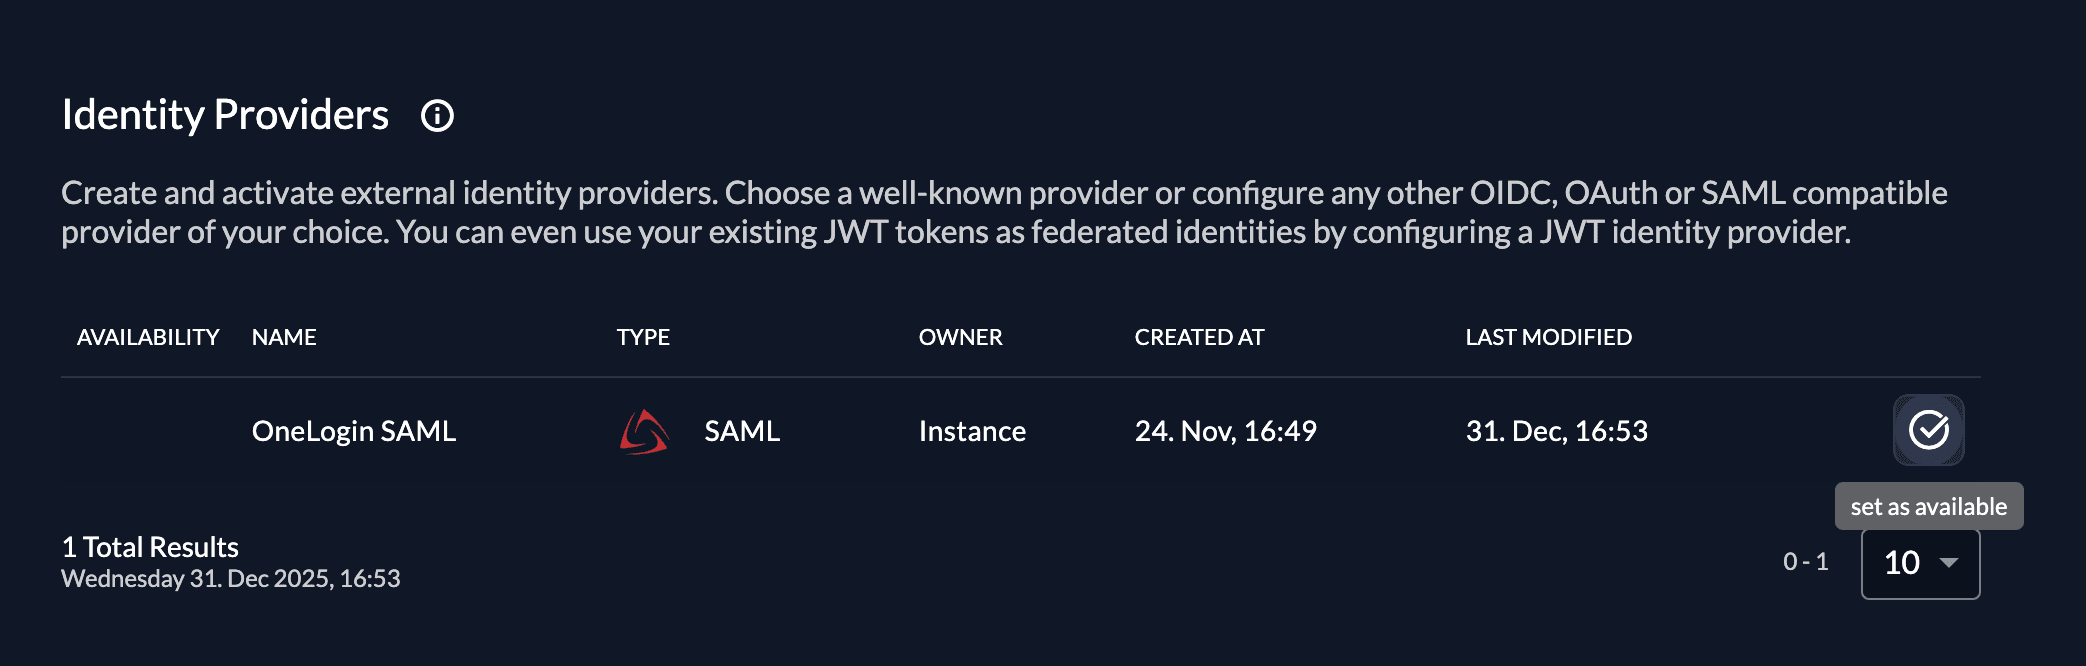
Activate IdP
Once you created the provider, it is listed in the providers overview. Activate it by selecting the tick with the tooltip set as available.
If you deactivate a provider, your users with links to it will not be able to authenticate anymore. You can reactivate it and the logins will work again.
The provider can also be activated via API. As the identity providers are sub-resources of the login settings, this is done by linking the provider to the settings:
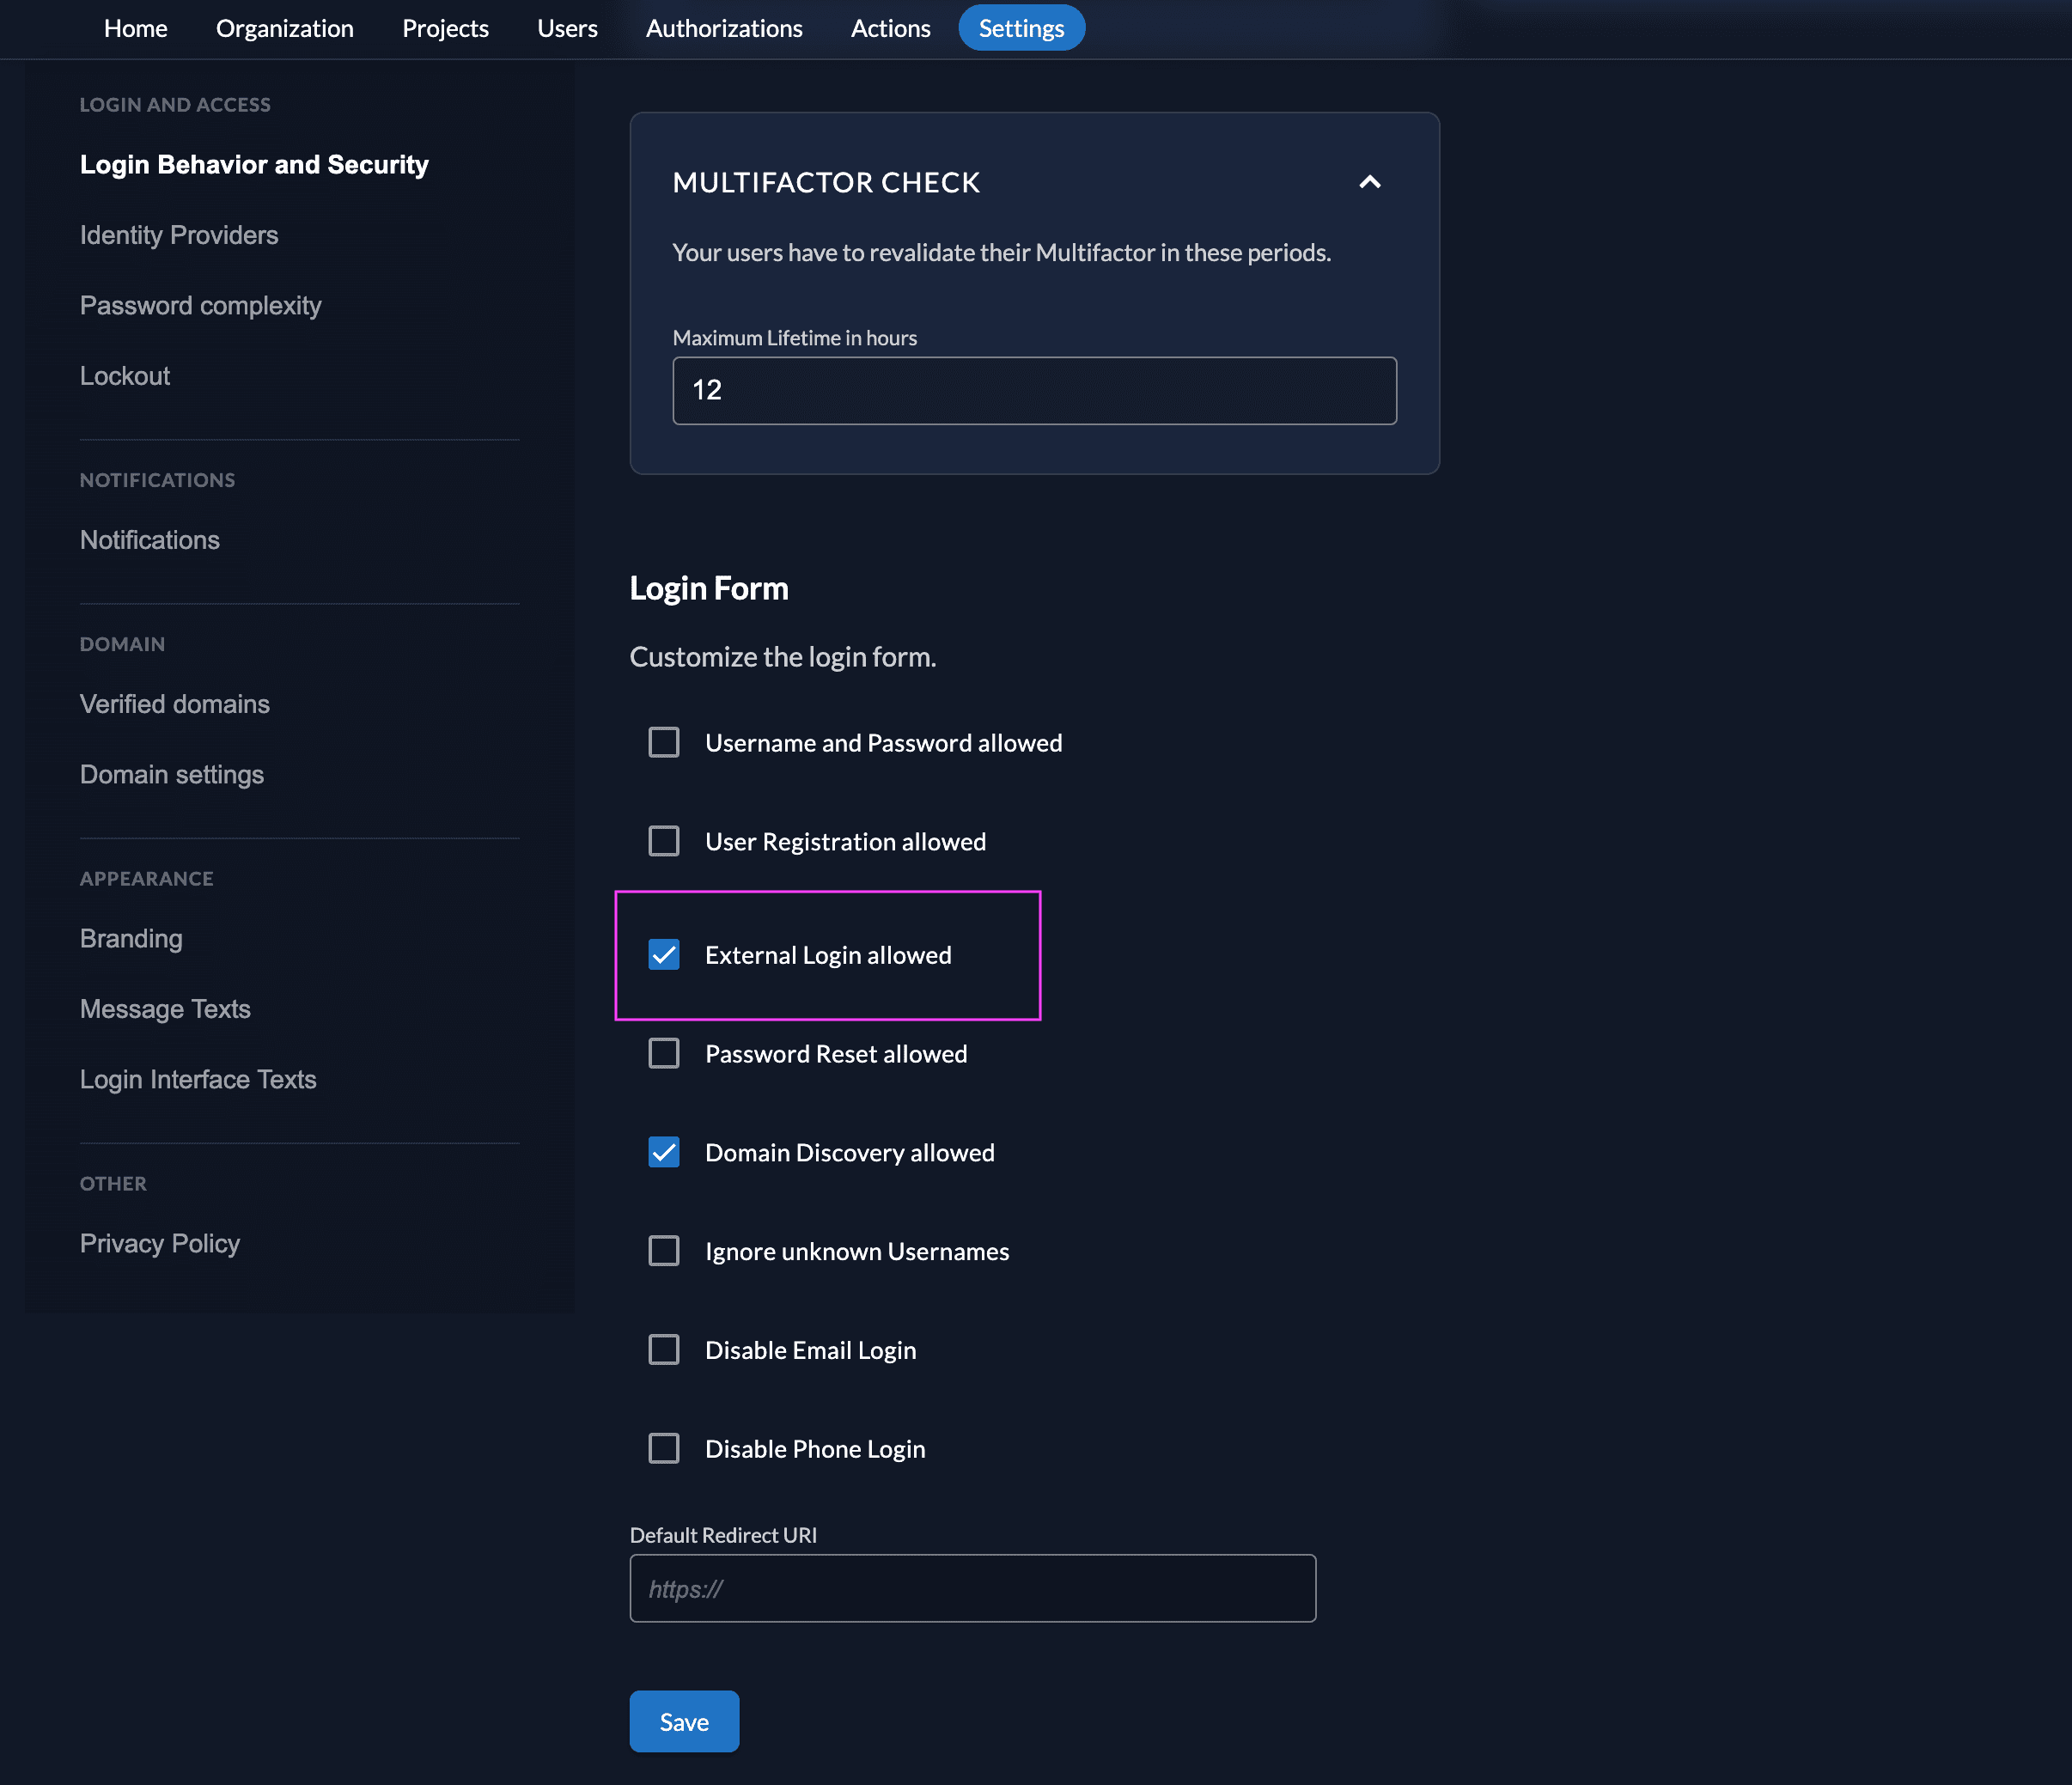
Ensure your Login Policy allows External IdPs
- Go to the Settings
- To allow external IdP logins by default, go to your instance default settings at
${CUSTOM_DOMAIN}/ui/console/instance?id=general - To allow external IdP logins on an organization, go to
${CUSTOM_DOMAIN}/ui/console/org-settings?id=loginand ensure you have the right org context.
- To allow external IdP logins by default, go to your instance default settings at
- Modify your login policy in the menu "Login Behavior and Security"
- Enable the attribute "External Login allowed"
You can also change the settings through the API directly either in the default settings or on a specific organization:
Configure an action to autofill user data
Required for Login V2
The creation of users in ZITADEL will fail if the required fields to create a user are not set.
Actions V2 can be used to map the SAML attributes returned by the IdP to the required fields in ZITADEL. See the Actions V2 Response Manipulation guide for more information on setting up a Target and an Execution. In short,
- Create an Actions V2 Target of type
REST Call. - Create an Execution of type
Responseon the method/zitadel.user.v2.UserService/RetrieveIdentityProviderIntent.
The following minimal example modifies the response of /zitadel.user.v2.UserService/RetrieveIdentityProviderIntent to set the required fields
for user creation. This is just an example, please adjust the attributes according to your IdP.
package main

import (
    "encoding/json"
    "io"
    "log"
    "net/http"

    "github.com/muhlemmer/gu"
    "github.com/zitadel/zitadel-go/v3/pkg/client/zitadel/user/v2"
    "google.golang.org/protobuf/encoding/protojson"
)

type contextResponse struct {
    Request  *retrieveIdentityProviderIntentRequestWrapper  `json:"request"`
    Response *retrieveIdentityProviderIntentResponseWrapper `json:"response"`
}

// RetrieveIdentityProviderIntentRequestWrapper necessary to marshal and unmarshal the JSON into the proto message correctly
type retrieveIdentityProviderIntentRequestWrapper struct {
    user.RetrieveIdentityProviderIntentRequest
}

func (r *retrieveIdentityProviderIntentRequestWrapper) MarshalJSON() ([]byte, error) {
    data, err := protojson.Marshal(r)
    if err != nil {
        return nil, err
    }
    return data, nil
}

func (r *retrieveIdentityProviderIntentRequestWrapper) UnmarshalJSON(data []byte) error {
    return protojson.Unmarshal(data, r)
}

// RetrieveIdentityProviderIntentResponseWrapper necessary to marshal and unmarshal the JSON into the proto message correctly
type retrieveIdentityProviderIntentResponseWrapper struct {
    user.RetrieveIdentityProviderIntentResponse
}

func (r *retrieveIdentityProviderIntentResponseWrapper) MarshalJSON() ([]byte, error) {
    data, err := protojson.Marshal(r)
    if err != nil {
        return nil, err
    }
    return data, nil
}

func (r *retrieveIdentityProviderIntentResponseWrapper) UnmarshalJSON(data []byte) error {
    return protojson.Unmarshal(data, r)
}

// call HandleFunc to read the response body, manipulate the content and return the response
func call(w http.ResponseWriter, req *http.Request) {
    // read the body content
    sentBody, err := io.ReadAll(req.Body)
    if err != nil {
        // if there was an error while reading the body return an error
        http.Error(w, "error", http.StatusInternalServerError)
        return
    }
    defer req.Body.Close()

    // read the response into the expected structure
    request := new(contextResponse)
    if err := json.Unmarshal(sentBody, request); err != nil {
        http.Error(w, "error", http.StatusInternalServerError)
        return
    }

    // build the response from the received response
    resp := request.Response
    // manipulate the received response to send back as response
    if err = manipulateResponse(resp); err != nil {
        http.Error(w, "error modifying response", http.StatusInternalServerError)
        return
    }

    // marshal the response into json
    data, err := json.Marshal(resp)
    if err != nil {
        // if there was an error while marshalling the json
        http.Error(w, "error marshaling response", http.StatusInternalServerError)
        return
    }

    // return the manipulated response
    w.Write(data)
}

type rawInformation struct {
    Attributes struct {
        Email     []string `json:"email"`
        FirstName []string `json:"firstName"`
        Id        []string `json:"id"`
        LastName  []string `json:"lastName"`
    } `json:"attributes"`
    Id string `json:"id"`
}

func manipulateResponse(resp *retrieveIdentityProviderIntentResponseWrapper) error {
    if resp == nil || resp.IdpInformation == nil || resp.IdpInformation.RawInformation == nil {
        log.Println("missing IdP/User information in the IdP response")
        return nil
    }
    // retrieve raw information from the IdP
    var rawInfoBytes []byte
    var err error
    if rawInfoBytes, err = resp.IdpInformation.RawInformation.MarshalJSON(); err != nil {
        return err
    }

    // NOTE: the raw information struct used here is just an example.
    // Please adapt this to your IdP.
    var rawInfo rawInformation
    if err = json.Unmarshal(rawInfoBytes, &rawInfo); err != nil {
        return err
    }

    if len(rawInfo.Attributes.Email) == 0 ||
        len(rawInfo.Attributes.FirstName) == 0 ||
        len(rawInfo.Attributes.Id) == 0 ||
        len(rawInfo.Attributes.LastName) == 0 {
        log.Println("missing required attributes in the IdP response")
        return nil
    }

    // to create a new user.
    if resp.AddHumanUser != nil {
        // set the required fields to create a new user in ZITADEL based on the information returned by the IdP
        resp.IdpInformation.UserName = rawInfo.Attributes.Email[0]

        resp.AddHumanUser.Profile = &user.SetHumanProfile{
            GivenName:  rawInfo.Attributes.FirstName[0],
            FamilyName: rawInfo.Attributes.LastName[0],
        }
        resp.AddHumanUser.Email = &user.SetHumanEmail{
            Email:        rawInfo.Attributes.Email[0],
            Verification: &user.SetHumanEmail_IsVerified{IsVerified: true},
        }
        resp.AddHumanUser.Username = gu.Ptr(rawInfo.Attributes.Email[0])
        resp.AddHumanUser.IdpLinks = []*user.IDPLink{
            {
                UserName: rawInfo.Attributes.Email[0],
            },
        }
    }
    return nil
}

func main() {
    // handle the HTTP call under "/call"
    http.HandleFunc("/call", call)

    // start an HTTP server with the before defined function to handle the endpoint under "http://localhost:8090"
    http.ListenAndServe(":8090", nil)
}
Test the setup
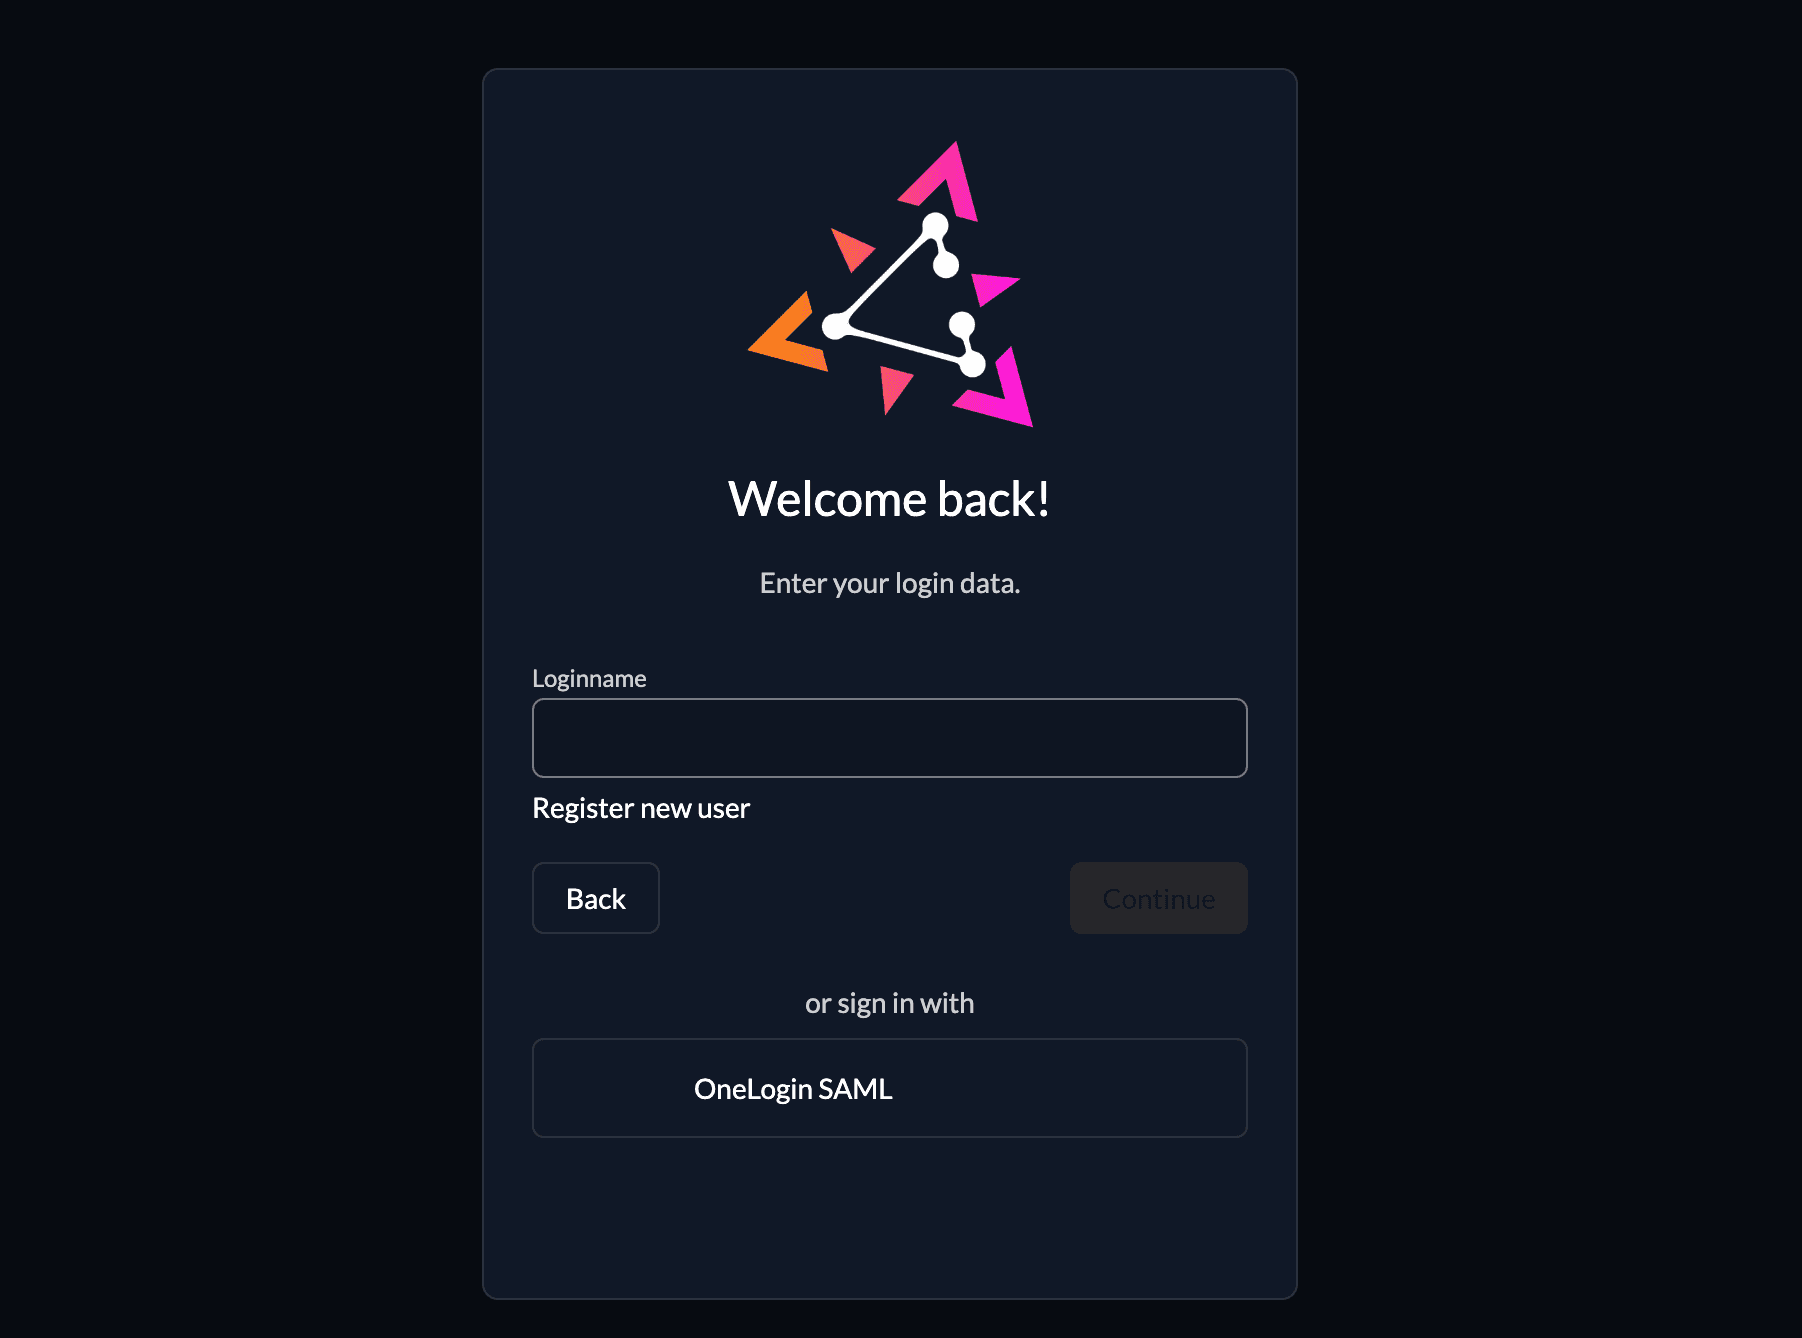
To test the setup, use incognito mode and browse to your login page. You see a new button which redirects you to your OneLogin login screen.
By default, ZITADEL shows what you define in the default settings. If you overwrite the default settings for an organization, you need to send the organization scope in your auth request.
The organization scope looks like this: urn:zitadel:iam:org:id:{id}.
You can read more about the reserved scopes
or use the ZITADEL OIDC Playground to see what happens with the login when you send different scopes.
Was this page helpful?