Set up Entra ID as a SAML Service Provider in ZITADEL
This guides shows you how to connect Entra ID (former Azure Active Directory) as an identity provider in ZITADEL.
In ZITADEL you can connect an Identity Provider (IdP) like Entra ID (former Azure Active Directory) to your instance and provide it as default to all organizations. Also, you can register the IdP to a specific organization only. If you allow so, your organizations members can do the same in self-service.
Entra ID SAML Configuration
You need to have access to an Entra ID Tenant. If you do not yet have one follow this guide from Microsoft to create one for free.
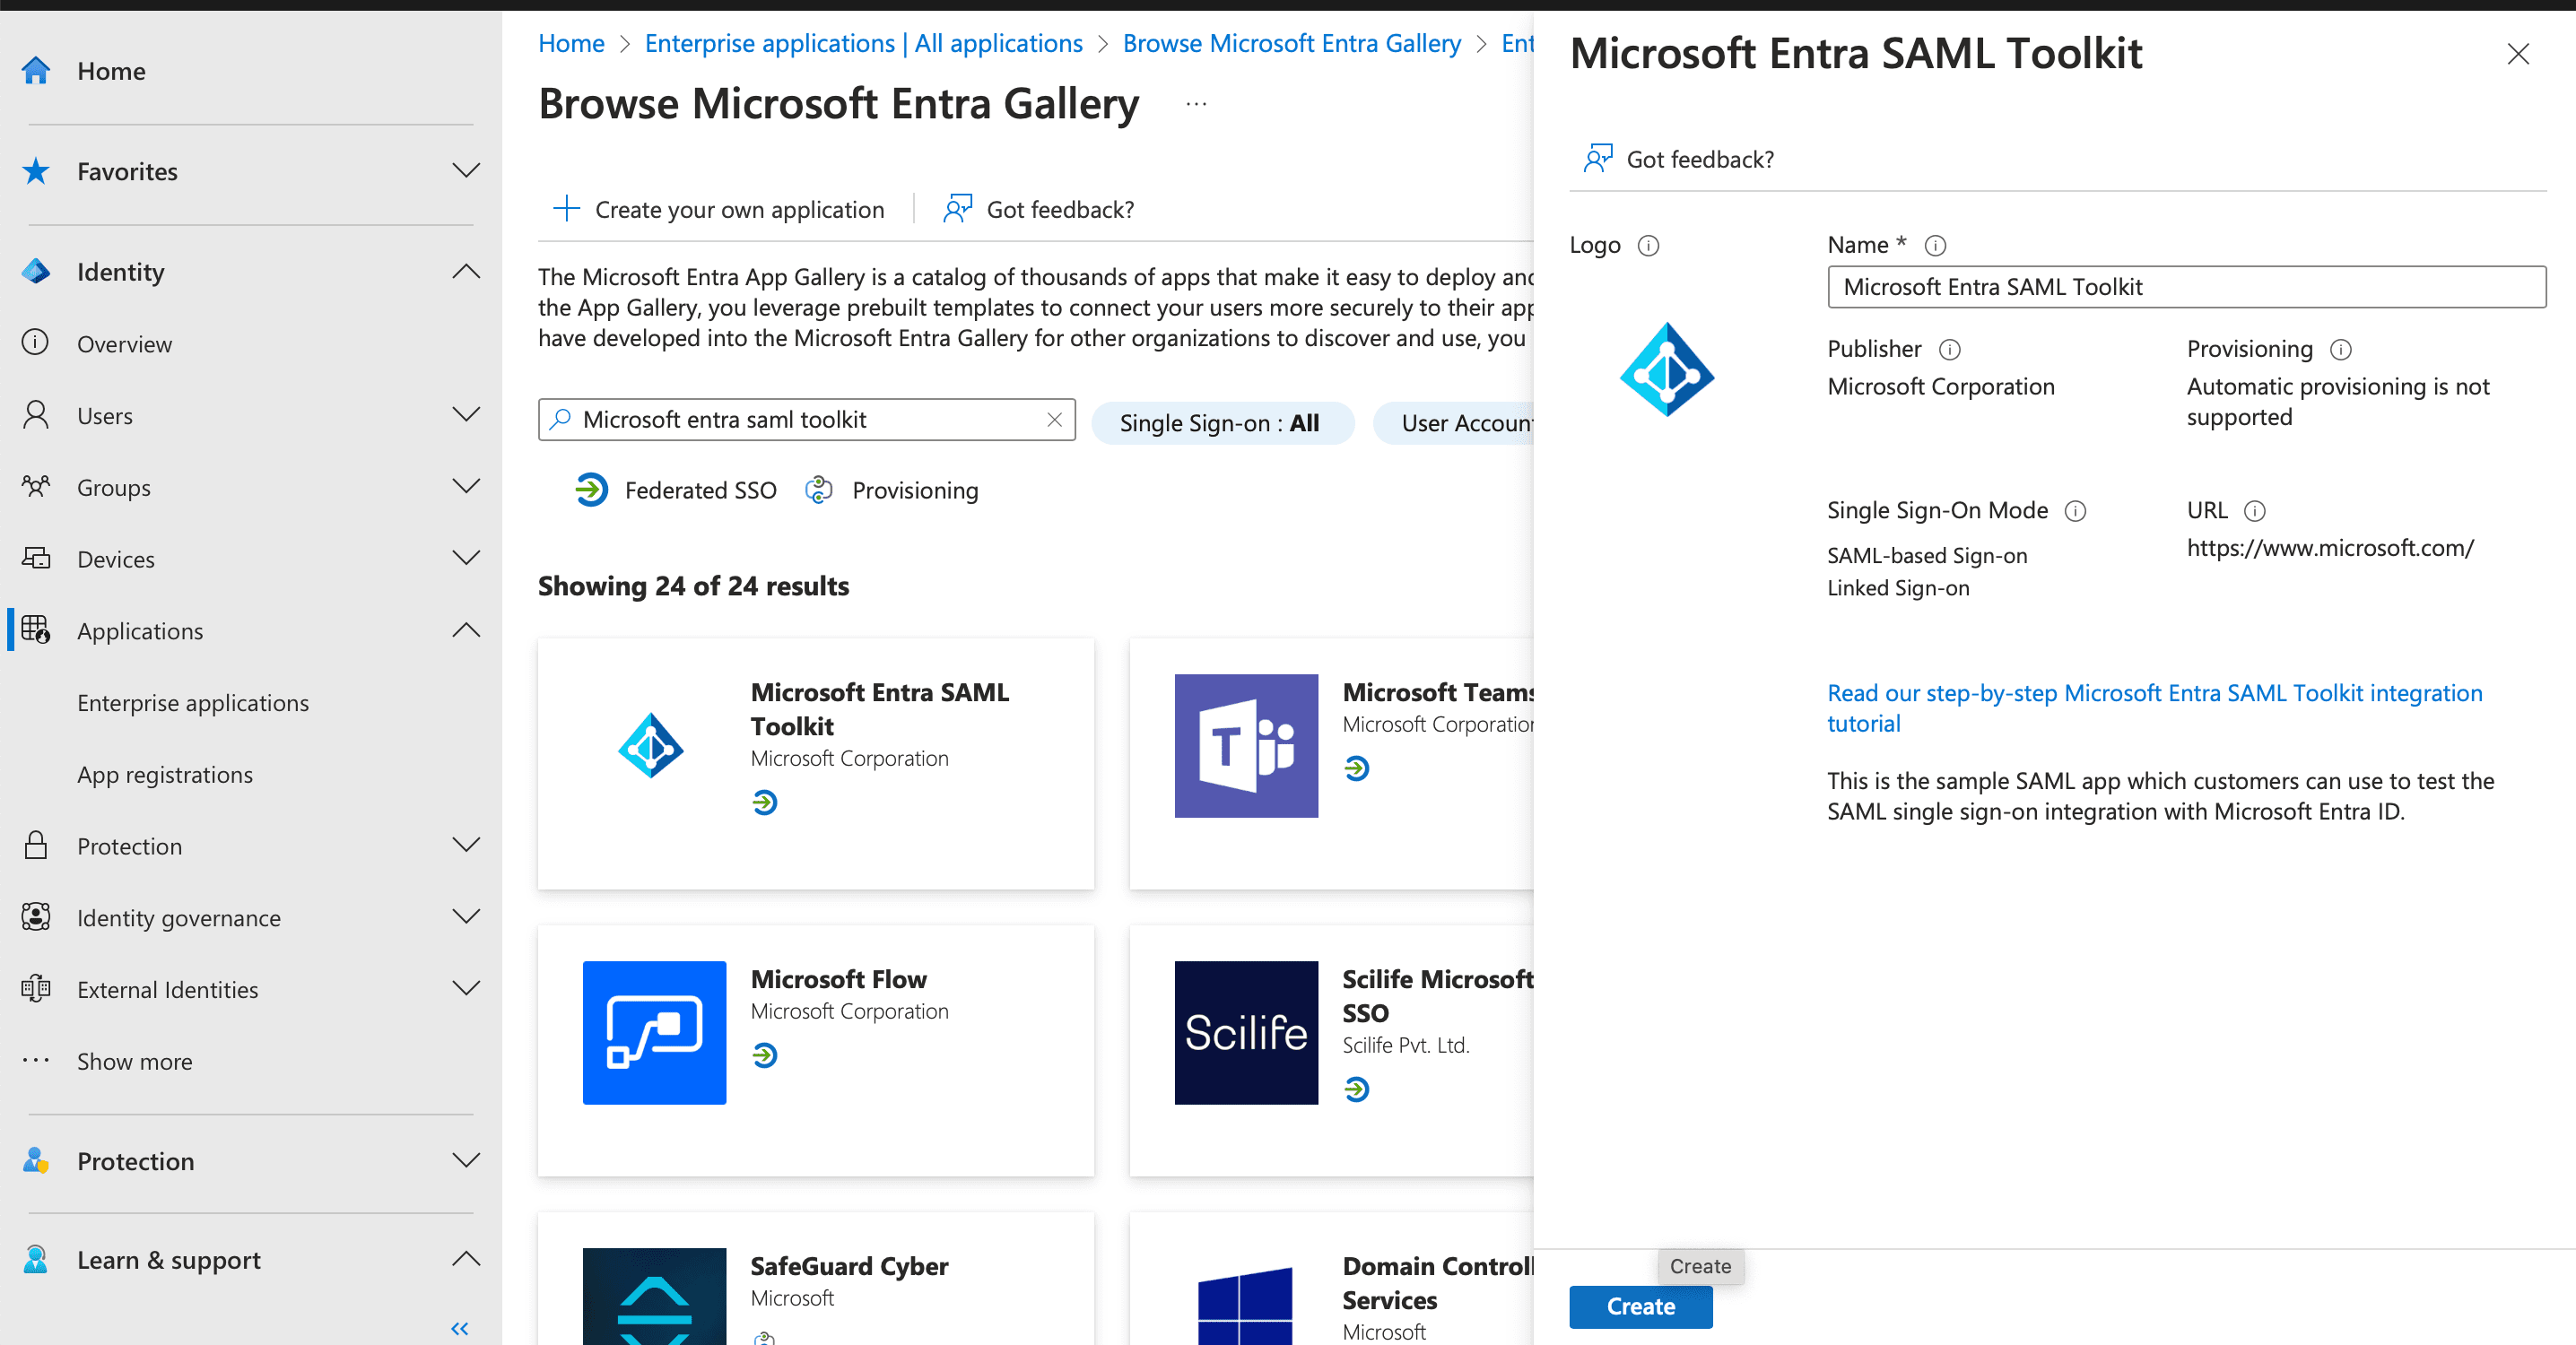
Register a new enterprise application in Entra
We start setting up the enterprise application.
- Browse to the Enterprise App registration menu.
- Search for "SAML Toolkit" and click on the "Microsoft Entra SAML Toolkit" card.
- Change the name if wanted and click "Create"
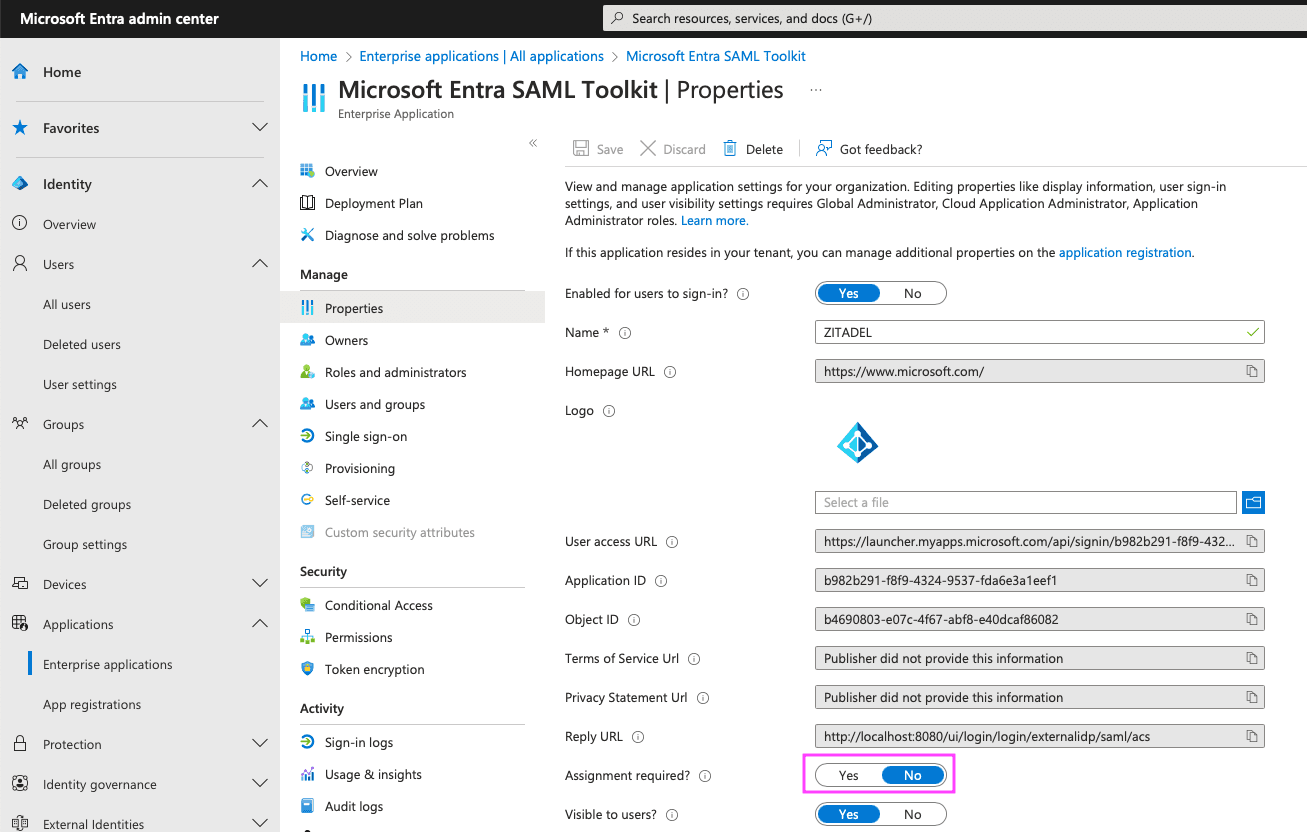
Disable required assignment
To allow all users to sign in using ZITADEL we need to manually disable required assignment:
- Go to Manage > Properties
- Set "Assignment required?" to No
- Hit Save
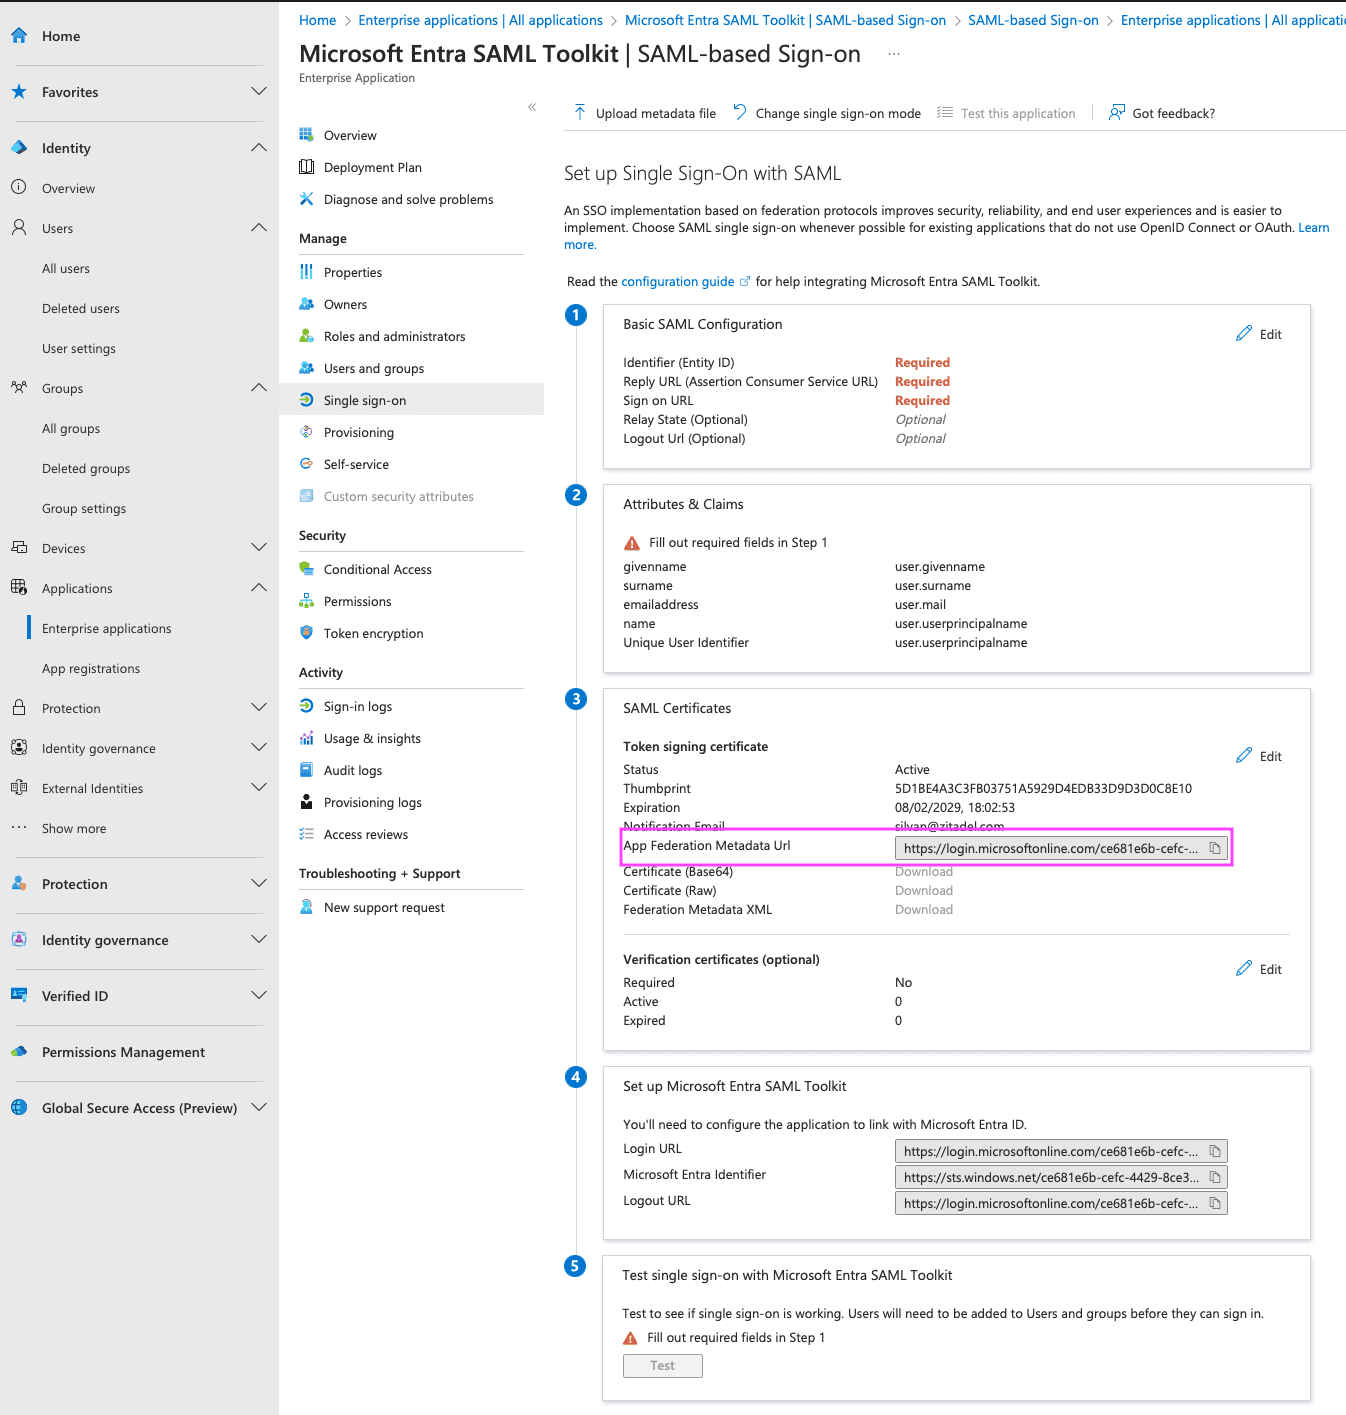
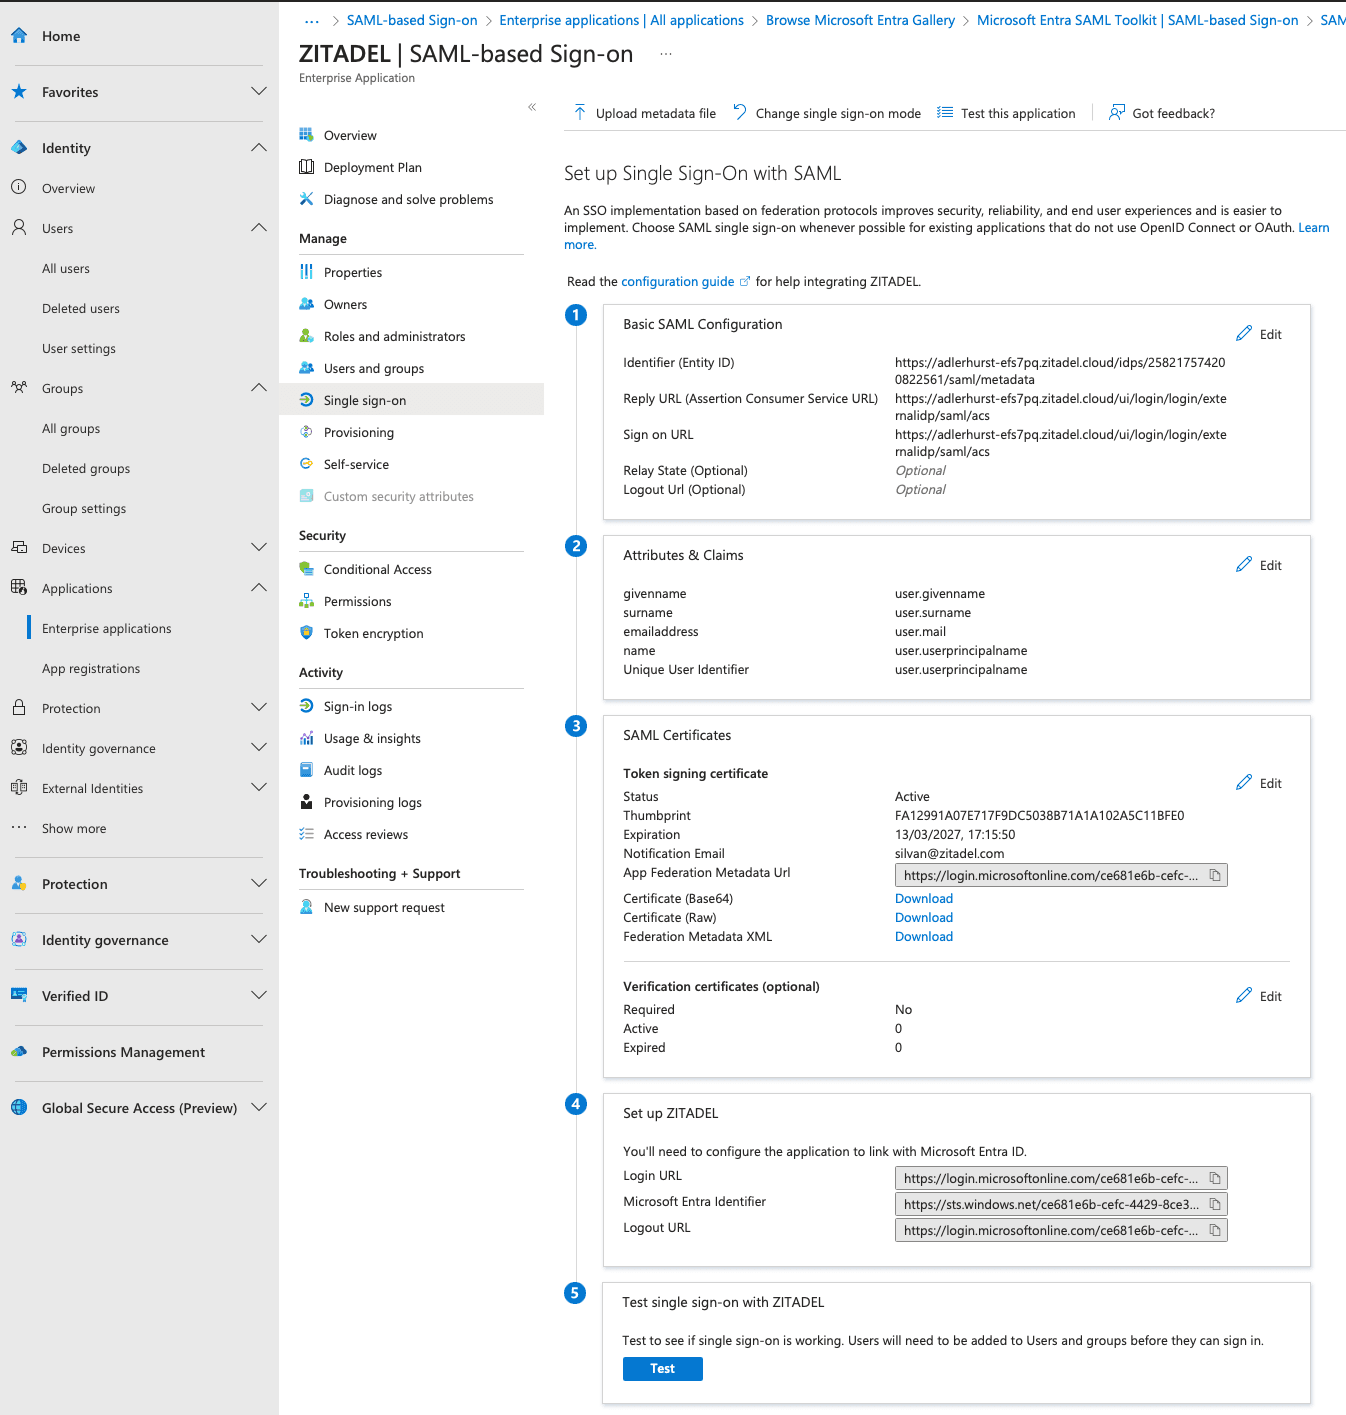
Setup SAML
Configure the sign-on method of the app.
- Go to Manage > Single sign-on
- Select SAML
- You will be redirected to the Single Sign-On details page
- Copy the URL of SAML Certificates > App Federation Metadata Url to your clipboard
ZITADEL Setup
Go to the IdP Providers Overview
Go to the settings page of your instance or organization and choose "Identity Providers".
In the table you can see all the providers you have configured. Also, you see all provider templates that are available.
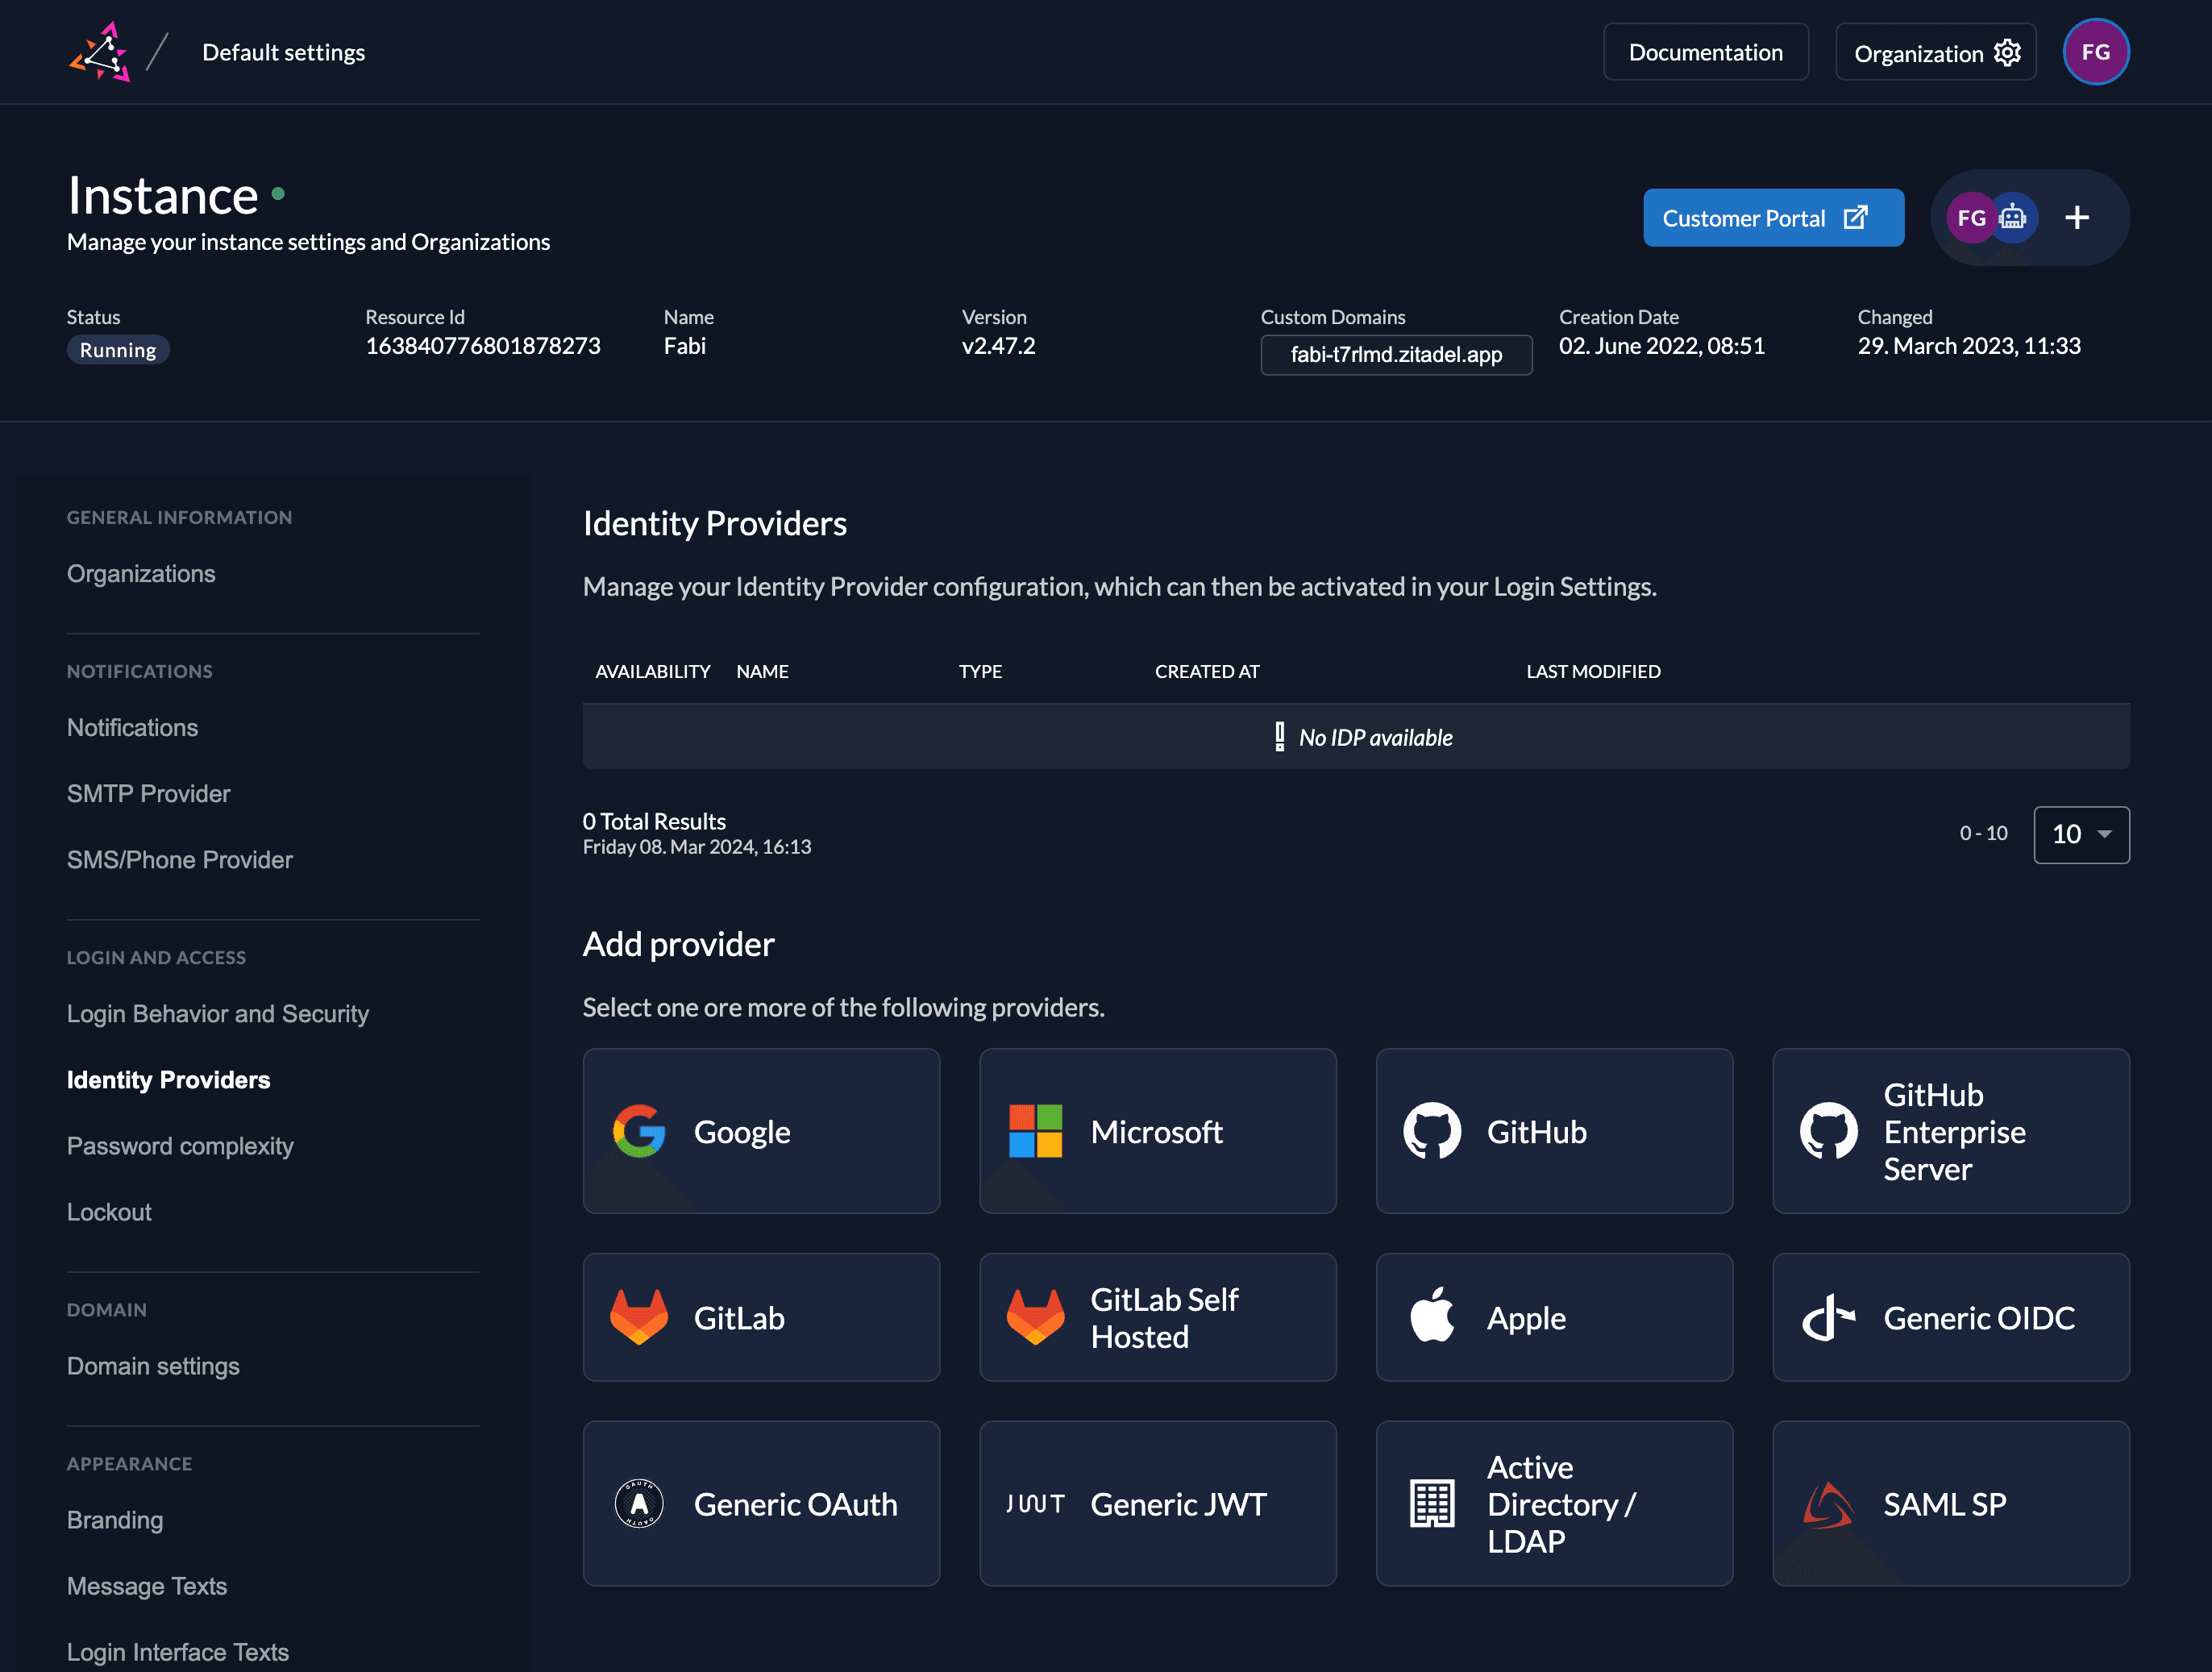
Select the SAML Provider template.
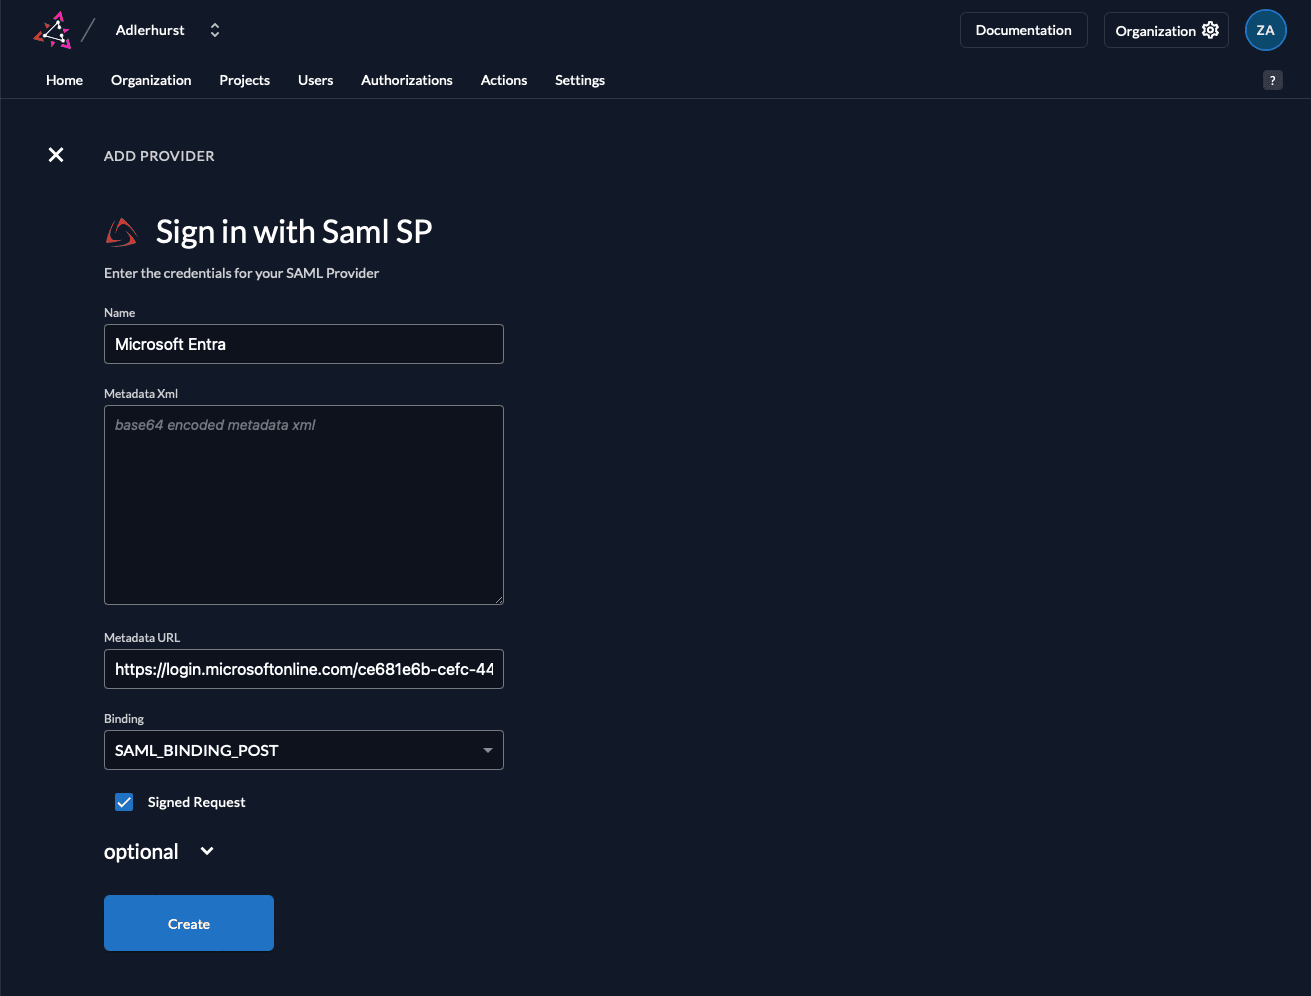
Create a new SAML Service Provider (SP)
Now we configure the identity provider on ZITADEL.
- Set a name like "Microsoft Entra"
- Paste the previously copied URL into the "Metadata URL"-field. The metadata will automatically be fetched from the provided URL after creation.
- Select the "SAML_POST_BINDING" as binding
- Ensure that the "Signed Request"-box is ticked
- Change the options if needed. Microsoft Entra works out of the box using the pre configured options.
- Click Create
Automatic creation: If this setting is enabled the user will be created automatically within ZITADEL, if it doesn't exist.
Automatic update: If this setting is enabled, the user will be updated within ZITADEL, if some user data is changed withing the provider. E.g if the lastname changes on the Microsoft account, the information will be changed on the ZITADEL account on the next login.
Account creation allowed: This setting determines if account creation within ZITADEL is allowed or not.
Account linking allowed: This setting determines if account linking is allowed. When logging in with a Microsoft account, a linkable ZITADEL account has to exist already.
Either account creation or account linking have to be enabled. Otherwise, the provider can't be used.
Configure Basic SAML Configuration
After you created the SAML provider in ZITADEL, you can copy the URLs you need to configure in your Entra ID application.
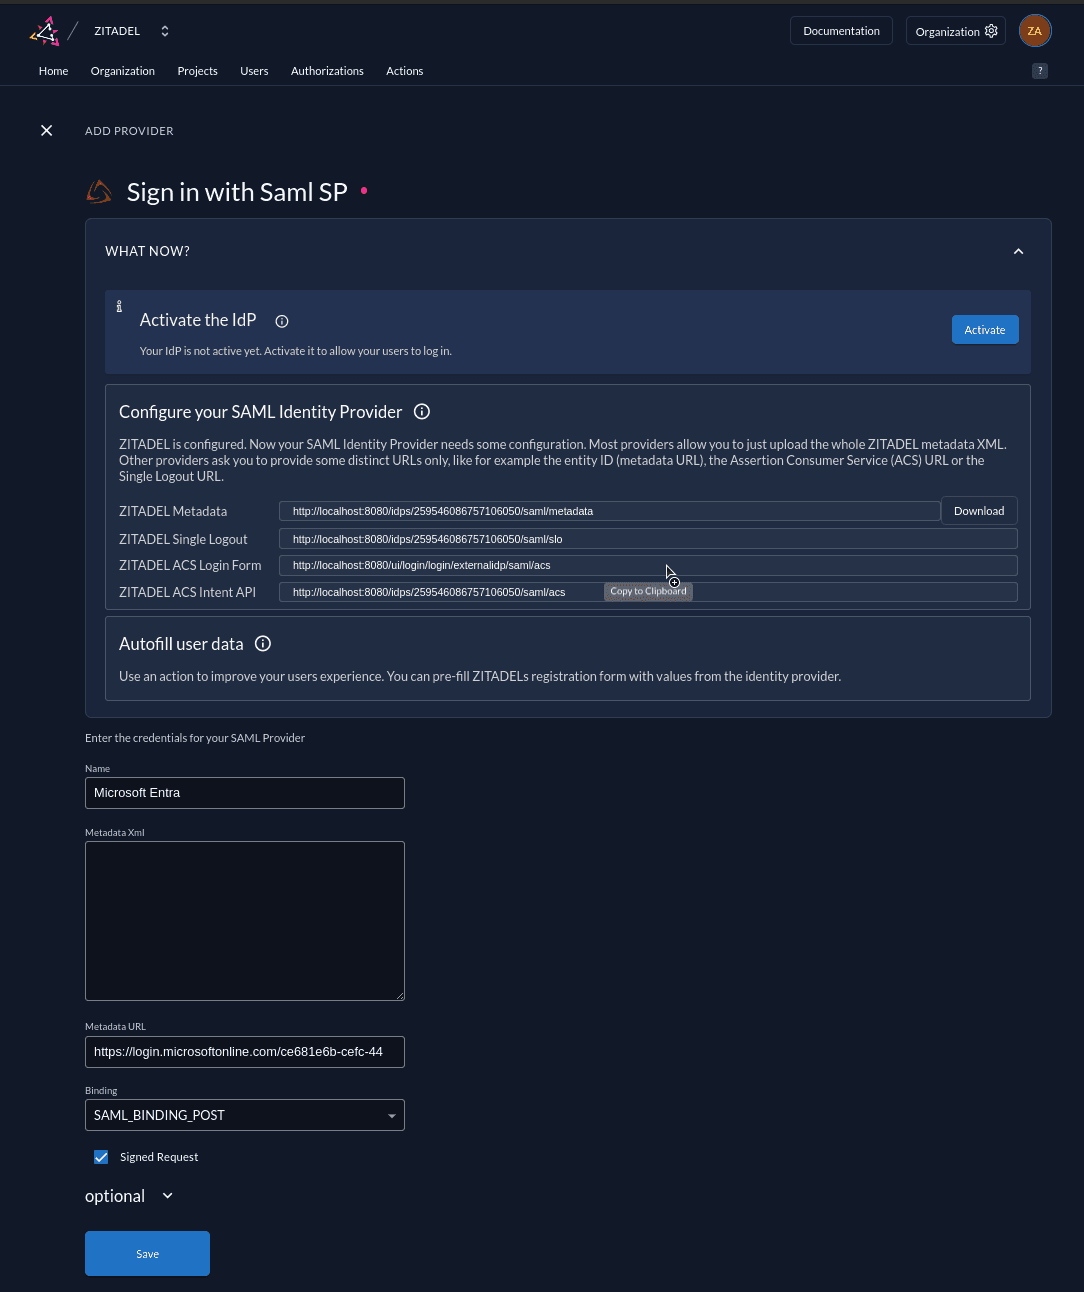
- Go to Microsoft Entra > Manage > Single sign-on
- Edit the "Basic SAML Configuration"
- Identifier (Entity ID): Paste the ZITADEL Metadata URL.
- Reply URL (Assertion Consumer Service URL): Paste the ZITADEL ACS Login Form URL
- Sign on URL: Paste the ZITADEL ACS Login Form URL
- Logout URL: Paste the ZITADEL Single Logout URL
- Optionally, you can enable the "Federated Logout", which will log out the user from Entra ID once they terminate their session in ZITADEL using the OIDC End Session Endpoint.
- Click Save
You can ignore the ZITADEL ACS Intent API URL for now. This is relevant if you want to programmatically sign users in at ZITADEL via a SAML Service Provider.
Enable the Microsoft Entra Button in ZITADELs Login Page
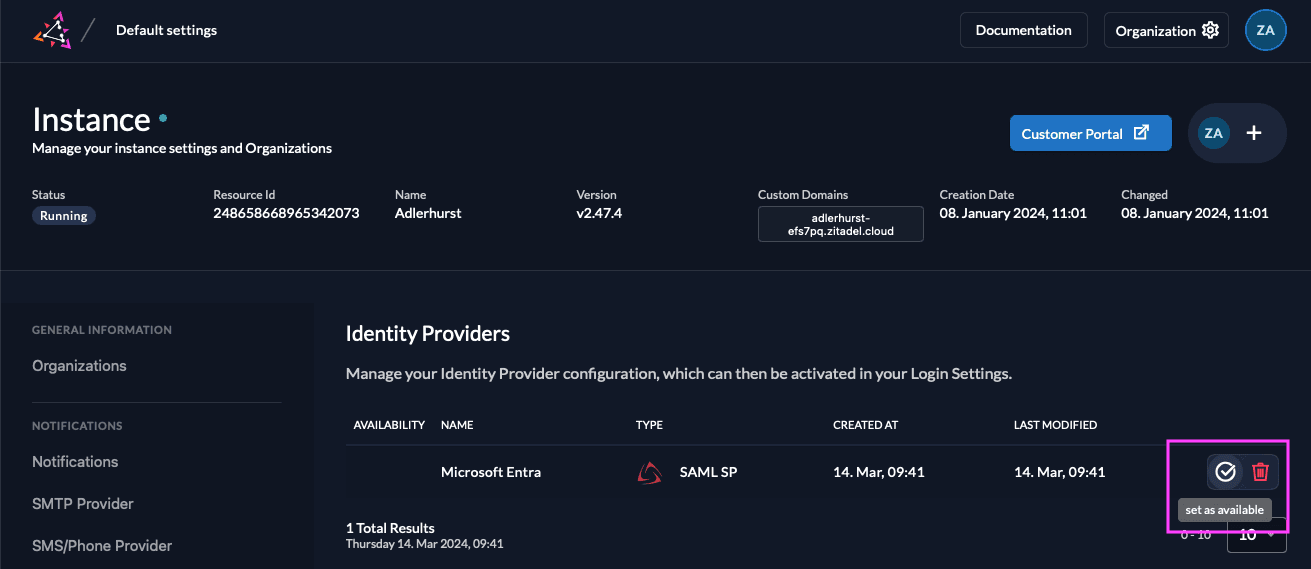
Go back to ZITADEL and activate the IdP.
Activate IdP
Once you created the provider, it is listed in the providers overview. Activate it by selecting the tick with the tooltip set as available.
If you deactivate a provider, your users with links to it will not be able to authenticate anymore. You can reactivate it and the logins will work again.
The provider can also be activated via API. As the identity providers are sub-resources of the login settings, this is done by linking the provider to the settings:
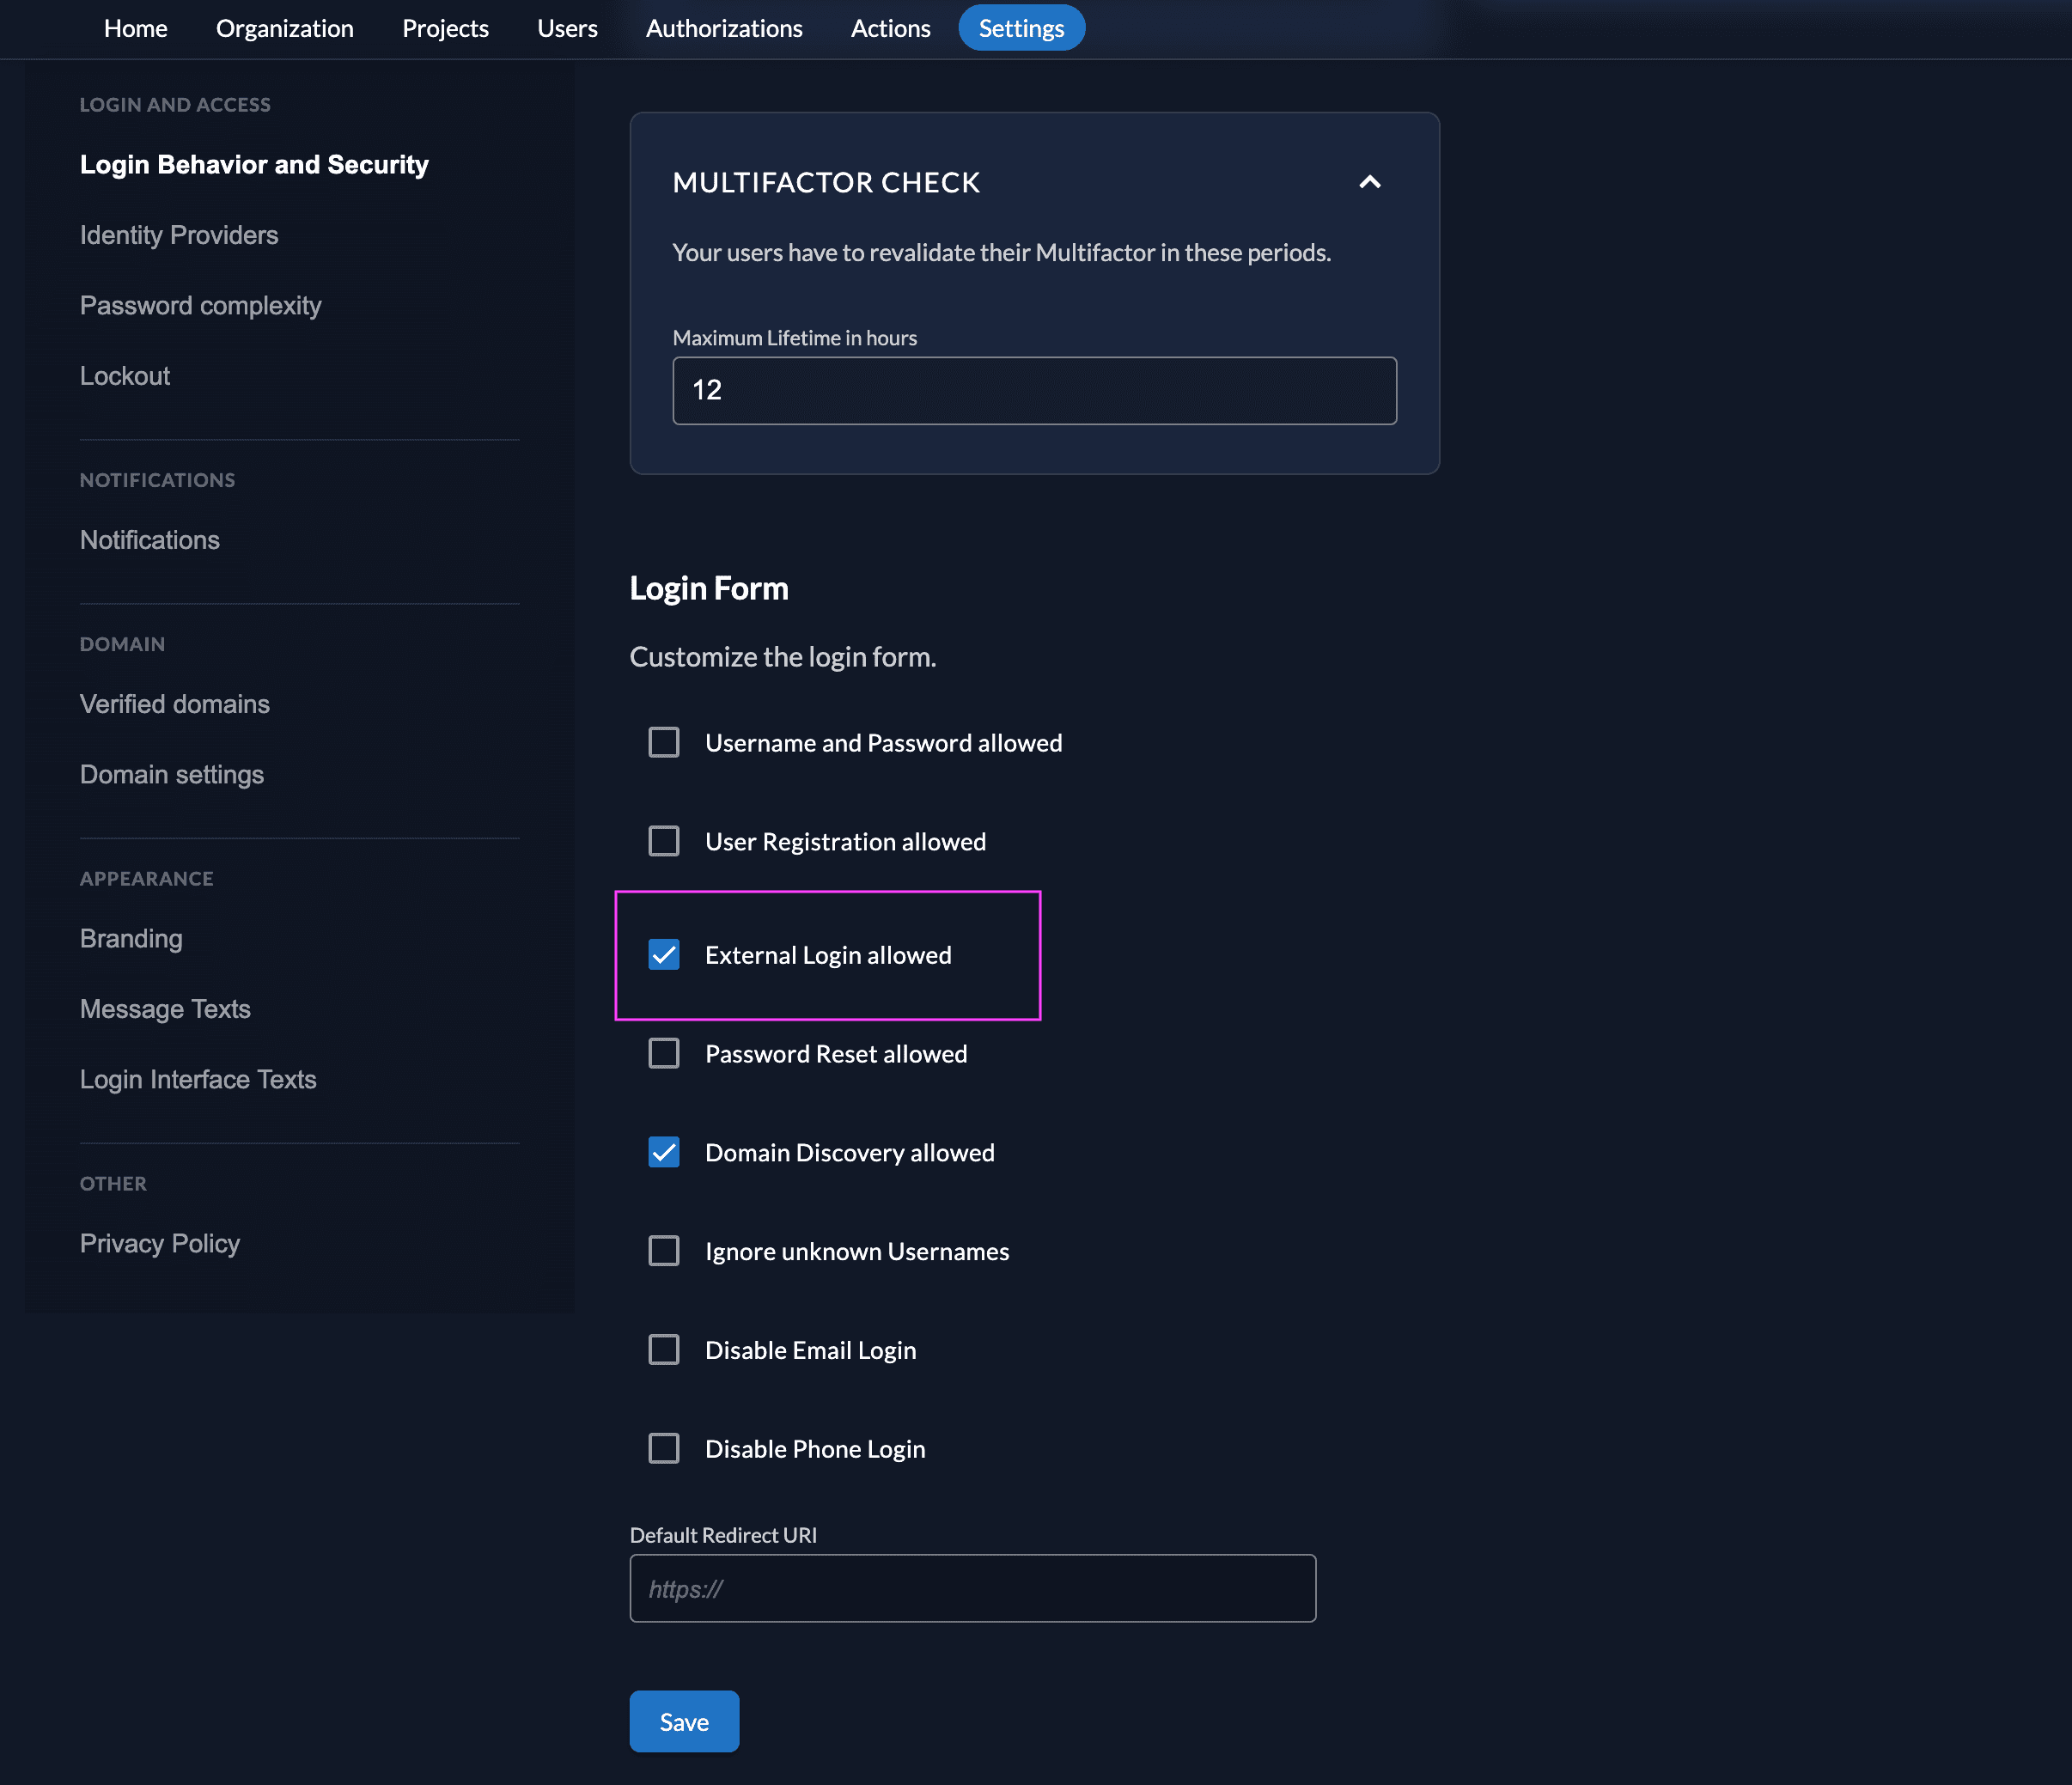
Ensure your Login Policy allows External IDPs
- Go to the Settings
- To allow external IdP logins by default, go to your instance default settings at
${CUSTOM_DOMAIN}/ui/console/instance?id=general - To allow external IdP logins on an organization, go to
${CUSTOM_DOMAIN}/ui/console/org-settings?id=loginand ensure you have the right org context.
- To allow external IdP logins by default, go to your instance default settings at
- Modify your login policy in the menu "Login Behavior and Security"
- Enable the attribute "External Login allowed"
You can also change the settings through the API directly either in the default settings or on a specific organization:
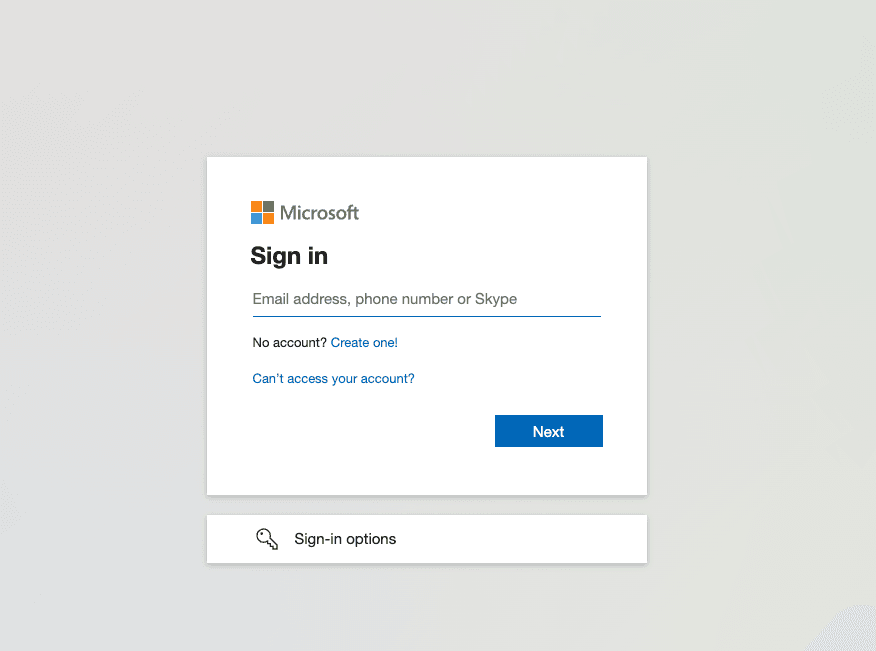
Test the setup
To test the setup, use incognito mode and browse to your login page. You see a new button which redirects you to Microsoft Entra screen.
By default, ZITADEL shows what you define in the default settings. If you overwrite the default settings for an organization, you need to send the organization scope in your auth request.
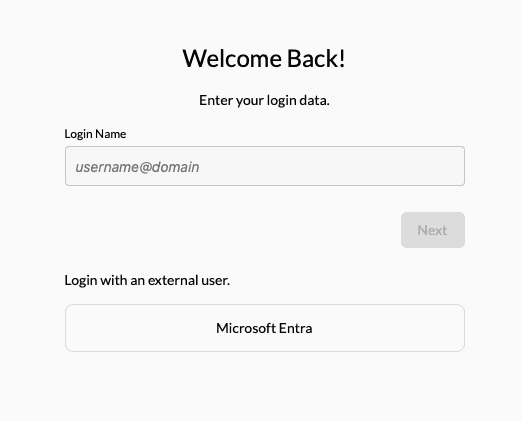
Click Microsoft Entra
Add Action to map user attributes
You can use a ZITADEL action if you want to prefill the fields username, firstname, lastname, displayname, email and email verified with Entra data.
- Go to the users target organizations settings page.
- Add a new action with the body below. Make sure the action name equals the scripts function name. Also change the id in the script to match your provider settings id.
- Add the action to the flow "External Authentication" and trigger it on "Post Authentication"
/** * Use SAML attributes from entra id SAML SP as attributes for user creation/update * * Flow: External Authentication, Trigger: Post authentication * * @param ctx * @param api */function prefilRegisterFromEntraId(ctx, api) { if (ctx.v1.externalUser.externalIdpId != "<SAML SP id>") { return } // the attribute names below represent the crewjam IDP example, be sure to update them to match your provider info let firstname = ctx.v1.providerInfo.attributes["http://schemas.xmlsoap.org/ws/2005/05/identity/claims/givenname"]; let lastname = ctx.v1.providerInfo.attributes["http://schemas.xmlsoap.org/ws/2005/05/identity/claims/surname"]; let email = ctx.v1.providerInfo.attributes["http://schemas.xmlsoap.org/ws/2005/05/identity/claims/emailaddress"]; let displayname = ctx.v1.providerInfo.attributes["http://schemas.microsoft.com/identity/claims/displayname"]; // username would look like this: adlerhurst_zitadel.com#EXT#@adlerhurstzitadel.onmicrosoft.com let username = ctx.v1.providerInfo.attributes["http://schemas.xmlsoap.org/ws/2005/05/identity/claims/name"]; if (firstname != undefined) { api.setFirstName(firstname[0]); } if (lastname != undefined) { api.setLastName(lastname[0]); } if (email != undefined) { api.setEmail(email[0]); api.setEmailVerified(true); } if (displayname != undefined) { api.setDisplayName(displayname[0]); } if (username != undefined) { api.setPreferredUsername(username[0]); } }Was this page helpful?