
| 2025 | 2026 | |||||||||||||||||||||||
|---|---|---|---|---|---|---|---|---|---|---|---|---|---|---|---|---|---|---|---|---|---|---|---|---|
| Q1 | Q2 | Q3 | Q4 | Q1 | Q2 | Q3 | Q4 | |||||||||||||||||
| Jan | Feb | Mar | Apr | May | Jun | Jul | Aug | Sep | Oct | Nov | Dec | Jan | Feb | Mar | Apr | May | Jun | Jul | Aug | Sep | Oct | Nov | Dec | |
| Zitadel Versions | ||||||||||||||||||||||||
| [v2.x](/product/roadmap#v2-x) | GA / Stable | Deprecated | ||||||||||||||||||||||
| [v3.x](/product/roadmap#v3-x) | Implementation | RC | GA / Stable | Deprecated | ||||||||||||||||||||
| [v4.x](/product/roadmap#v4-x) | Implementation | RC | GA / Stable | Deprecated | ||||||||||||||||||||
| [v5.x](/product/roadmap#v5-x) | TBC |
| 25-Q1 | 25-Q2 | 25-Q3 | 25-Q4 |
|---|---|---|---|
| Zitadel Core | |||
| [v2.x](/product/roadmap#v2-x) |
[v3.x](/product/roadmap#v3-x)
|
[v4.x](/product/roadmap#v4-x)
|
[v5.x](/product/roadmap#v5-x)
Release: TBC
|
| Zitadel SDKs | |||
|
|
|
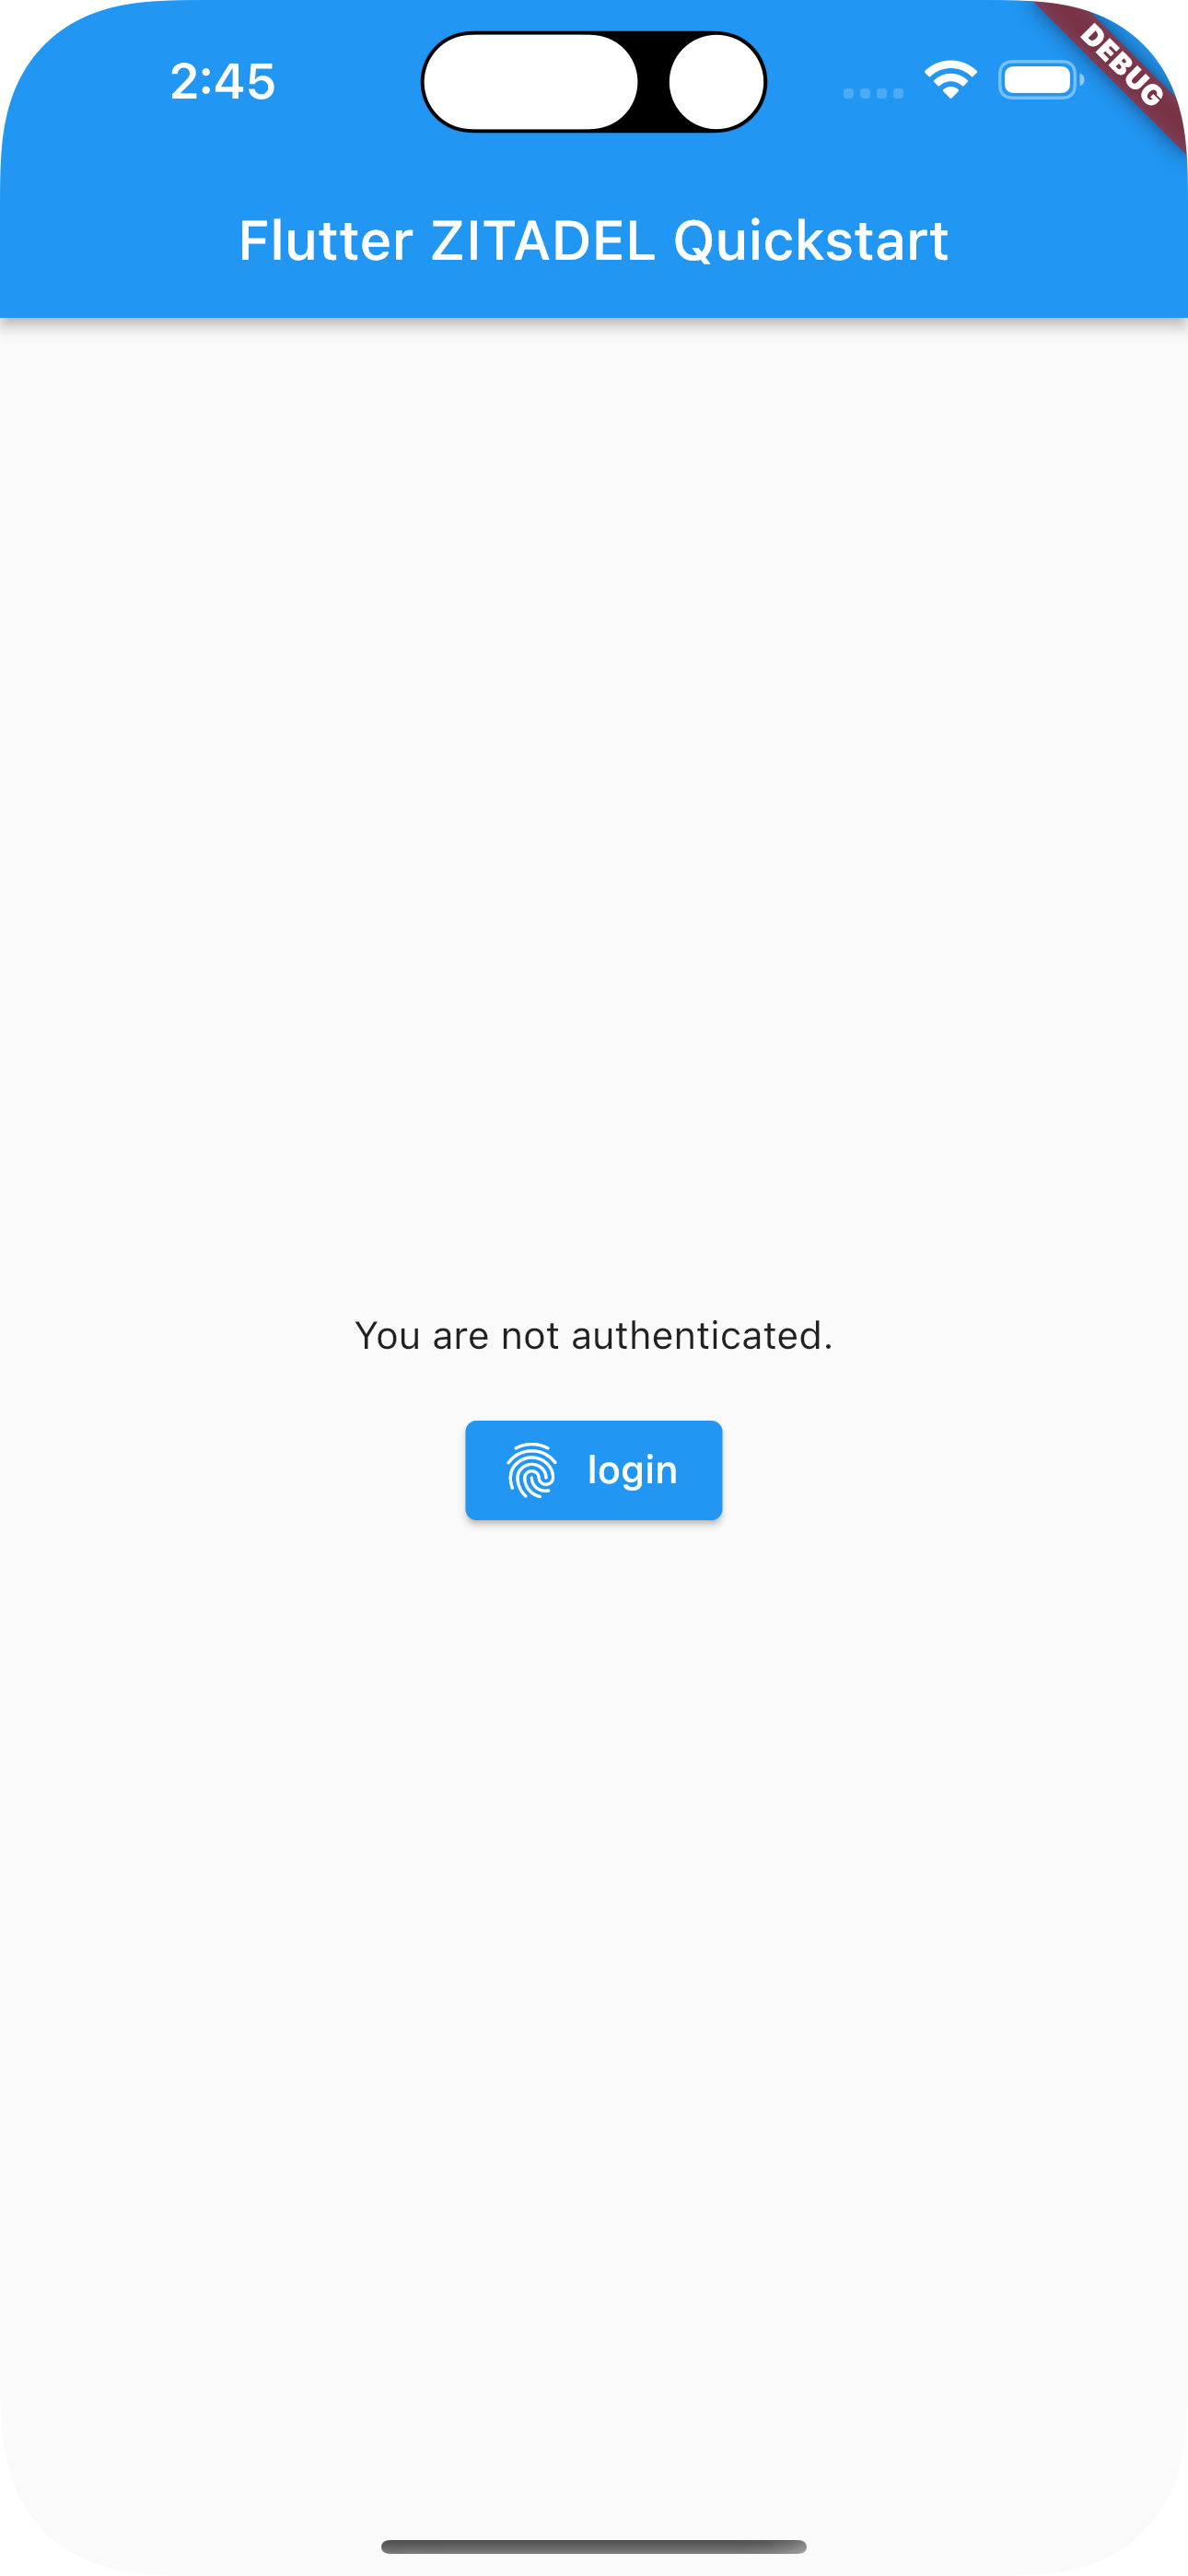
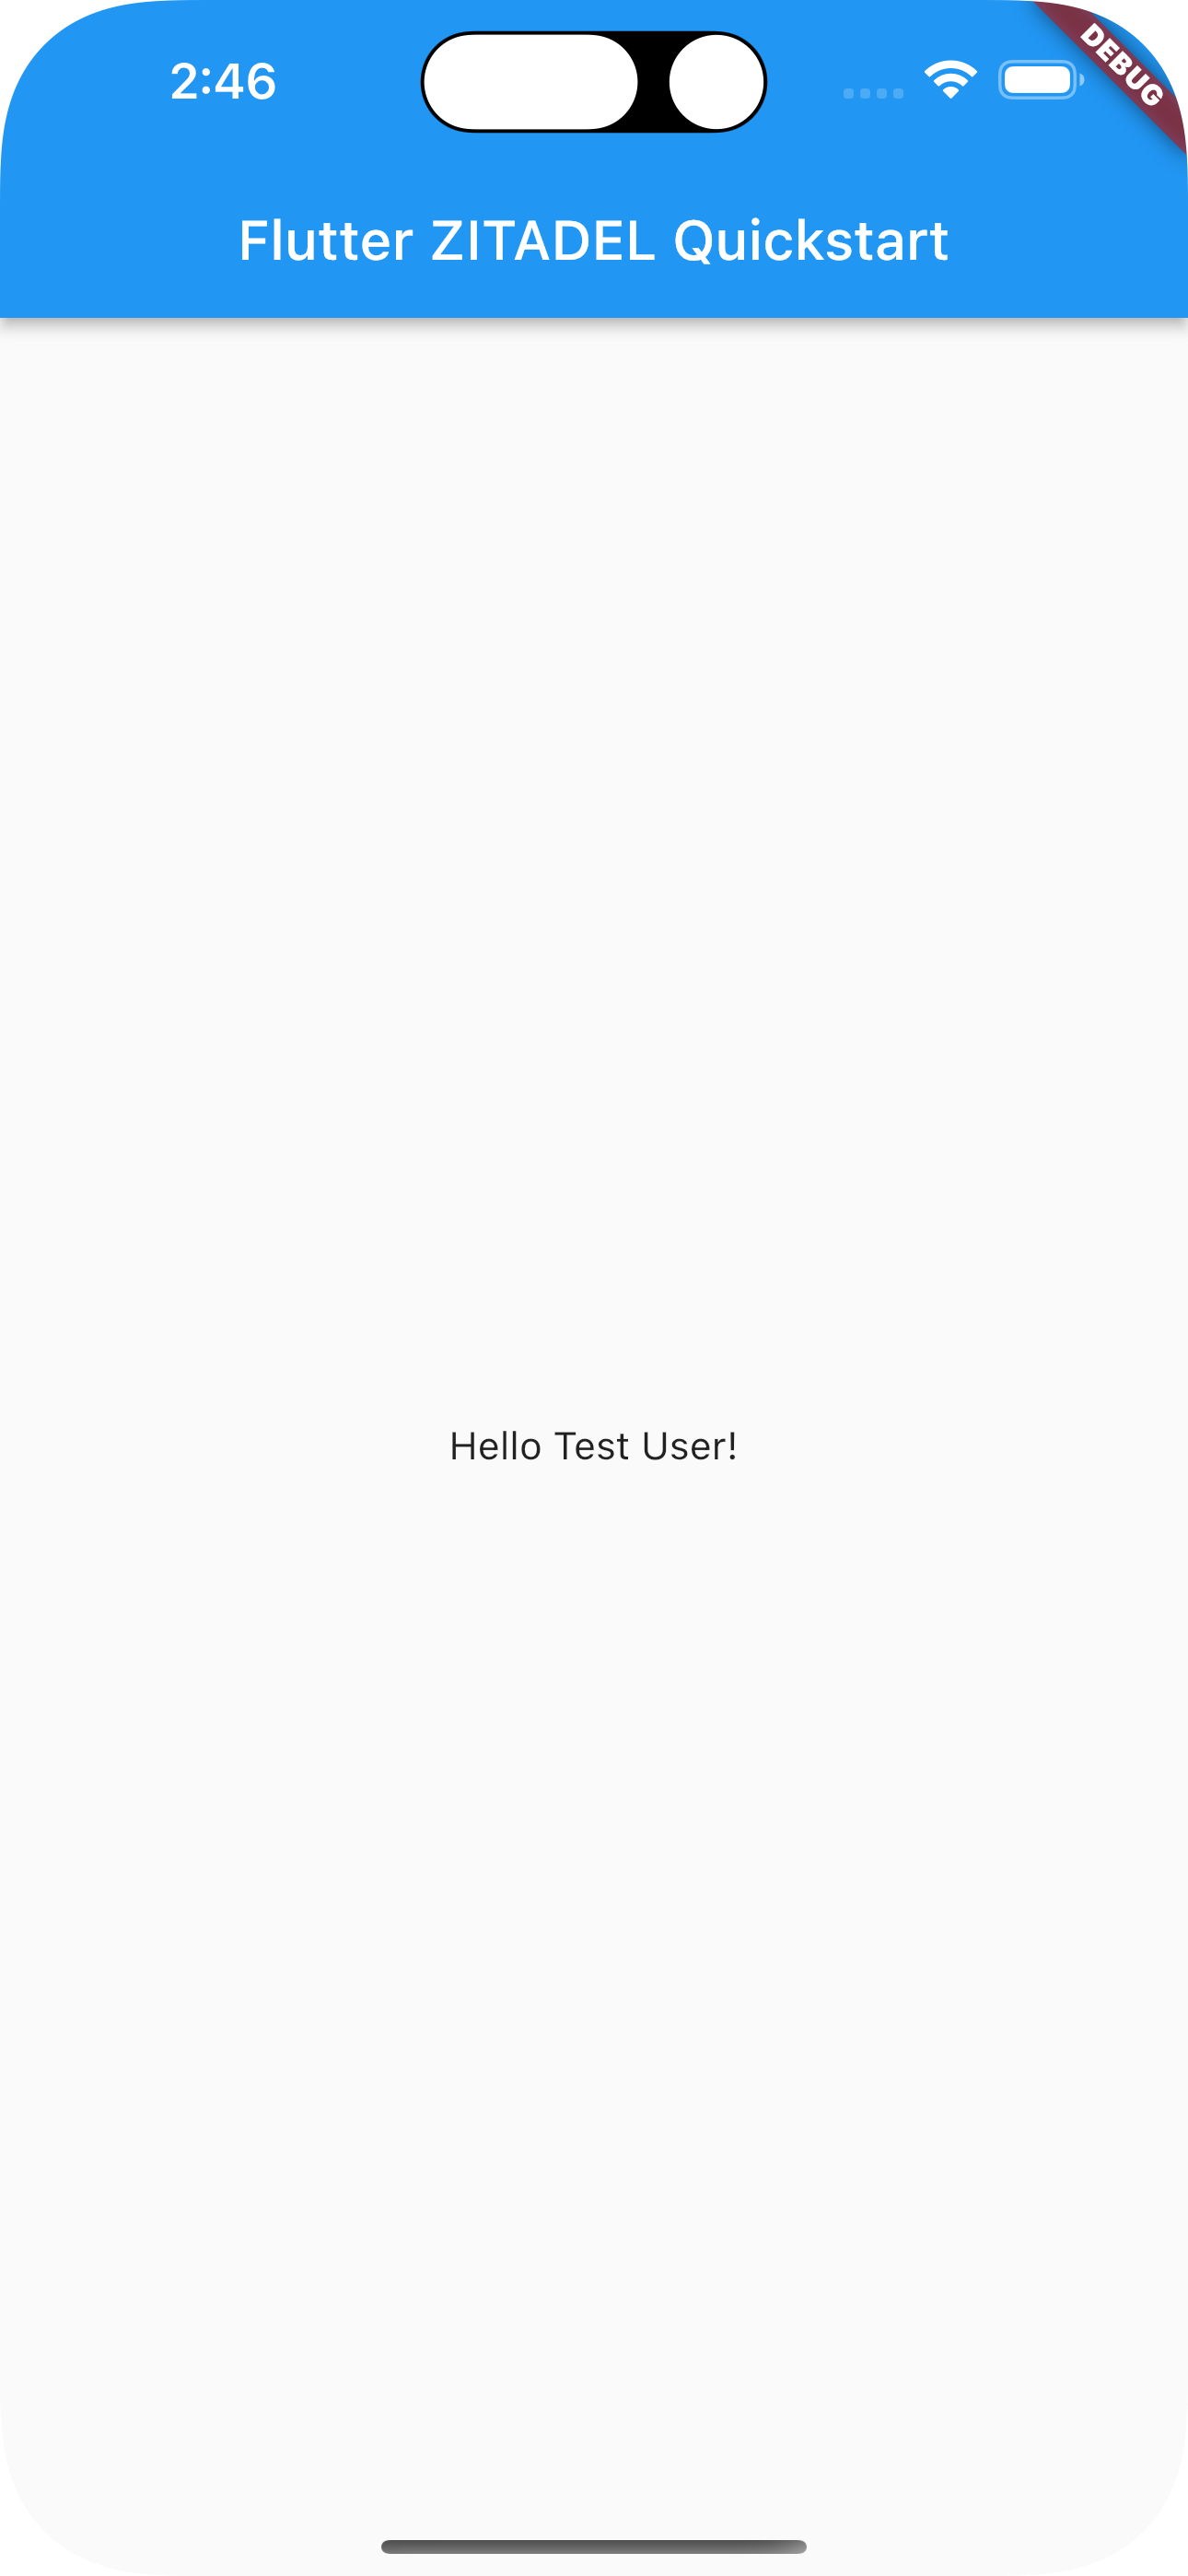
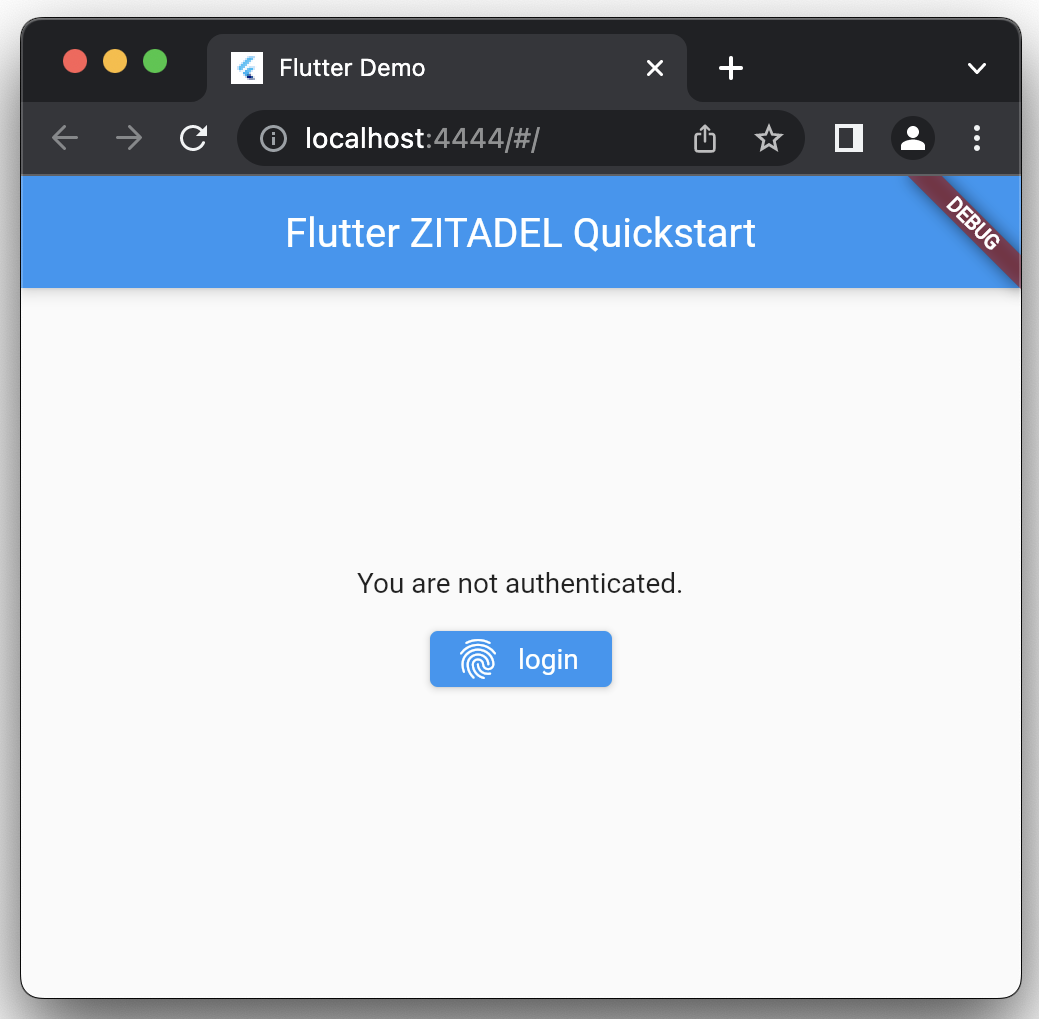
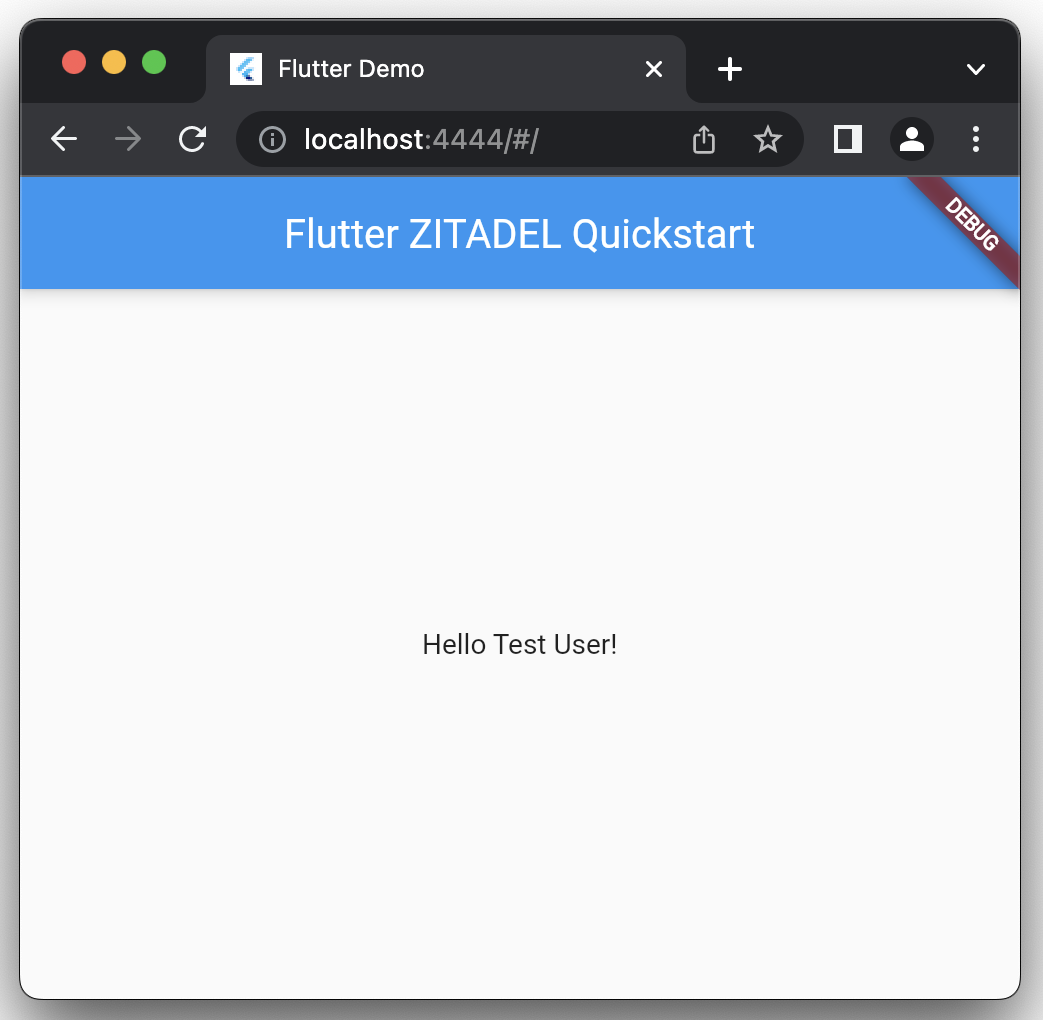
Flutter is a cross-platform mobile app development framework that allows developers to build native iOS and Android apps using a single codebase. Integrate authentication to your Flutter App easily by using the zitadel-flutter Example. |

|
Go is an open-source, compiled programming language that is known for its simplicity, efficiency, and concurrency capabilities. Get started integrating authentication to your Go Application by checking out our zitadel-go SDK. |

|
Java is a general-purpose programming language designed for object-oriented programming. Spring Security is used to protect your applications from unauthorized access, protect sensitive data, and enforce access control policies. Get started integrating authentication to your Java Web App or API by checking out our zitadel-java Example |
| Advisory | Name | Type | Summary | Affected versions | Date |
|---|---|---|---|---|---|
| A-10000 | Reusing user session | Breaking Behavior Change | The default behavior for users logging in is to be directed to the Select Account Page on the Login. With the upcoming changes, users will be automatically authenticated when logging into a second application, as long as they only have one active session. No action is required on your part if this is the intended behavior. | 2.32.0 | Calendar week 32 |
| A-10001 | Login Policy - Allow Register | Breaking Behavior Change | When disabling the option, users are currently not able to register locally and also not through an external IDP. With the upcoming change, the setting will only prevent local registration. Restriction to Identity Providers can be managed through the corresponding IDP Template. No action is required on your side if this is the intended behavior or if you already disabled registration on your IDP. | 2.35.0 | Calendar week 34 |
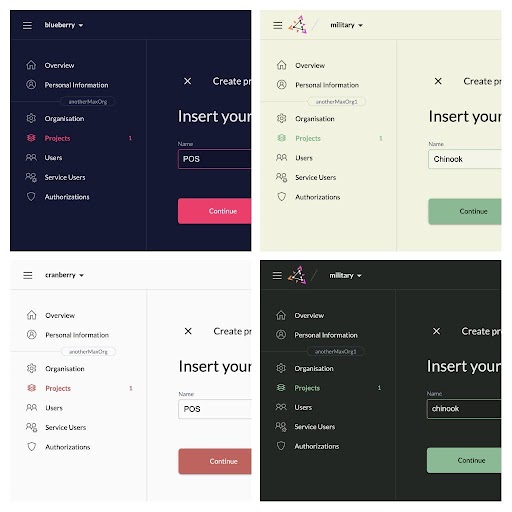
| A-10002 | Console - Branding | Breaking Design Change | Since Angular Material v15 many of the UI components have been refactored to be based on the official Material Design Components for Web (MDC). These refactored components do not support dynamic styling, so in order to keep the library up-to-date, the management console UI will loose its dynamic theming capability. If you need users to have your branding settings (background-, button-, link and text coloring) you should implement your own user facing UI yourself and not use ZITADEL's management console UI. ZITADEL hosted Login-UI is not affected by this change. | 2.40.0 | Calendar week 44 |
| A-10003 | Login-UI - Default Context | Breaking Behavior Change | When users are redirected to the ZITADEL Login-UI without any organizational context, they're currently presented a login screen, based on the default settings, e.g. available IDPs and possible login mechanisms. If the user will then register themselves, by the registration form or through an IDP, the user will always be created on the default organization. With the introduced change, the settings will no longer be loaded from the instance, but rather the default organization directly. | 2.38.0 | Calendar week 41 |
| A-10004 | Sequence uniqueness | Breaking Behavior Change | Due to storage optimizations ZITADEL changes the behavior of sequences. This change improves command (create, update, delete) performance of ZITADEL. Sequences are no longer unique inside an instance. From now on sequences are incrementing per aggregate id. For example sequences of newly created users begin at 1. Existing sequences remain untouched. | 2.39.0 | 2023-10-14 |
| A-10005 | Expected downtime during upgrade | Expected downtime during upgrade | Migrating to versions >= 2.39 from \< 2.39 will cause down time during setup starts and the new version is started. This is caused by storage optimizations which replace the `eventstore.events` database table with the new `eventstore.events2` table. All existing events are migrated during the execution of the `zitadel setup` command. New events will be inserted into the new `eventstore.events2` table. The old table `eventstore.events` is renamed to `eventstore.events_old` and will be dropped in a future release of ZITADEL. | 2.39.0 | Calendar week 41/42 2023 |
| A-10006 | Additional grant to cockroach database user | Breaking Behavior Change | Versions >= 2.39.0 require the cockroach database user of ZITADEL to be granted to the `VIEWACTIVITY` grant. This can either be reached by grant the role manually or execute the `zitadel init` command. | 2.39.0 | Calendar week 41/42 2023 |
| A-10007 | Additional grant to cockroach database user | Breaking Behavior Change | Upcoming Versions require the SYSTEM\_OWNER role to be available in the permission role mappings. Self-hosting ZITADEL users who define custom permission role mappings need to make sure their system users don't lose access to the system API. | Upcoming | Upcoming |
| A-10008 | New flag to prefill projections during setup instead of after start | Feature description | New flag `--init-projections` introduced to `zitadel setup` commands (`setup`, `start-from-setup`, `start-from-init`) | 2.44.0, 2.43.6, 2.42.12 | 2024-01-25 |
| A-10009 | Ensure lock distribution for `FOR UPDATE` -statements on Cockroachdb | Feature description | Fixes rare cases where updating projections was blocked by a `WRITE_TOO_OLD`-error when using cockroachdb. | 2.53.0 | 2024-05-28 |
| A-10010 | Event type of token added event changed | Breaking Behavior Change | Version 2.53.0 improves the token issuance. Due to this there are changes to the event types created on token creation. | 2.53.0 | 2024-05-28 |
| A-10011 | Identity Provider options: allow "auto" only | Breaking Behavior Change | Version 2.59.0 allows more combinations in the identity provider options. Due to this there might be unexpected behavior changes. | 2.59.0 | 2024-08-19 |
| A-10012 | Increased transaction duration for projections | Breaking Behavior Change | In version 2.63.0 we've increased the transaction duration for projections to resolve outdated projections or dead-locks. | 2.63.0 | 2024-09-26 |
| A-10013 | Deprecation of "stable" version | Breaking Behavior Change | The "stable" version will no longer be published or updated, and the corresponding Docker image tag will not be maintained anymore. | \- | 2024-12-09 |
| A-10014 | Correction of project grant owner | Breaking Behavior Change | Correct project grant owners, ensuring they are correctly associated with the projects organization. | \- | 2025-01-10 |
| A-10015 | Drop CockroachDB support | Breaking Behavior Change | CockroachDB is no longer supported by Zitadel. | 3.0.0 | 2025-03-31 |
| A-10016 | Position precision fix | Manual Intervention | 2.65.10 | 2025-05-14 |
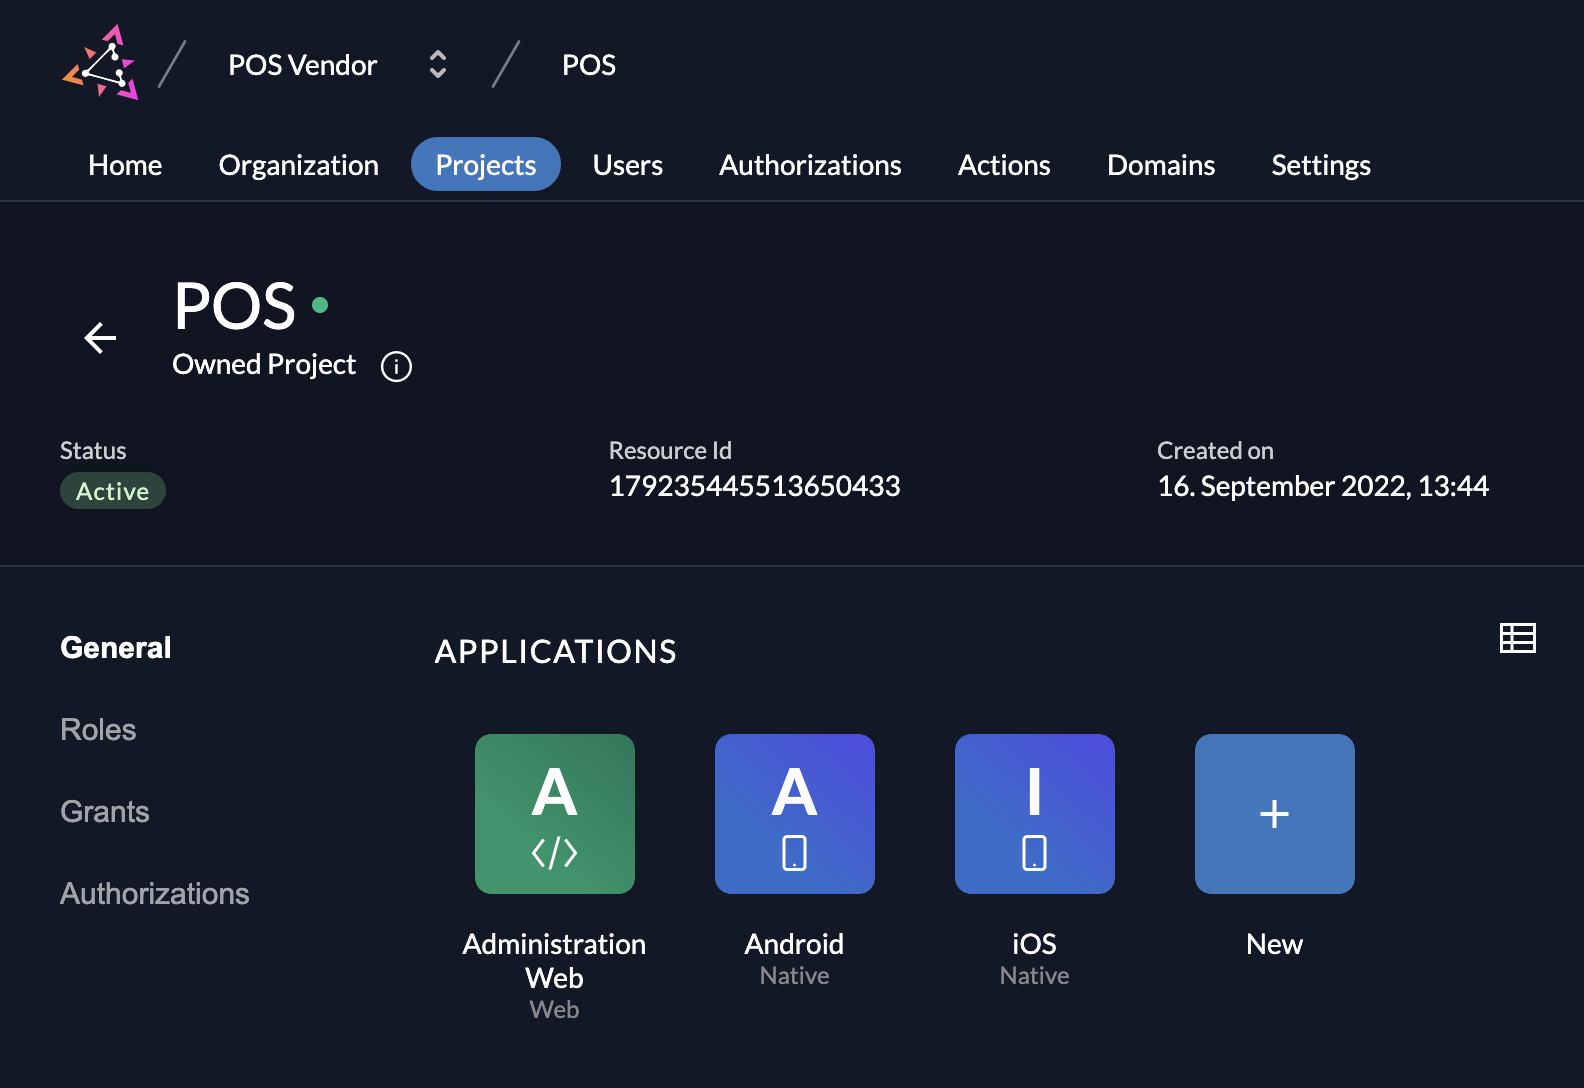
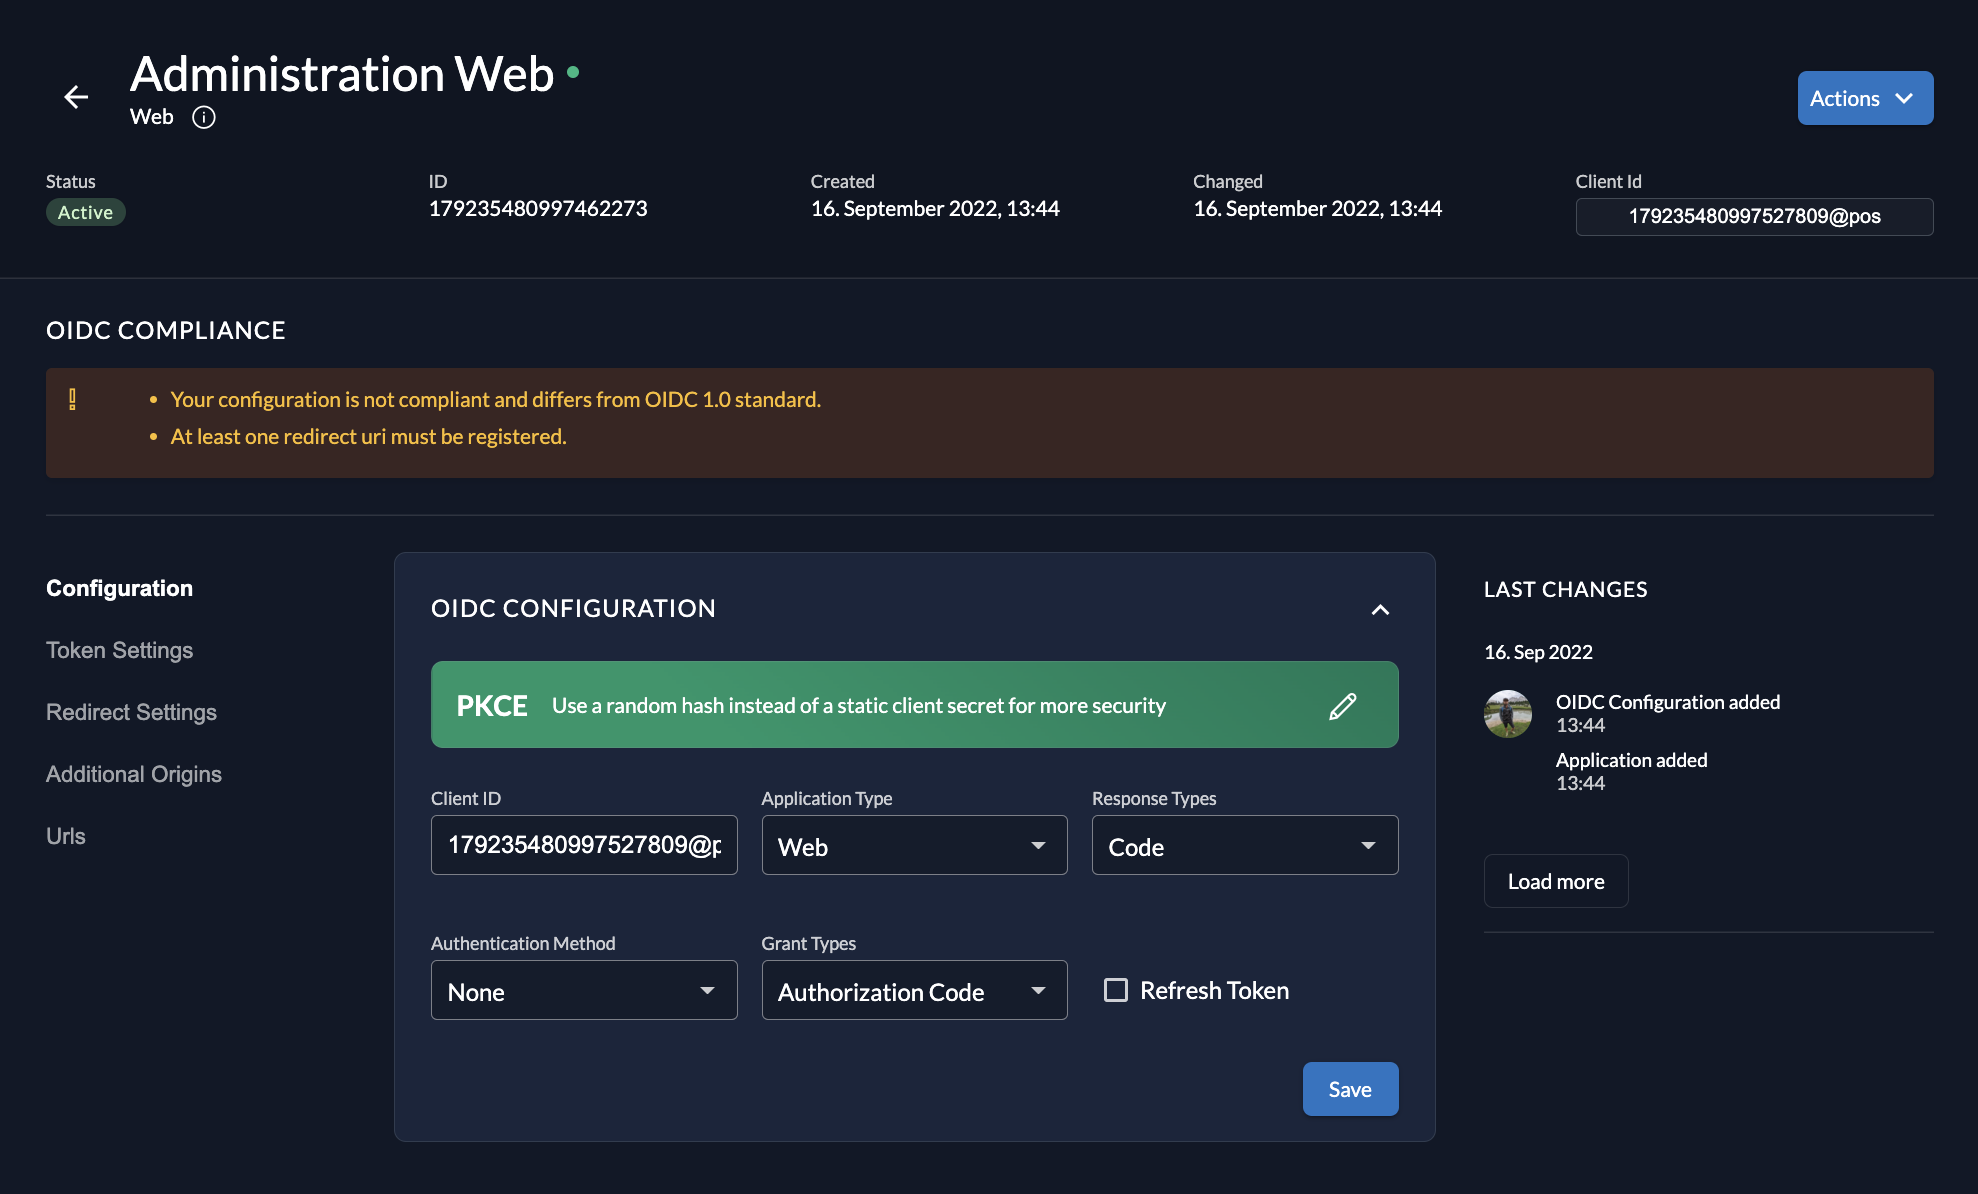
Client ID is the resource id of an application. It's the application where you want your users to login. You can find the Client ID in the Console. When using project grants, use the Client ID from the origin organization.
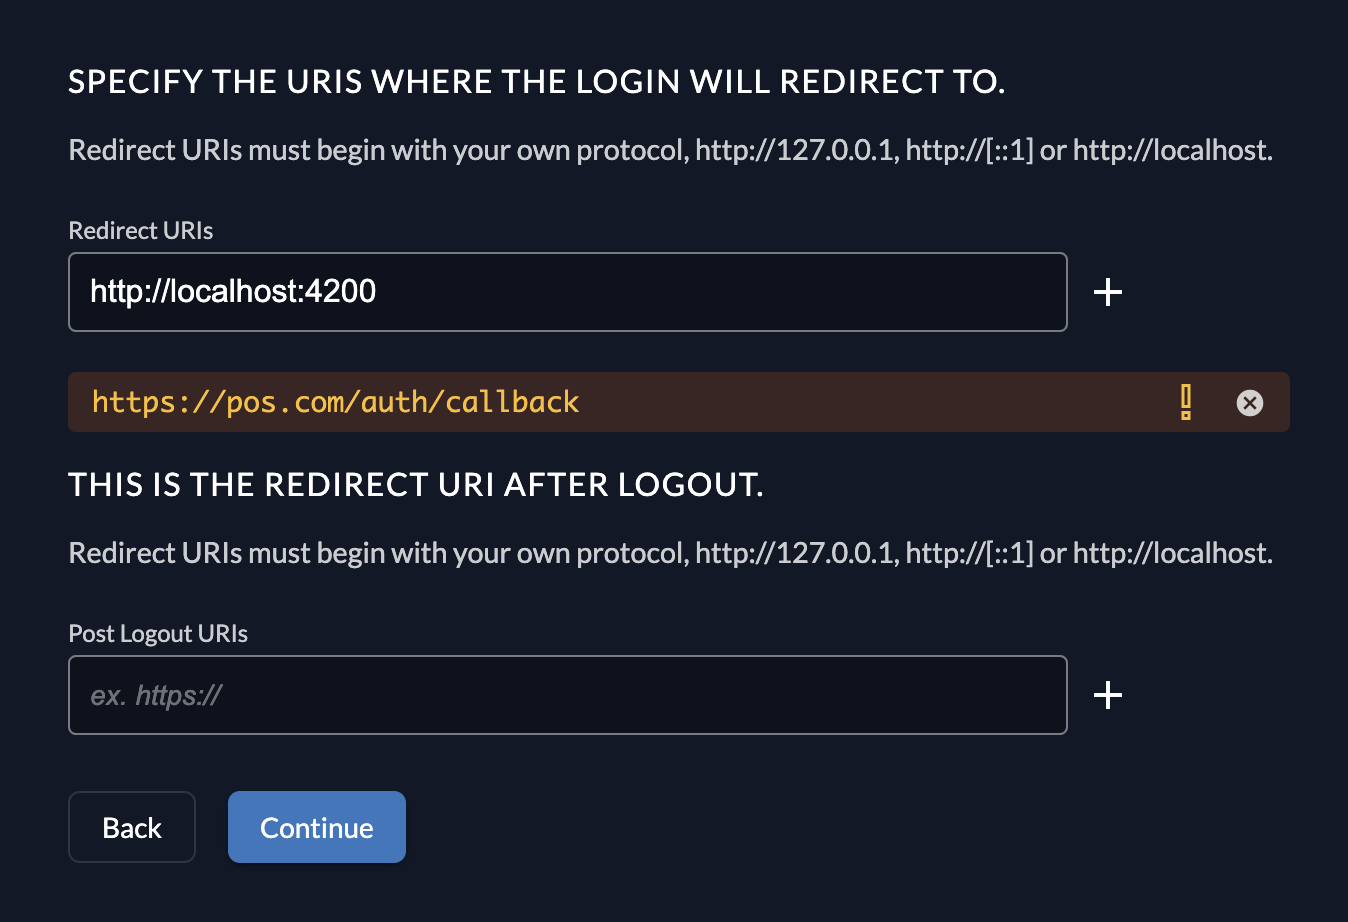
Redirect URI be one of the pre-configured redirect uris for your application. You must add the redirect uri for your application, else you will receive an error.
Response Type defines whether a code, id\_token token or just id\_token will be returned. Most use cases will need code.
More in the documentation about required Parameters. Authentication methods [#authentication-methods] Depending on the authentication and authorization flow of your application you might need to append some information to the authentication request. Authentication method "(none) PKCE" is recommended for most application types. The playground appends automatically a code challenge for PKCE flows. You need to append a "Code Challenge" by providing a random Code Verifier that is being hashed and encoded in the request to the token endpoint, please see our [guide](/guides/integrate/login/oidc/oauth-recommended-flows#our-recommended-authorization-flows) for more details. More in the [documentation](/apis/openidoauth/authn-methods) about authentication methods. Additional Parameters [#additional-parameters]select\_account: user is prompted to select one of the
existing sessions or create a new one
create: present the register form
login: requires the user to re-authenticate
none: user must be authenticated without interaction, an
error is returned otherwise; use for silent-refresh
Login hint must be a valid logon name of a user. You can skip the account picker by providing the Login hint.
There are many more additional parameters. Please refer to the [documentation](/apis/openidoauth/endpoints#additional-parameters) about additional parameters. Standard Scopes [#standard-scopes] Used to request additional information from ZITADEL. These scopes are defined in the OpenID Connect specification. The `openid` scope is mandatory. Not all scopes are available in the playground. Please refer to the full [documentation](/apis/openidoauth/scopes) for the exhaustive list of available standard and reserved scopes. Reserved Scopes [#reserved-scopes] You can request additional information that is specific to ZITADEL or customize the behavior of ZITADEL by including reserved scopes. Please refer to the [documentation](/apis/openidoauth/scopes#reserved-scopes) for a full list of available reserved scopes. Organization policies and branding [#organization-policies-and-branding] Enforce an organization's policies and branding as well as membership of the user by passing the scope `urn:zitadel:iam:org:id:{id}` with the required Organization ID. Please refer to the full [guide on branding](/guides/manage/customize/branding). Get user metadata [#get-user-metadata] Pass the scope `urn:zitadel:iam:user:metadata` to request a user's metadata. Please refer to the full [guide on user-metadata](/guides/manage/customize/user-metadata) for further details. Access core APIs [#access-core-ap-is] Calling the [core API](/apis/introduction) with the authenticated user, requires that the projectID of ZITADEL is included in the audience claim. This can be achieved by adding the scope `urn:zitadel:iam:org:project:id:zitadel:aud` to your applications authorization request. How to use ZITADEL in your project [#how-to-use-zitadel-in-your-project] Please refer to our [guide](/guides/integrate/login/oidc/login-users) on how to login users. OpenID Connect certified libraries should allow you to customize the parameters and define scopes for the authorization request. You can also continue by using one of our [example applications](/sdk-examples/introduction). # Claims in ZITADEL ZITADEL asserts claims on different places according to the corresponding specifications or project and applications settings. Please check below the matrix for an overview where which scope is asserted. | Claims | Userinfo | Introspection | ID Token | Access Token | | :------------------------------------------------- | :------------- | --------------------------------------- | ----------------------------------------------- | ---------------------------------------------------- | | acr | No | No | Yes | No | | act | No | After Token Exchange with `actor_token` | After Token Exchange with `actor_token` | When JWT and after Token Exchange with `actor_token` | | address | When requested | When requested | When requested and response\_type `id_token` | No | | amr | No | No | Yes | No | | aud | No | Yes | Yes | When JWT | | auth\_time | No | No | Yes | No | | azp (client\_id when Introspect) | No | Yes | Yes | When JWT | | email | When requested | When requested | When requested and response\_type `id_token` | No | | email\_verified | When requested | When requested | When requested and response\_type `id_token` | No | | exp | No | Yes | Yes | When JWT | | family\_name | When requested | When requested | When requested and response\_type `id_token` | No | | gender | When requested | When requested | When requested and response\_type `id_token` | No | | given\_name | When requested | When requested | When requested and response\_type `id_token` | No | | iat | No | Yes | Yes | When JWT | | iss | No | Yes | Yes | When JWT | | jti | No | Yes | No | When JWT | | locale | When requested | When requested | When requested and response\_type `id_token` | No | | name | When requested | When requested | When requested and response\_type `id_token` | No | | nbf | No | Yes | No | When JWT | | nonce | No | No | When provided in the authorization request [^1] | No | | phone | When requested | When requested | When requested and response\_type `id_token` | No | | phone\_verified | When requested | When requested | When requested and response\_type `id_token` | No | | preferred\_username (username when Introspect) | When requested | When requested | Yes | No | | sid | No | No | Yes | No | | sub | Yes | Yes | Yes | When JWT | | urn:zitadel:iam:org:domain:primary:\{domainname} | When requested | When requested | When requested | When JWT and requested | | urn:zitadel:iam:org:project:roles | When requested | When requested | When requested or configured | When JWT and requested or configured | | urn:zitadel:iam:user:metadata | When requested | When requested | When requested | When JWT and requested | | urn:zitadel:iam:user:resourceowner:id | When requested | When requested | When requested | When JWT and requested | | urn:zitadel:iam:user:resourceowner:name | When requested | When requested | When requested | When JWT and requested | | urn:zitadel:iam:user:resourceowner:primary\_domain | When requested | When requested | When requested | When JWT and requested | [^1]: The nonce can also be used to distinguish between an id\_token and a logout\_token as latter must never include a nonce. Standard Claims [#standard-claims] | Claims | Example | Description | | :------------------ | :------------------------------------------------------------- | -------------------------------------------------------------------------------------------------------------------------------------------------------------------------- | | acr | TBA | TBA | | act | `{"iss": "${CUSTOM_DOMAIN}","sub": "259241944654282754"}` | JSON object describing the actor from the `actor_token` after [token exchange](/guides/integrate/token-exchange#actor-token) | | address | `Lerchenfeldstrasse 3, 9014 St. Gallen` | TBA | | amr | `pwd mfa` | Authentication Method References as defined in [RFC8176](https://tools.ietf.org/html/rfc8176)
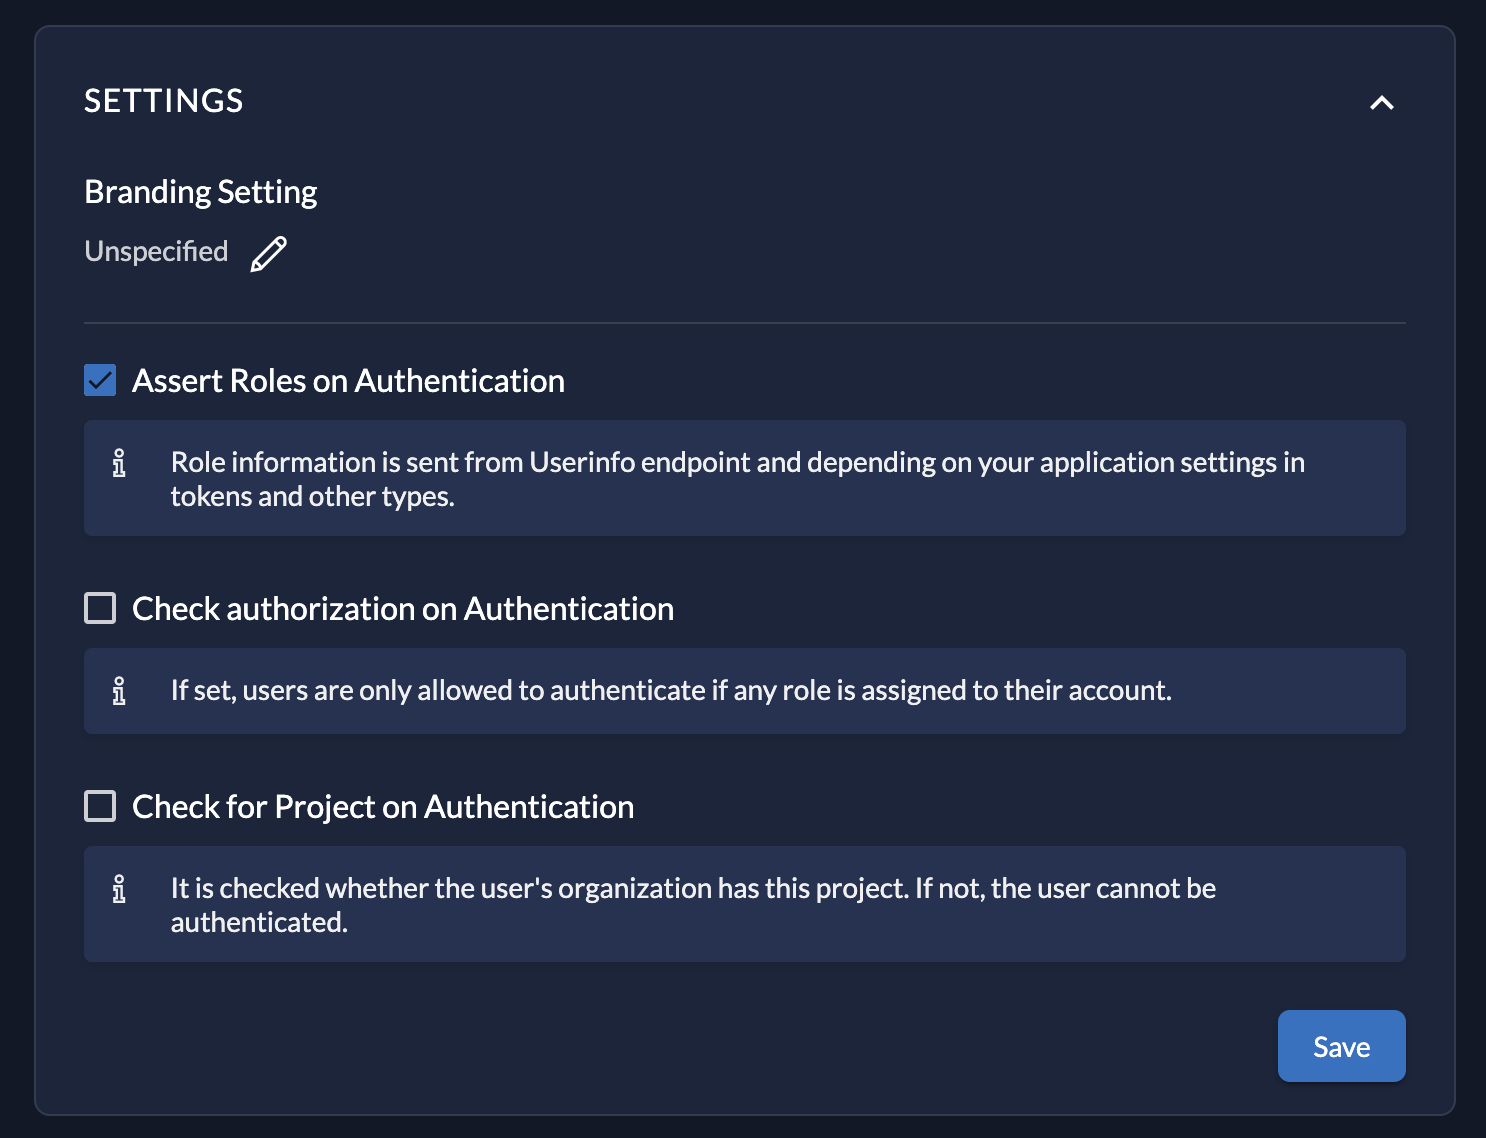 If you need them included in your ID Token, select **’User Roles Inside ID Token’** in application settings. This has to be set in your applications as this is dependent on your application type. Navigate to your application and select this setting.
 Alternatively, you can include the claims `urn:iam:org:project:roles` or/and `urn:zitadel:iam:org:projects:roles` in your scope to achieve the same as above.
Determine the roles assigned to a user [#determine-the-roles-assigned-to-a-user]
To determine the roles assigned to a user, you have two options:
* **Token claims**: Request that the relevant roles claim (such as `urn:zitadel:iam:org:project:{projectId}:roles`) is included in the token when you authenticate. The roles assigned to the user will then be part of the token’s payload.
* **Token introspection**: After a token is issued, you can introspect it using the [ZITADEL introspection endpoint](/guides/integrate/token-introspection) to view the roles claim. This will return the roles assigned to the user according to the token.
Retrieve roles from the userinfo endpoint [#retrieve-roles-from-the-userinfo-endpoint]
The user info endpoint is **`${CUSTOM_DOMAIN}`/oidc/v1/userinfo**.
This endpoint will return information about the authenticated user.
Send the access token of the user as `Bearer Token` in the `Authorization` header:
**cURL Request:**
```bash
curl --request GET \
--url ${CUSTOM_DOMAIN}/oidc/v1/userinfo
--header 'Authorization: Bearer
Alternatively, you can include the claims `urn:iam:org:project:roles` or/and `urn:zitadel:iam:org:projects:roles` in your scope to achieve the same as above.
Determine the roles assigned to a user [#determine-the-roles-assigned-to-a-user]
To determine the roles assigned to a user, you have two options:
* **Token claims**: Request that the relevant roles claim (such as `urn:zitadel:iam:org:project:{projectId}:roles`) is included in the token when you authenticate. The roles assigned to the user will then be part of the token’s payload.
* **Token introspection**: After a token is issued, you can introspect it using the [ZITADEL introspection endpoint](/guides/integrate/token-introspection) to view the roles claim. This will return the roles assigned to the user according to the token.
Retrieve roles from the userinfo endpoint [#retrieve-roles-from-the-userinfo-endpoint]
The user info endpoint is **`${CUSTOM_DOMAIN}`/oidc/v1/userinfo**.
This endpoint will return information about the authenticated user.
Send the access token of the user as `Bearer Token` in the `Authorization` header:
**cURL Request:**
```bash
curl --request GET \
--url ${CUSTOM_DOMAIN}/oidc/v1/userinfo
--header 'Authorization: Bearer 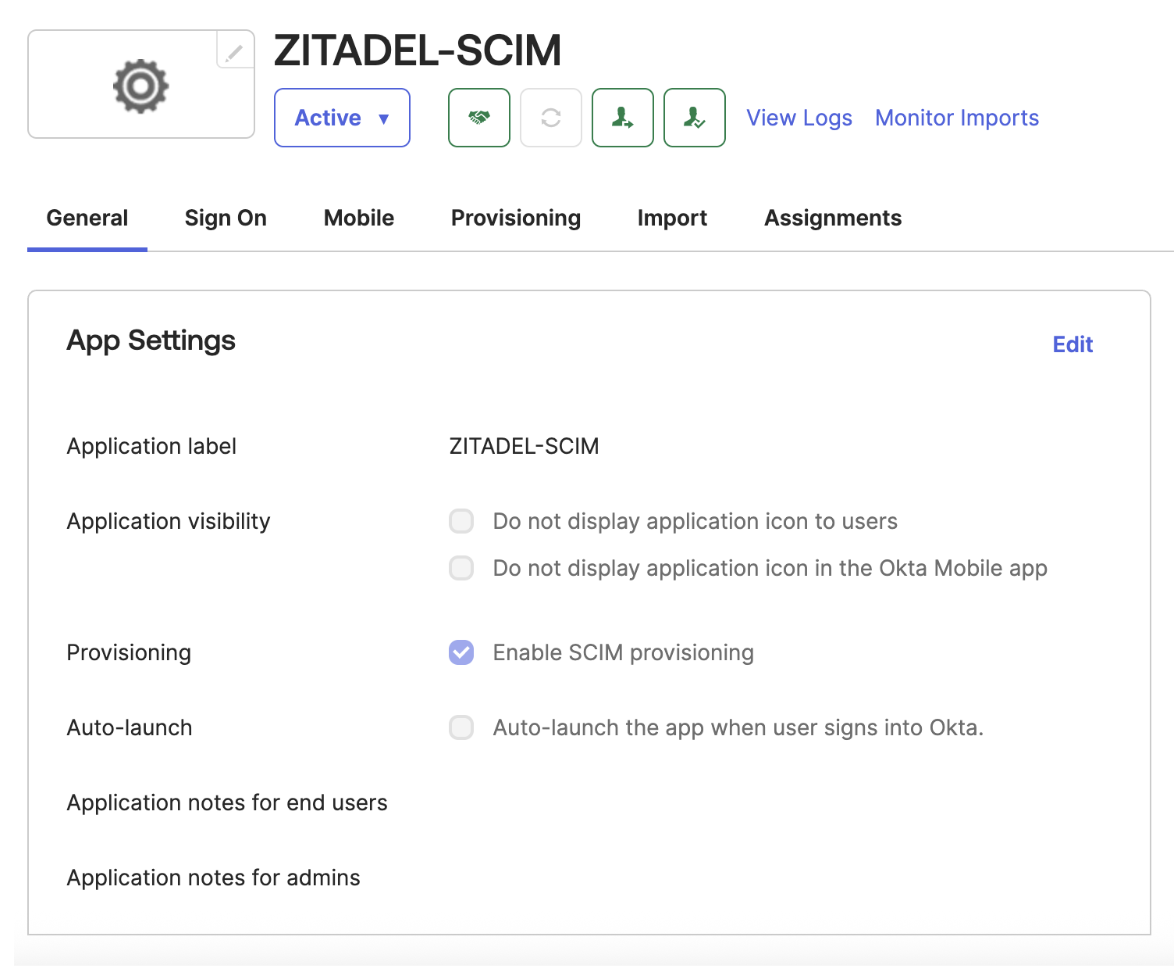 5. Under the **General** tab, also confirm that [Federation Broker Mode](https://help.okta.com/en-us/content/topics/apps/apps-fbm-main.htm) is disabled.
6. Click on the **Provisioning** tab, then go to the **Integration** tab and select **Edit**.
5. Under the **General** tab, also confirm that [Federation Broker Mode](https://help.okta.com/en-us/content/topics/apps/apps-fbm-main.htm) is disabled.
6. Click on the **Provisioning** tab, then go to the **Integration** tab and select **Edit**.
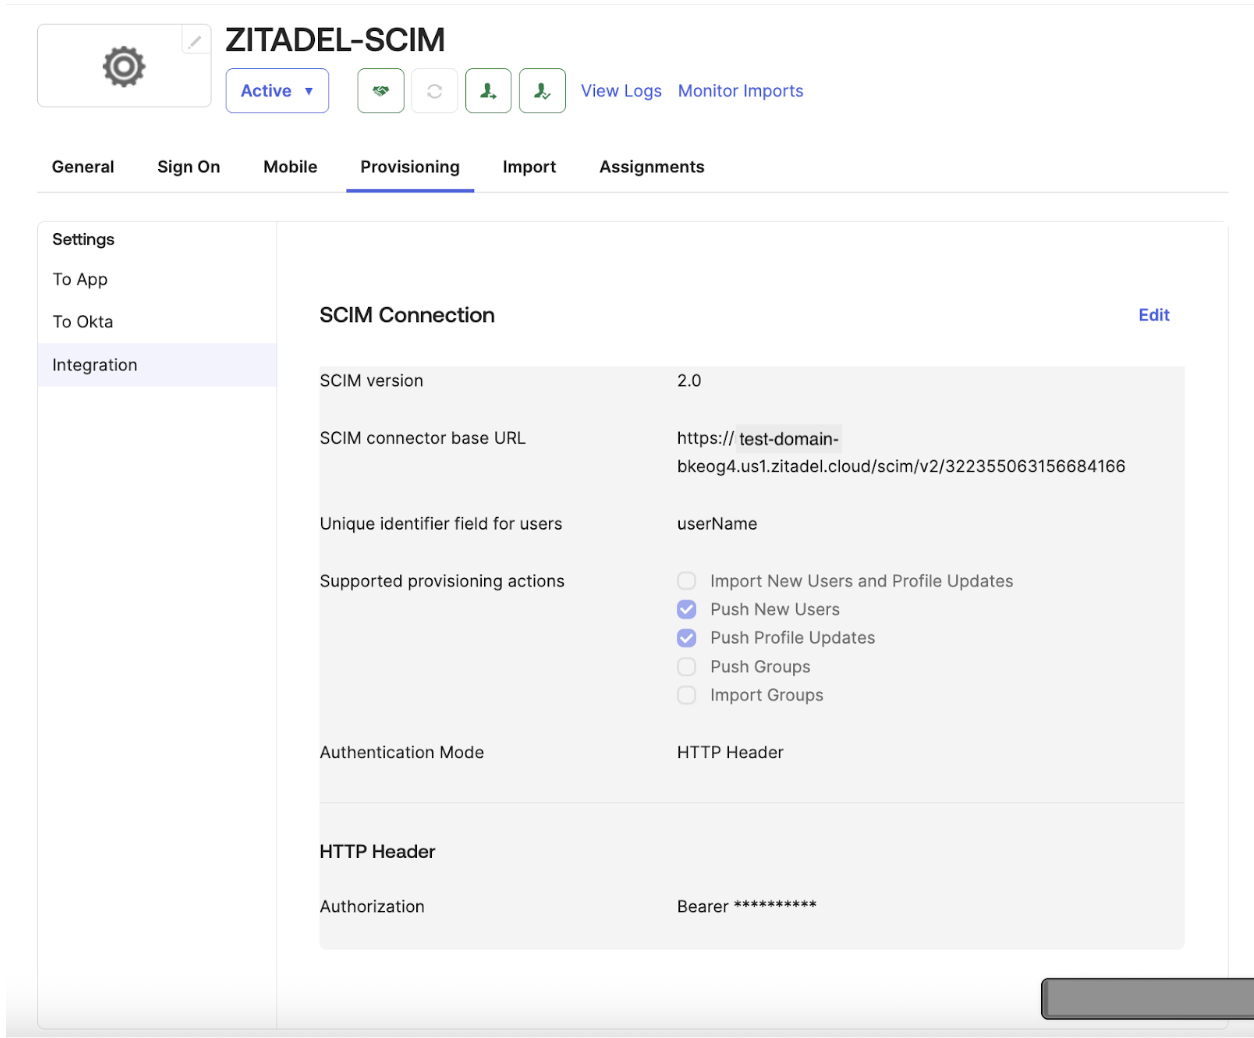 7. Enter the **SCIM connector base URL** using this format:
`https://${ZITADEL_DOMAIN}/scim/v2/{orgId}`
Like the example in the above image:
`https://test-domain-bkeog4.us1.zitadel.cloud/scim/v2/322355063156684166`
*(Find more details about endpoints [here](https://zitadel.com/docs/apis/scim2#supported-endpoints)).*
8. For **Unique identifier field for users**, enter **userName**.
9. Under **Supported provisioning actions**, select ***Push New Users*** and ***Push Profile Updates***.
10. Choose your authentication method under **Authentication Mode**:
* **HTTP Header** if using a Personal Access Token (PAT).
* **OAuth 2** if using Client Credentials Grant.
11. Provide the authentication details according to your chosen method:
* For **HTTP Header (PAT)**, enter the PAT token generated from ZITADEL.
* For **OAuth 2**, provide the client credentials (Client ID, Client Secret, token URL, authorization URL).
12. Click **Test Connection Settings** to verify the integration (optional but recommended), then click **Save**.
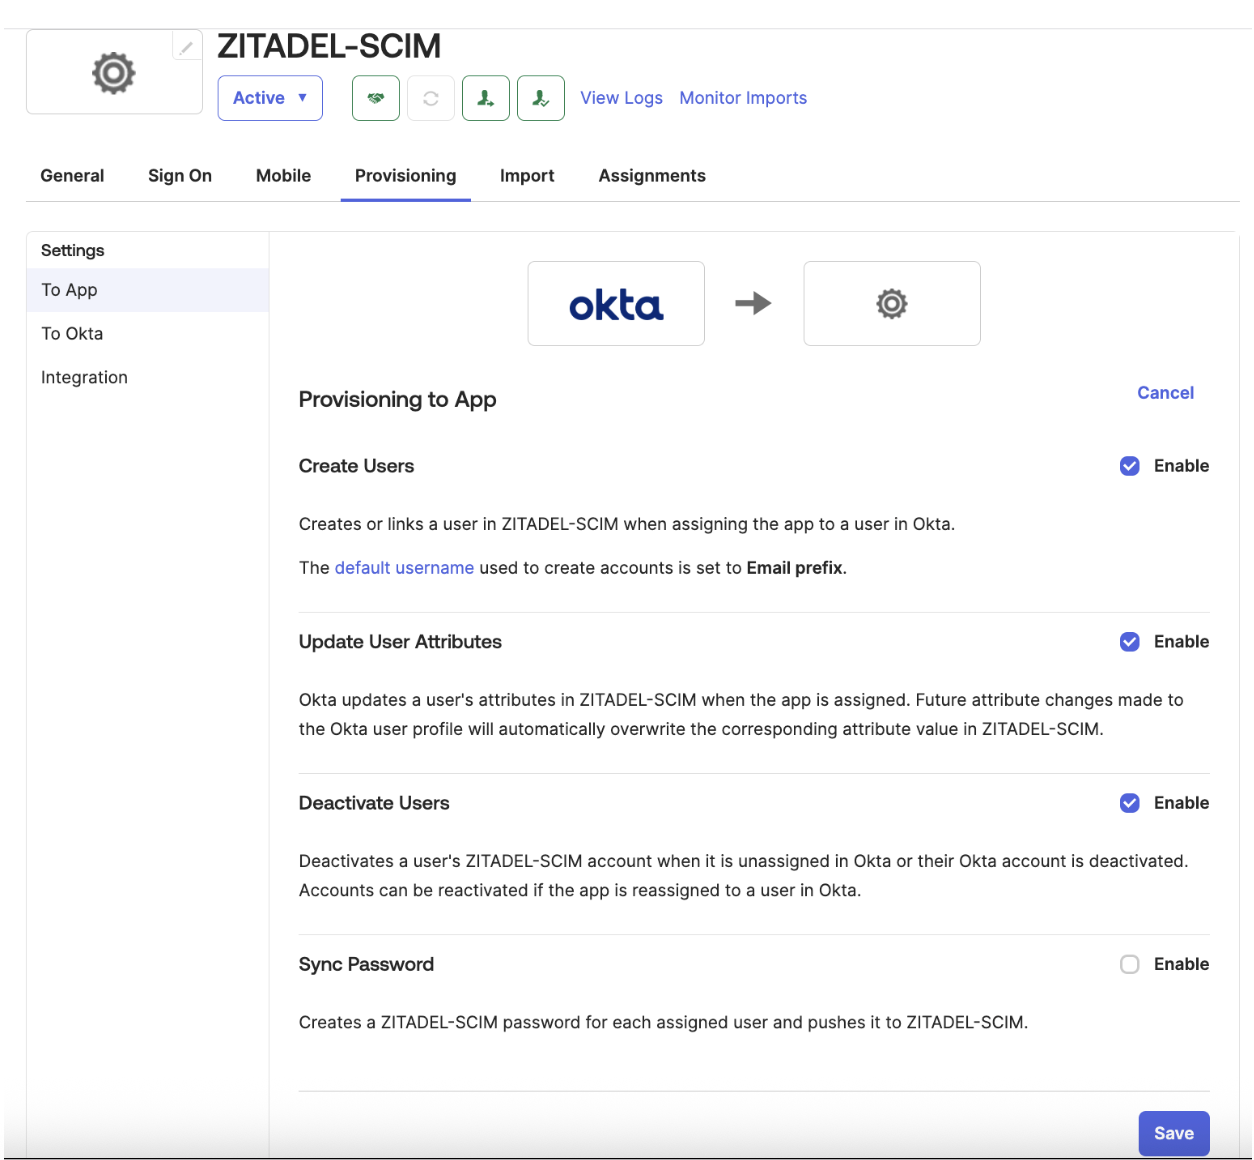
13. Under the **Provisioning to App** settings, enable:
* **Create Users**
* **Update User Attributes**
* **Deactivate Users**
14. Click **Save** to apply these settings.
7. Enter the **SCIM connector base URL** using this format:
`https://${ZITADEL_DOMAIN}/scim/v2/{orgId}`
Like the example in the above image:
`https://test-domain-bkeog4.us1.zitadel.cloud/scim/v2/322355063156684166`
*(Find more details about endpoints [here](https://zitadel.com/docs/apis/scim2#supported-endpoints)).*
8. For **Unique identifier field for users**, enter **userName**.
9. Under **Supported provisioning actions**, select ***Push New Users*** and ***Push Profile Updates***.
10. Choose your authentication method under **Authentication Mode**:
* **HTTP Header** if using a Personal Access Token (PAT).
* **OAuth 2** if using Client Credentials Grant.
11. Provide the authentication details according to your chosen method:
* For **HTTP Header (PAT)**, enter the PAT token generated from ZITADEL.
* For **OAuth 2**, provide the client credentials (Client ID, Client Secret, token URL, authorization URL).
12. Click **Test Connection Settings** to verify the integration (optional but recommended), then click **Save**.
13. Under the **Provisioning to App** settings, enable:
* **Create Users**
* **Update User Attributes**
* **Deactivate Users**
14. Click **Save** to apply these settings.
 Step 3: Attribute Mapping (Recommended) [#step-3-attribute-mapping-recommended]
Review and adjust attribute mappings in Okta as needed:
* Ensure standard attributes such as `userName`, `email`, `name.givenName`, and `name.familyName` are correctly mapped.
Step 4: Verify SCIM Provisioning [#step-4-verify-scim-provisioning]
* Assign the configured application to test users/groups in Okta.
* Verify that users are automatically provisioned into ZITADEL by checking under **Users** in your ZITADEL console.
* Validate attribute synchronization and lifecycle management (activation, updates, deactivation).
Helpful Reference Links [#helpful-reference-links]
* [Authenticate users with SAML](https://zitadel.com/docs/guides/integrate/login/saml)
* [ZITADEL: Creating Service Accounts](https://zitadel.com/docs/guides/manage/console/users-overview)
* [ZITADEL: Service Account Authentication](https://zitadel.com/docs/guides/integrate/service-accounts/authenticate-service-accounts)
* [ZITADEL SCIM 2.0 API Endpoints](https://zitadel.com/docs/apis/scim2)
* [SCIM v2.0 (Preview) docs](https://zitadel.com/docs/guides/manage/user/scim2)
# Impersonation and delegation using Token Exchange
import TokenExchangeTypes from "../../apis/openidoauth/_token_exchange_types.mdx";
import TokenExchangeRequest from "../../apis/openidoauth/_token_exchange_request.mdx";
import TokenExchangeResponse from "../../apis/openidoauth/_token_exchange_response.mdx";
The Token Exchange grant implements [RFC 8693, OAuth 2.0 Token Exchange](https://www.rfc-editor.org/rfc/rfc8693) and can be used to exchange tokens to a different scope, audience or subject. Changing the subject of an authenticated token is called impersonation or delegation. This guide will explain how token exchange is implemented inside ZITADEL and gives some usage examples.
In this guide we assume that the application performing the token exchange is already in possession of tokens. You should already have a good understanding on the following topics before starting with this guide:
* Integrate your app with the [OIDC flow](/guides/integrate/login/oidc/login-users) to obtain tokens
* [Claims](/apis/openidoauth/claims)
* [Scope](/apis/openidoauth/scopes)
* Audience
The basics [#the-basics]
Token Exchange is a complex and broad subject. Before we get our hands dirty with the "how-to" part, lets first cover some basics.
Token types [#token-types]
Token Exchange offers a range of possibilities for providing and requesting different token types. The existence of the various `*_token_type` fields in the request and response data helps defining which tokens we are sending, which ones we wish to receive and finally which one(s) we did receive in the response.
Step 3: Attribute Mapping (Recommended) [#step-3-attribute-mapping-recommended]
Review and adjust attribute mappings in Okta as needed:
* Ensure standard attributes such as `userName`, `email`, `name.givenName`, and `name.familyName` are correctly mapped.
Step 4: Verify SCIM Provisioning [#step-4-verify-scim-provisioning]
* Assign the configured application to test users/groups in Okta.
* Verify that users are automatically provisioned into ZITADEL by checking under **Users** in your ZITADEL console.
* Validate attribute synchronization and lifecycle management (activation, updates, deactivation).
Helpful Reference Links [#helpful-reference-links]
* [Authenticate users with SAML](https://zitadel.com/docs/guides/integrate/login/saml)
* [ZITADEL: Creating Service Accounts](https://zitadel.com/docs/guides/manage/console/users-overview)
* [ZITADEL: Service Account Authentication](https://zitadel.com/docs/guides/integrate/service-accounts/authenticate-service-accounts)
* [ZITADEL SCIM 2.0 API Endpoints](https://zitadel.com/docs/apis/scim2)
* [SCIM v2.0 (Preview) docs](https://zitadel.com/docs/guides/manage/user/scim2)
# Impersonation and delegation using Token Exchange
import TokenExchangeTypes from "../../apis/openidoauth/_token_exchange_types.mdx";
import TokenExchangeRequest from "../../apis/openidoauth/_token_exchange_request.mdx";
import TokenExchangeResponse from "../../apis/openidoauth/_token_exchange_response.mdx";
The Token Exchange grant implements [RFC 8693, OAuth 2.0 Token Exchange](https://www.rfc-editor.org/rfc/rfc8693) and can be used to exchange tokens to a different scope, audience or subject. Changing the subject of an authenticated token is called impersonation or delegation. This guide will explain how token exchange is implemented inside ZITADEL and gives some usage examples.
In this guide we assume that the application performing the token exchange is already in possession of tokens. You should already have a good understanding on the following topics before starting with this guide:
* Integrate your app with the [OIDC flow](/guides/integrate/login/oidc/login-users) to obtain tokens
* [Claims](/apis/openidoauth/claims)
* [Scope](/apis/openidoauth/scopes)
* Audience
The basics [#the-basics]
Token Exchange is a complex and broad subject. Before we get our hands dirty with the "how-to" part, lets first cover some basics.
Token types [#token-types]
Token Exchange offers a range of possibilities for providing and requesting different token types. The existence of the various `*_token_type` fields in the request and response data helps defining which tokens we are sending, which ones we wish to receive and finally which one(s) we did receive in the response.
 Front-end login with ZITADEL [#front-end-login-with-zitadel]
* You must create a User Agent application in your project to add login to your React application using the Authorization Code with PKCE flow. This allows the front-end application to integrate with ZITADEL to enable user authentication and authorization.
* In the React front-end application, configure the ZITADEL OIDC client settings, including the client ID, ZITADEL URLs, redirect URIs, and required scopes.
* Implement the login flow, authentication callbacks, and token handling logic in the front-end application.
* When a user visits the front-end application, they are presented with a login option.
* Upon clicking the login button, the frontend initiates the Authorization Code with PKCE authentication flow and redirects the user to the ZITADEL login page. The user enters their credentials and authenticates with ZITADEL. Authorization Code Flow returns an authorization code to the client application, which can then exchange it for an ID token and an access token directly. This provides the benefit of not exposing any tokens to the user agent and possibly other malicious applications with access to the user agent.
* You must set up the required scopes and claims to ensure the front-end and back-end can exchange data securely. It’s important to note that when specifying the scope when calling the token API, the scope must contain the project ID of the ZITADEL project in which the API resides (to enable token validation by the back-end API):`scope:'openid profile email urn:zitadel:iam:org:project:id:
Front-end login with ZITADEL [#front-end-login-with-zitadel]
* You must create a User Agent application in your project to add login to your React application using the Authorization Code with PKCE flow. This allows the front-end application to integrate with ZITADEL to enable user authentication and authorization.
* In the React front-end application, configure the ZITADEL OIDC client settings, including the client ID, ZITADEL URLs, redirect URIs, and required scopes.
* Implement the login flow, authentication callbacks, and token handling logic in the front-end application.
* When a user visits the front-end application, they are presented with a login option.
* Upon clicking the login button, the frontend initiates the Authorization Code with PKCE authentication flow and redirects the user to the ZITADEL login page. The user enters their credentials and authenticates with ZITADEL. Authorization Code Flow returns an authorization code to the client application, which can then exchange it for an ID token and an access token directly. This provides the benefit of not exposing any tokens to the user agent and possibly other malicious applications with access to the user agent.
* You must set up the required scopes and claims to ensure the front-end and back-end can exchange data securely. It’s important to note that when specifying the scope when calling the token API, the scope must contain the project ID of the ZITADEL project in which the API resides (to enable token validation by the back-end API):`scope:'openid profile email urn:zitadel:iam:org:project:id:Widespread failure or complete unavailability of ZITADEL Core Services.
ZITADEL will use continuous effort to provide a workaround or permanent solution. When Core Services are available, the severity will be lowered to the new appropriate level.
| | **Severity 2**Core Services of ZITADEL software continue to operate in severely restricted fashion, yet long-term productivity may be impacted.
When Core Services are no longer severely degraded (eg, through a viable workaround or release), the severity level will be lowered to Severity 3.
| | **Severity 3**Partial and non-critical loss of ZITADEL software functionality or major software defect, yet a workaround exists for viable long-term operation.
ZITADEL will continue to work on developing permanent resolution.
| | **Severity 4**ZITADEL will continue to work on developing permanent resolution and response to general requests. ZITADEL does not provide a timeline or guarantee to include any feature requests.
| | Escalation [#escalation] The customer may escalate support requests following the escalation process: 1. For non-urgent needs, the client may request management escalation within the ticket. A manager will review the request and provide a response within one business day. 2. For urgent needs, the client may escalate directly by calling +41 71 560 28 06 and emailing to [hi@zitadel.com](mailto:hi@zitadel.com). A manager will review the request and provide response within two business hours. If we fail to provide a response to the escalation, you will be entitled to service credits. For every 15 minutes exceeding the state objective, 1 day will be added as extension to the current term. # Java Client|
|
This guide covers the official Zitadel Management API Client for the JVM (Java 11+), which allows you to programmatically manage resources in your Zitadel instance. |

|
This guide covers the official Zitadel Management API Client for Node.js (20+), which allows you to programmatically manage resources in your Zitadel instance. |

|
This guide covers the official Zitadel Management API Client for PHP, which allows you to programmatically manage resources in your Zitadel instance. |

|
This guide covers the official Zitadel Management API Client for Python (3.9+), which allows you to programmatically manage resources in your Zitadel instance. |

|
This guide covers the official Zitadel Management API Client for Ruby (3.1+), which allows you to programmatically manage resources in your Zitadel instance. |
 ***
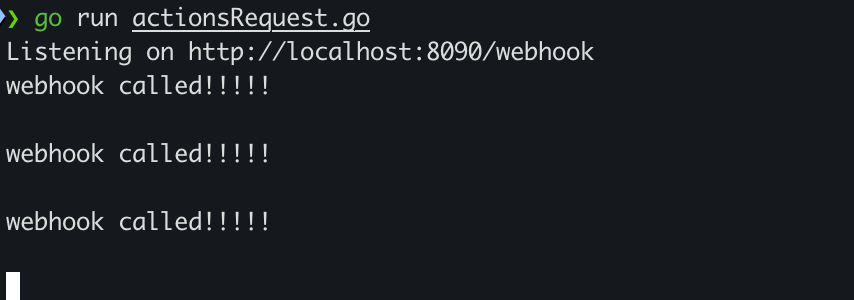
4. Run Your Listener [#4-run-your-listener]
Start your local listener:
```sh
go run actionsRequest.go
```
You should see output in your console whenever the listener is called.
***
4. Run Your Listener [#4-run-your-listener]
Start your local listener:
```sh
go run actionsRequest.go
```
You should see output in your console whenever the listener is called.
 ***
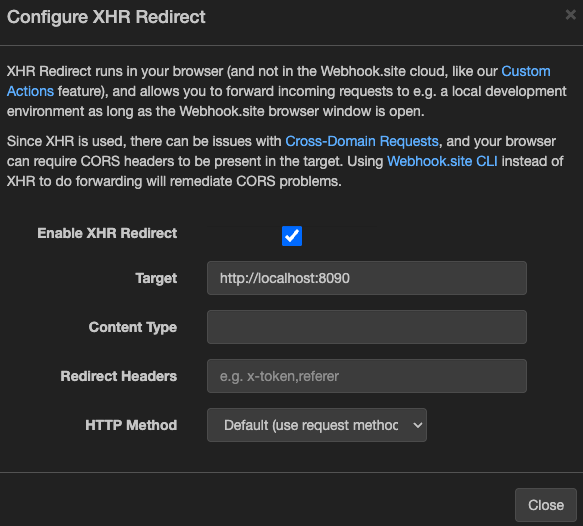
5. Create Target in ZITADEL [#5-create-target-in-zitadel]
As shown in the example above, the target is created with HTTP and port '8090'. If you want to use it as a webhook, the target can be created as follows:
See [Create a target](/reference/api/action/zitadel.action.v2.ActionService.CreateTarget) for more detailed information. Notice that the `endpoint` is your Webhook.site URL.
```shell
curl -L -X POST 'https://${CUSTOM_DOMAIN}/v2/actions/targets' \
-H 'Content-Type: application/json' \
-H 'Accept: application/json' \
-H 'Authorization: Bearer
***
5. Create Target in ZITADEL [#5-create-target-in-zitadel]
As shown in the example above, the target is created with HTTP and port '8090'. If you want to use it as a webhook, the target can be created as follows:
See [Create a target](/reference/api/action/zitadel.action.v2.ActionService.CreateTarget) for more detailed information. Notice that the `endpoint` is your Webhook.site URL.
```shell
curl -L -X POST 'https://${CUSTOM_DOMAIN}/v2/actions/targets' \
-H 'Content-Type: application/json' \
-H 'Accept: application/json' \
-H 'Authorization: Bearer 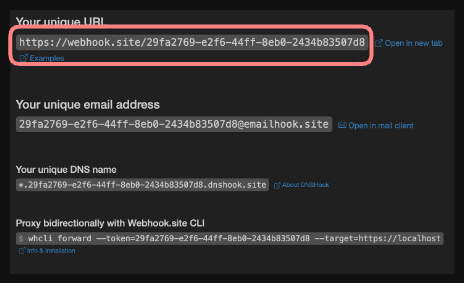 ***
Save the returned ID to use in the execution step. A sample response looks like this:
```json
{
"id": "337246363446151234",
"creationDate": "2025-09-10T13:21:36.959699Z",
"signingKey": "OpUHaCtEqh8swdJ5xUYbQ2bhej1abcXYZ"
}
```
6. Set execution [#6-set-execution]
To configure ZITADEL to call the target when an API endpoint is called, set an execution and define the request condition.
See [Set an execution](/reference/api/action/zitadel.action.v2.ActionService.SetExecution) for more detailed information.
Here, `
***
Save the returned ID to use in the execution step. A sample response looks like this:
```json
{
"id": "337246363446151234",
"creationDate": "2025-09-10T13:21:36.959699Z",
"signingKey": "OpUHaCtEqh8swdJ5xUYbQ2bhej1abcXYZ"
}
```
6. Set execution [#6-set-execution]
To configure ZITADEL to call the target when an API endpoint is called, set an execution and define the request condition.
See [Set an execution](/reference/api/action/zitadel.action.v2.ActionService.SetExecution) for more detailed information.
Here, `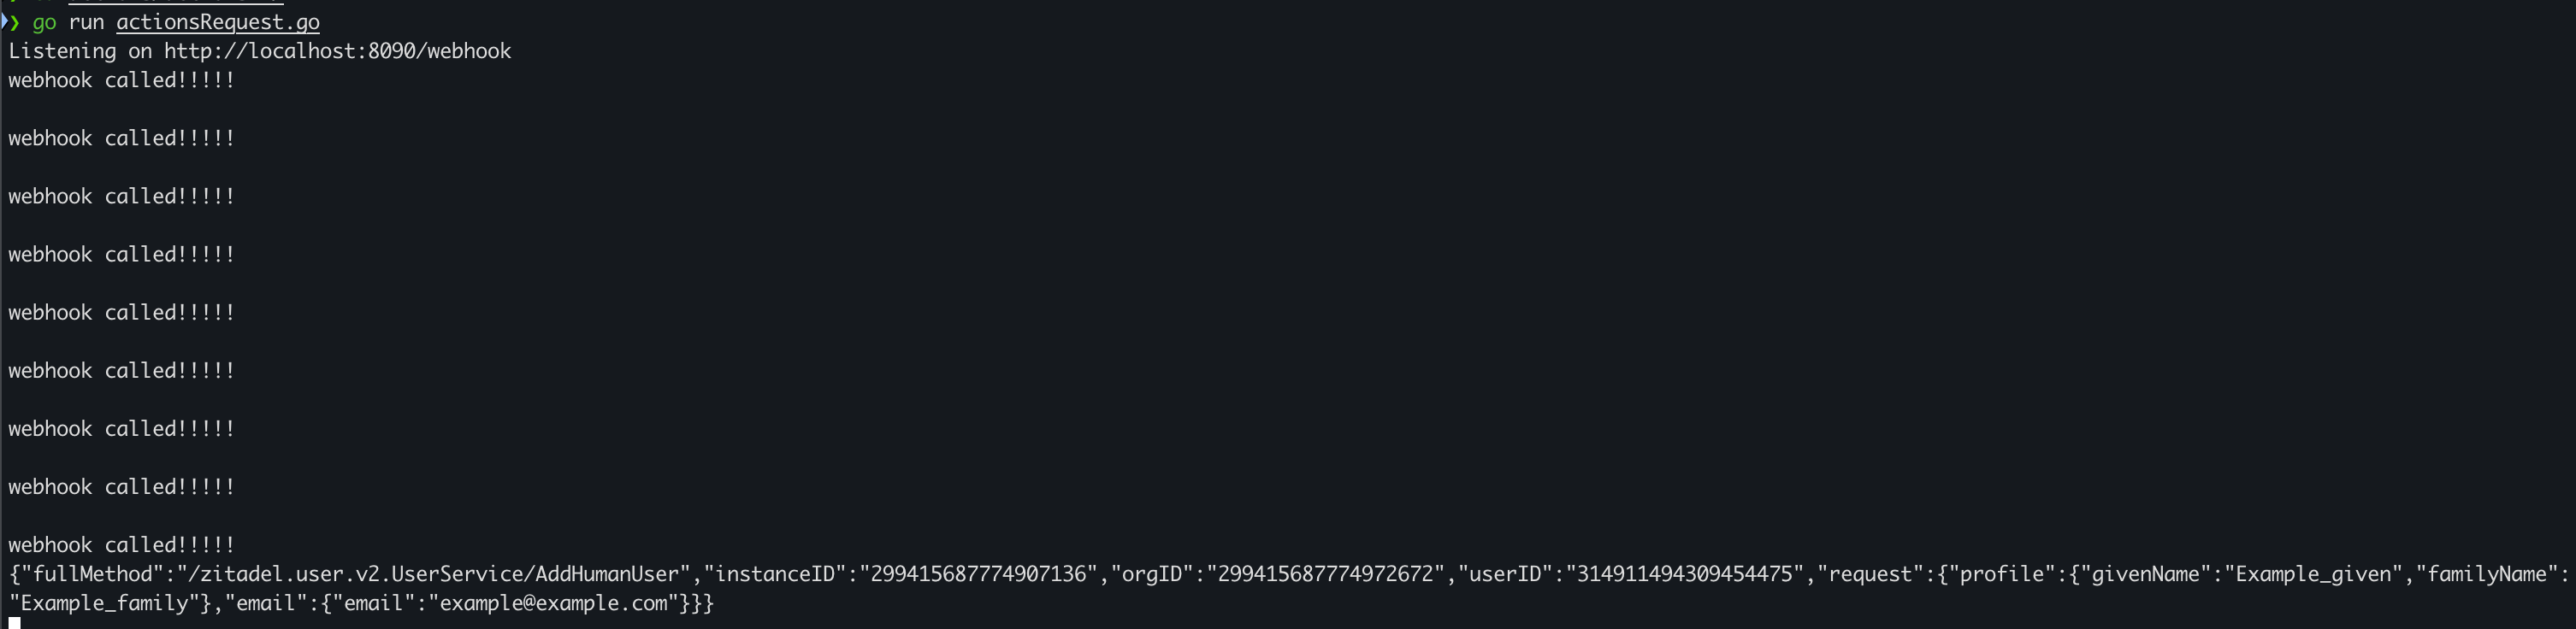 Your Webhook.site should look like this:
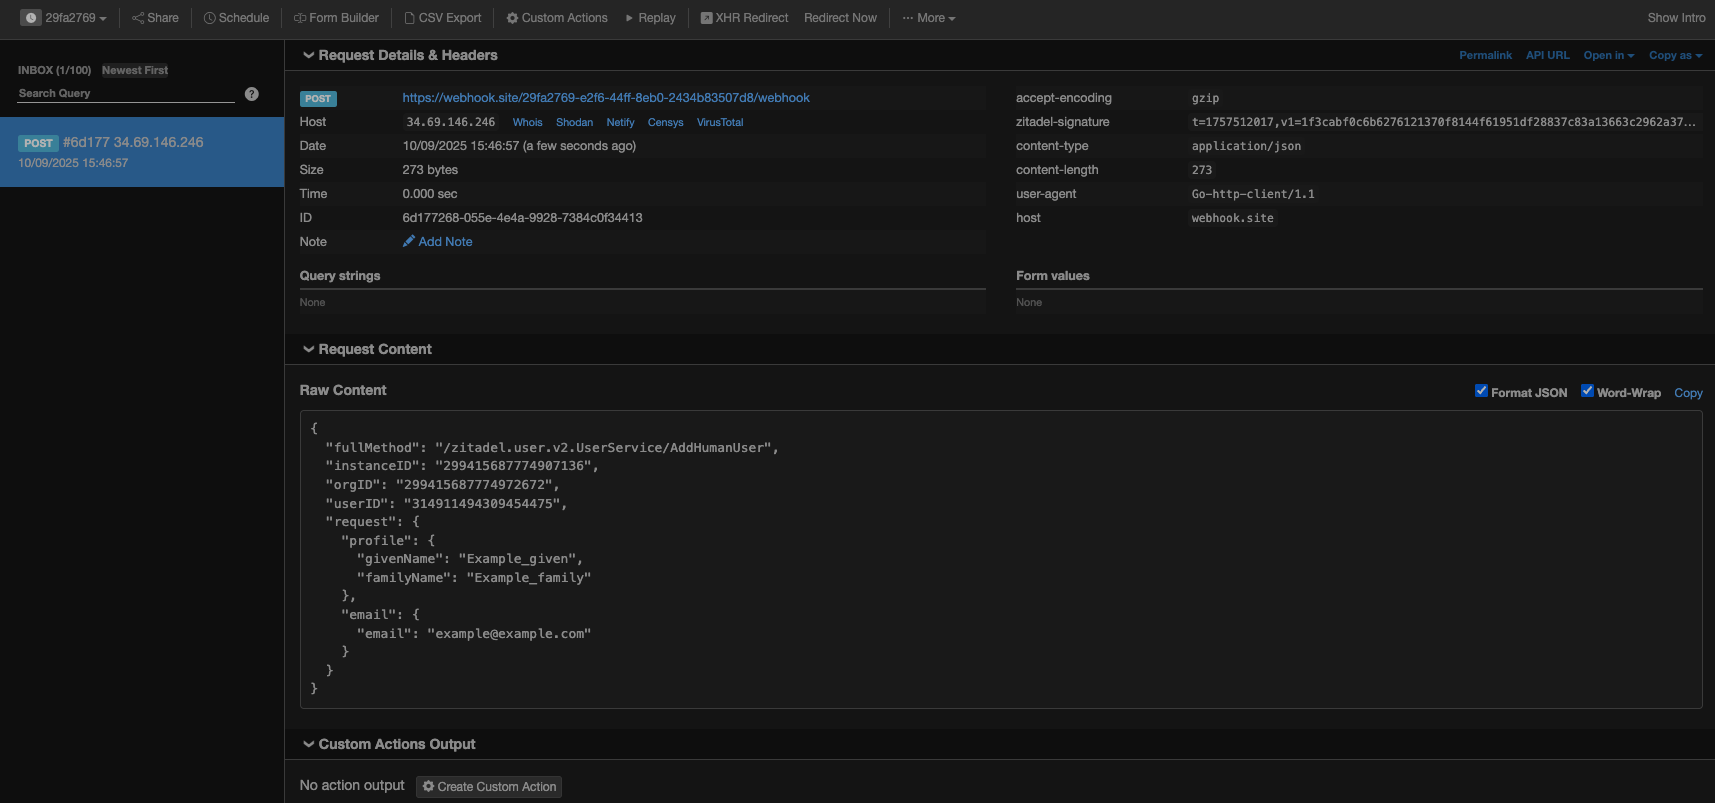 ***
8. Done [#8-done]
You now have a fully working setup for testing ZITADEL Actions V2 with Webhook.site. This allows you to forward requests securely from ZITADEL to your local environment without needing a public IP address or domain.
# Profile Pre-filling from External IdP
import PrefillAction from './_prefill_action.mdx';
Automatically pre-fill user data [#automatically-pre-fill-user-data]
***
8. Done [#8-done]
You now have a fully working setup for testing ZITADEL Actions V2 with Webhook.site. This allows you to forward requests securely from ZITADEL to your local environment without needing a public IP address or domain.
# Profile Pre-filling from External IdP
import PrefillAction from './_prefill_action.mdx';
Automatically pre-fill user data [#automatically-pre-fill-user-data]
To test the setup, use incognito mode and browse to your login page. You see a new button which redirects you to Microsoft Entra screen.
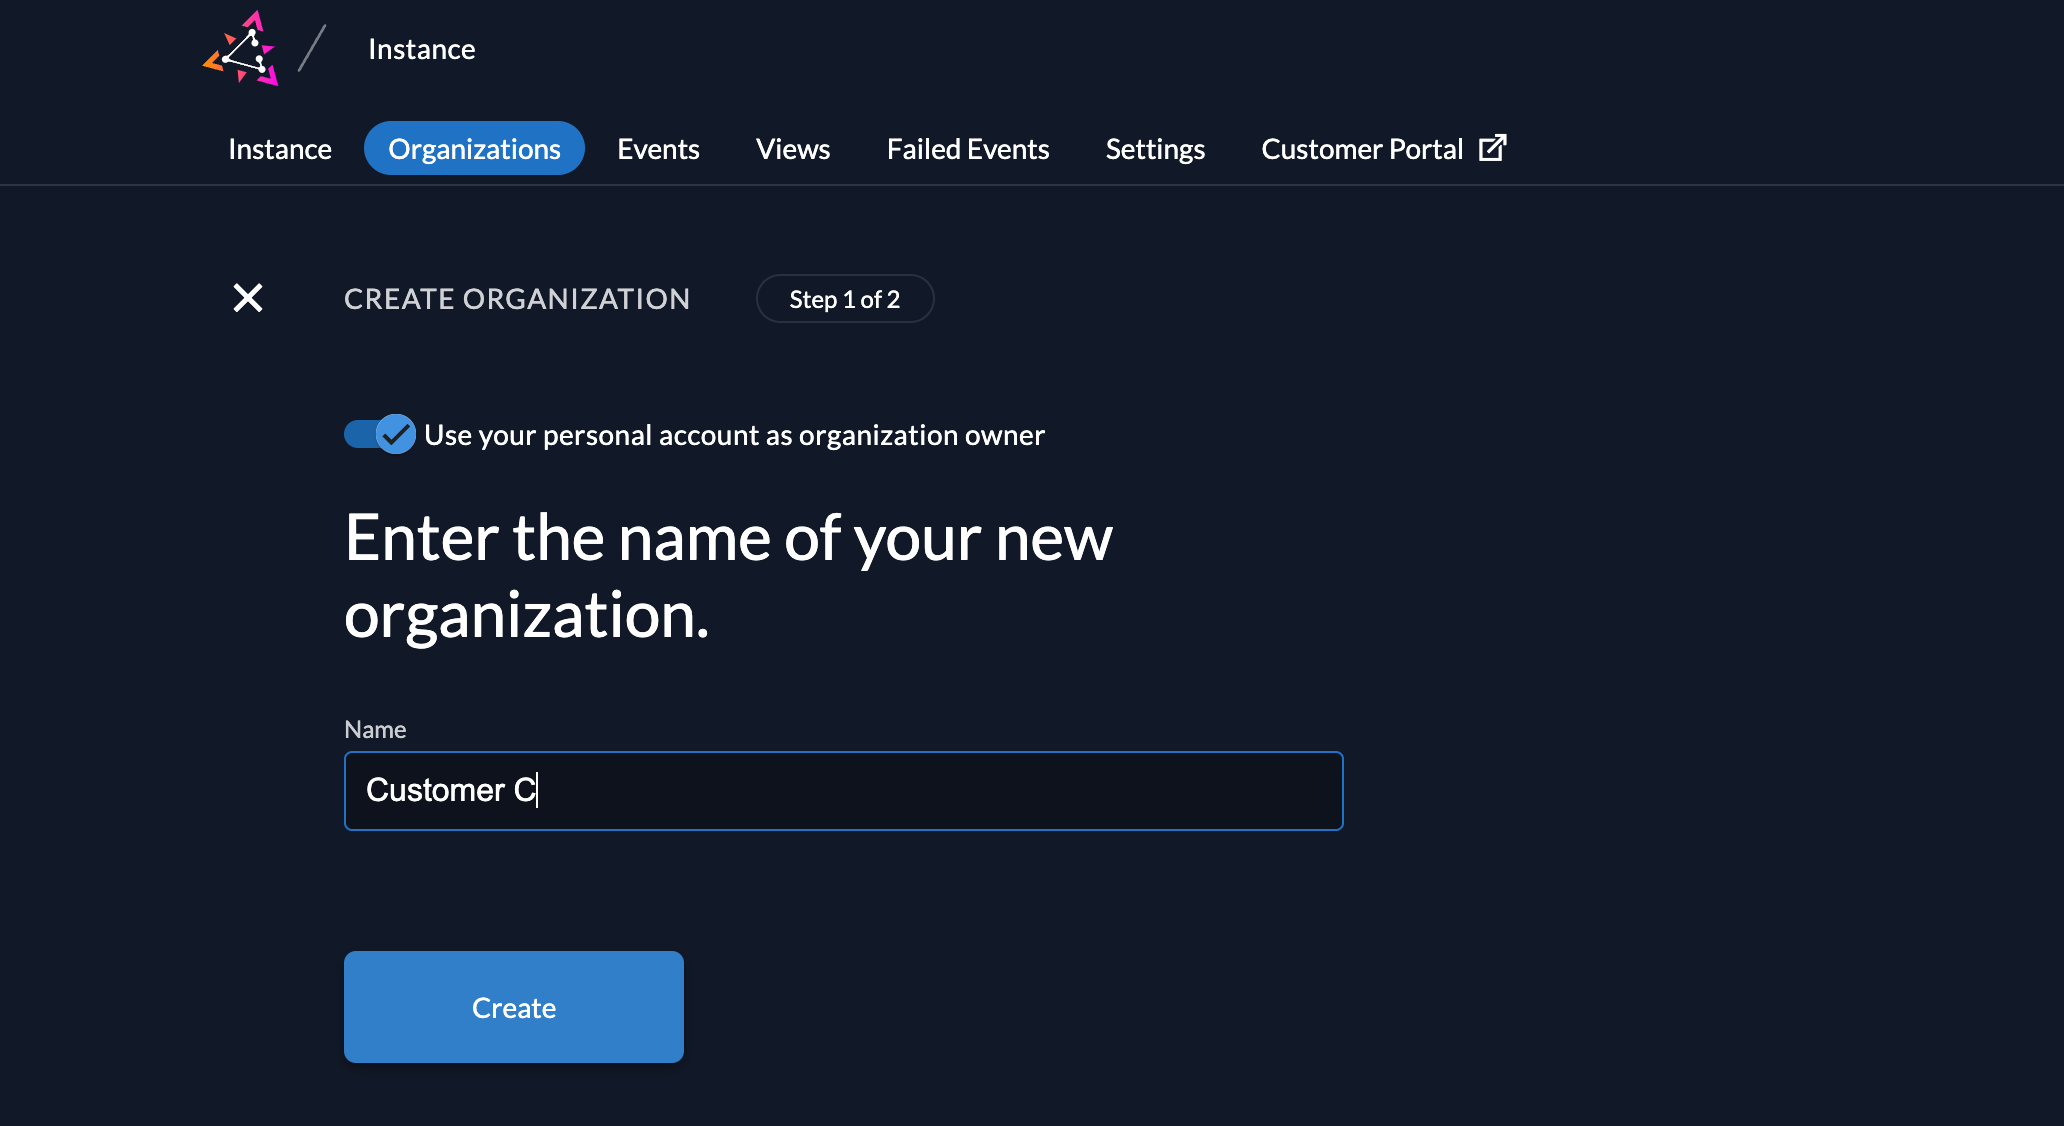
By default, ZITADEL shows what you define in the default settings. If you overwrite the default settings for an organization, you need to send the organization scope in your auth request.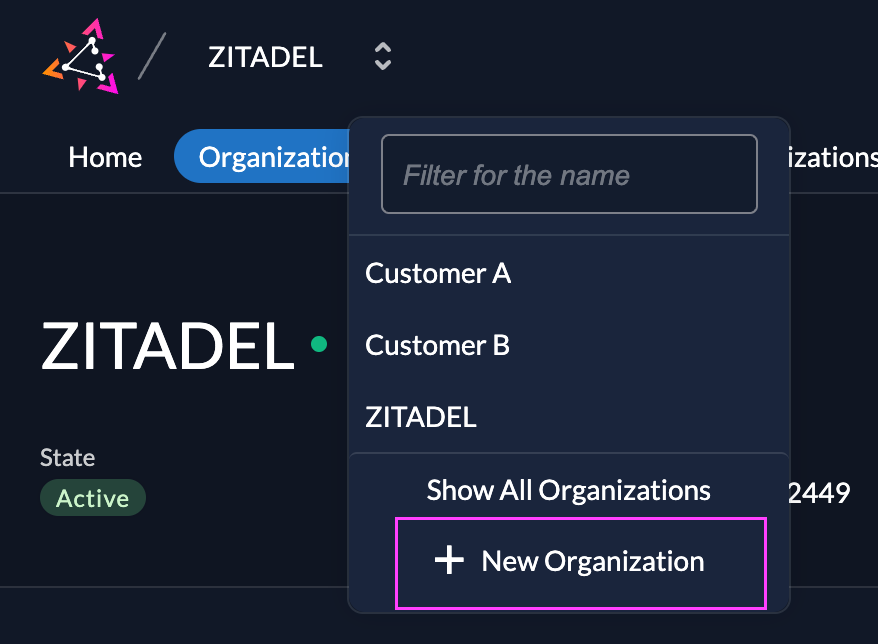 If the setting "Use your personal account as organization owner" is enabled, your user will automatically get the role "ORG\_OWNER" in the organization.
Give the organization a name and create it.
If the setting "Use your personal account as organization owner" is enabled, your user will automatically get the role "ORG\_OWNER" in the organization.
Give the organization a name and create it.
 Click on the newly created organization in the list and you will switch your context to that organization.
Add First Administrator [#add-first-administrator]
Create the first user for your customer and ensure the user has enough permissions to self-manage the needed settings.
Create User [#create-user]
import CreateUser from "../../../guides/manage/console/_create-user.mdx";
Click on the newly created organization in the list and you will switch your context to that organization.
Add First Administrator [#add-first-administrator]
Create the first user for your customer and ensure the user has enough permissions to self-manage the needed settings.
Create User [#create-user]
import CreateUser from "../../../guides/manage/console/_create-user.mdx";
 import AddAdministrator from "../../manage/console/_add_administrator.mdx";
 Automated onboarding for your customers [#automated-onboarding-for-your-customers]
If you want to start automating the process of onboarding your customers, the following sections give you some guidance.
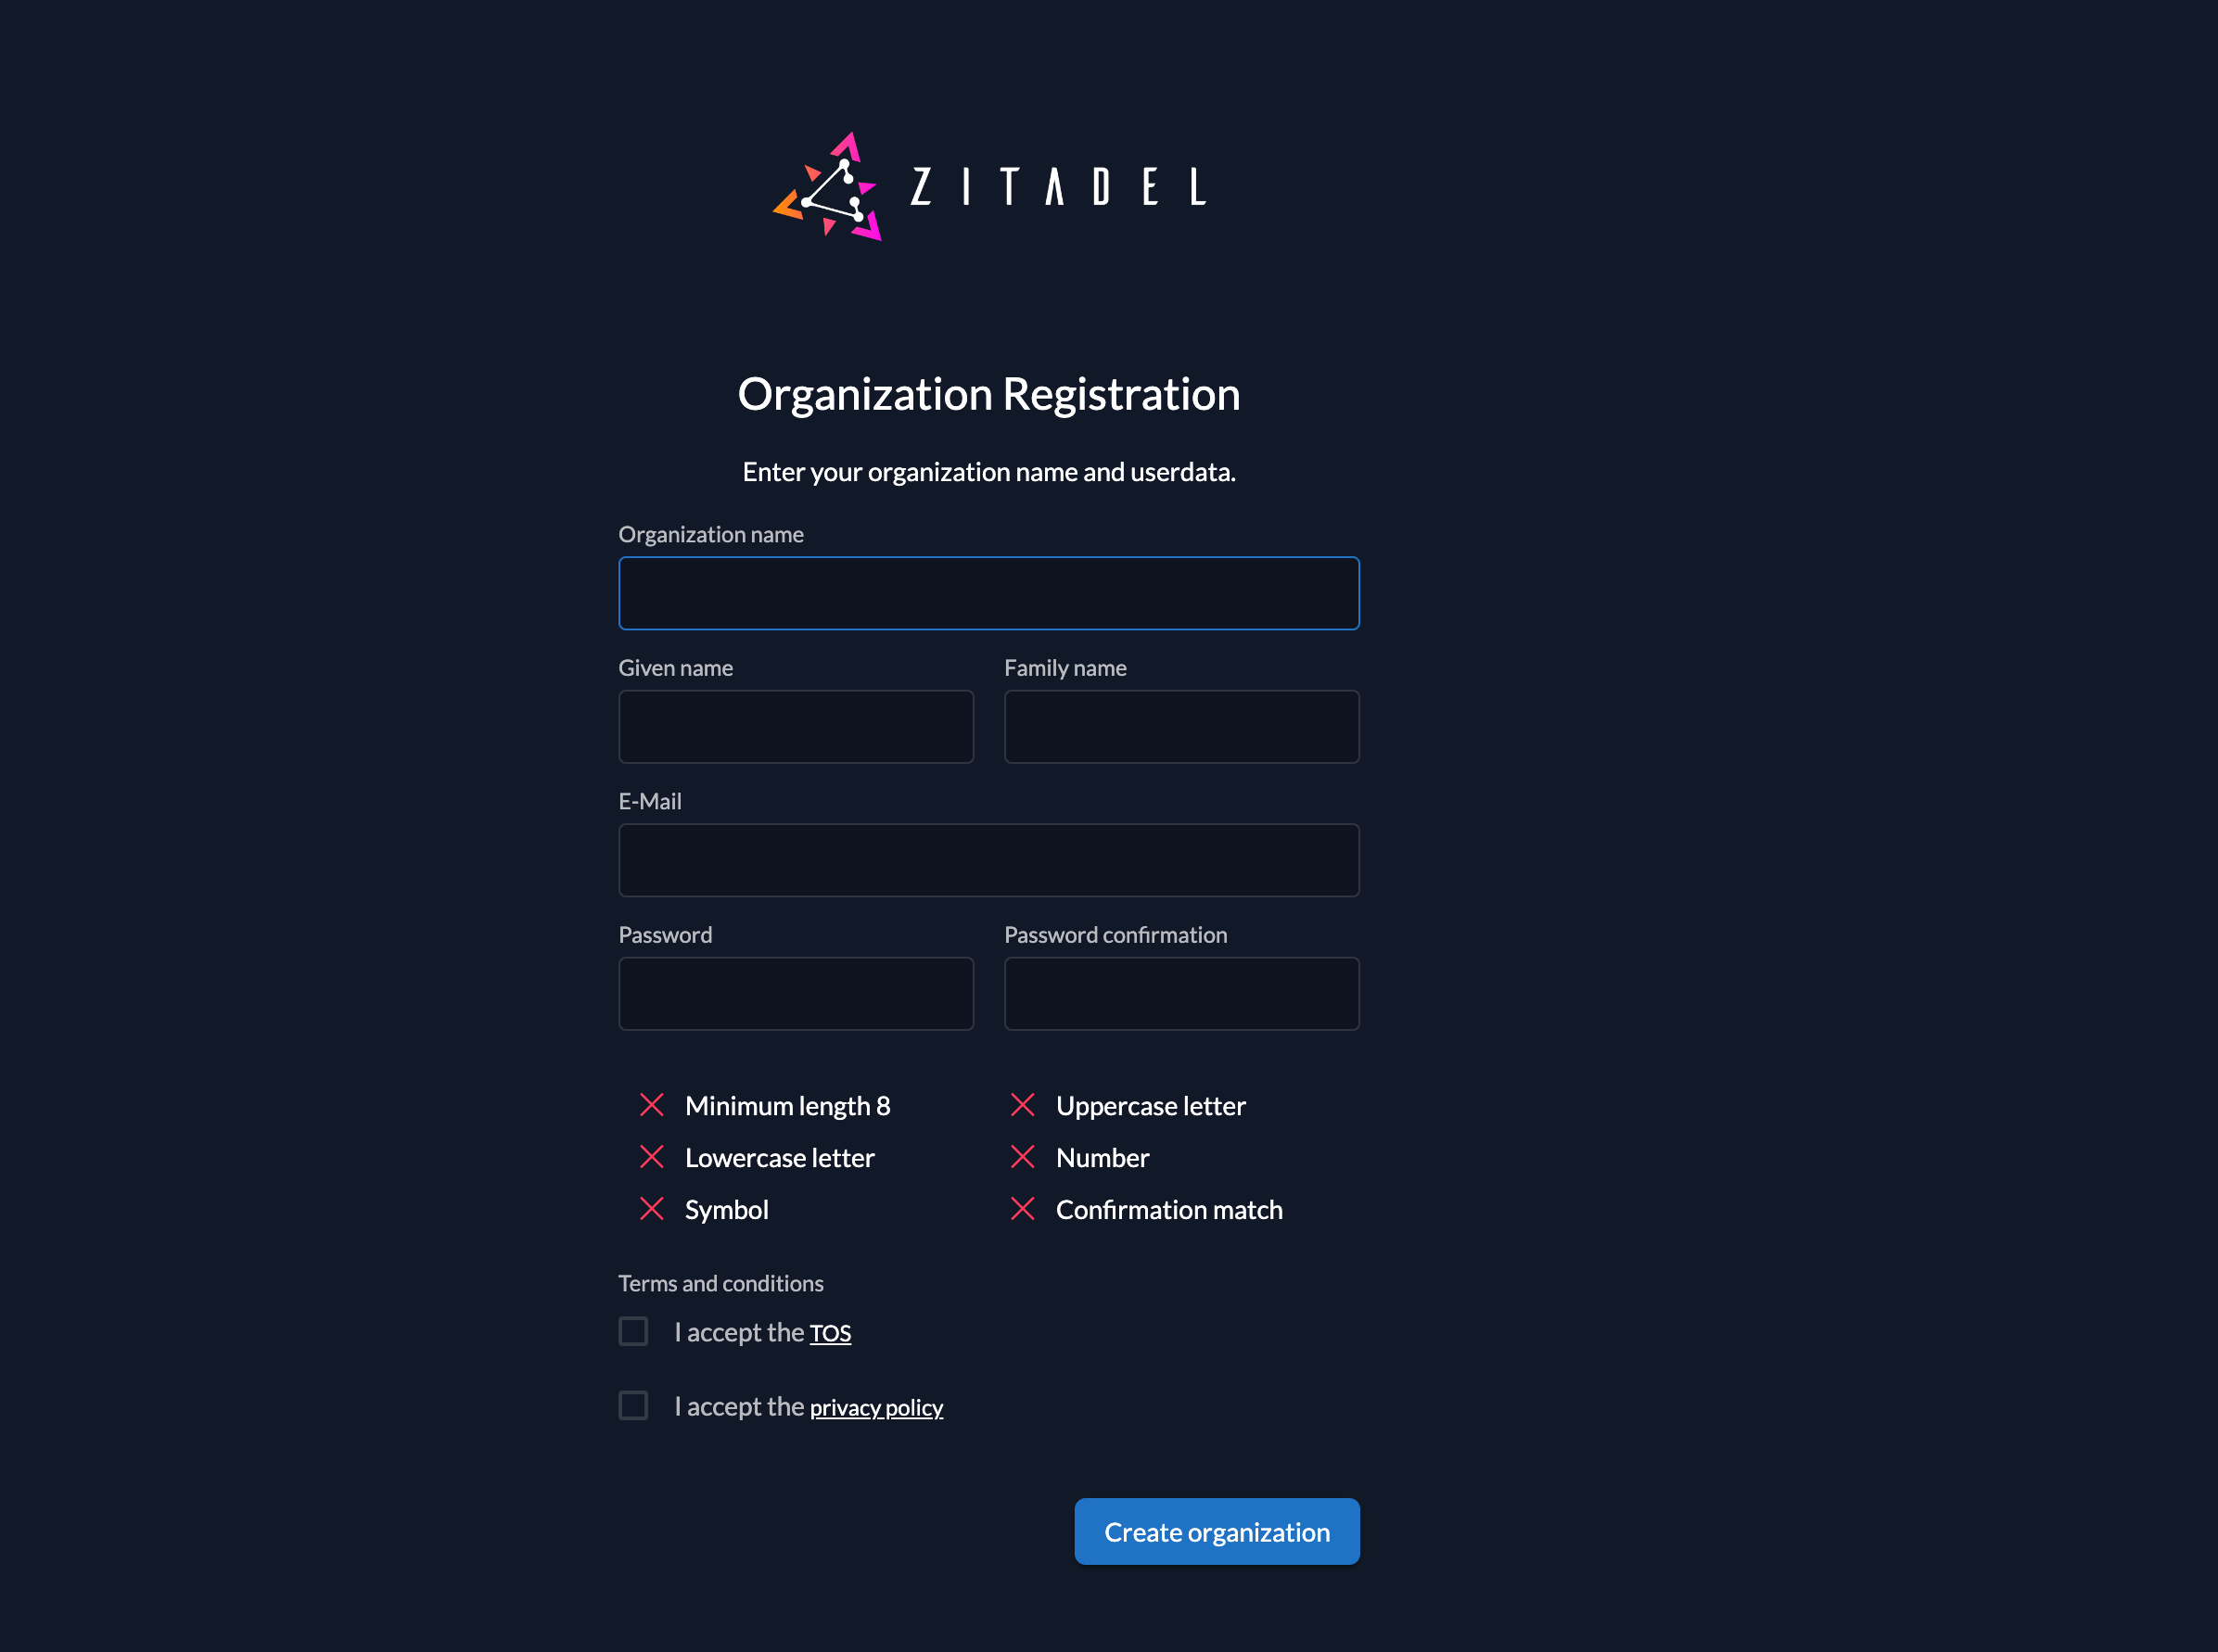
Built-in register organization form [#built-in-register-organization-form]
A basic form that allows a customer to enter an organization name and a user account is hosted on the following URL:
`{custom-domain}/ui/login/register/org`
When a user registers through this form, an organization and a user are created.
The user will automatically get the role "ORG\_OWNER" withing ZITADEL and is able to manage the whole organization.
You can read more about the administrators, roles and their meanings [here](/guides/manage/console/administrators)
Automated onboarding for your customers [#automated-onboarding-for-your-customers]
If you want to start automating the process of onboarding your customers, the following sections give you some guidance.
Built-in register organization form [#built-in-register-organization-form]
A basic form that allows a customer to enter an organization name and a user account is hosted on the following URL:
`{custom-domain}/ui/login/register/org`
When a user registers through this form, an organization and a user are created.
The user will automatically get the role "ORG\_OWNER" withing ZITADEL and is able to manage the whole organization.
You can read more about the administrators, roles and their meanings [here](/guides/manage/console/administrators)
 Disable built-in register organization form [#disable-built-in-register-organization-form]
If you do not want to allow users to register organizations with this form, you can disable it with the following request27: [Restrict the instance features](/reference/api/admin/zitadel.admin.v1.AdminService.SetRestrictions)
Disabling the form makes sense if your administrators manage new customers themselves or if you build your own form.
Build your own form with setup organization request [#build-your-own-form-with-setup-organization-request]
If the built-in register form doesn't fulfill your needs, we recommend building your own form.
The administration API of ZITADEL allows you to set up a new organization with a first administrator user.
The setup organization requests, has the possibility to specify an organization with its name and a domain.
You can directly send a human user with all the necessary information like the profile, email, password. etc.
This request allows you only to set up a user with password authentication at the moment.
By specifying the roles you can define which permission the user should have within ZITADEL.
By default, the user will automatically get "ORG\_OWNER".
Disable built-in register organization form [#disable-built-in-register-organization-form]
If you do not want to allow users to register organizations with this form, you can disable it with the following request27: [Restrict the instance features](/reference/api/admin/zitadel.admin.v1.AdminService.SetRestrictions)
Disabling the form makes sense if your administrators manage new customers themselves or if you build your own form.
Build your own form with setup organization request [#build-your-own-form-with-setup-organization-request]
If the built-in register form doesn't fulfill your needs, we recommend building your own form.
The administration API of ZITADEL allows you to set up a new organization with a first administrator user.
The setup organization requests, has the possibility to specify an organization with its name and a domain.
You can directly send a human user with all the necessary information like the profile, email, password. etc.
This request allows you only to set up a user with password authentication at the moment.
By specifying the roles you can define which permission the user should have within ZITADEL.
By default, the user will automatically get "ORG\_OWNER".
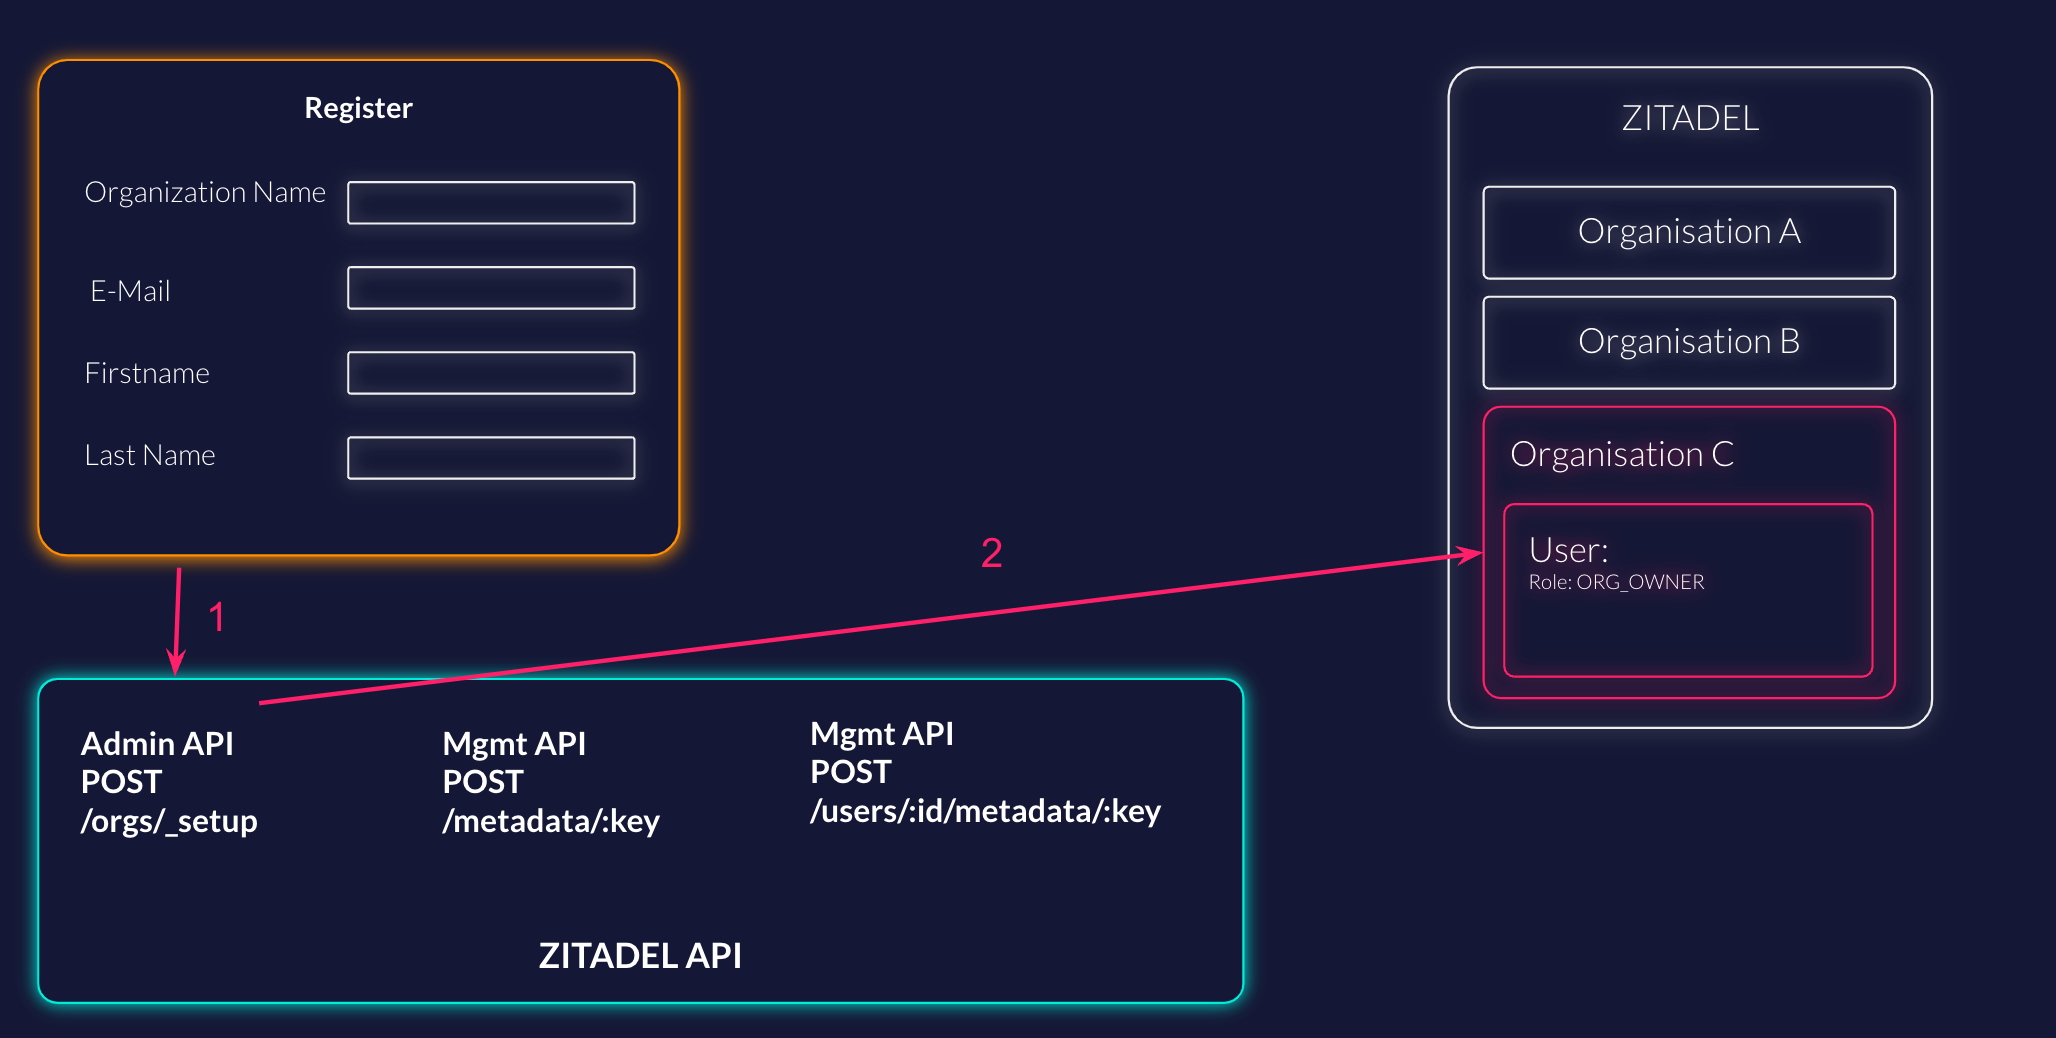 Example Request [#example-request]
```bash
curl -L -X POST 'https://${CUSTOM_DOMAIN}/admin/v1/orgs/_setup' \
-H 'Content-Type: application/json' \
-H 'Accept: application/json' \
-H 'Authorization: Bearer
Example Request [#example-request]
```bash
curl -L -X POST 'https://${CUSTOM_DOMAIN}/admin/v1/orgs/_setup' \
-H 'Content-Type: application/json' \
-H 'Accept: application/json' \
-H 'Authorization: Bearer 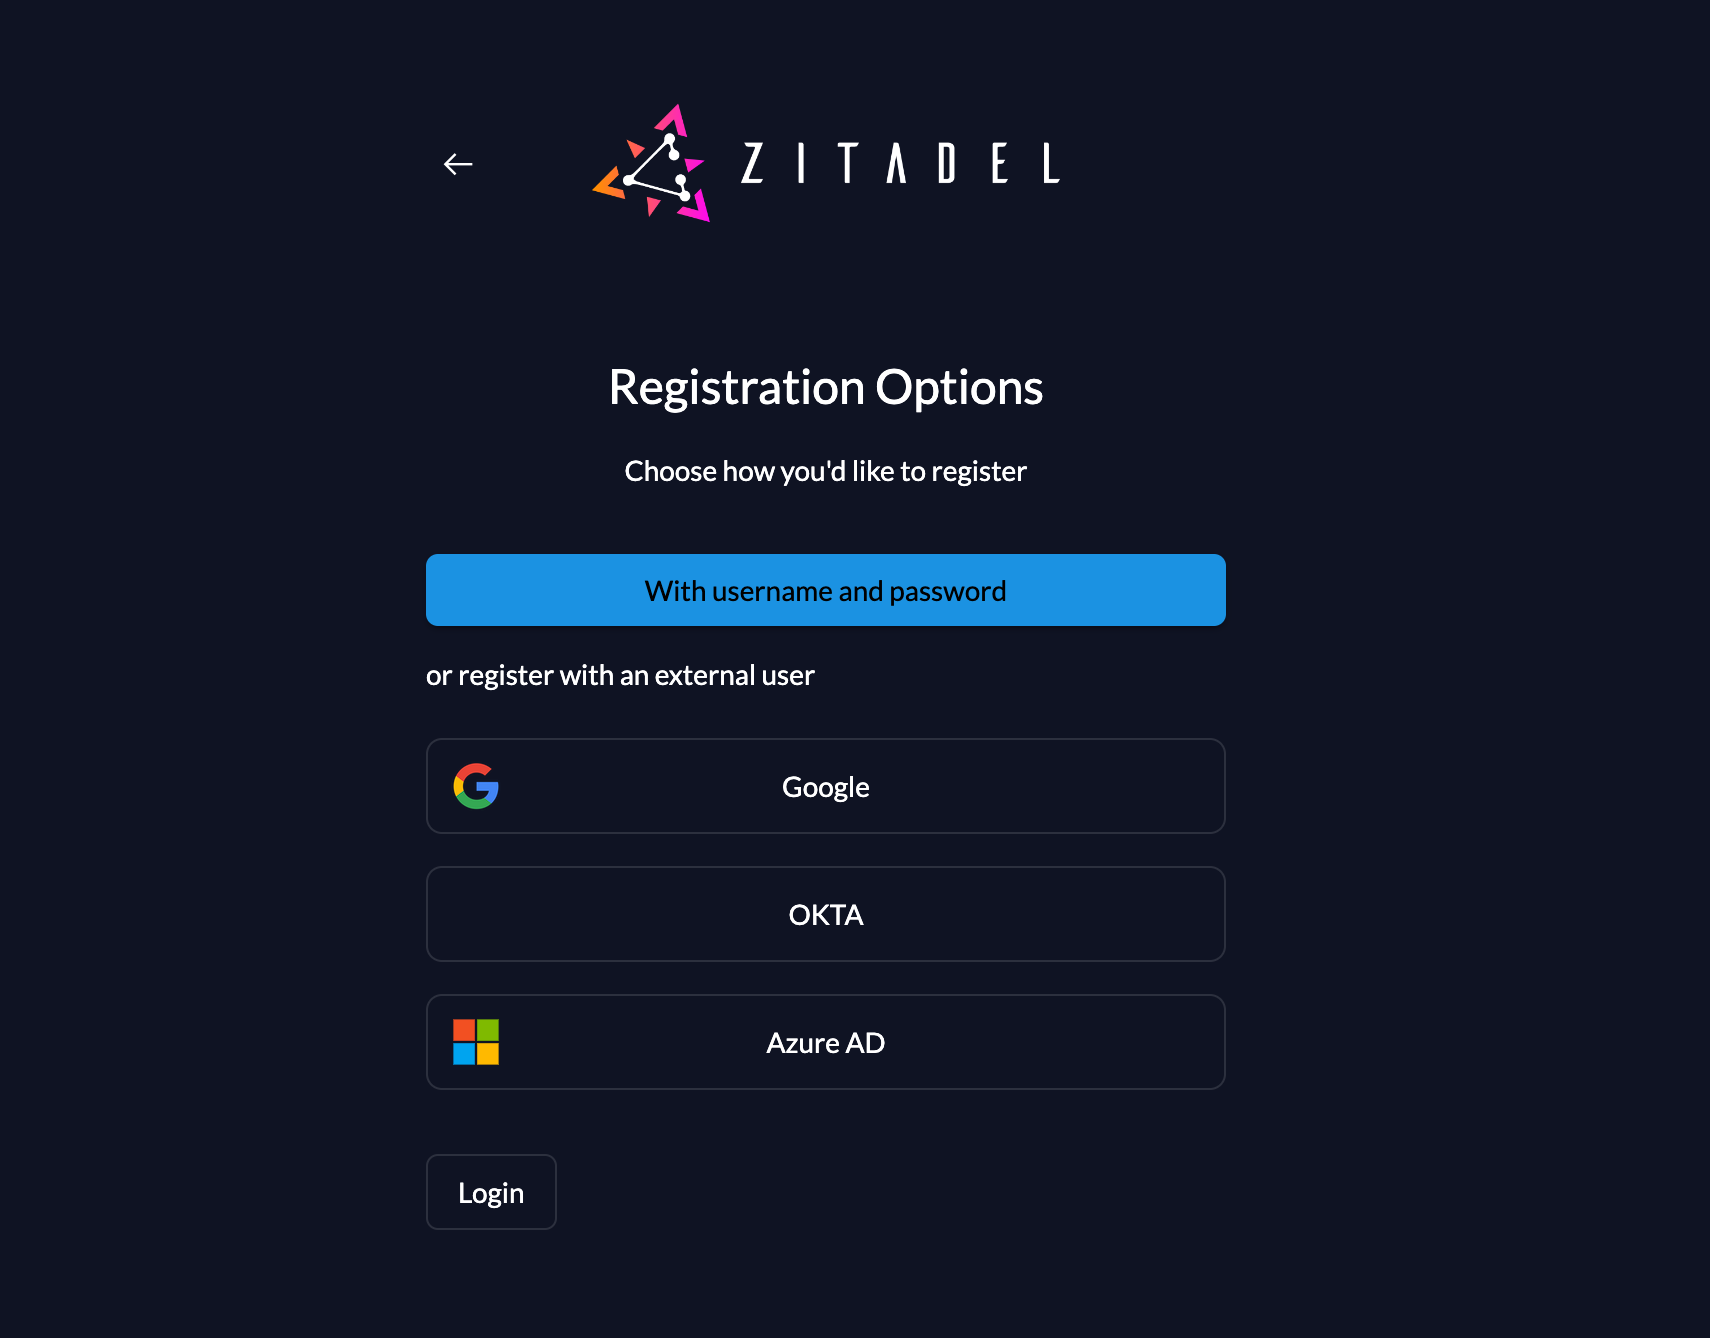 After that, the user can select either local user registration or an external provider.
By pressing the button of an external provider, the user will directly be redirected to the provider for consent.
After that, the user can select either local user registration or an external provider.
By pressing the button of an external provider, the user will directly be redirected to the provider for consent.
 If nothing else is specified, a user will be registered to the default organization.
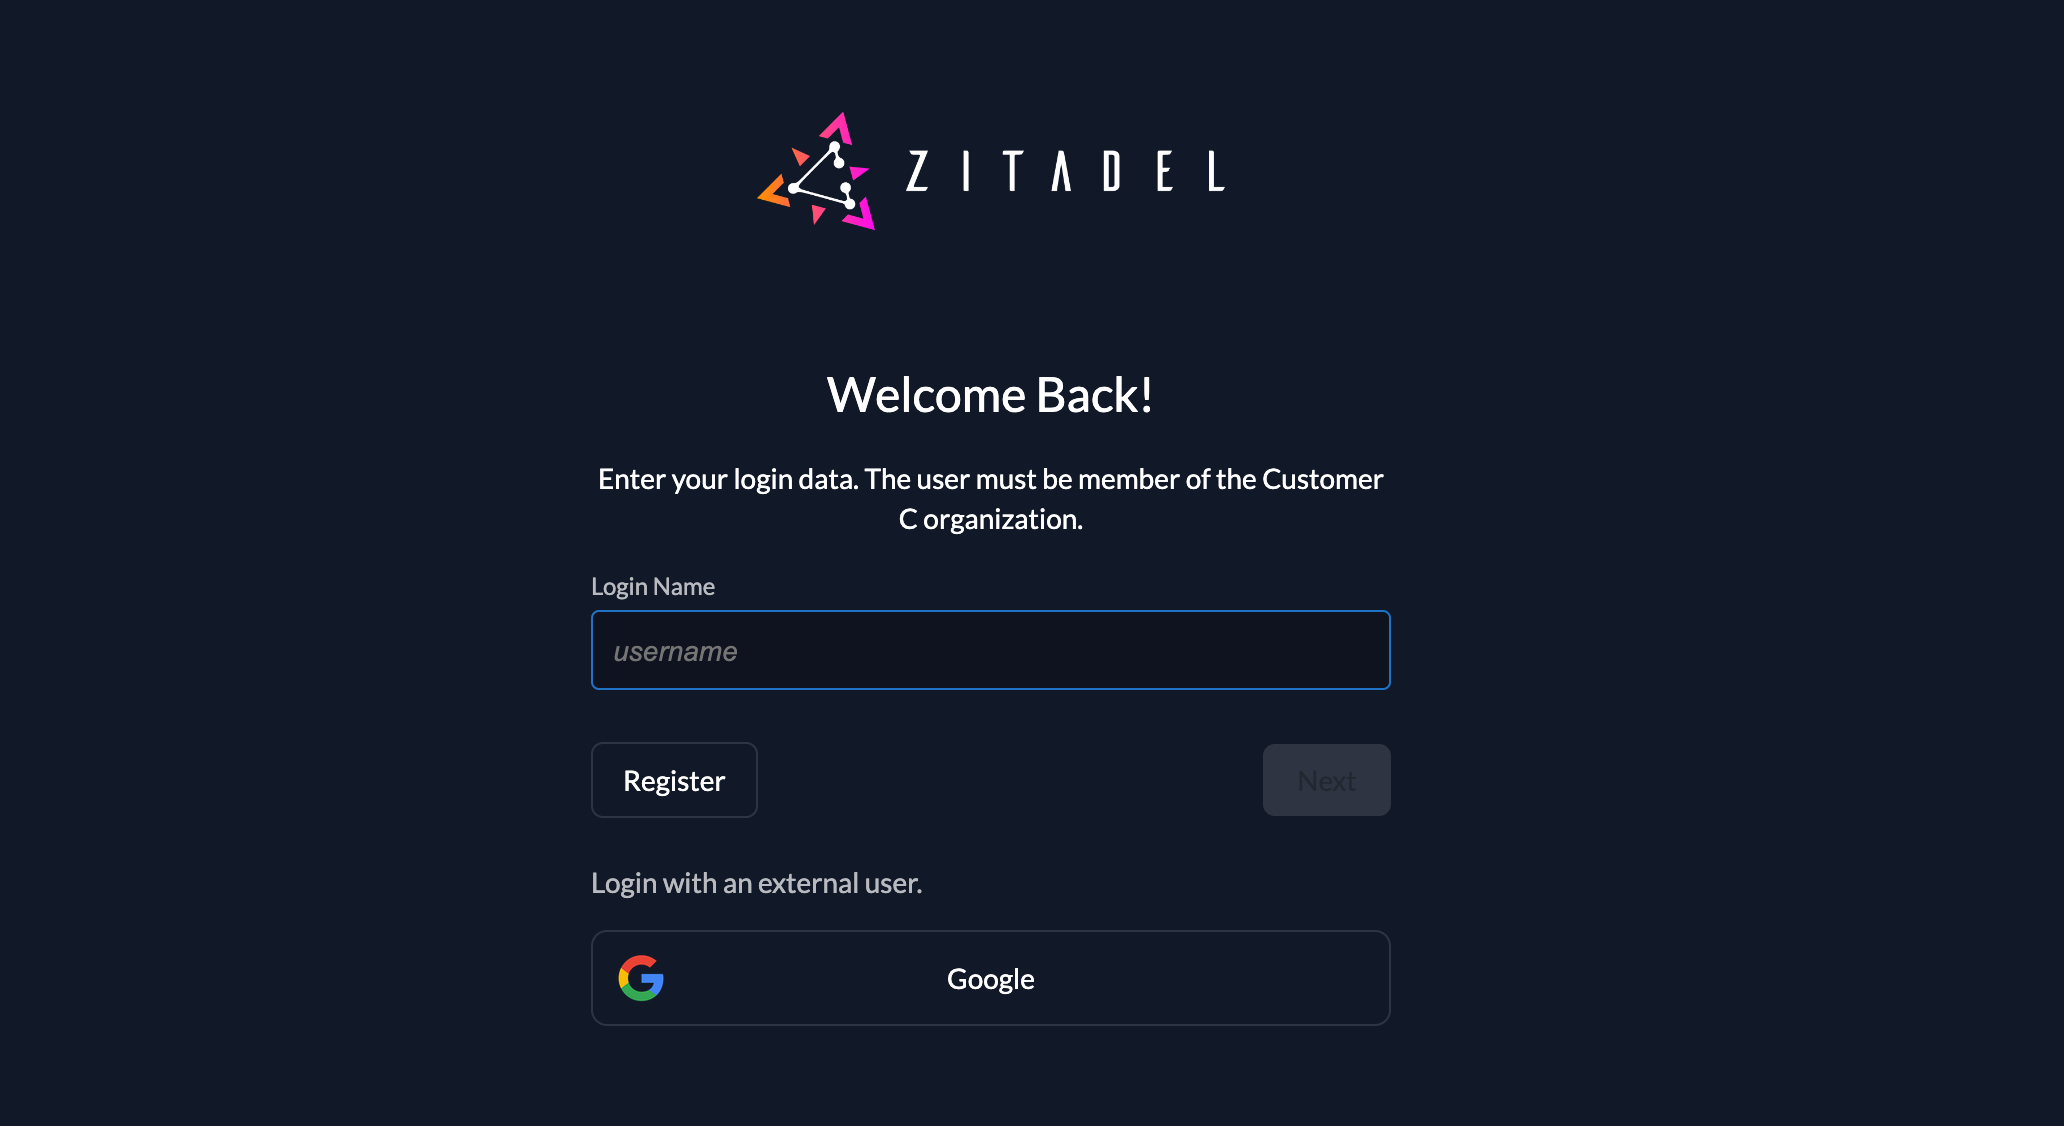
 You can specify another organization, by sending the organization scope in the authorization requests.
By sending the scope below the settings of the specified organization will be triggered and only users of the said organization will be able to authenticate.
The users will be registered to the given organization.
```
urn:zitadel:iam:org:id:{id}
```
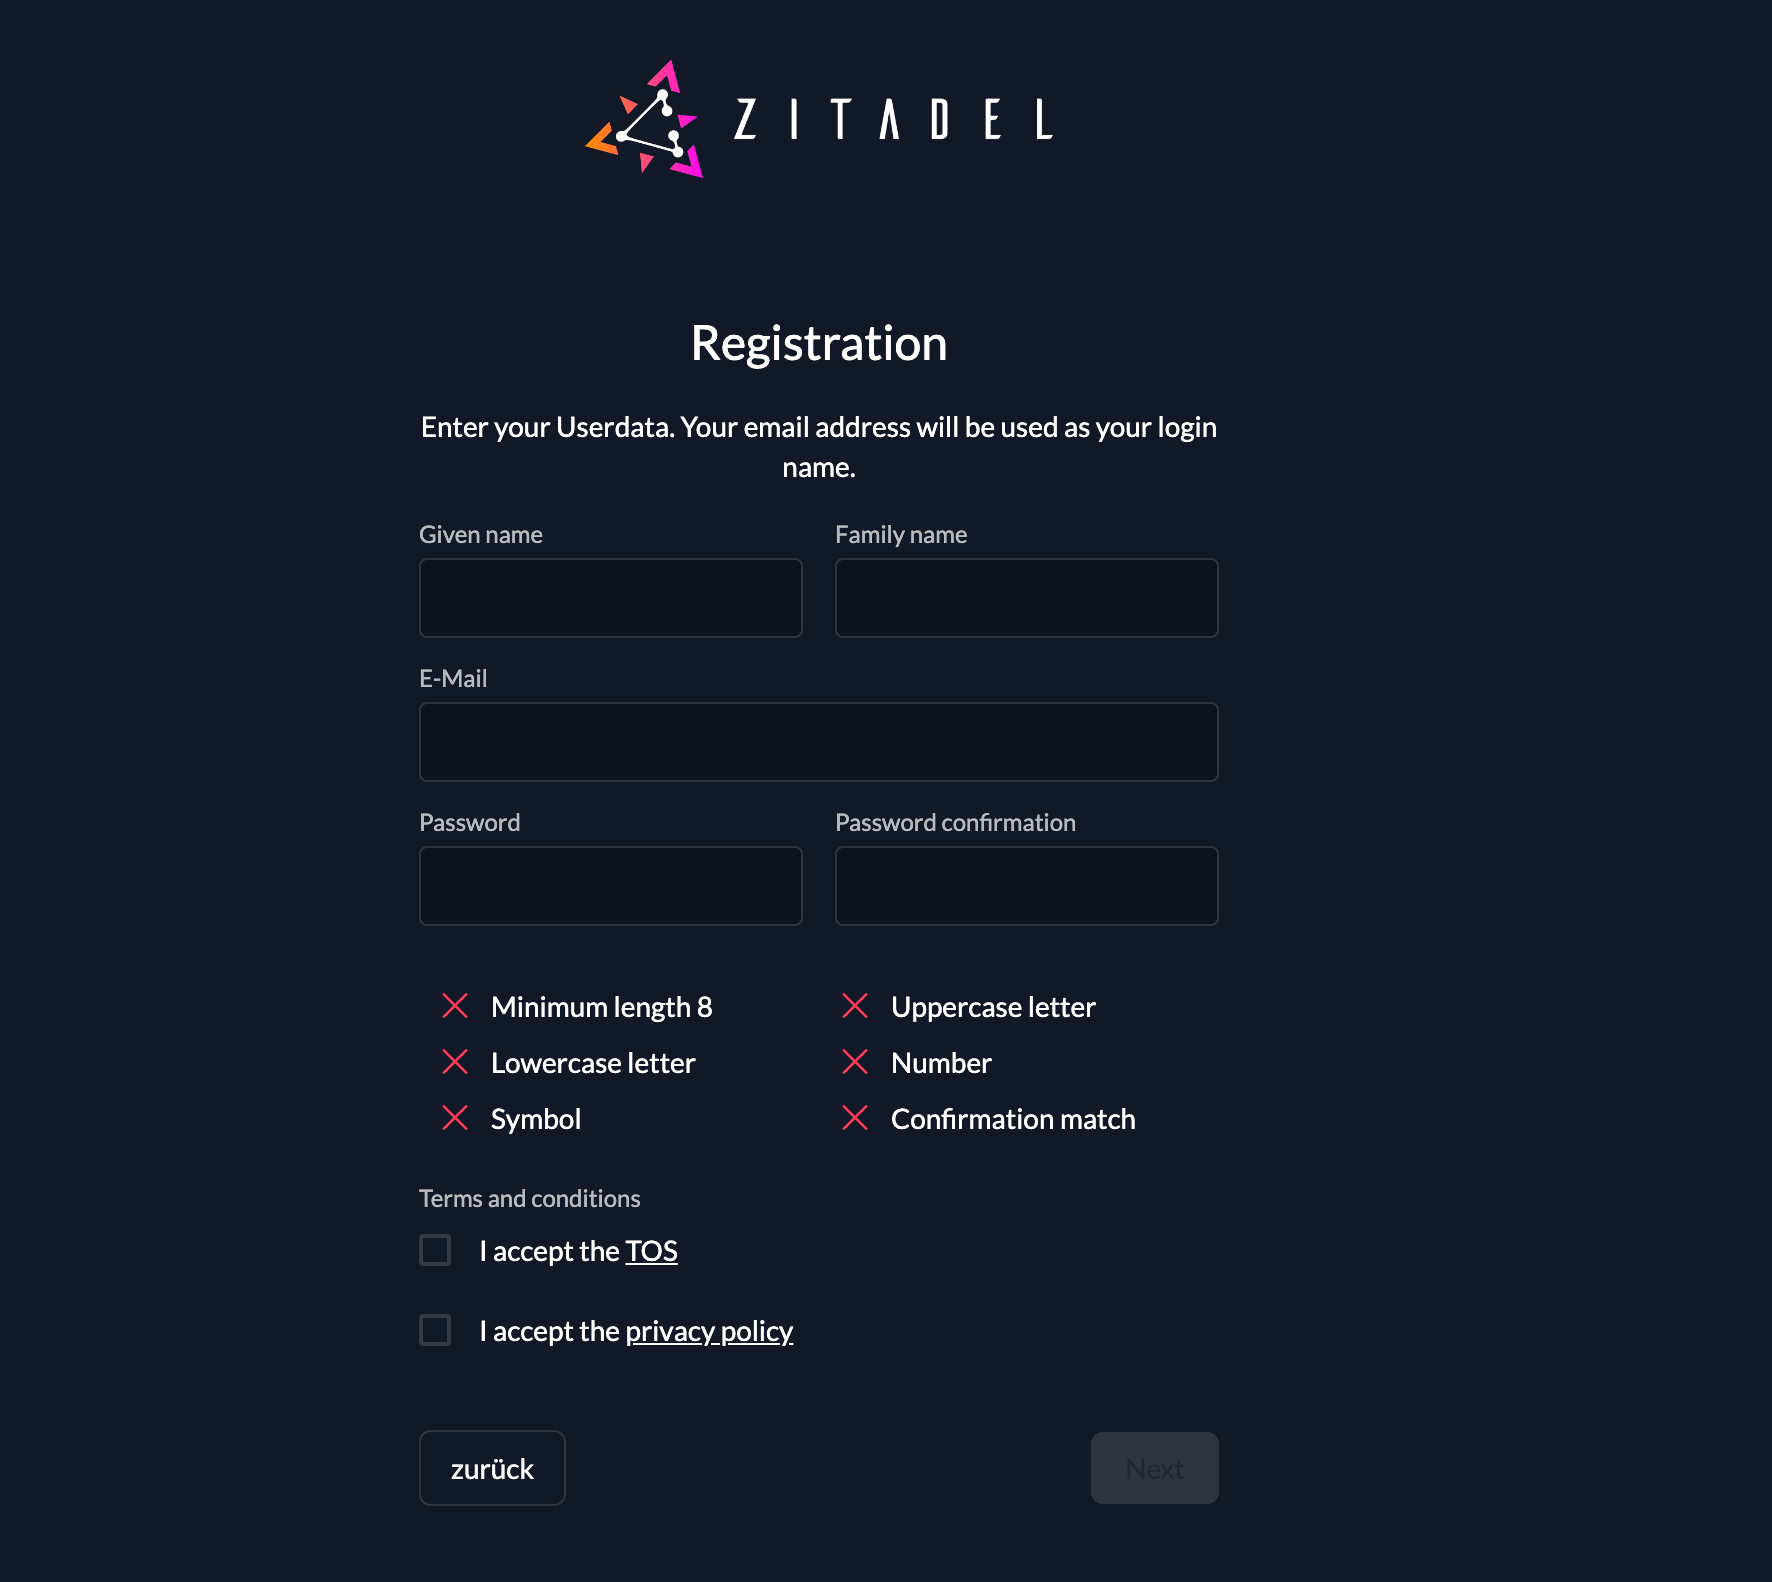
If the user chooses to register a local account, the register form will be shown.
All the mandatory fields like first name, last name, e-mail and password have to be filled.
You can only setup authentication with the built-in form.
You can specify another organization, by sending the organization scope in the authorization requests.
By sending the scope below the settings of the specified organization will be triggered and only users of the said organization will be able to authenticate.
The users will be registered to the given organization.
```
urn:zitadel:iam:org:id:{id}
```
If the user chooses to register a local account, the register form will be shown.
All the mandatory fields like first name, last name, e-mail and password have to be filled.
You can only setup authentication with the built-in form.
 Registration with Social Login [#registration-with-social-login]
To allow your users to register with social logins you have to set up the external identity providers.
If you only need the social logins for your end users and you want to have them all in the organization, we recommend using the default organization for those users.
In that case you can set up the identity providers on the default organization.
If you want to have the social logins on different organizations you can configure the default on the instance, and enable it on the needed organizations.
Please follow the setup guides for the needed providers: [Let Users Login with Preferred Identity Provider in ZITADEL](/guides/integrate/identity-providers/introduction)
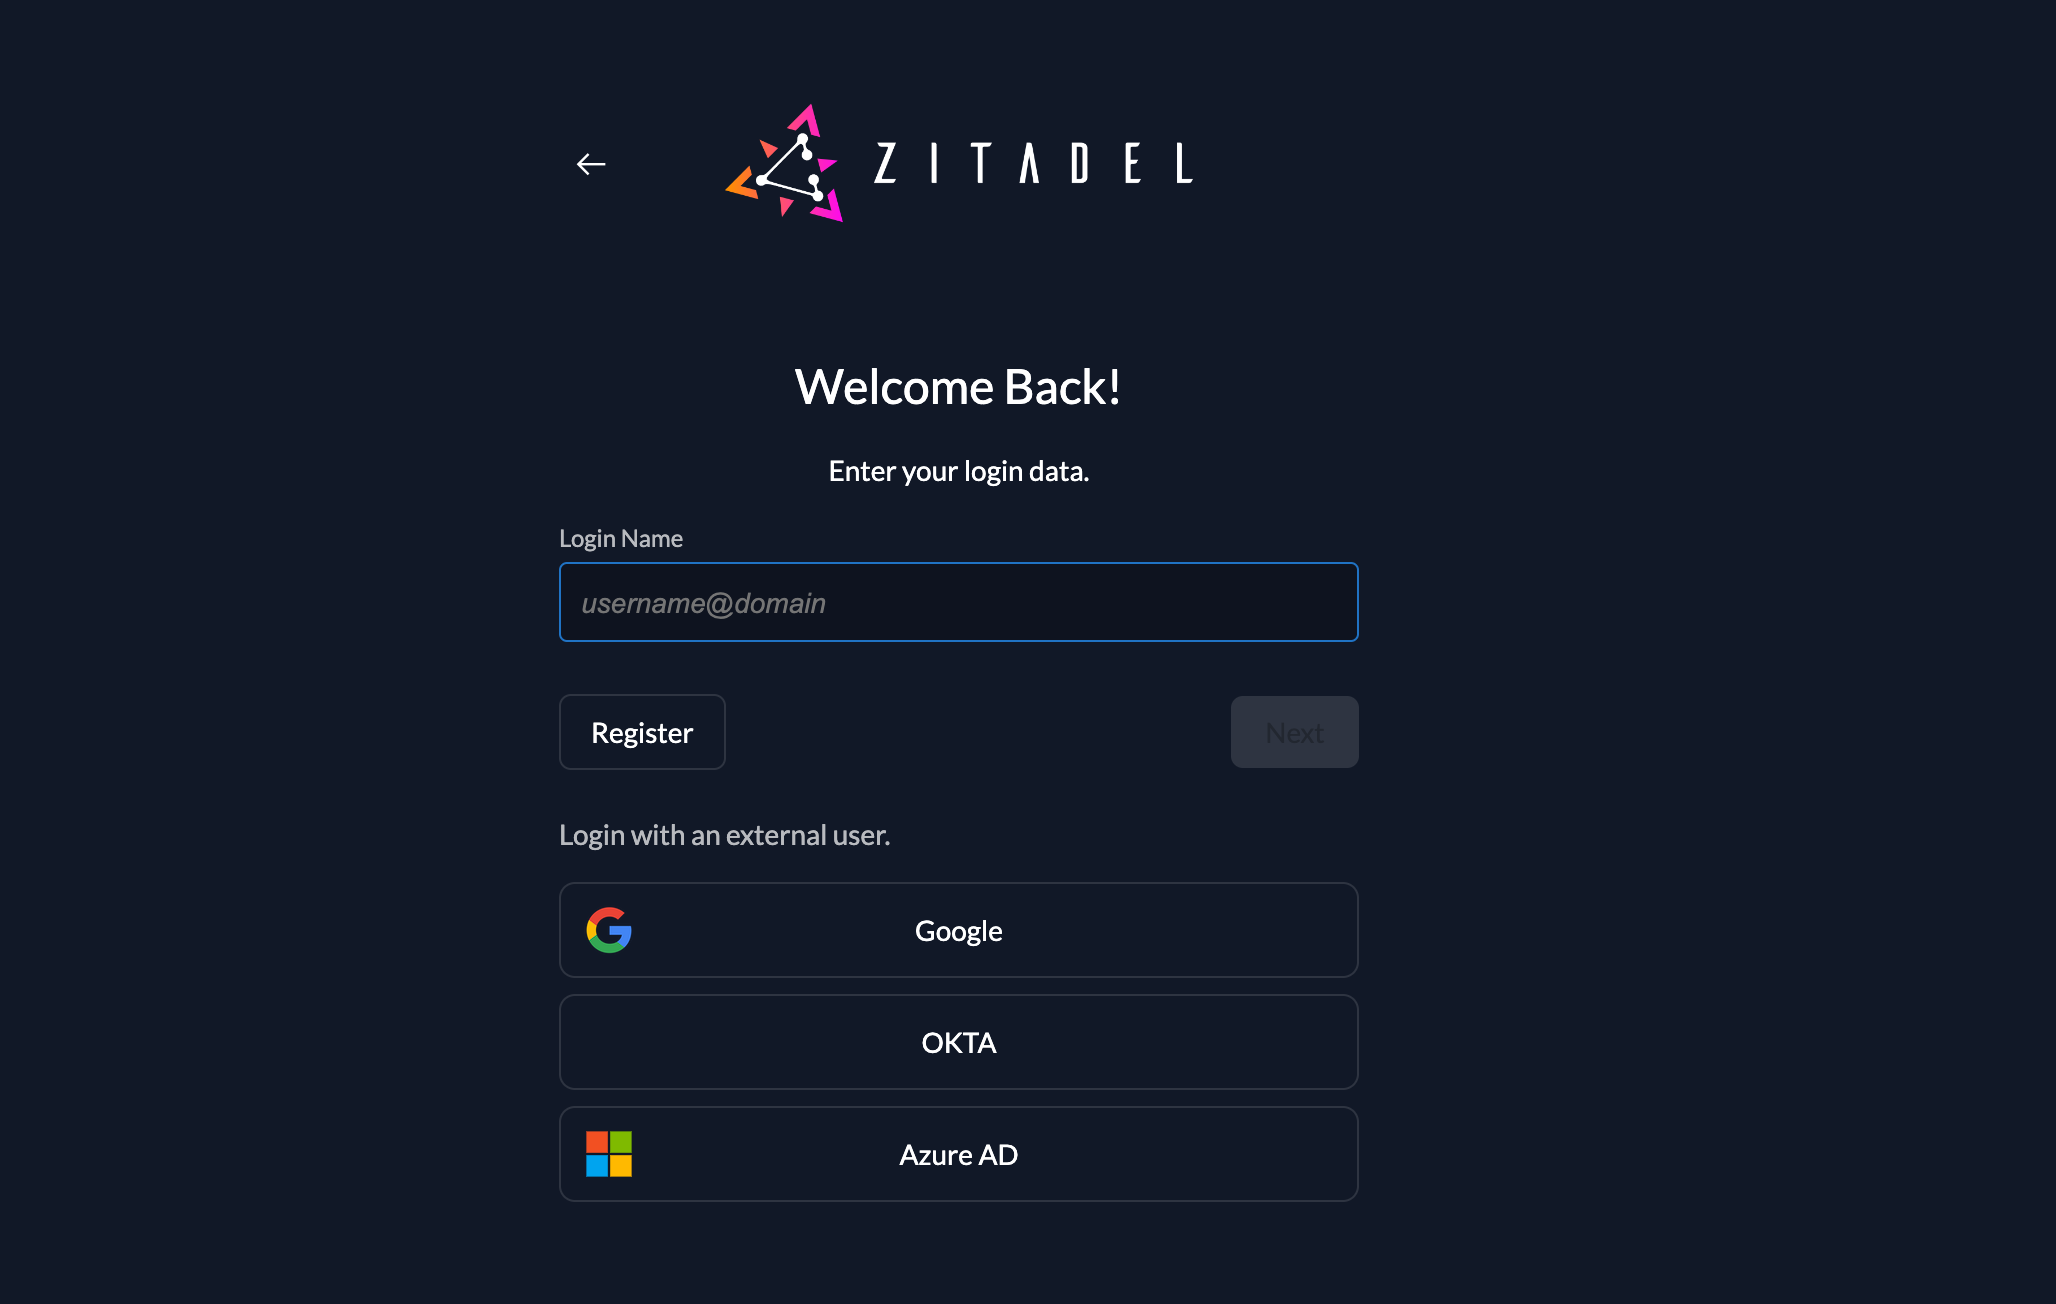
The configured providers will be shown on the first login screen or when the users click on the registration button, they will be able to choose between local account or the social login.
Registration with Organization External Identity Provider [#registration-with-organization-external-identity-provider]
If your business customer already have an identity provider, and you want to allow SSO for them, you can set up their providers directly for their organization.
Set up the needed provider such as Entra ID or OKTA.
Please follow the setup guides for the needed providers: [Let Users Login with Preferred Identity Provider in ZITADEL](/guides/integrate/identity-providers/introduction)
Registration with Social Login [#registration-with-social-login]
To allow your users to register with social logins you have to set up the external identity providers.
If you only need the social logins for your end users and you want to have them all in the organization, we recommend using the default organization for those users.
In that case you can set up the identity providers on the default organization.
If you want to have the social logins on different organizations you can configure the default on the instance, and enable it on the needed organizations.
Please follow the setup guides for the needed providers: [Let Users Login with Preferred Identity Provider in ZITADEL](/guides/integrate/identity-providers/introduction)
The configured providers will be shown on the first login screen or when the users click on the registration button, they will be able to choose between local account or the social login.
Registration with Organization External Identity Provider [#registration-with-organization-external-identity-provider]
If your business customer already have an identity provider, and you want to allow SSO for them, you can set up their providers directly for their organization.
Set up the needed provider such as Entra ID or OKTA.
Please follow the setup guides for the needed providers: [Let Users Login with Preferred Identity Provider in ZITADEL](/guides/integrate/identity-providers/introduction)
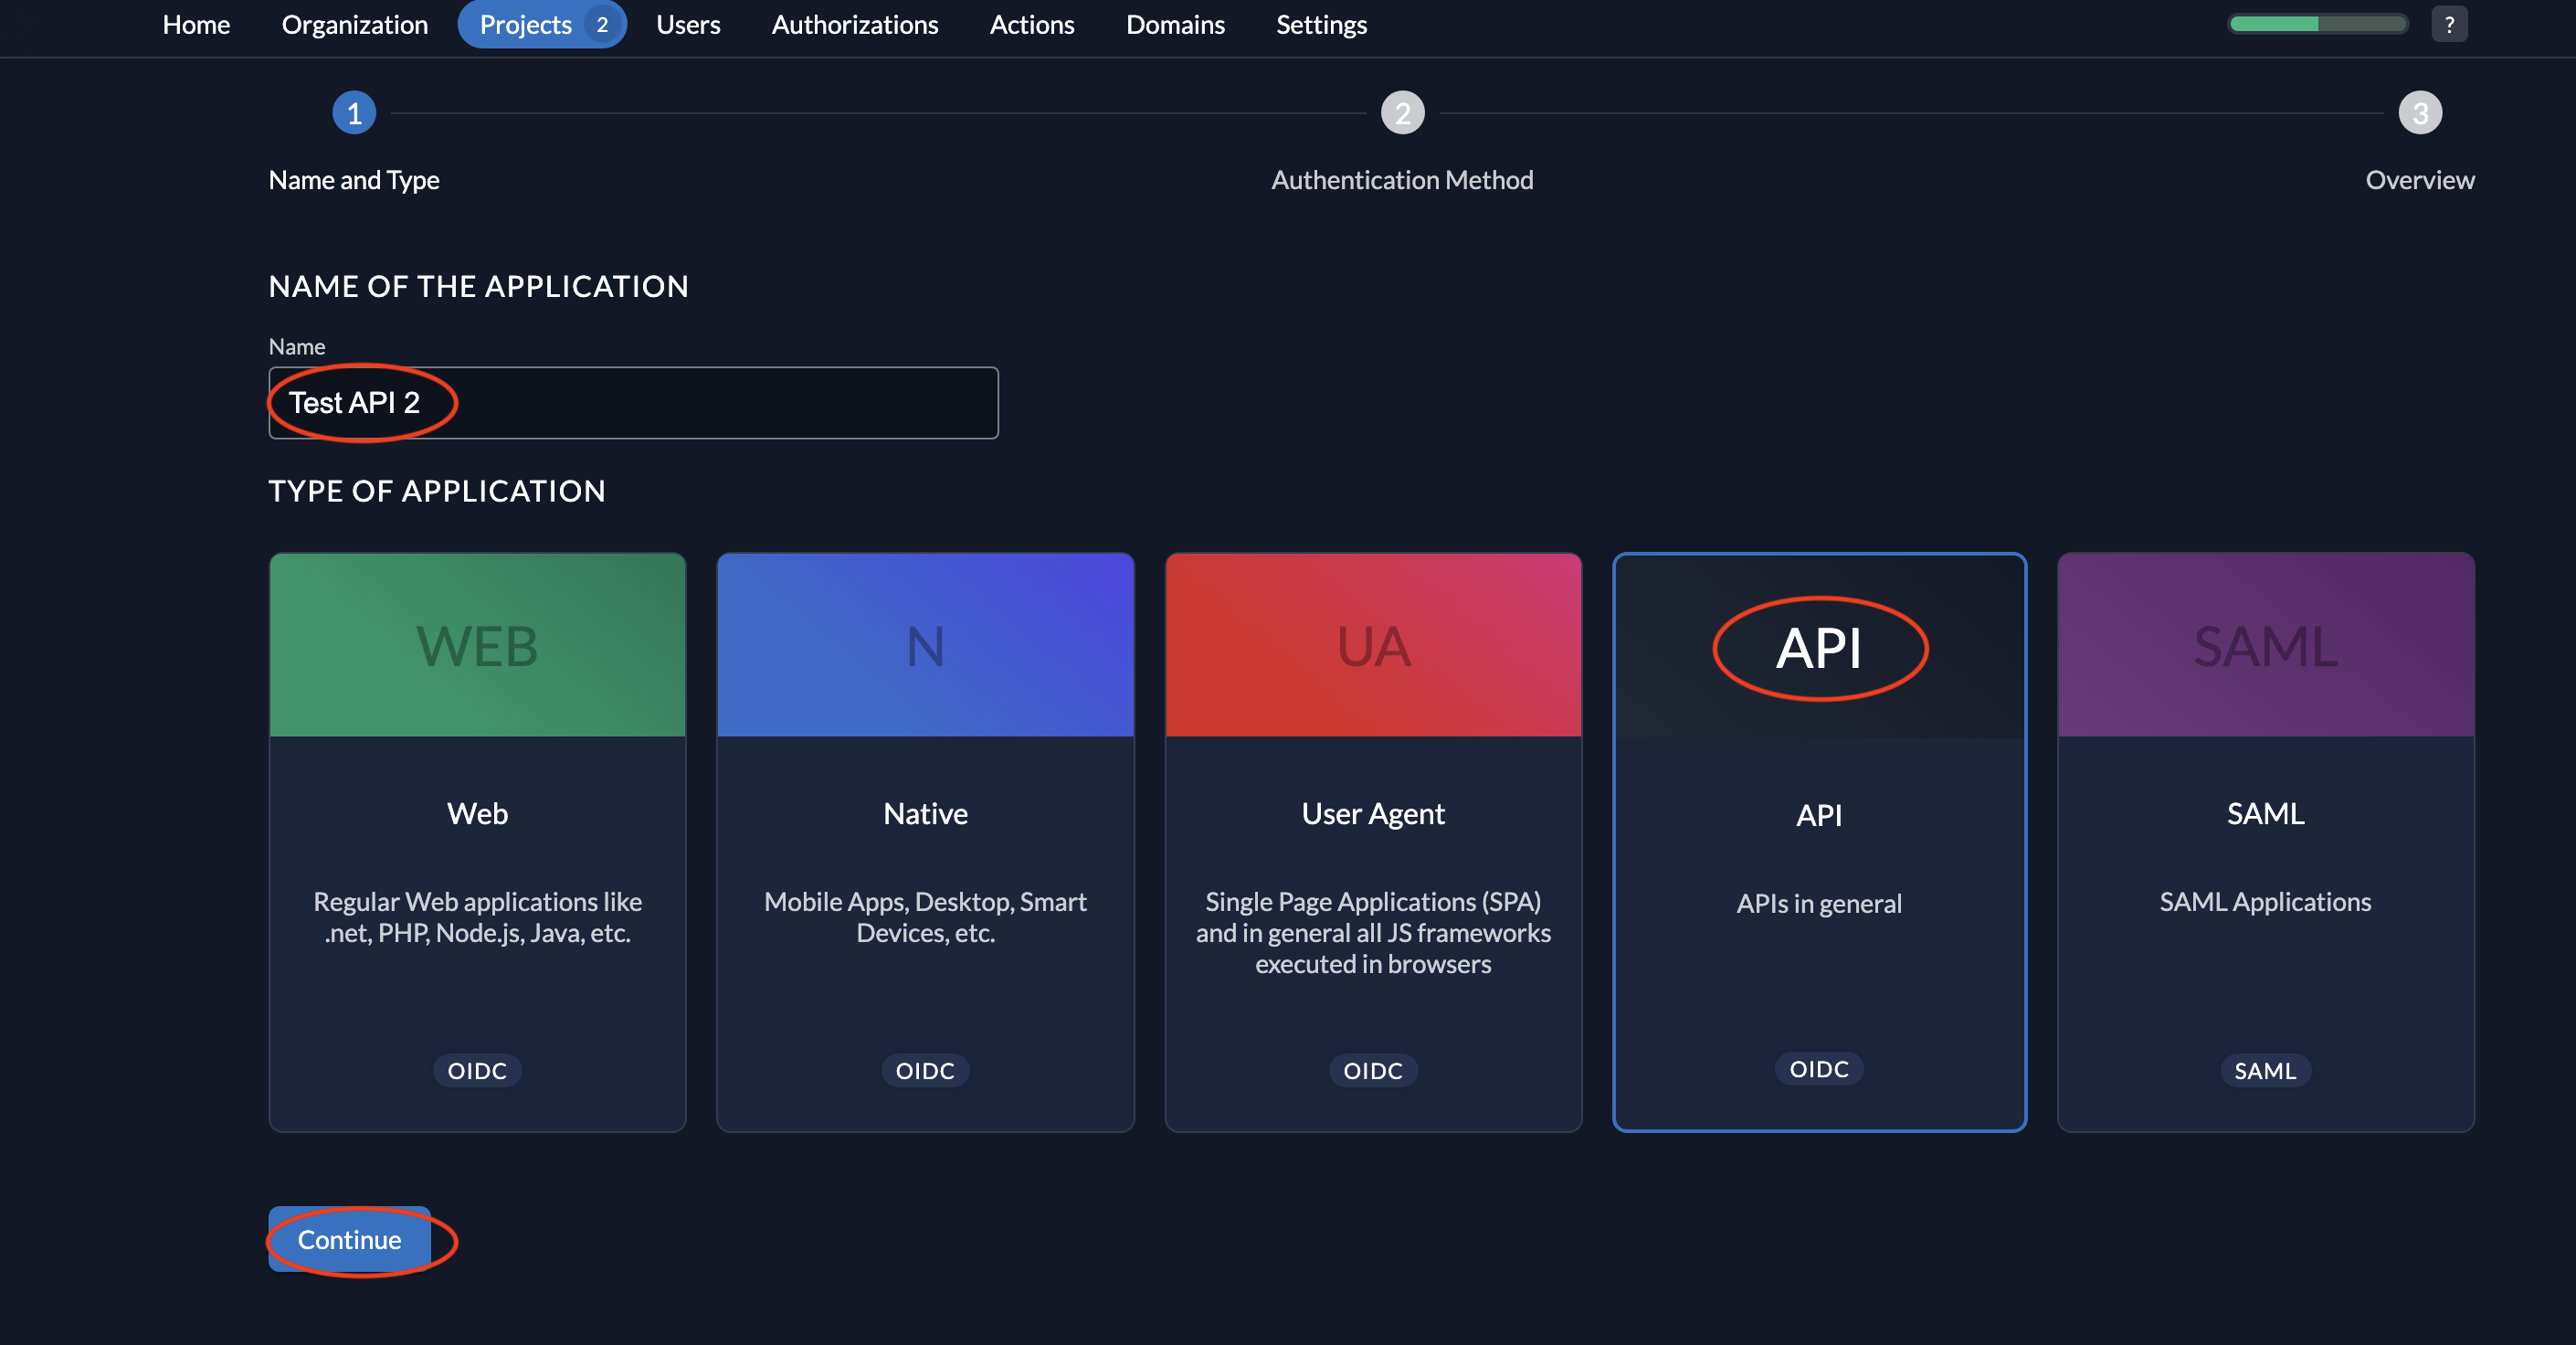
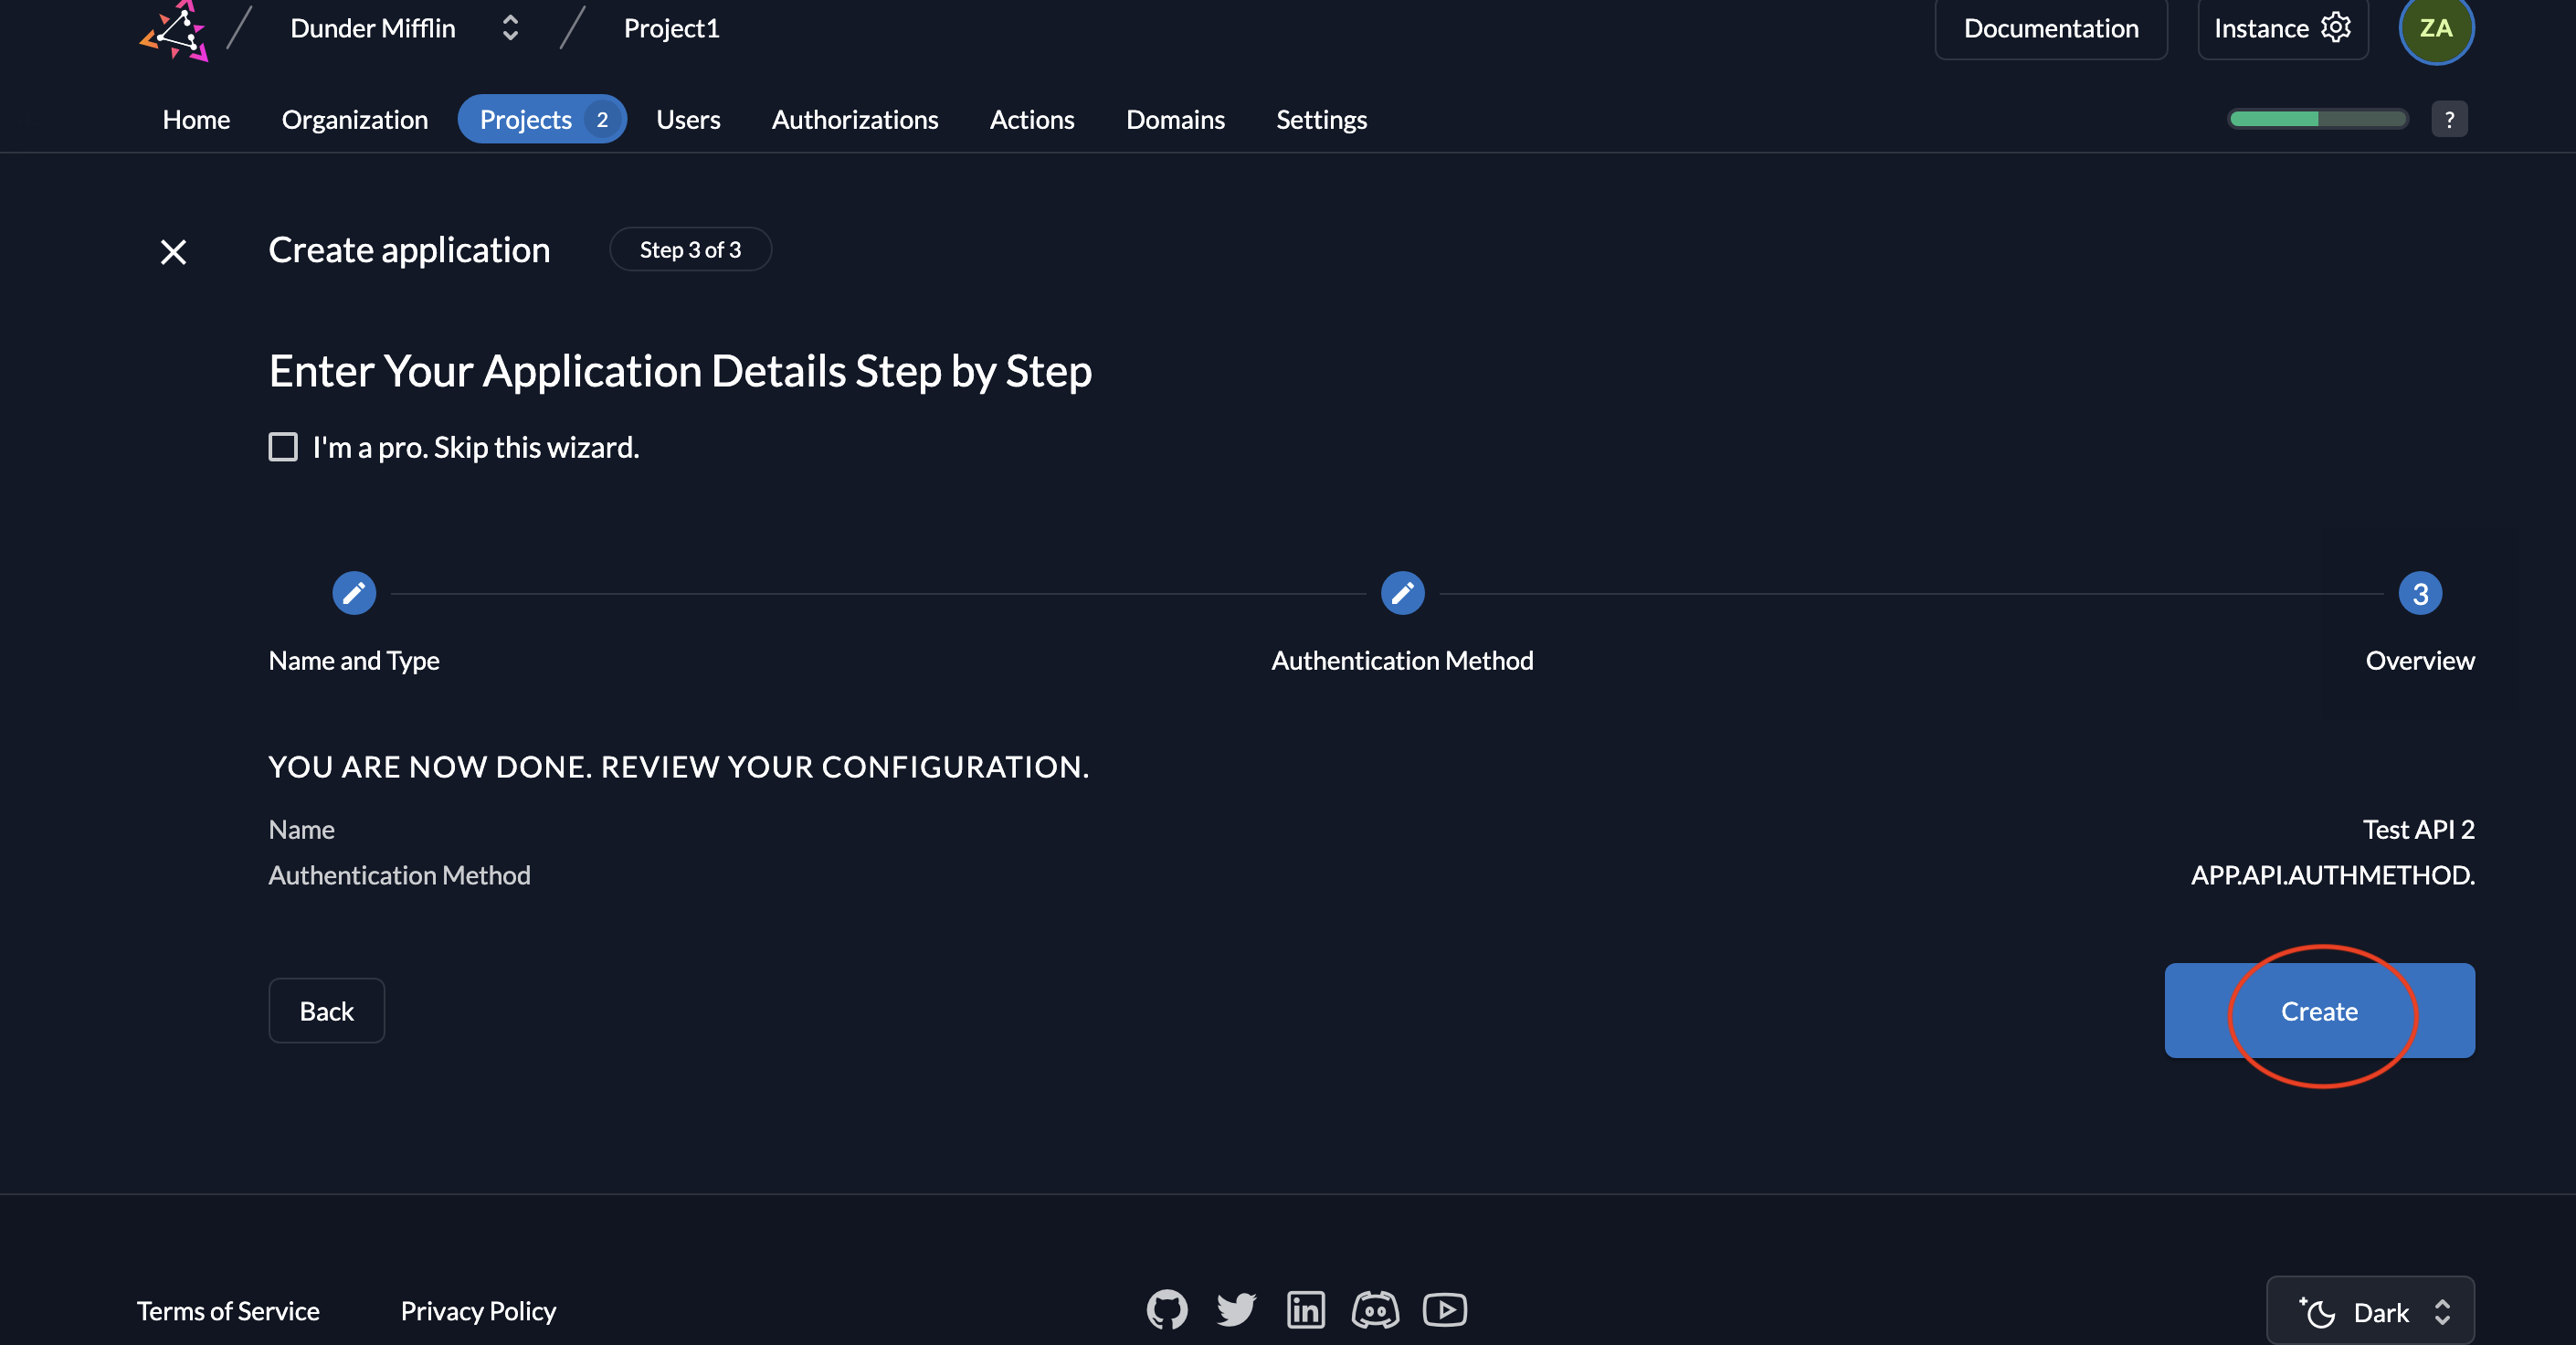
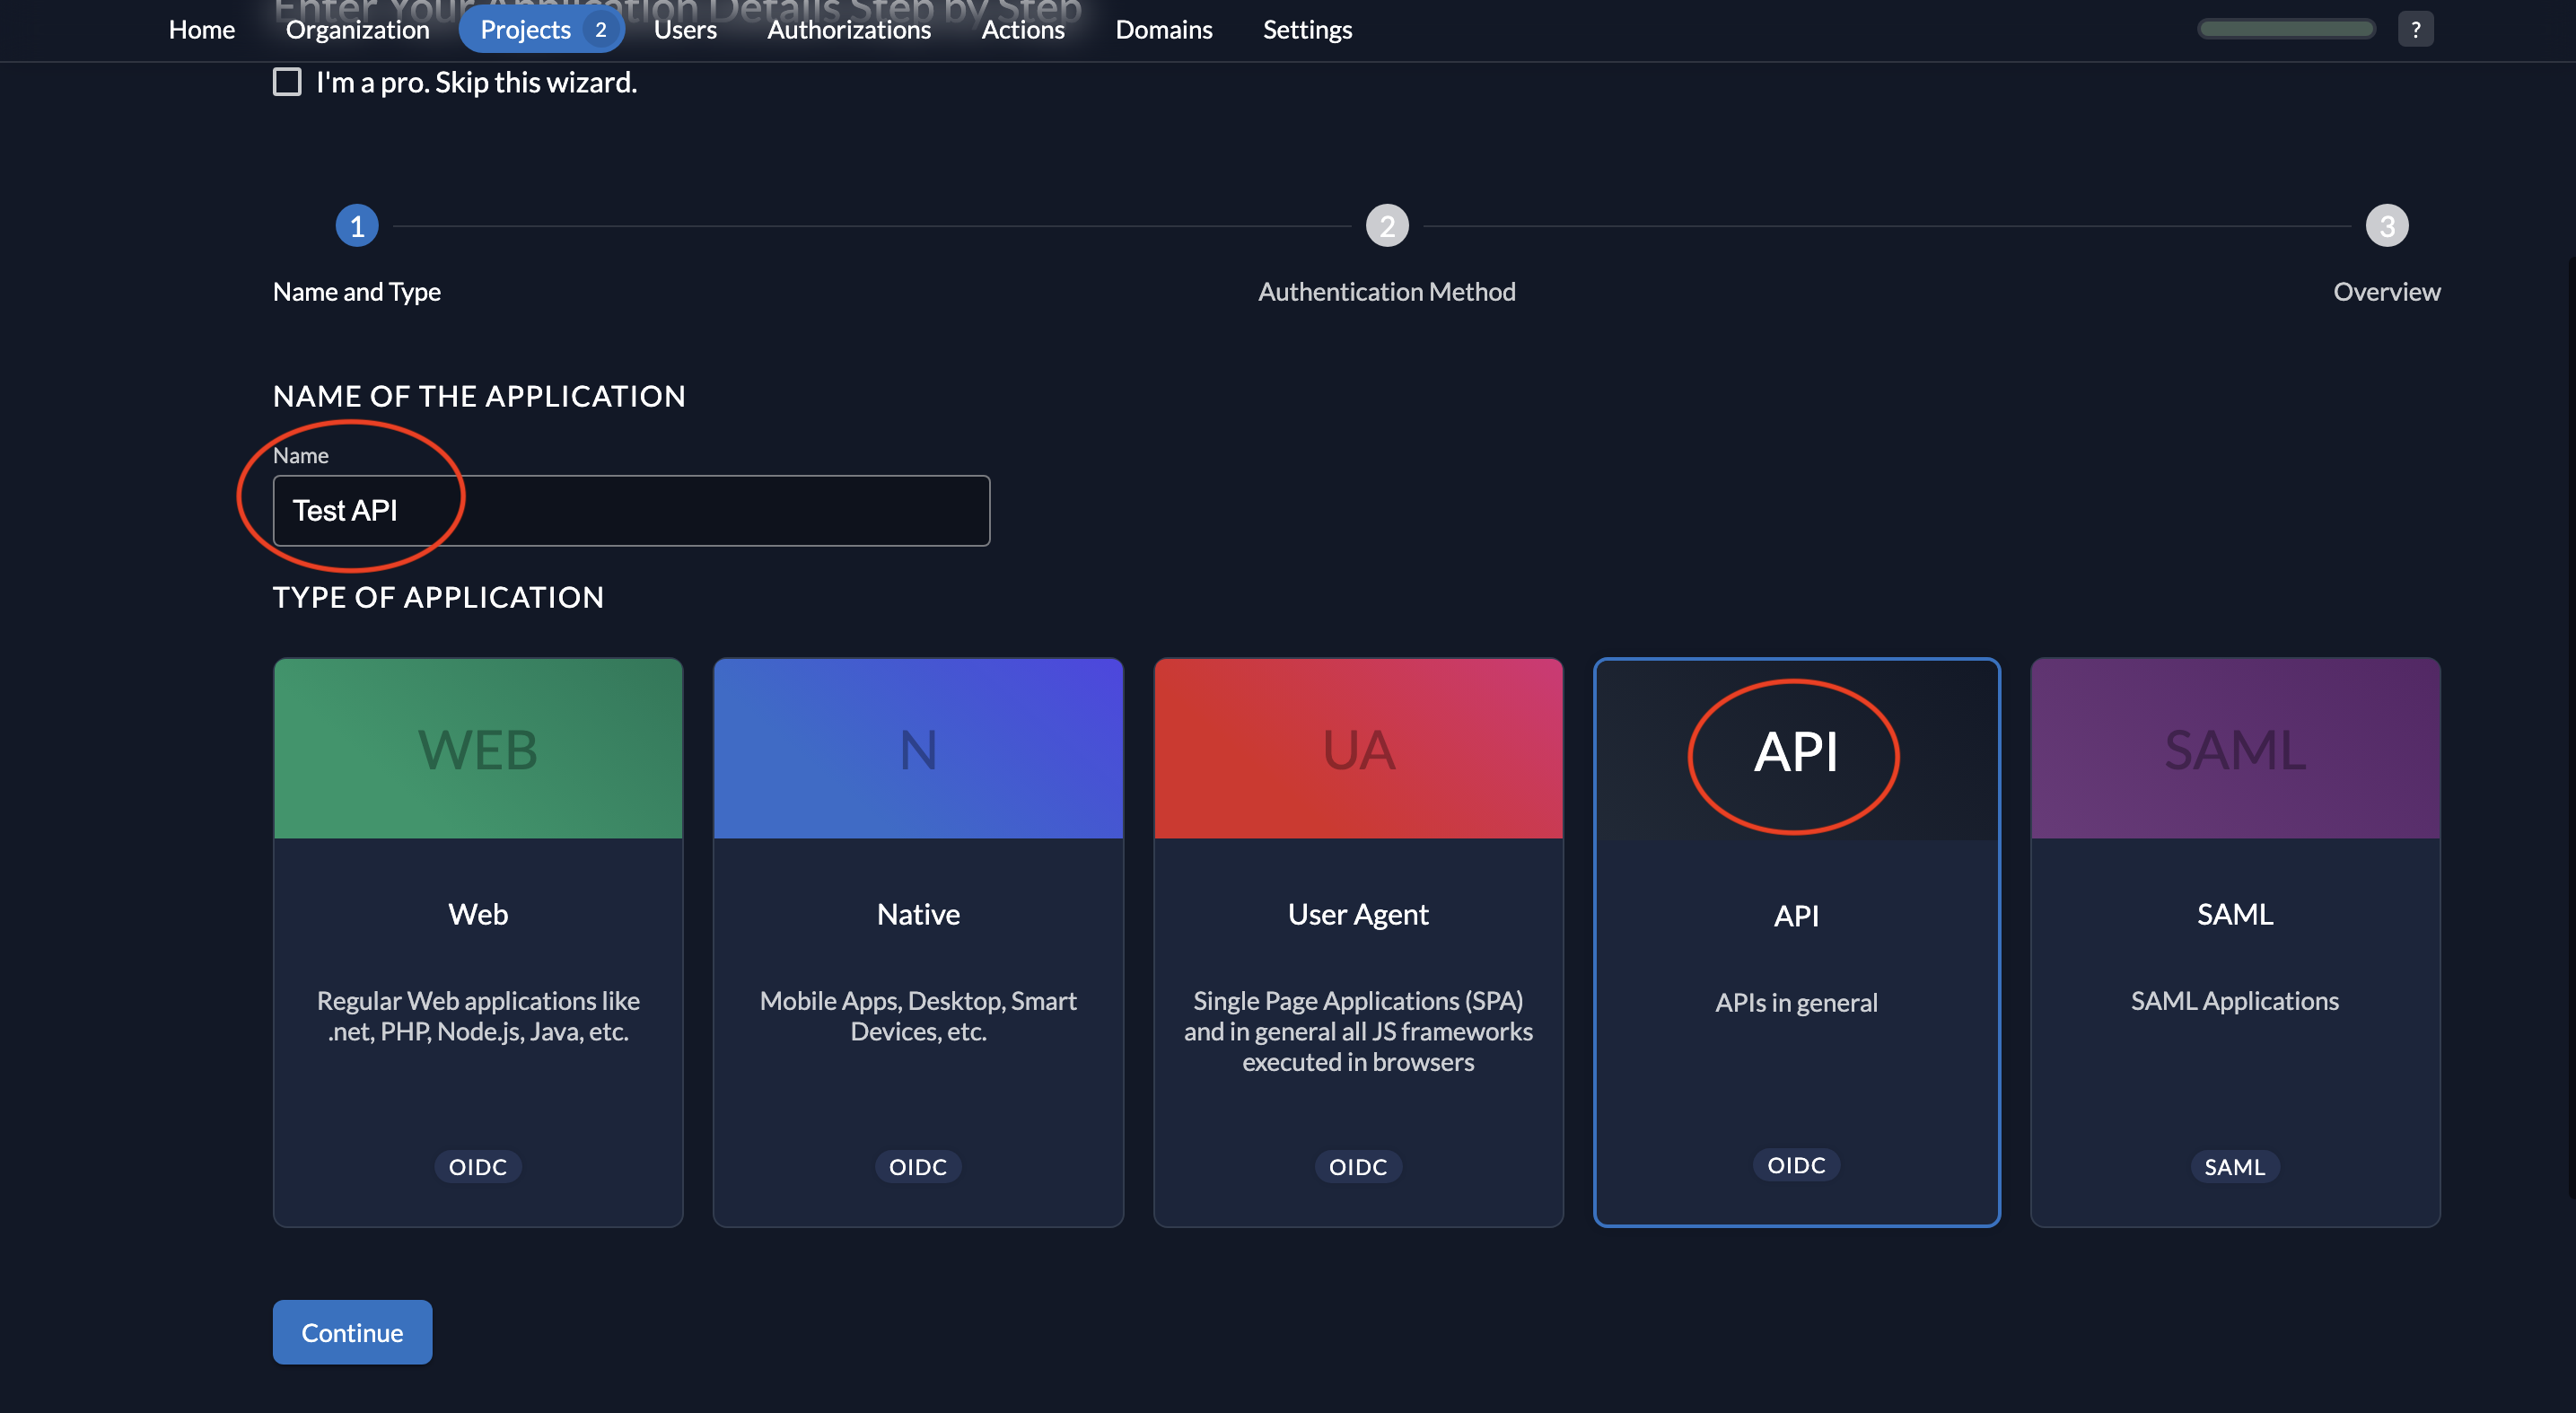
 2. Give a name to your application (Test API 2 is the name given below) and select type **API**.
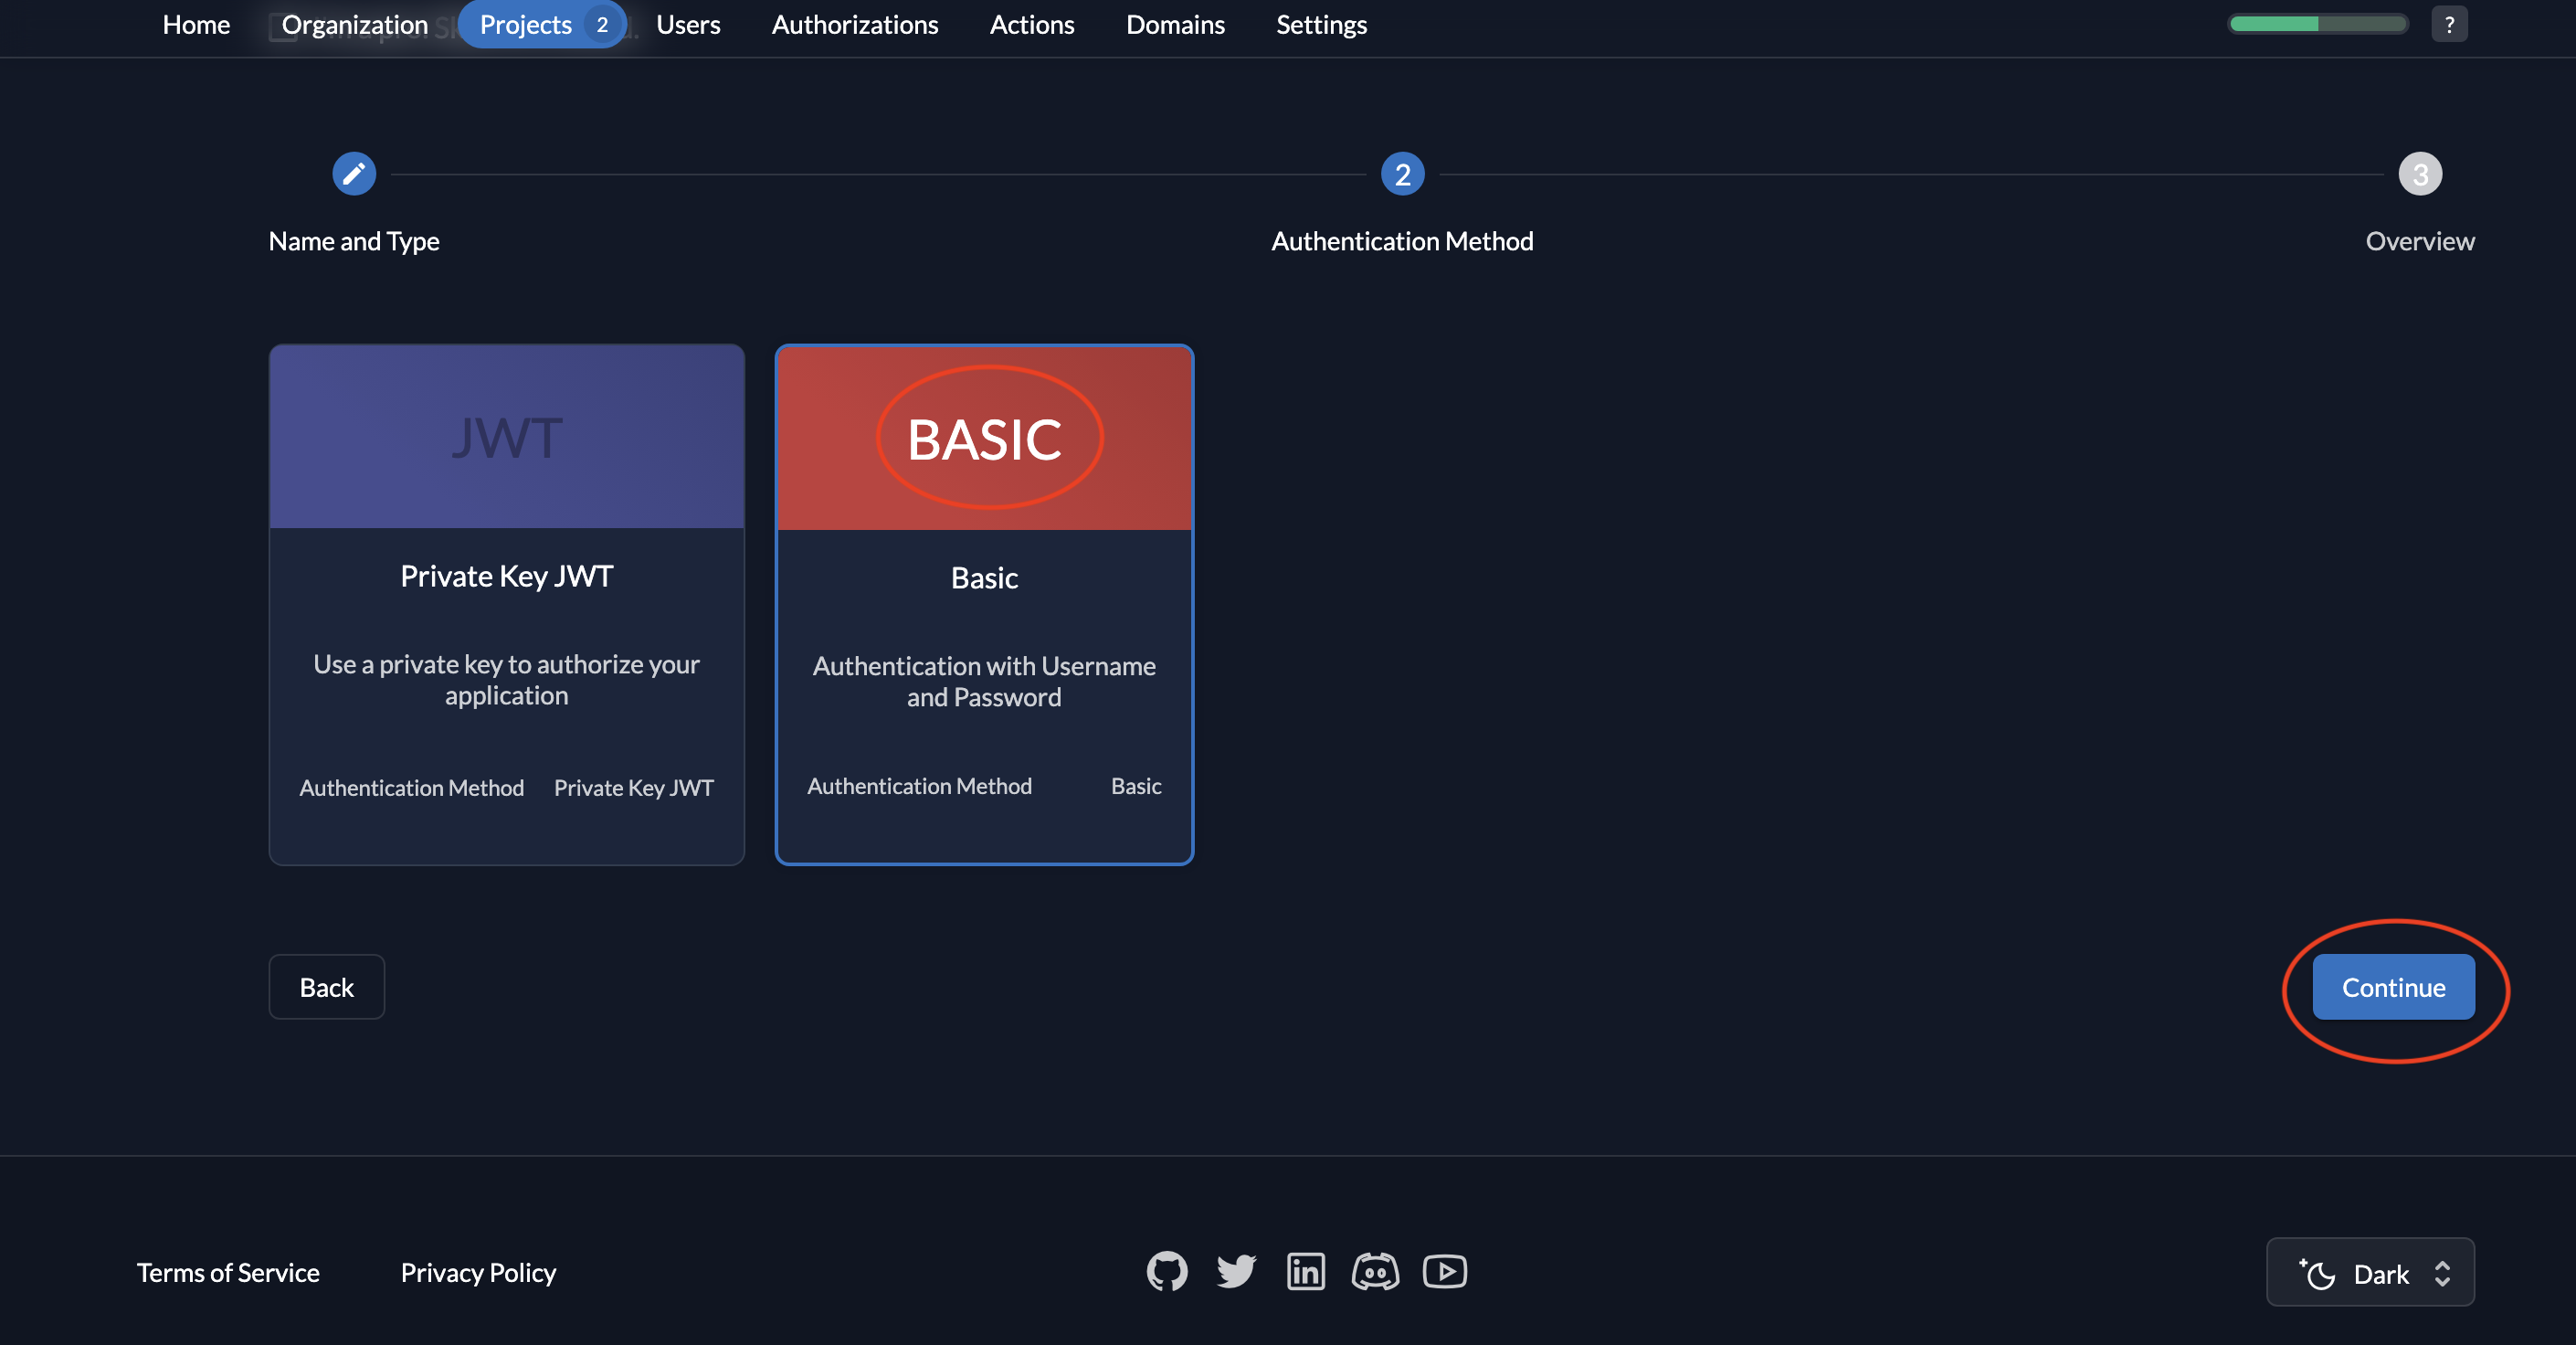
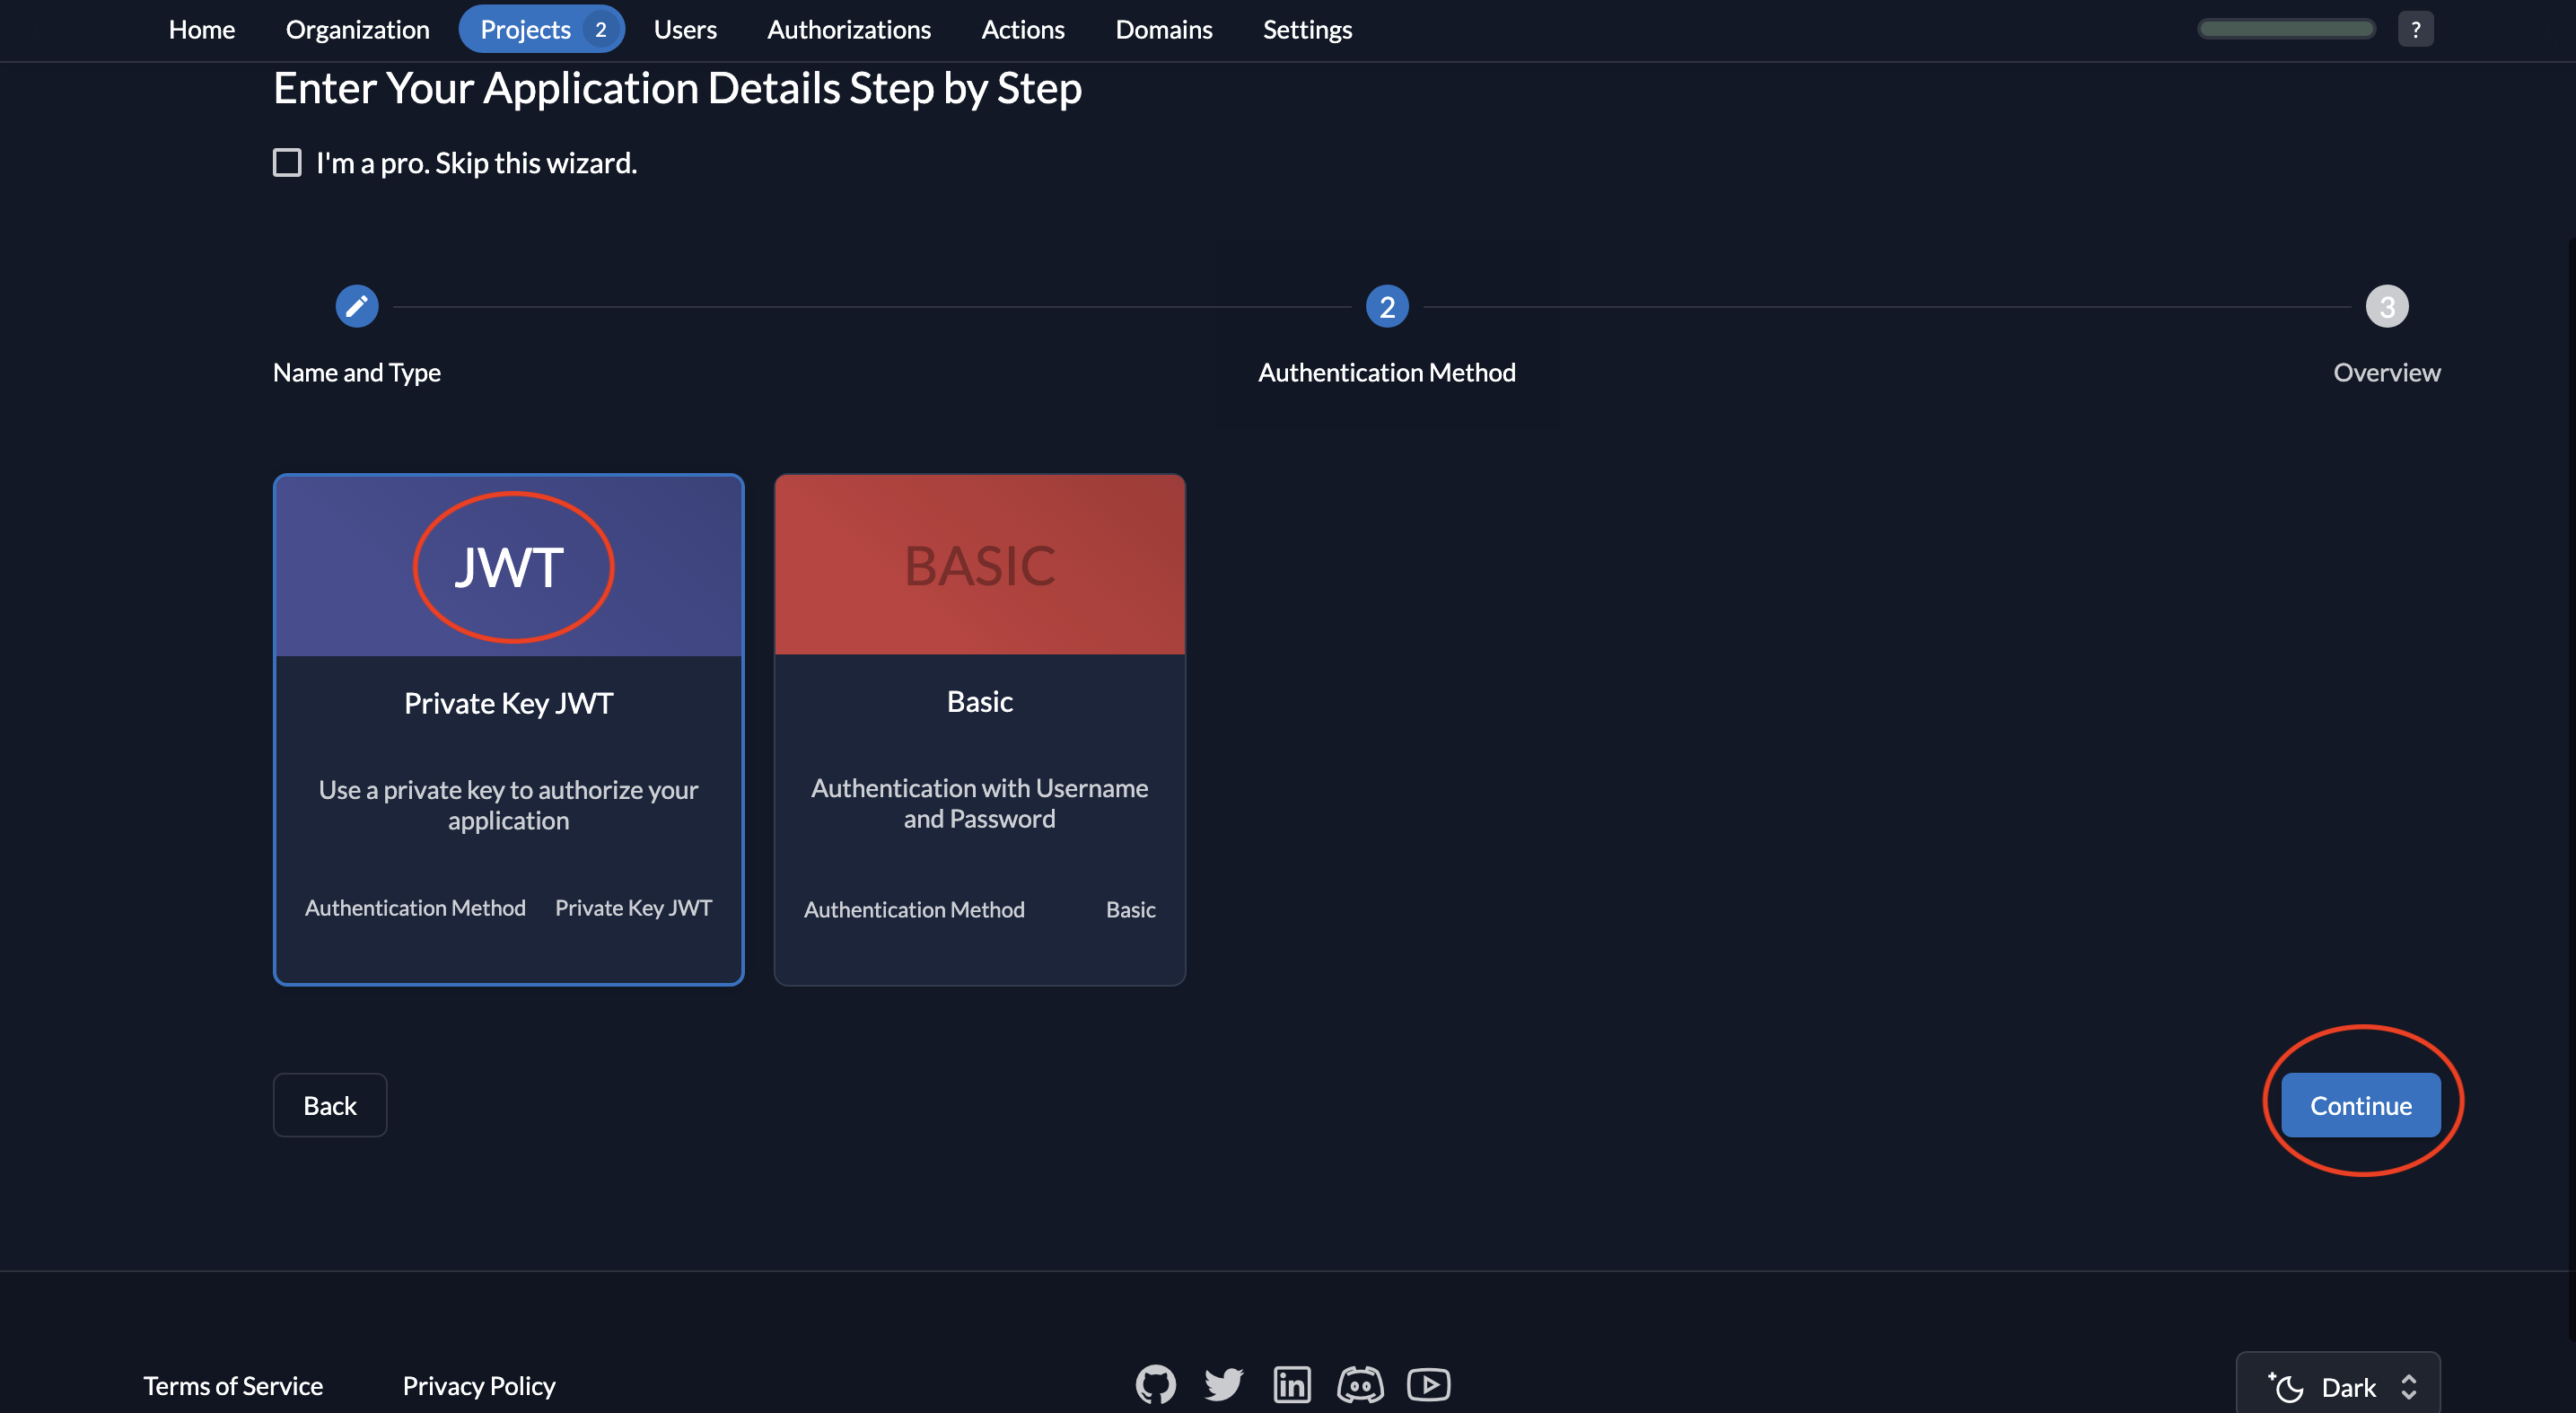
 3. Select **Basic** as the authentication method and click **Continue**.
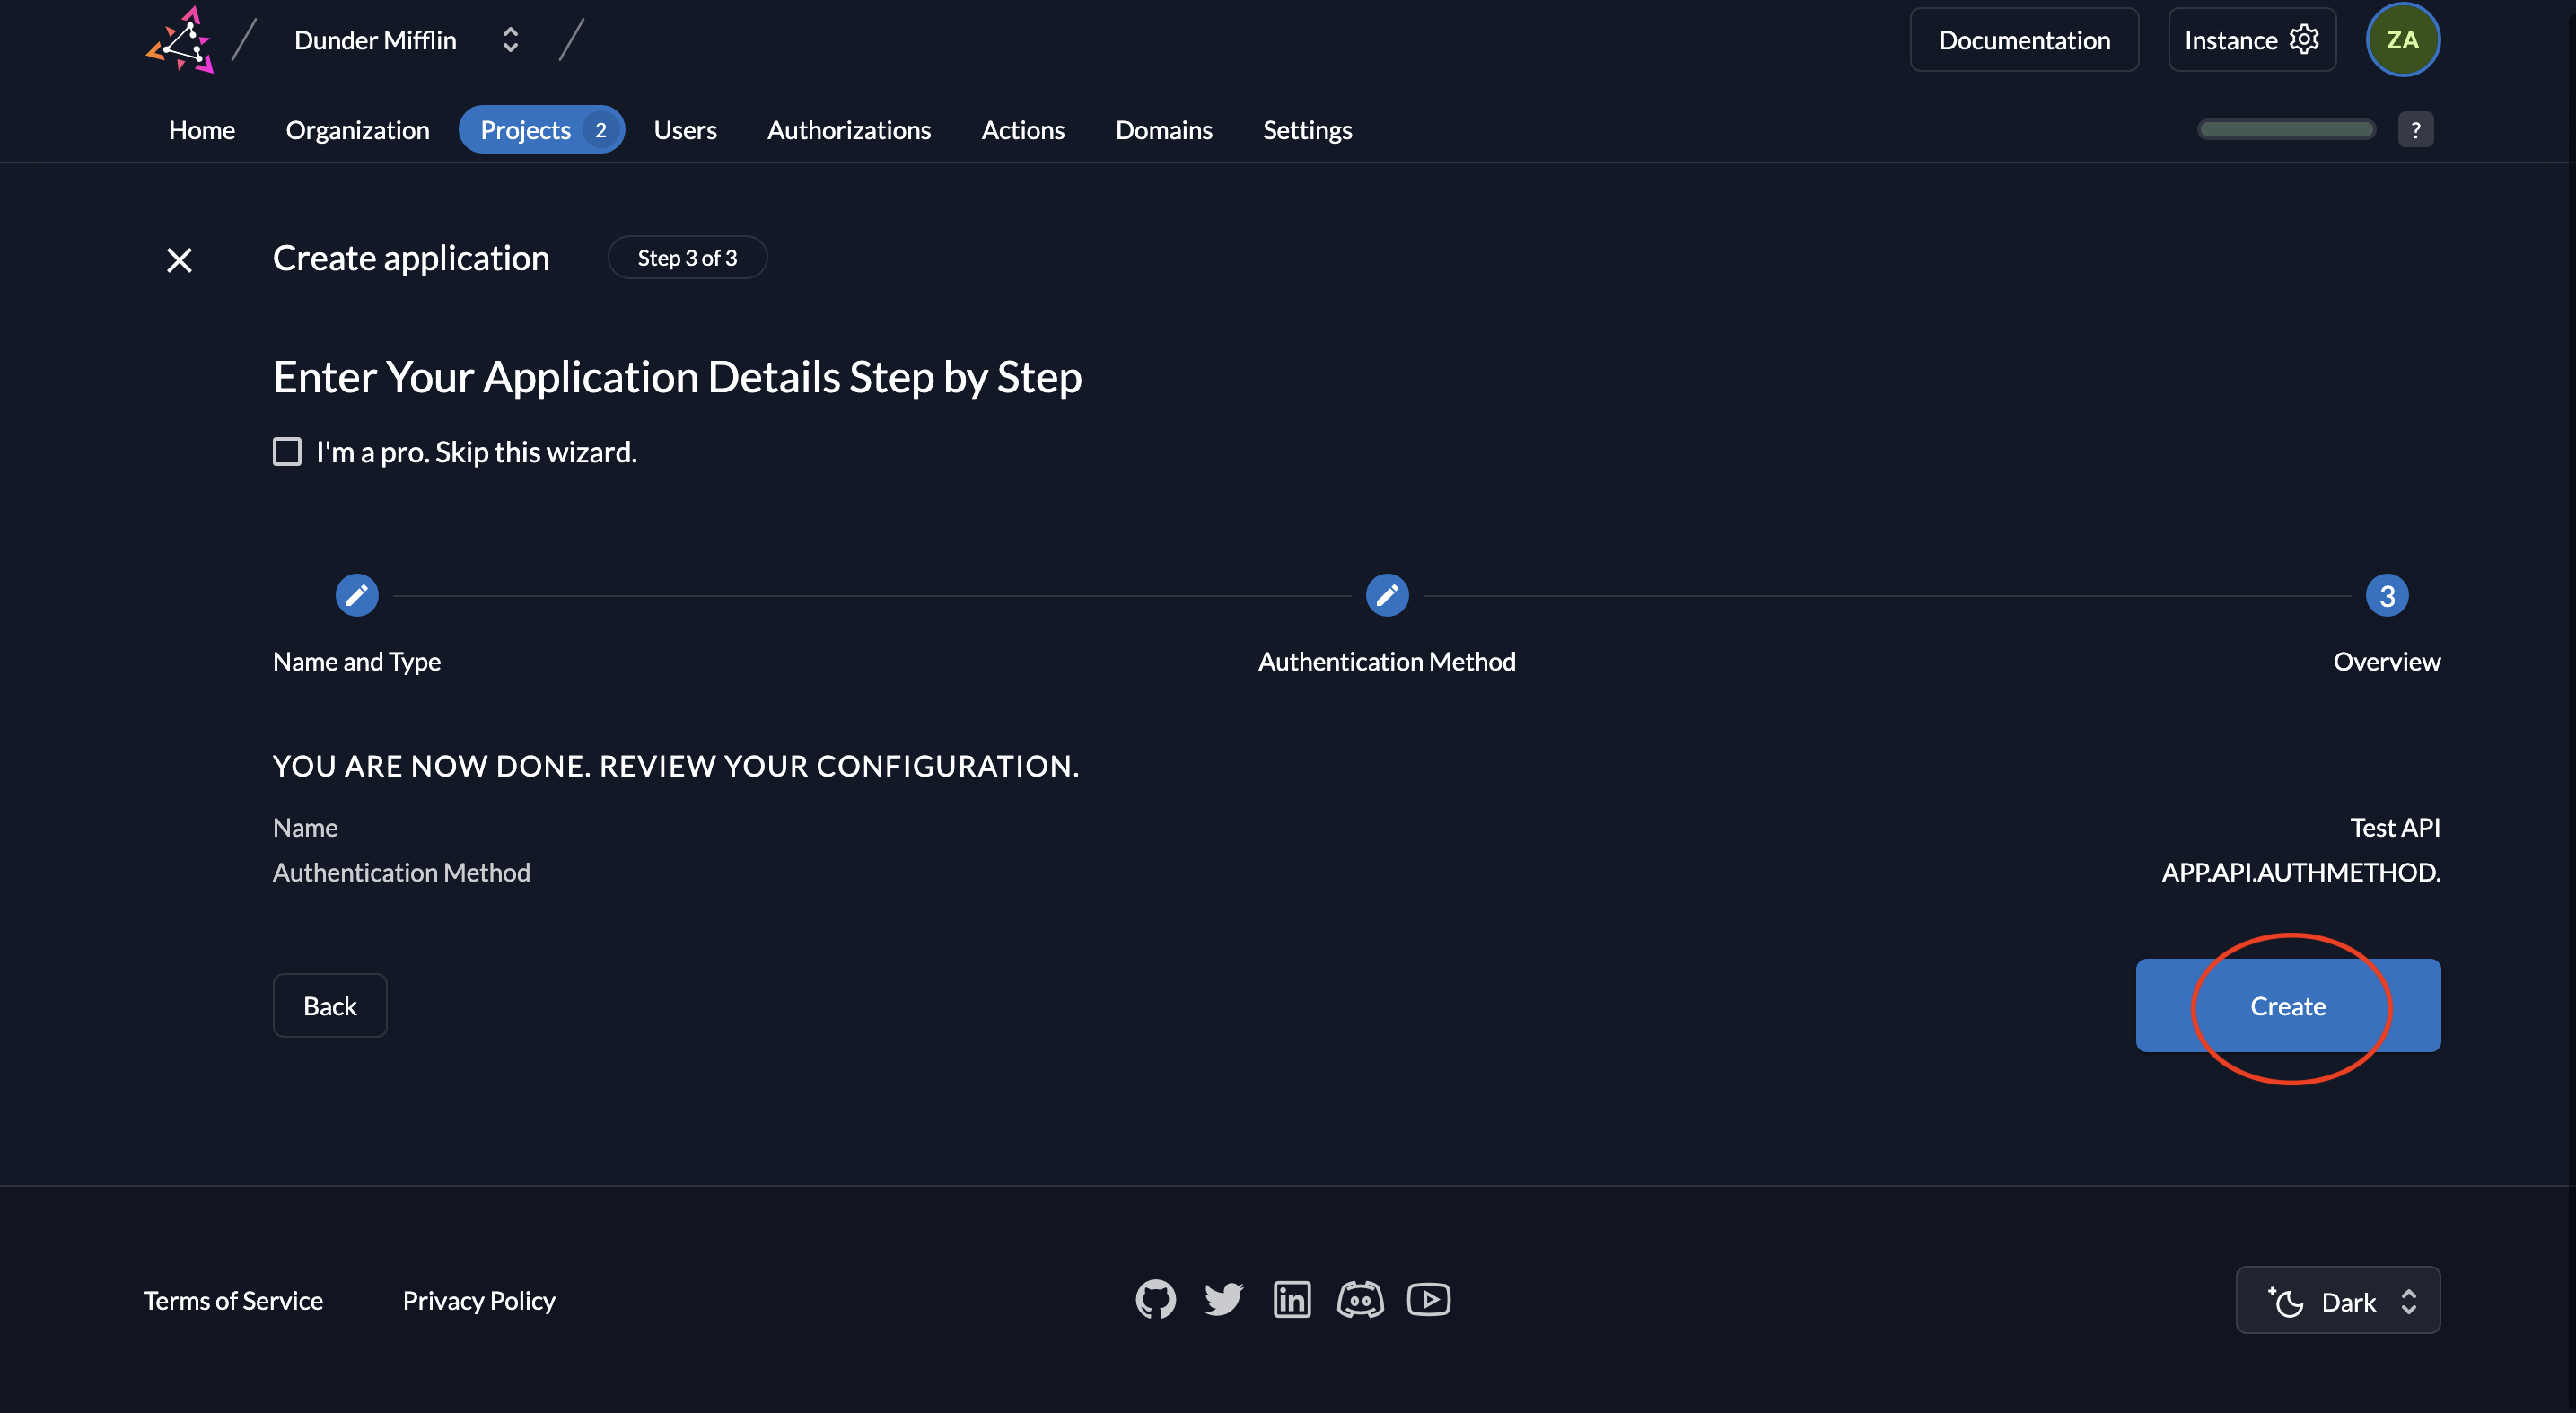
 4. Now review your settings and click **Create**.
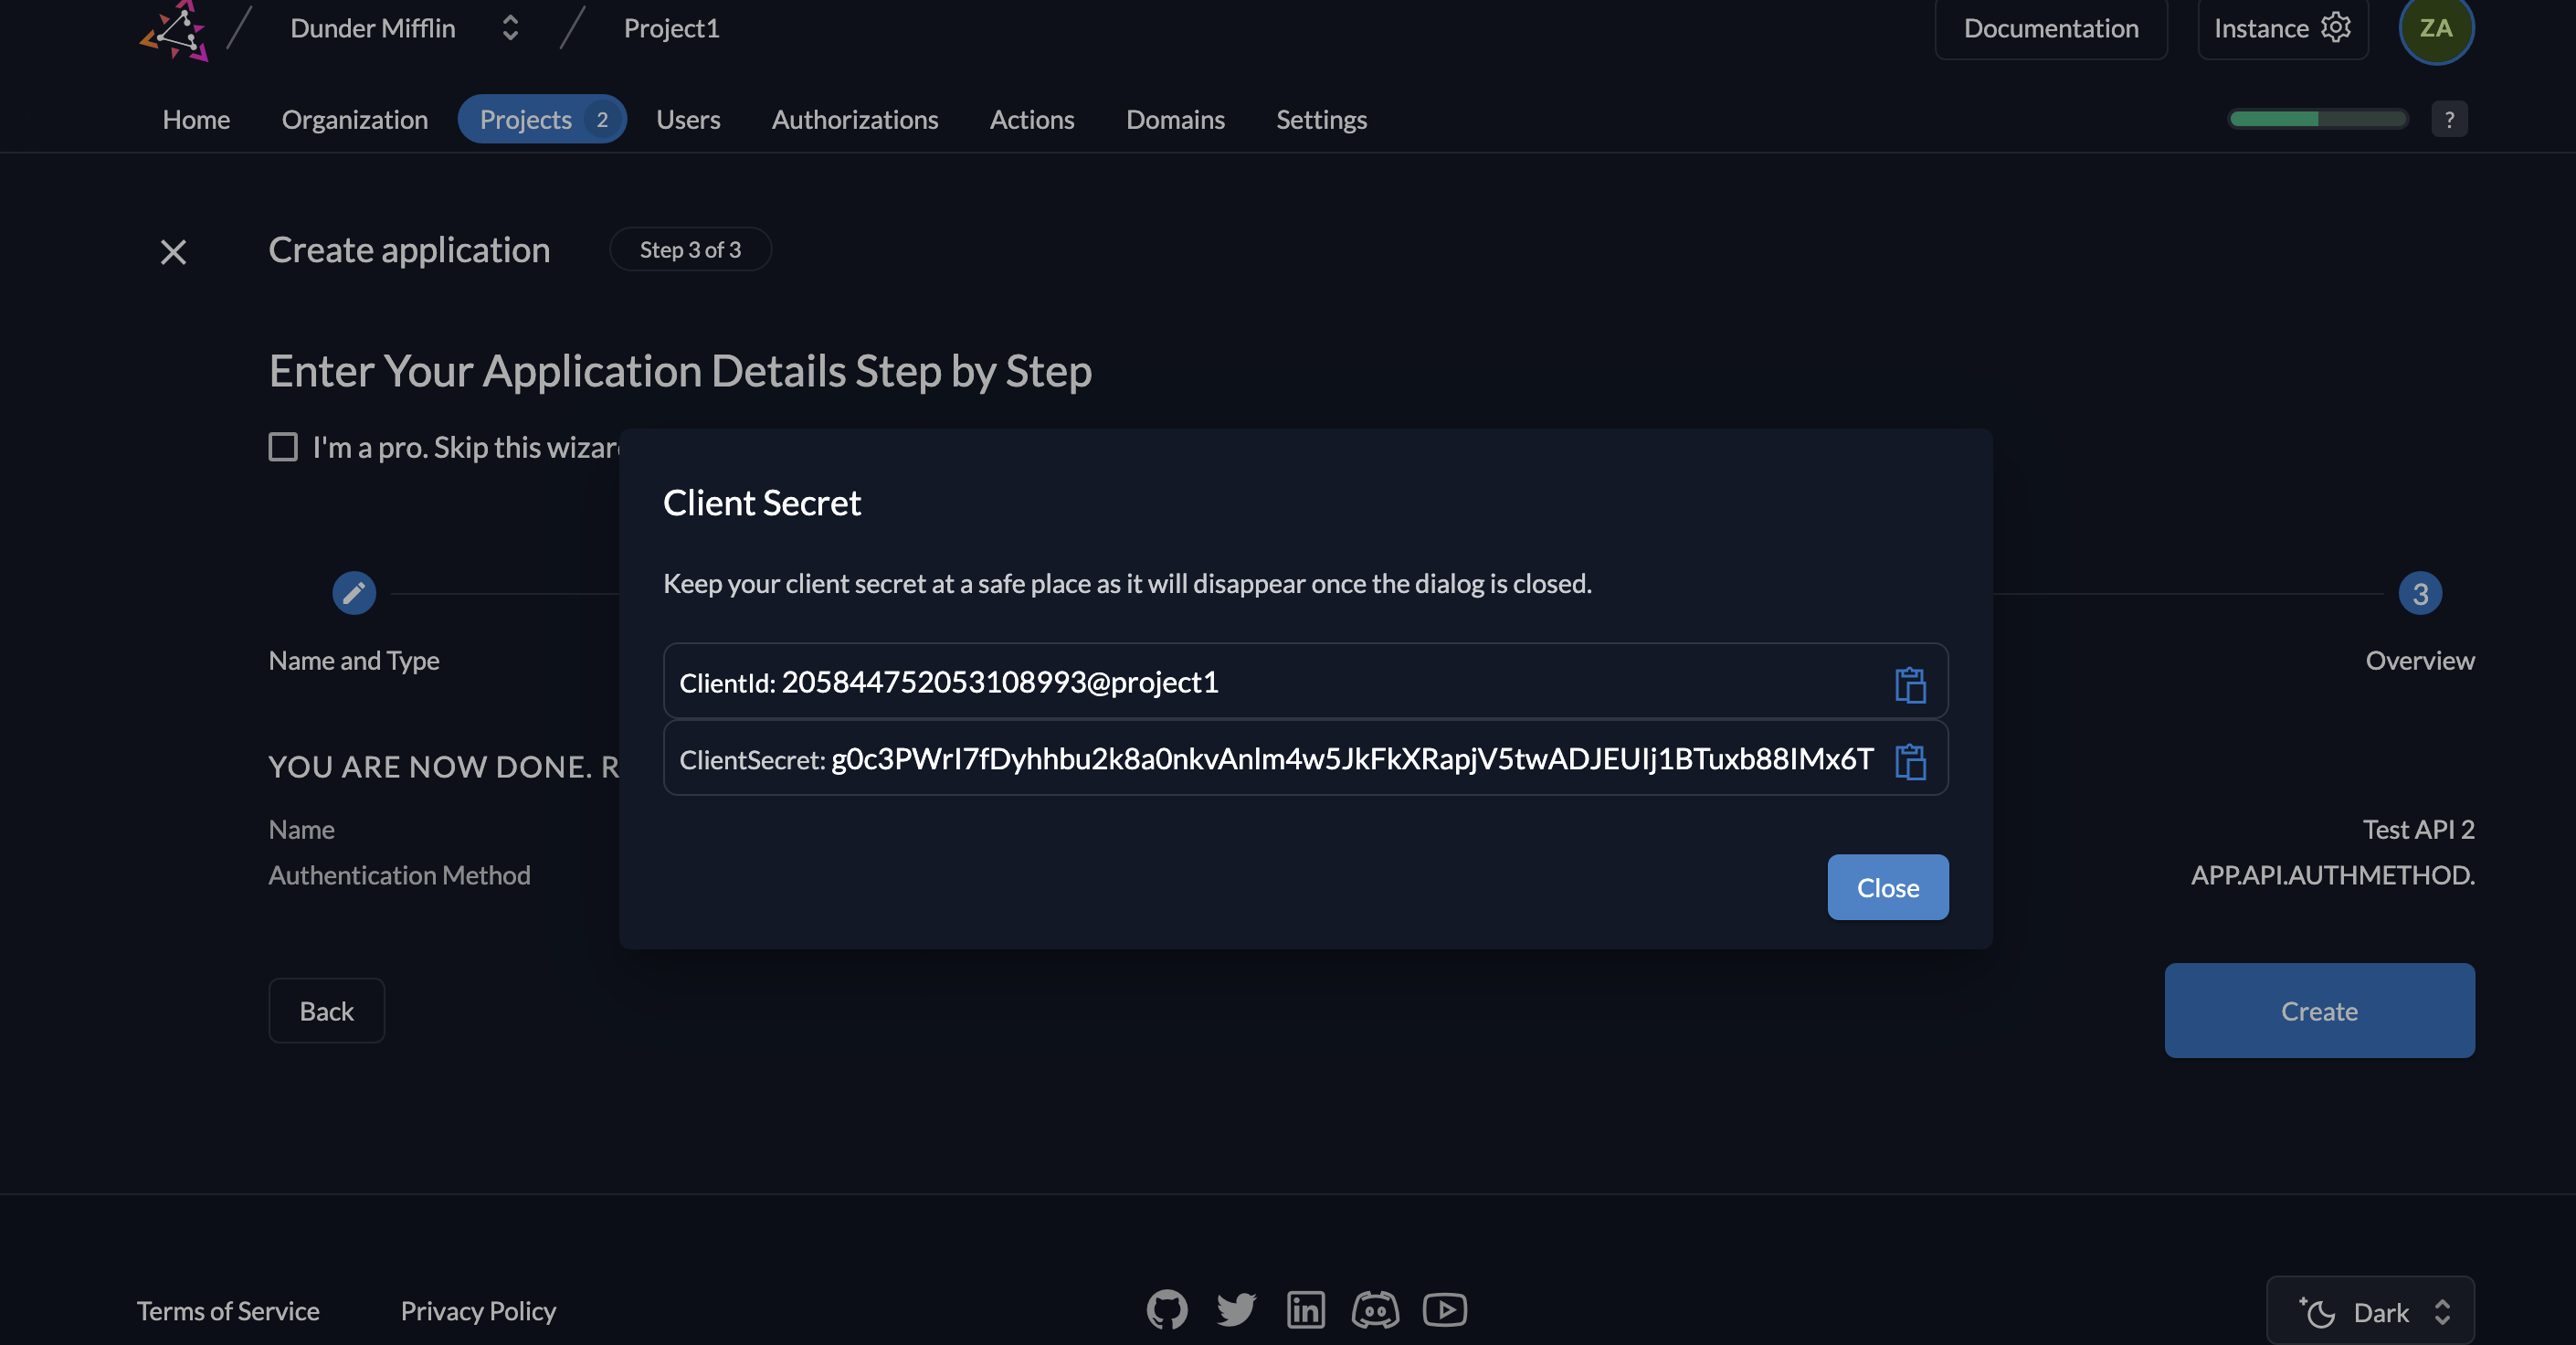
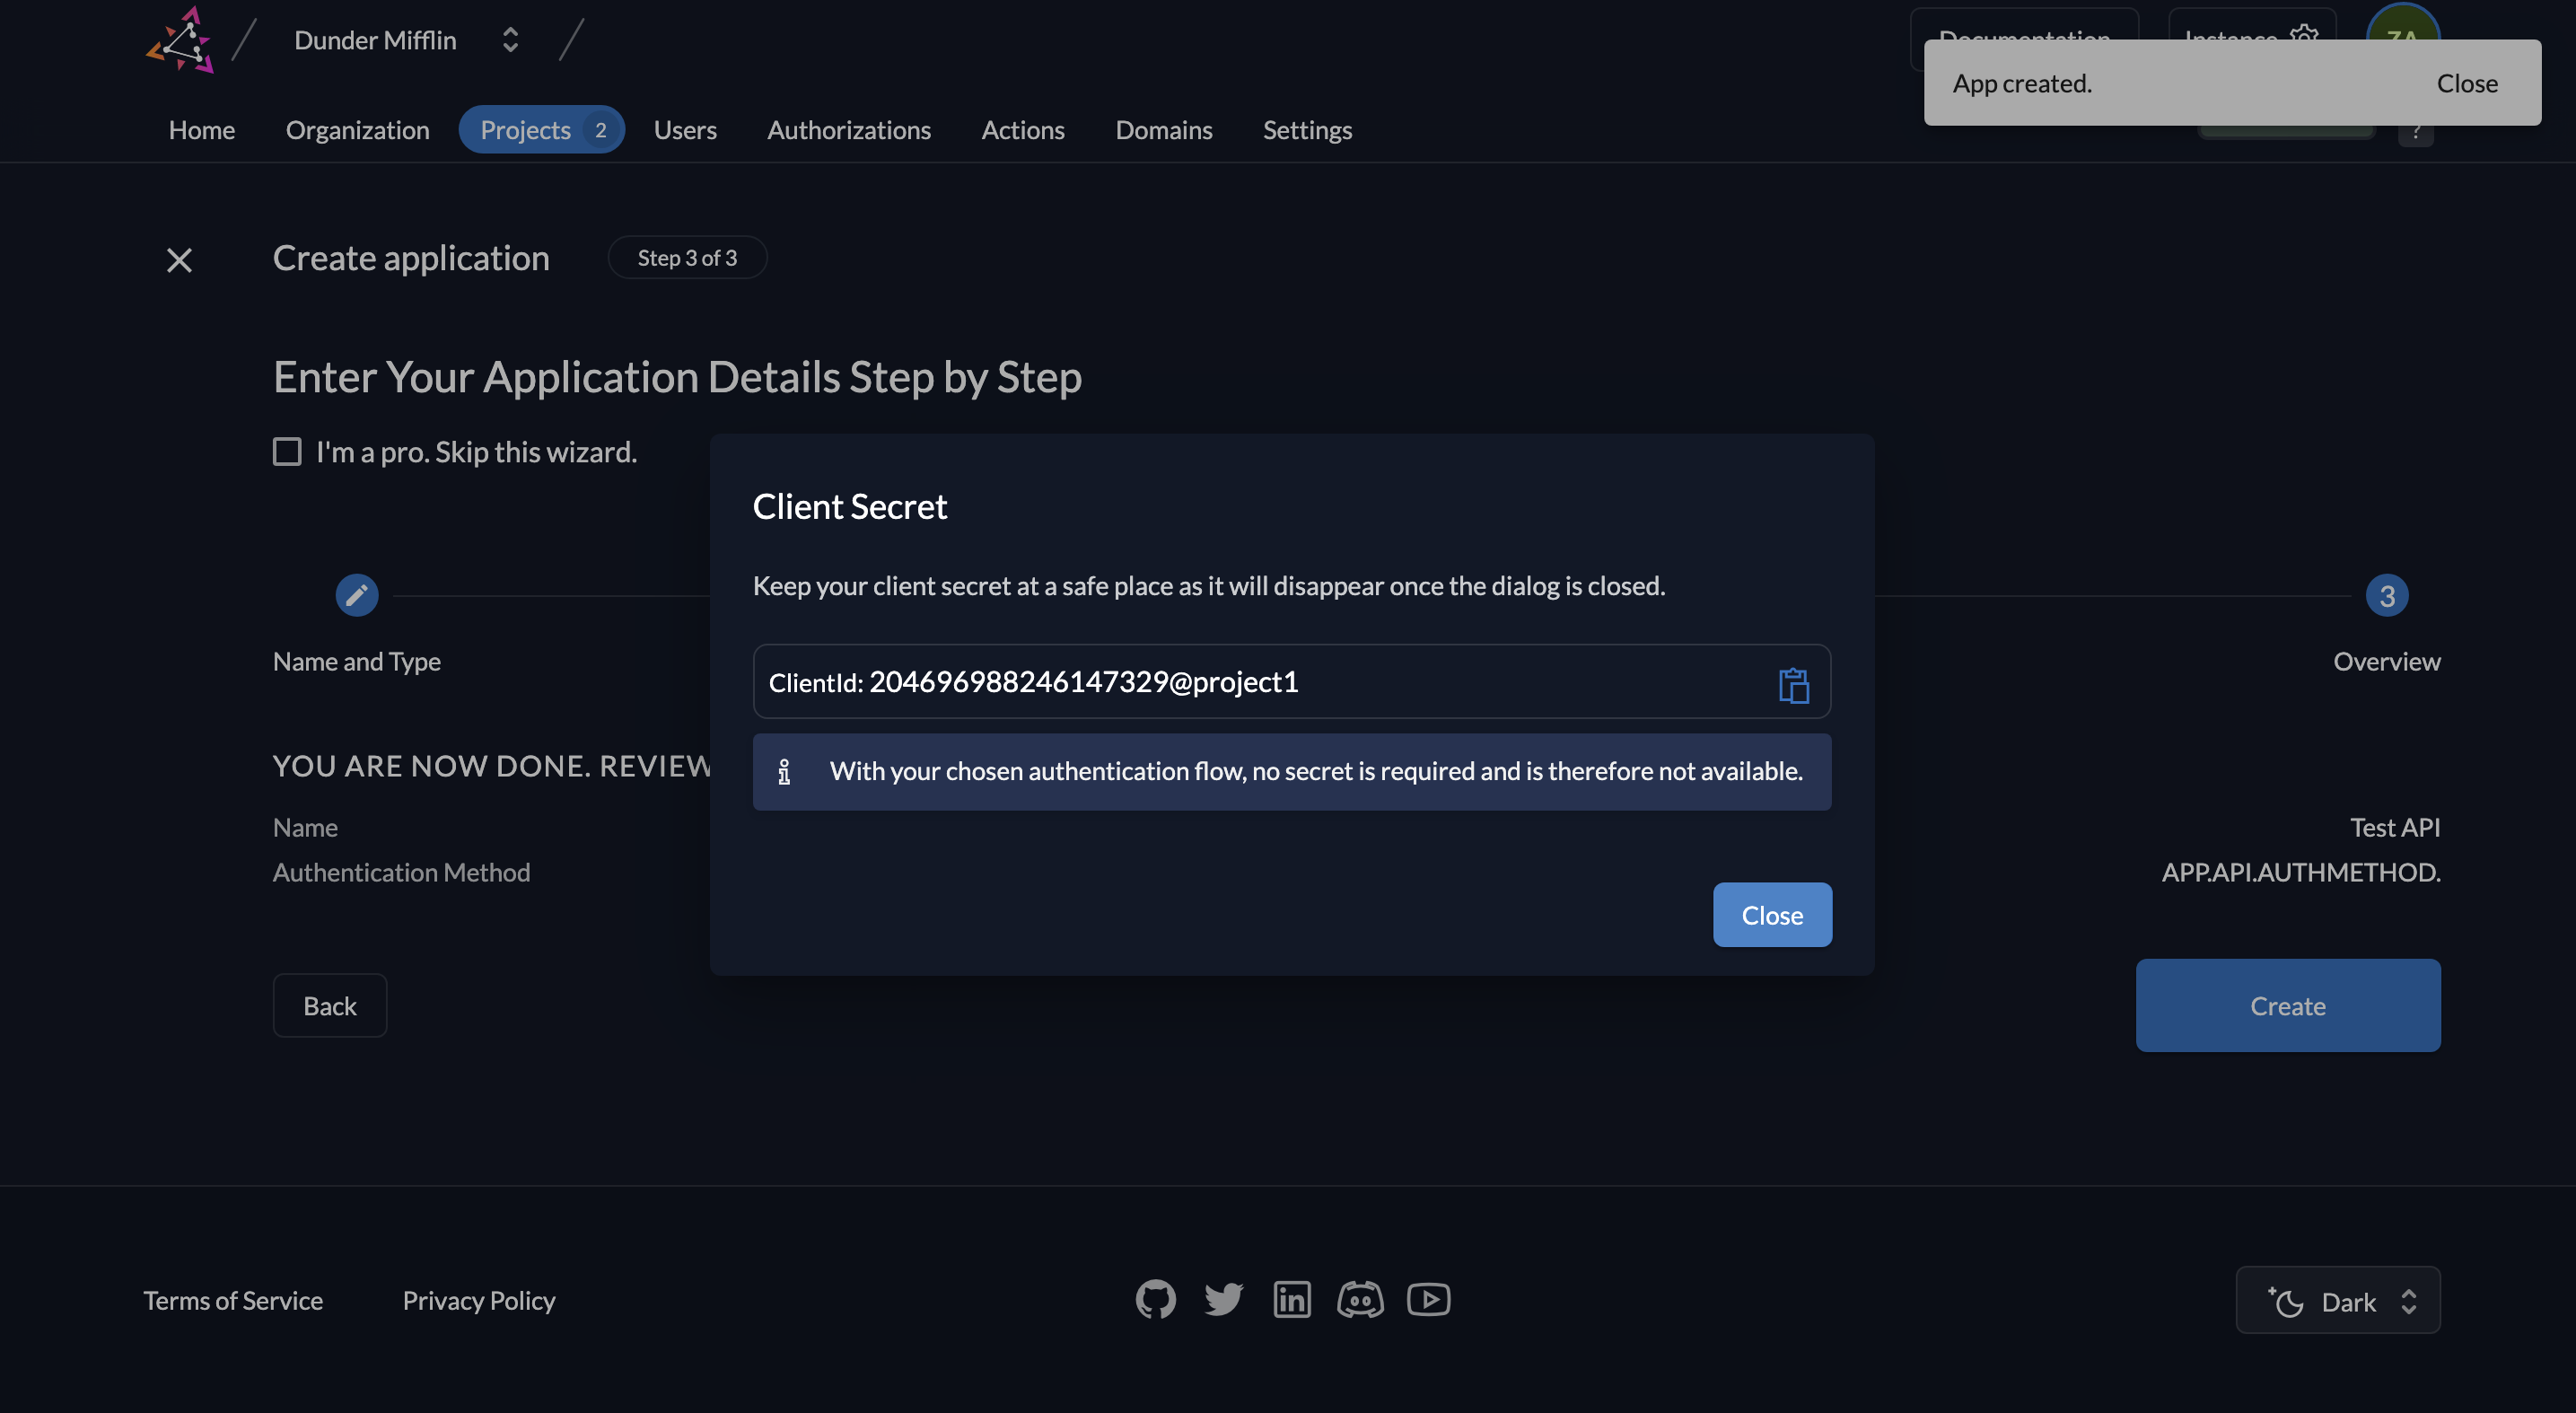
 5. You will now see the API’s **Client ID** and the **Client Secret**. Copy them and click **Close**.
 6. When you click **URLs** on the left, you will see the relevant OIDC URLs. Note down the **issuer** URL, **token\_endpoint** and **introspection\_endpoint**.
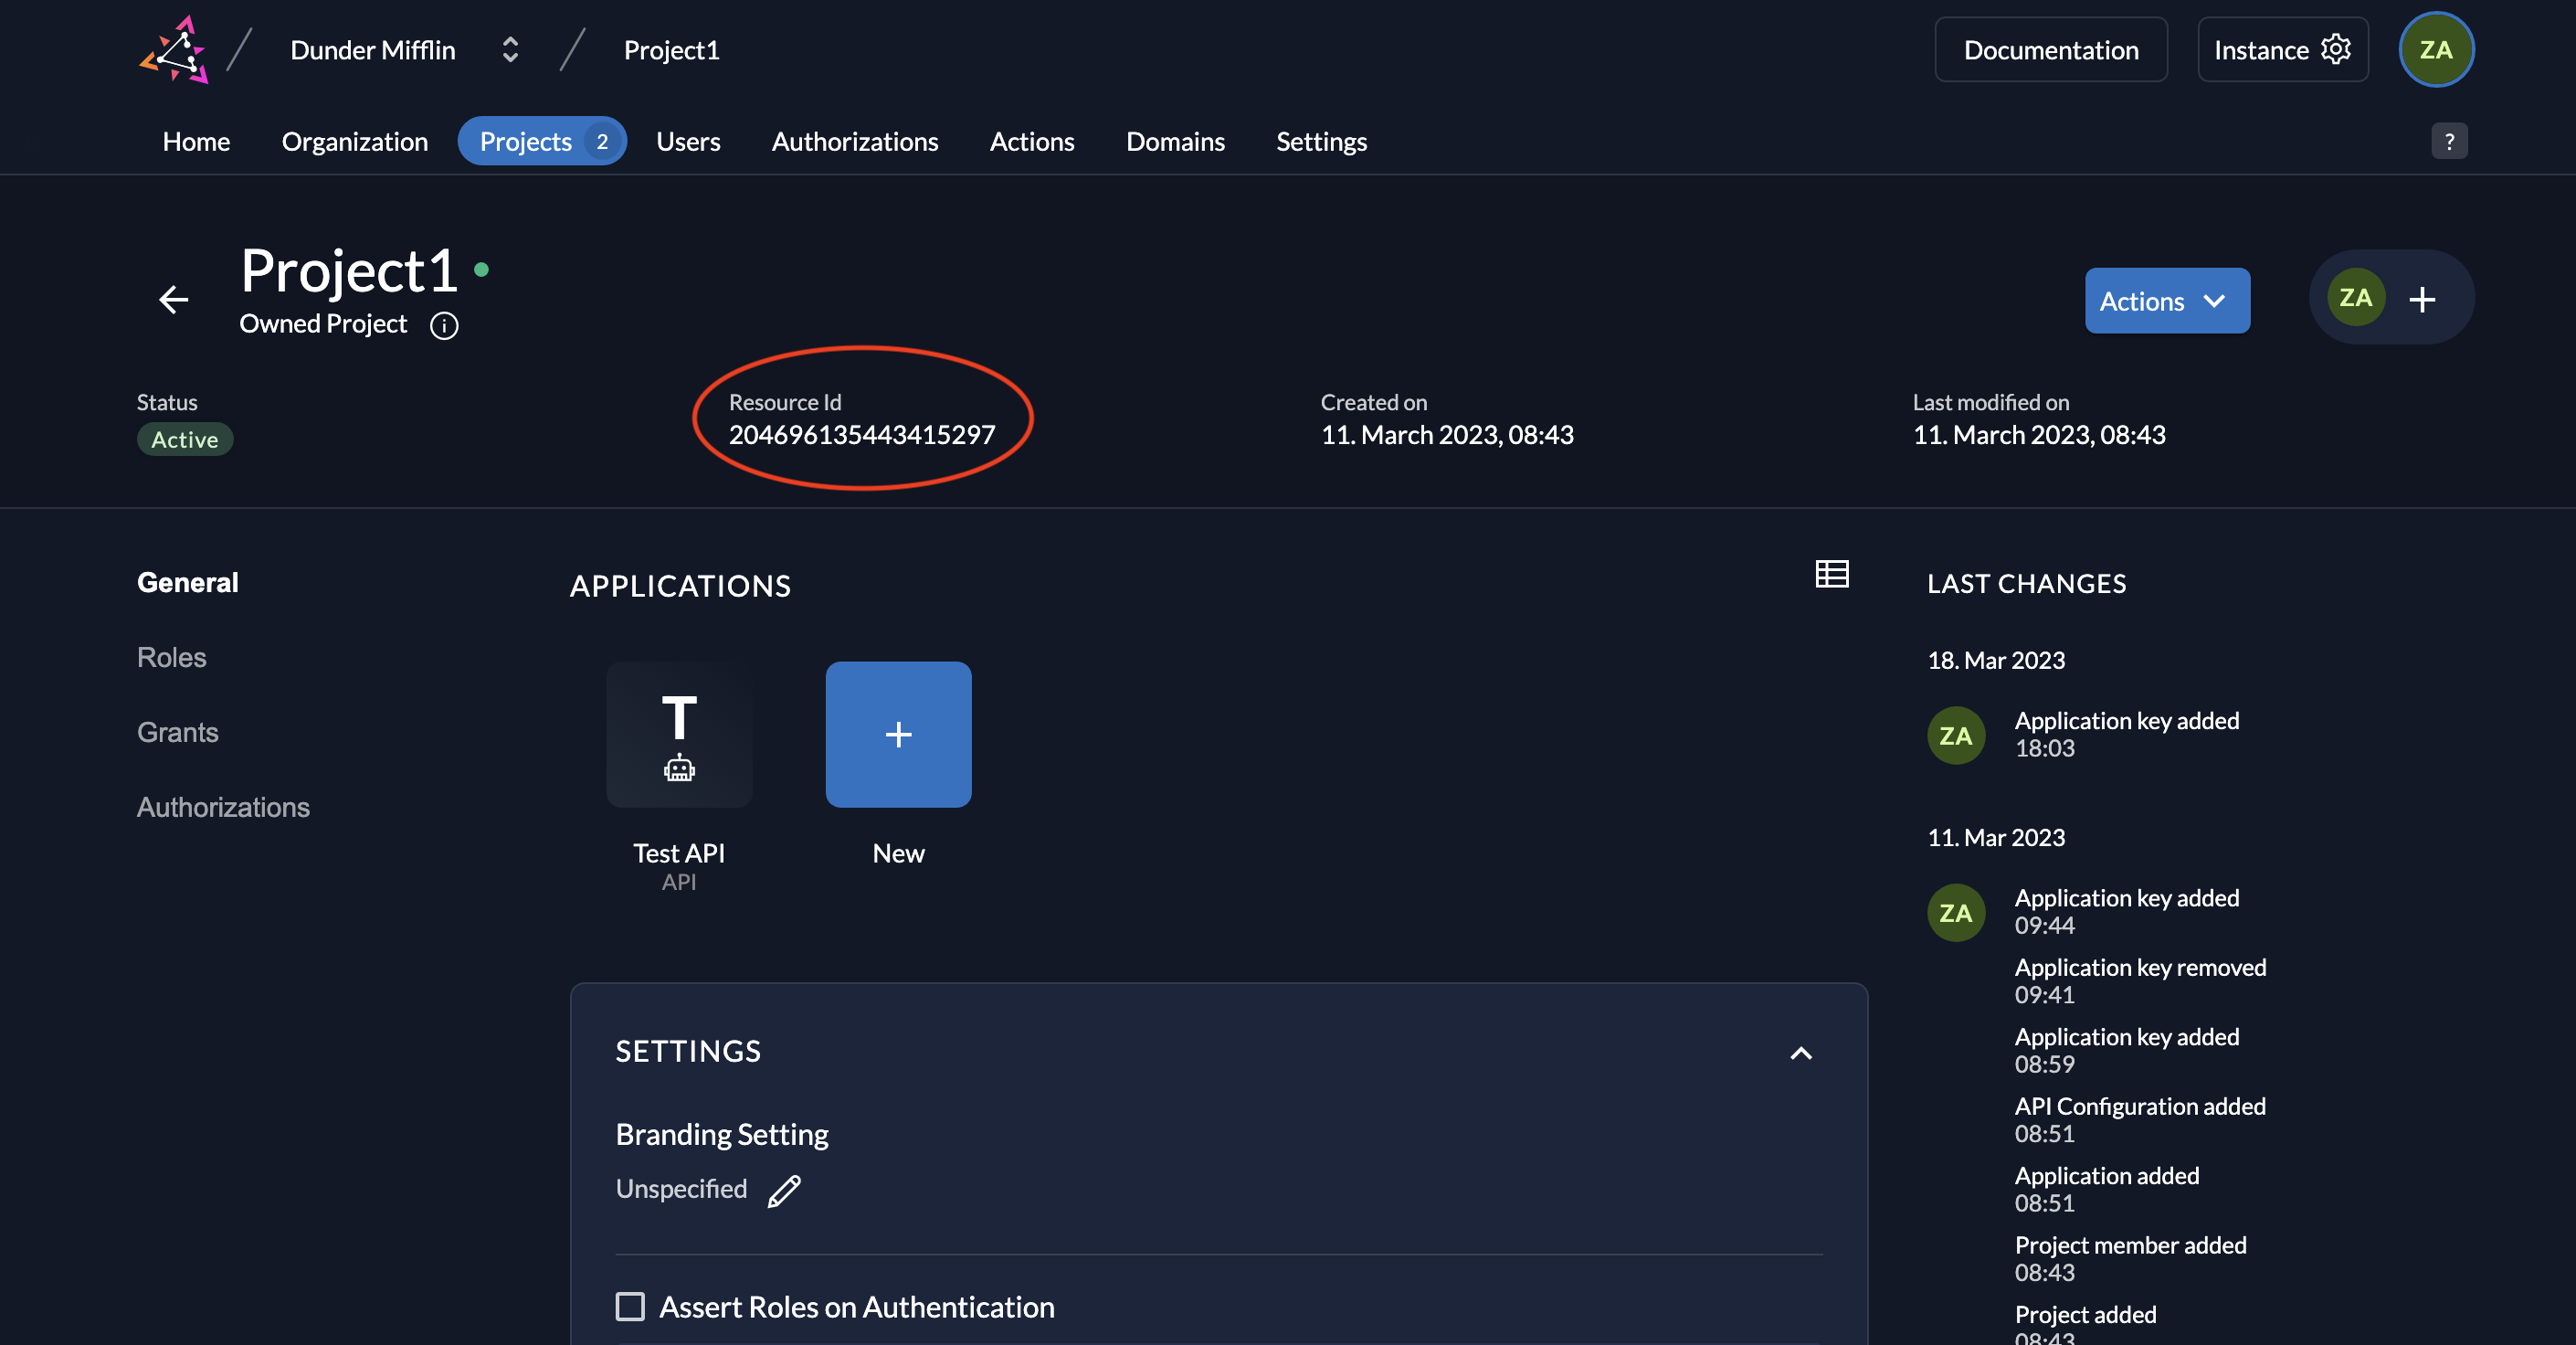
 7. Also note down the **Project ID** of your project.
 Token introspection [#token-introspection]
With Basic Authentication, you will receive a Client ID and Client Secret for your API. Send your client\_id and client\_secret as a Basic Auth Header in the following format:
```
Authorization: "Basic " + base64( formUrlEncode(client_id) + ":" + formUrlEncode(client_secret) )
```
The request from the API to the introspection endpoint should be in the following format:
```bash
curl --request POST \
--url ${CUSTOM_DOMAIN}/oauth/v2/introspect \
--header 'Content-Type: application/x-www-form-urlencoded' \
--header 'Authorization: Basic {your_basic_auth_header}' \
--data token=VjVxyCZmRmWYqd3_F5db9Pb9mHR5fqzhn...
```
Here's an example of how this is done in Python code:
```python
def introspect_token(self, token_string):
url = ZITADEL_INTROSPECTION_URL
data = {'token': token_string, 'token_type_hint': 'access_token', 'scope': 'openid'}
auth = HTTPBasicAuth(API_CLIENT_ID, API_CLIENT_SECRET)
resp = requests.post(url, data=data, auth=auth)
resp.raise_for_status()
return resp.json()
```
Introspection response [#introspection-response]
Token introspection [#token-introspection]
With Basic Authentication, you will receive a Client ID and Client Secret for your API. Send your client\_id and client\_secret as a Basic Auth Header in the following format:
```
Authorization: "Basic " + base64( formUrlEncode(client_id) + ":" + formUrlEncode(client_secret) )
```
The request from the API to the introspection endpoint should be in the following format:
```bash
curl --request POST \
--url ${CUSTOM_DOMAIN}/oauth/v2/introspect \
--header 'Content-Type: application/x-www-form-urlencoded' \
--header 'Authorization: Basic {your_basic_auth_header}' \
--data token=VjVxyCZmRmWYqd3_F5db9Pb9mHR5fqzhn...
```
Here's an example of how this is done in Python code:
```python
def introspect_token(self, token_string):
url = ZITADEL_INTROSPECTION_URL
data = {'token': token_string, 'token_type_hint': 'access_token', 'scope': 'openid'}
auth = HTTPBasicAuth(API_CLIENT_ID, API_CLIENT_SECRET)
resp = requests.post(url, data=data, auth=auth)
resp.raise_for_status()
return resp.json()
```
Introspection response [#introspection-response]
 2. Enter a name (e.g., "Backend Client") and select **API** as the application type.
 3. Choose **JWT** as the authentication method and click **Continue**.
 4. Review your settings and click **Create**.
 5. After creation, you’ll see the application’s **Client ID**. There is no client secret—instead, authentication relies on your private key and JWT.
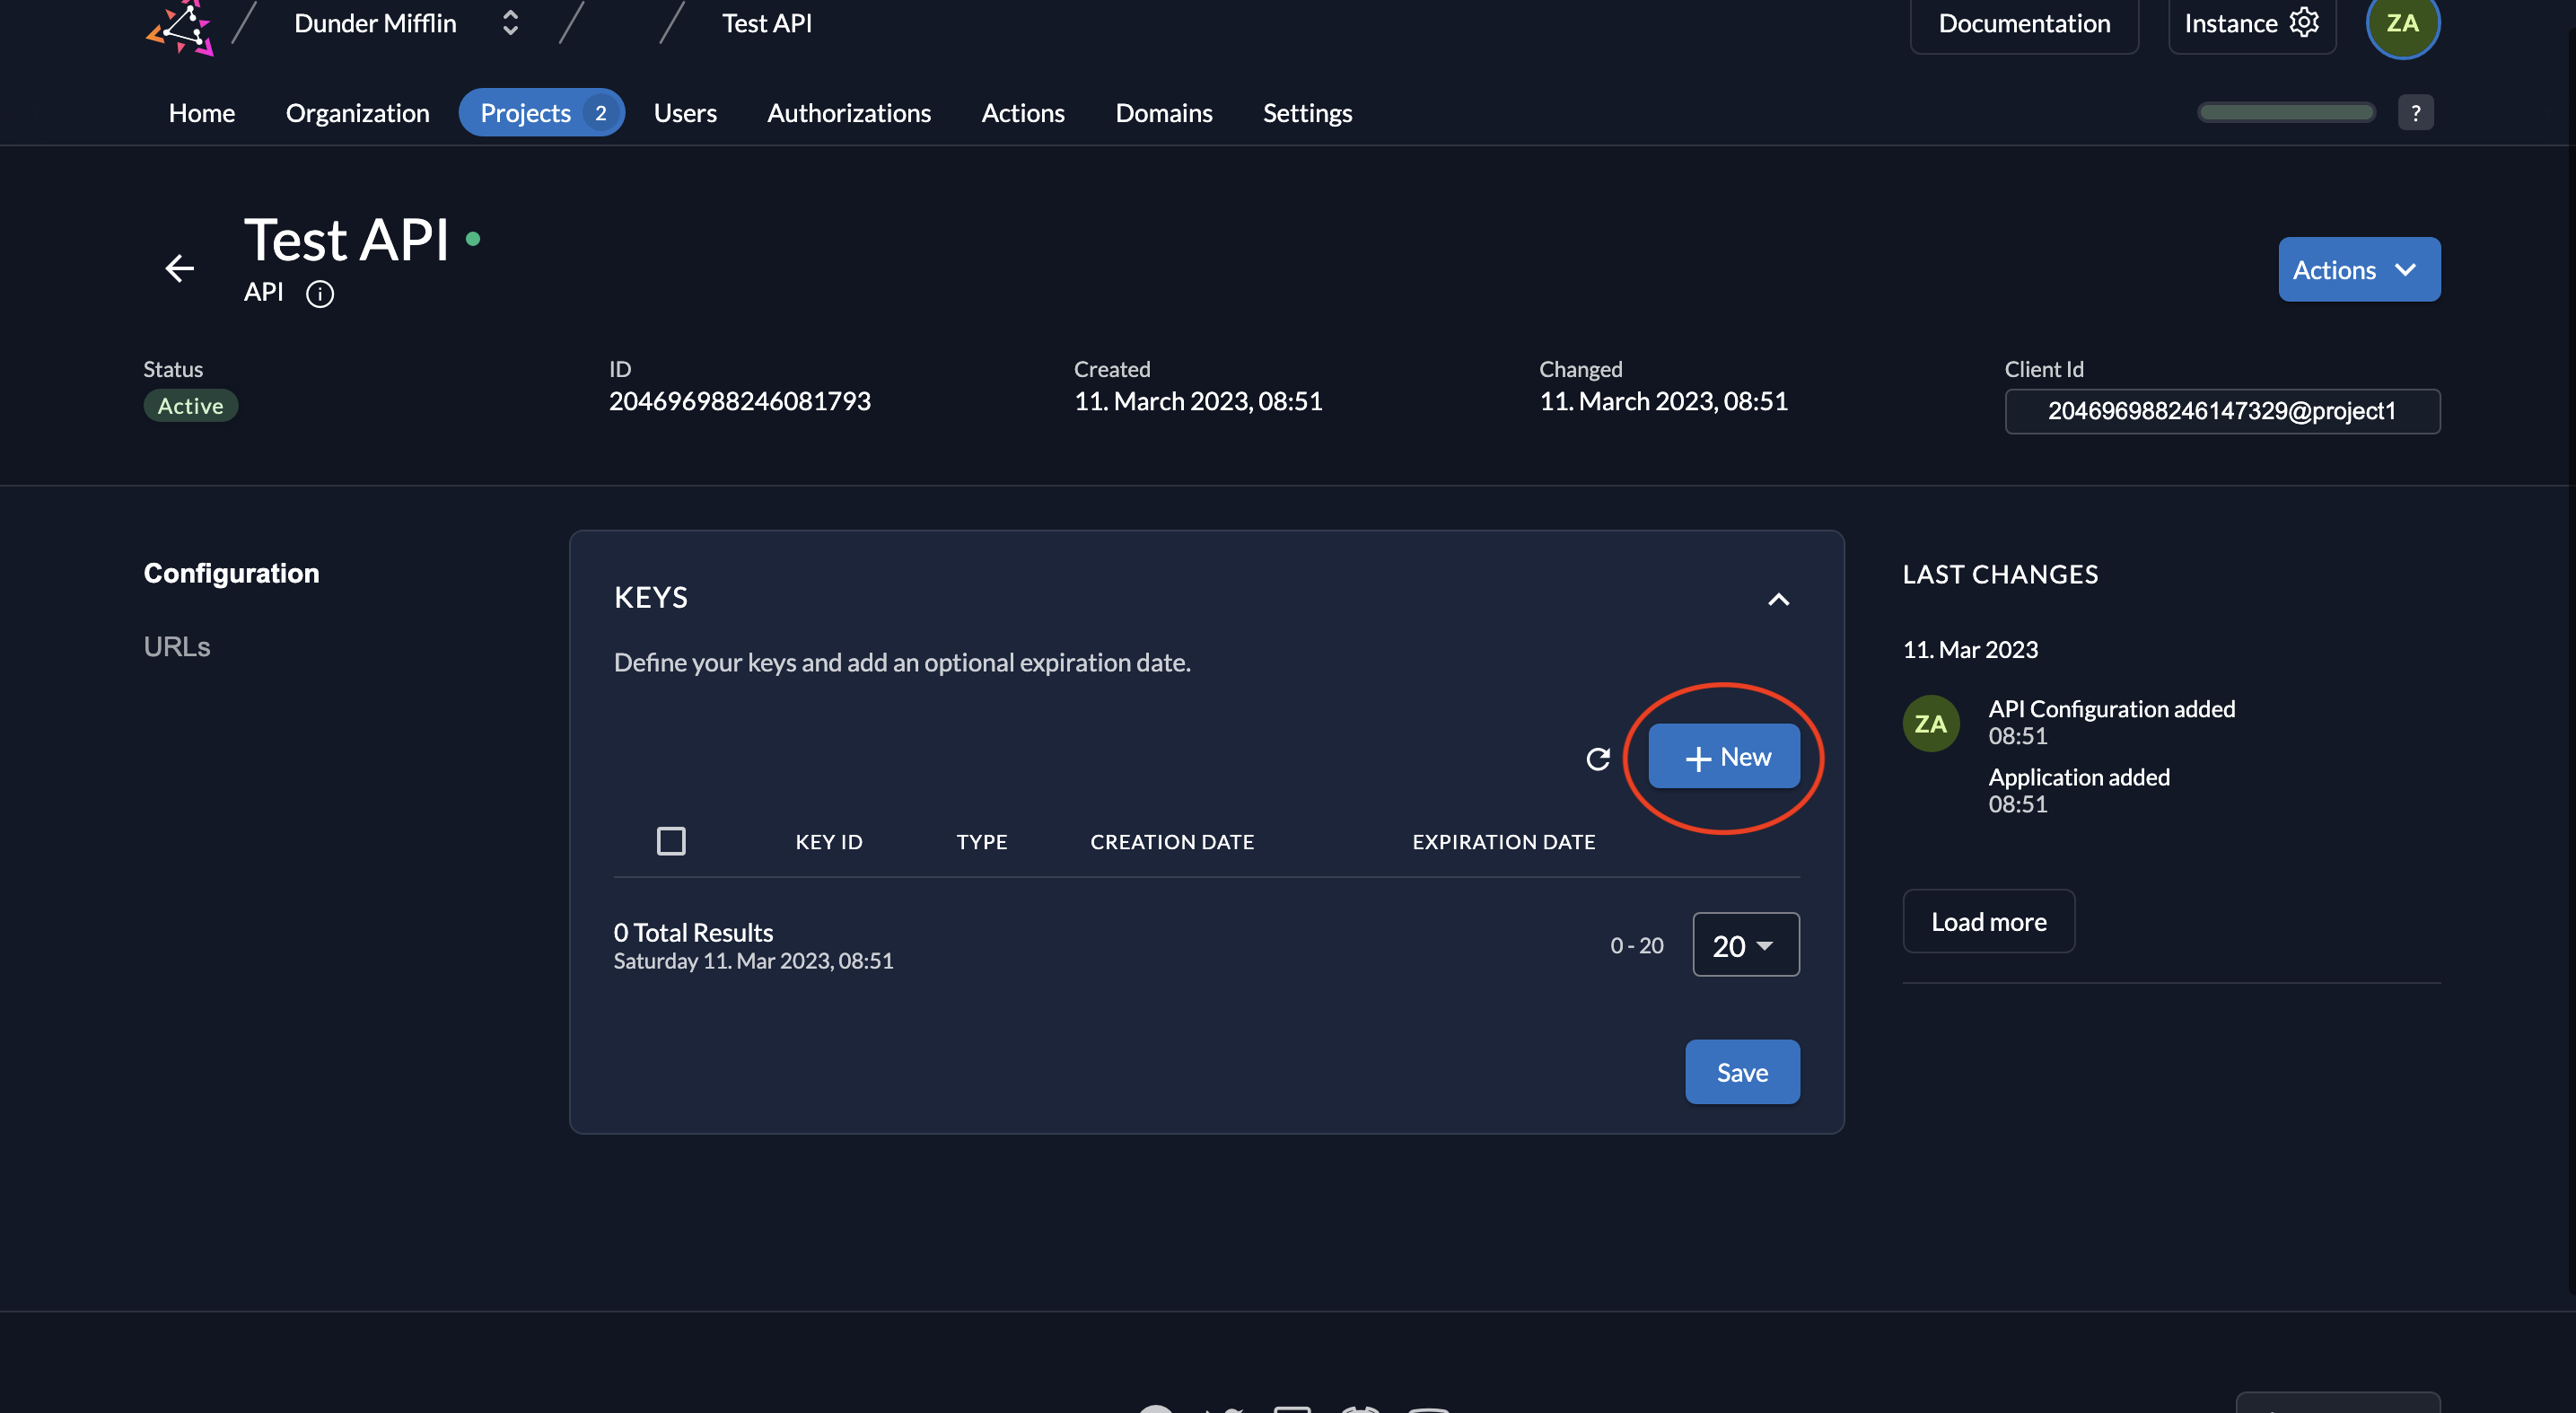
 6. To generate a key pair, click **New** under the application’s keys section.
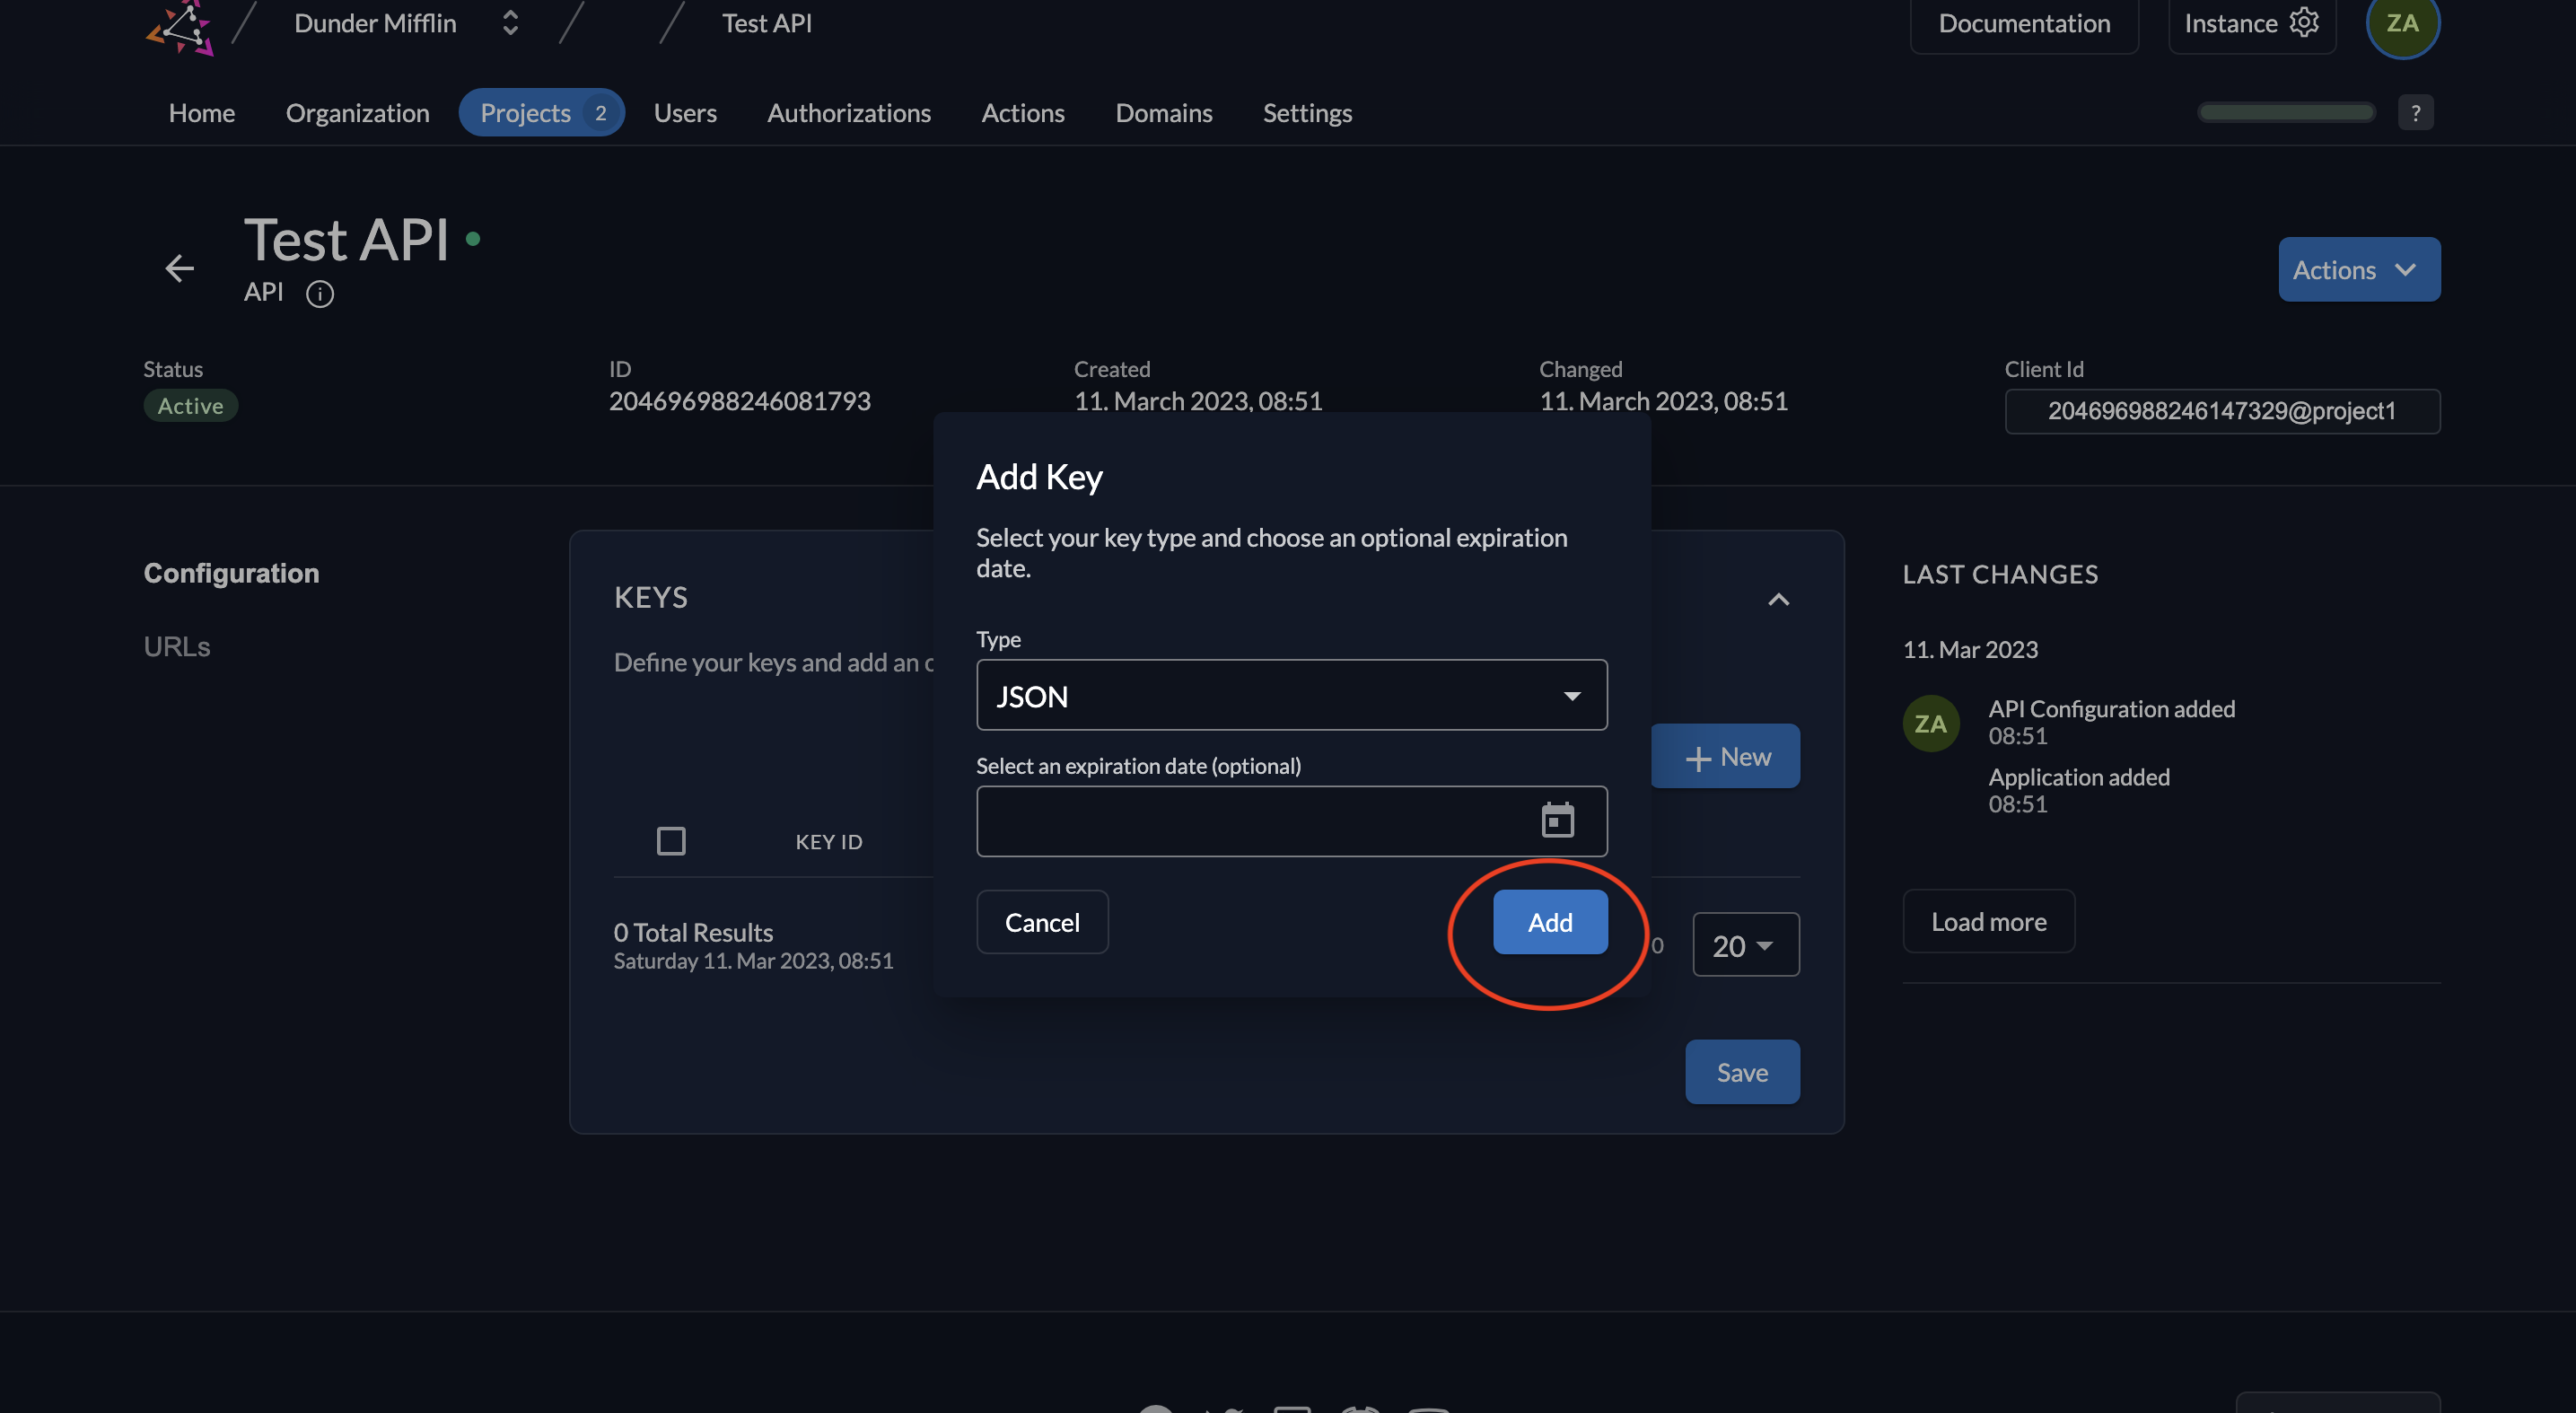
 7. Select **JSON** as the key type, set an expiration if desired, and click **Add**.
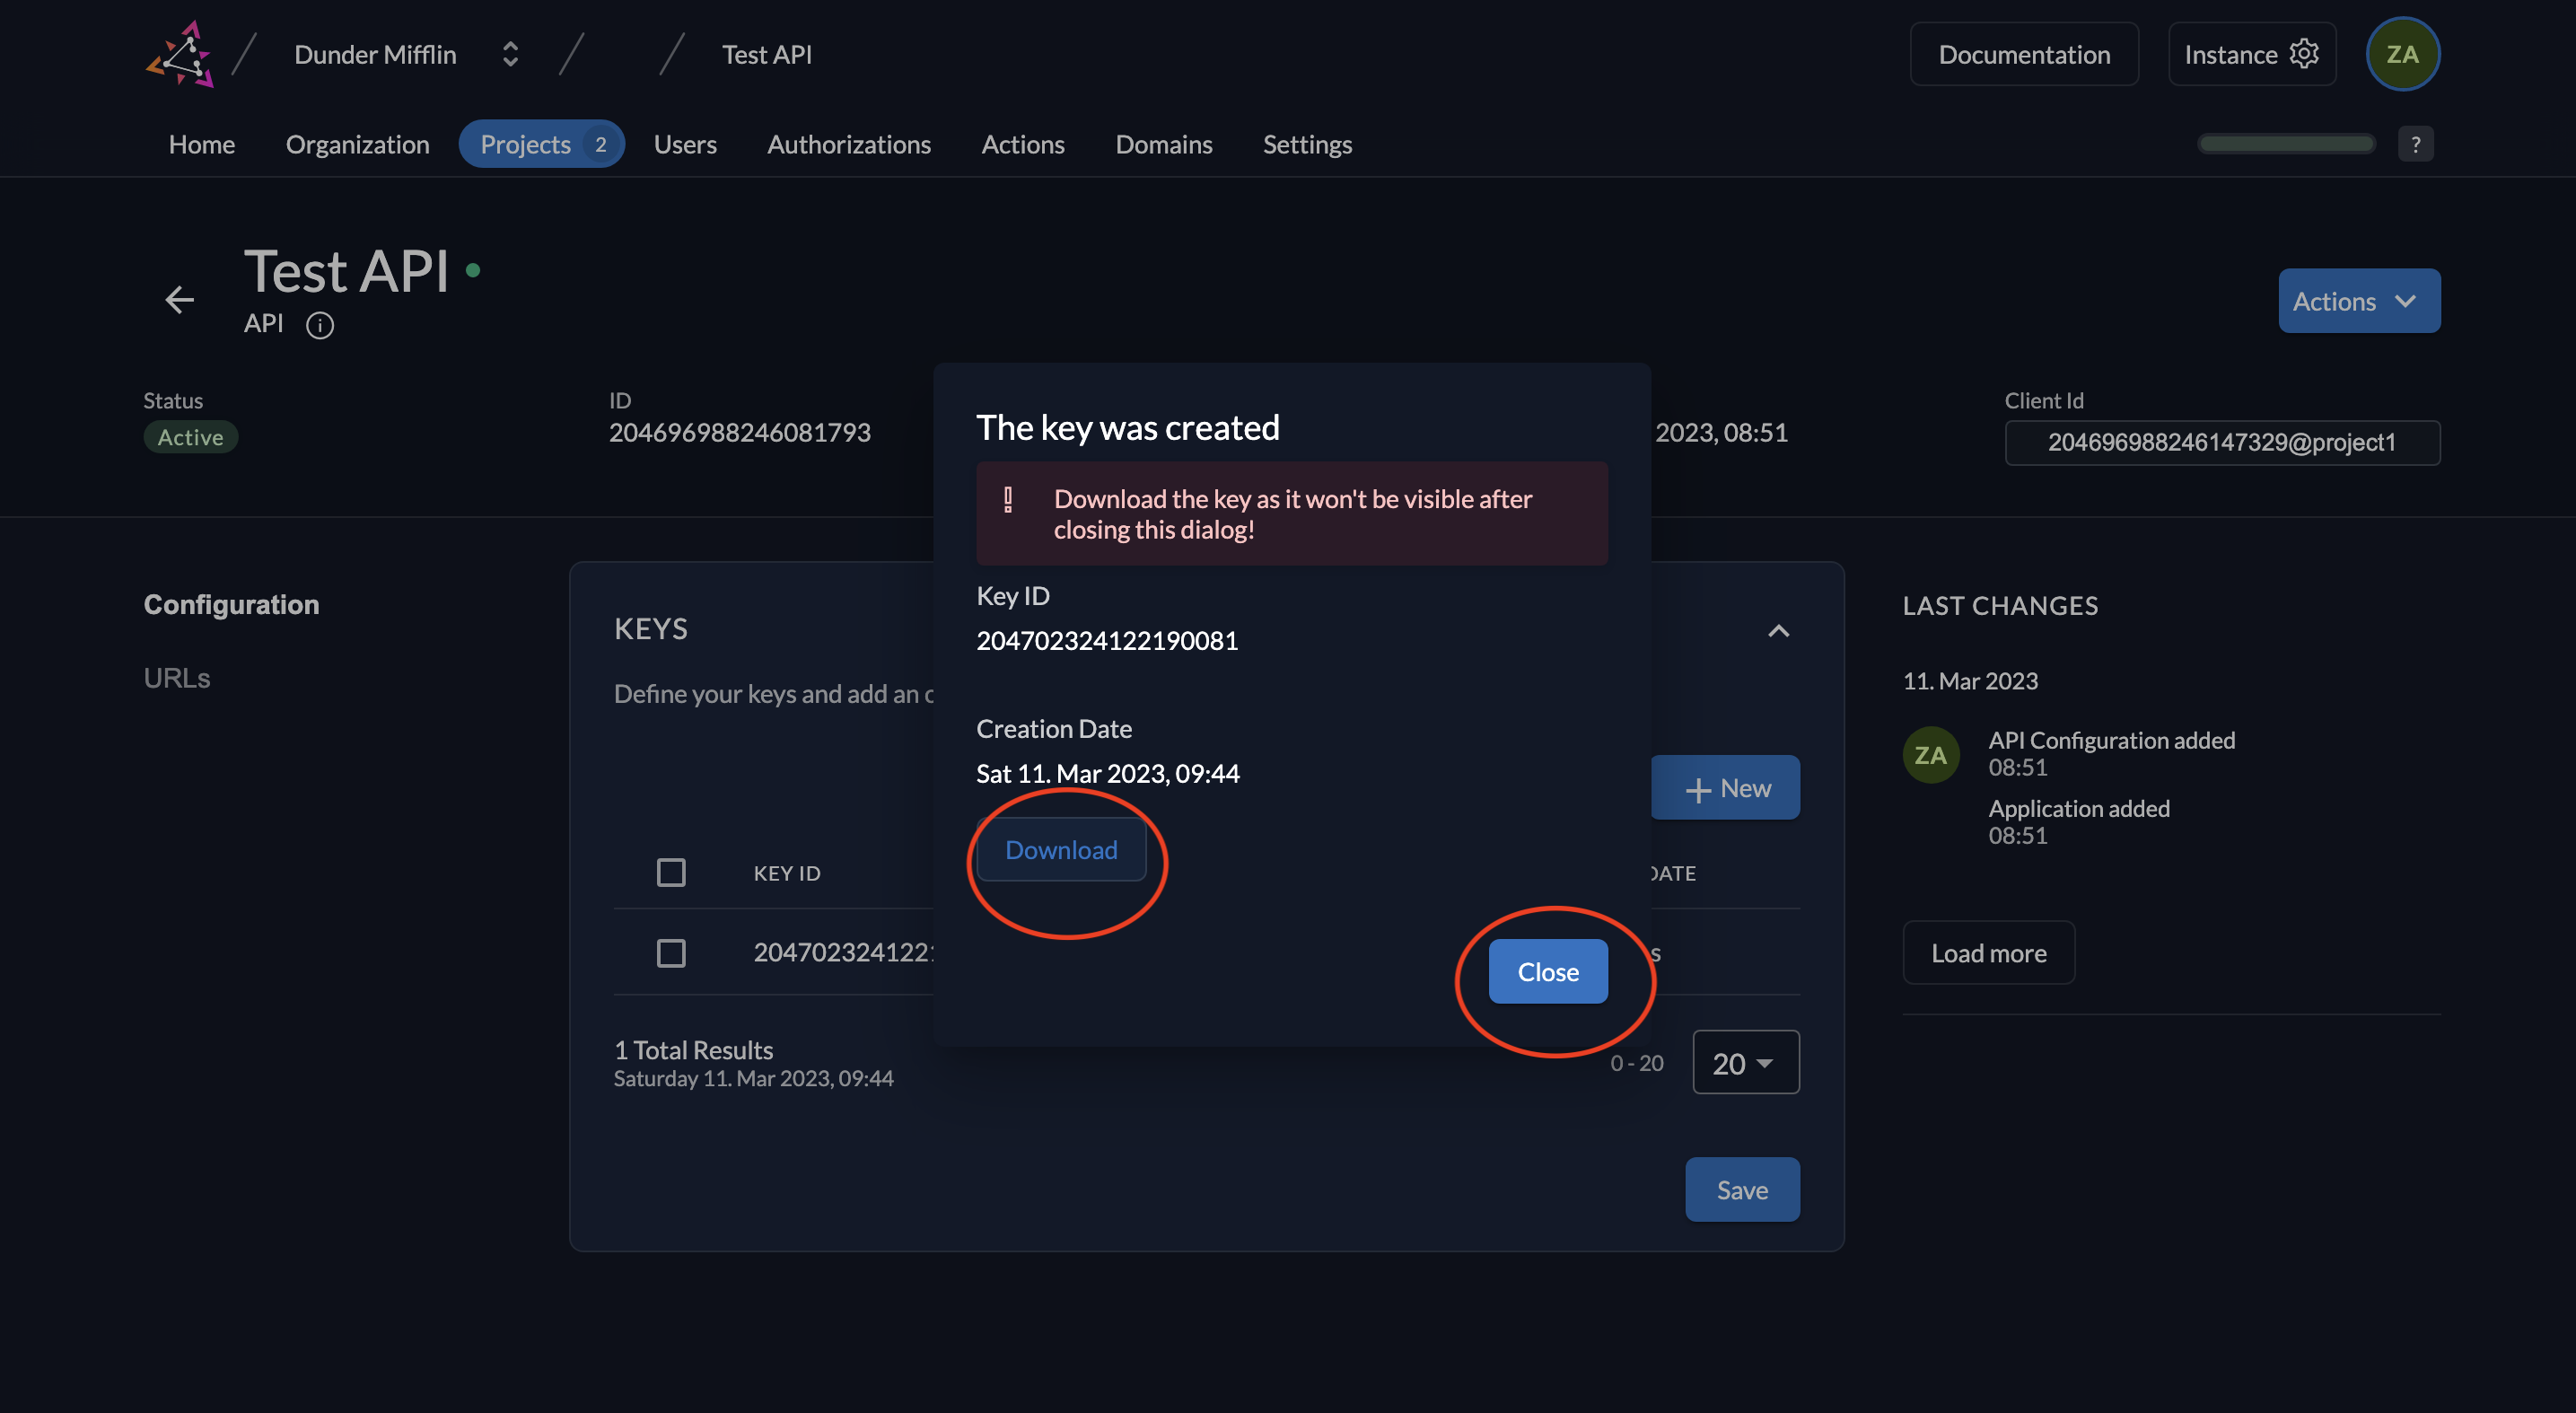
 8. Download and save the generated key by clicking **Download**. Afterward, click **Close**.
 9. The downloaded key file will look like this:
```
{
"type": "application",
"keyId": "
9. The downloaded key file will look like this:
```
{
"type": "application",
"keyId": "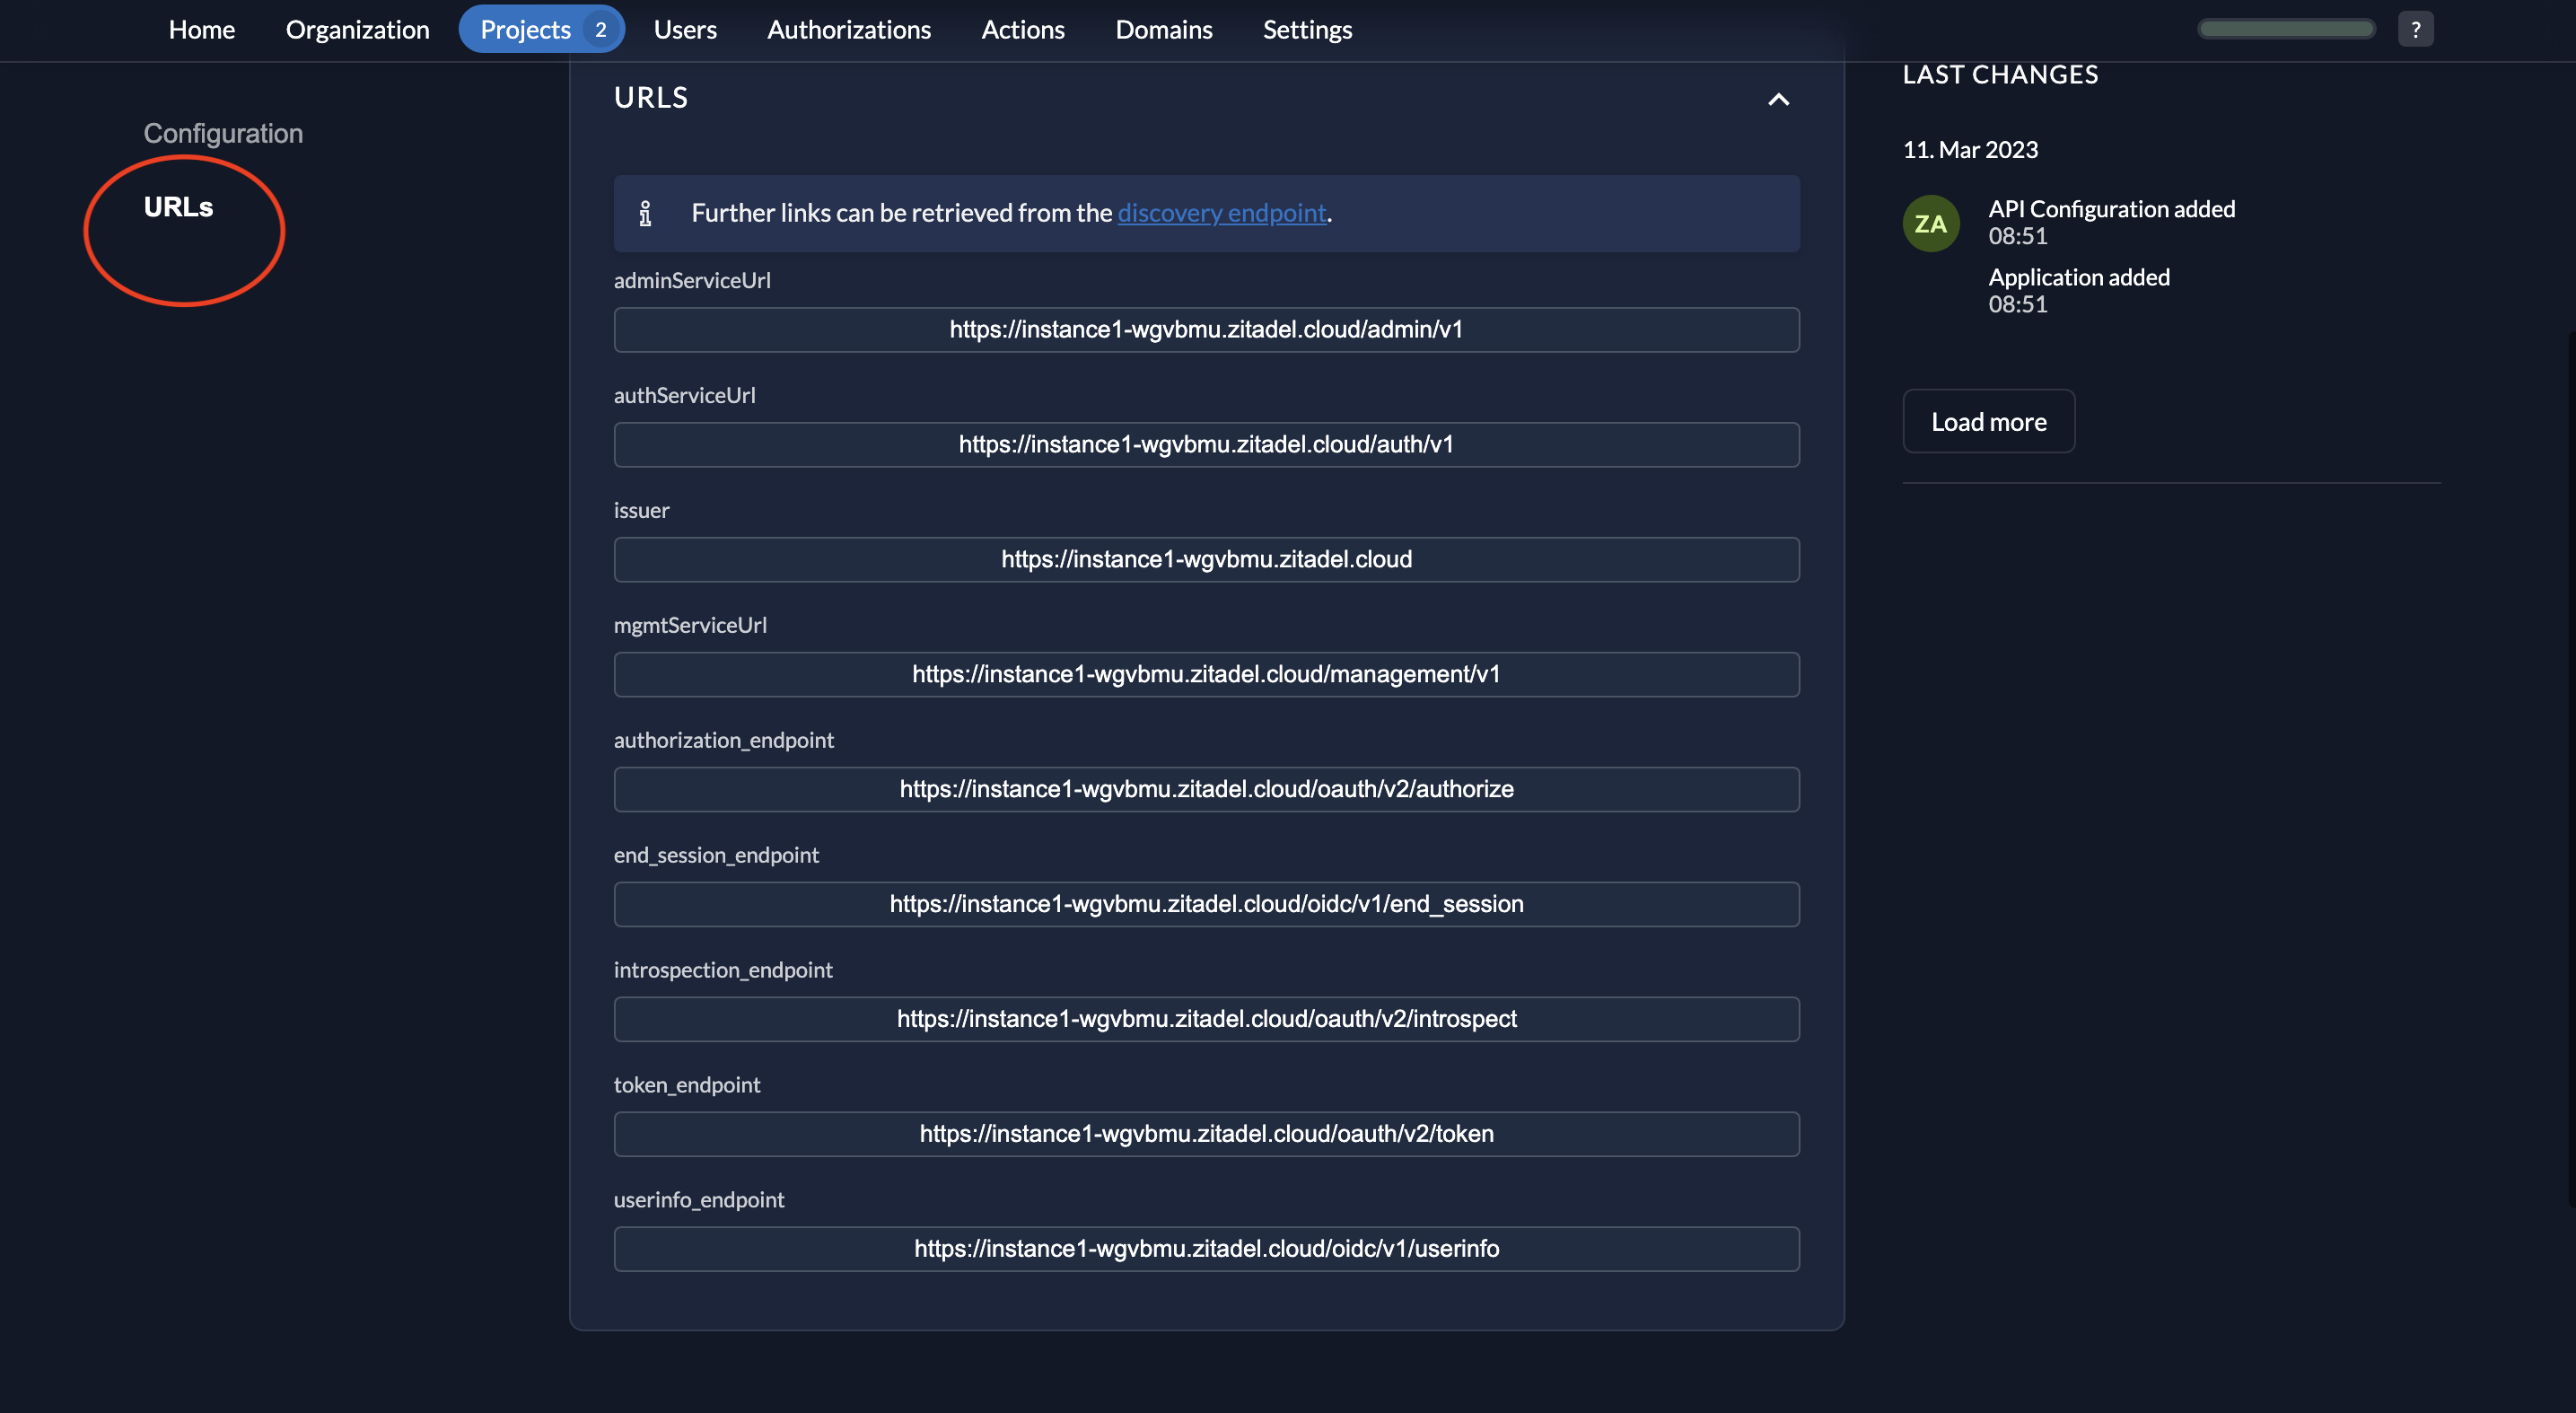 11. Optionally, note your **Project ID** for reference.
 Calling the Introspection Endpoint [#calling-the-introspection-endpoint]
To introspect an access token in ZITADEL, your backend must authenticate by providing a JWT (`client_assertion`) signed with your application's private key. ZITADEL verifies this JWT to ensure the request is from a trusted application.
**Required request parameters:**
| **Parameter** | **Description** |
| ----------------------- | ---------------------------------------------------------------- |
| `client_assertion` | The JWT assertion created and signed as described below. |
| `client_assertion_type` | Must be `urn:ietf:params:oauth:client-assertion-type:jwt-bearer` |
| `token` | The access token you want to introspect. |
Creating the Client Assertion (JWT) [#creating-the-client-assertion-jwt]
The `client_assertion` parameter is a signed JWT with the following structure:
**Header:**
```json
{
"alg": "RS256",
"kid": "
Calling the Introspection Endpoint [#calling-the-introspection-endpoint]
To introspect an access token in ZITADEL, your backend must authenticate by providing a JWT (`client_assertion`) signed with your application's private key. ZITADEL verifies this JWT to ensure the request is from a trusted application.
**Required request parameters:**
| **Parameter** | **Description** |
| ----------------------- | ---------------------------------------------------------------- |
| `client_assertion` | The JWT assertion created and signed as described below. |
| `client_assertion_type` | Must be `urn:ietf:params:oauth:client-assertion-type:jwt-bearer` |
| `token` | The access token you want to introspect. |
Creating the Client Assertion (JWT) [#creating-the-client-assertion-jwt]
The `client_assertion` parameter is a signed JWT with the following structure:
**Header:**
```json
{
"alg": "RS256",
"kid": " How Actions Work [#how-actions-work]
The Actions architecture consists of three main components:
1. **Action:** The JavaScript code containing your business logic.
2. **Trigger Type:** The specific event in ZITADEL (e.g., "Post Authentication") where code execution is allowed.
3. **Flow:** The settings that links an Action to a Trigger Type.
The JavaScript Runtime [#the-java-script-runtime]
ZITADEL interprets your Action scripts as JavaScript.
* **Compliance:** Scripts must be **ECMAScript 5.1(+)** compliant.
* **Engine:** The underlying engine is [goja](https://github.com/dop251/goja). Refer to their documentation for detailed references about the underlying library features and limitations.
Structure of an Action Script [#structure-of-an-action-script]
The script of an action must contain a function that matches the Action's name. ZITADEL calls this function at runtime.
The function receives two primary objects:
* `ctx` (Context): Provides **readable** information about the current request (User, Request Info, etc.).
* `api` (API): Provides **methods** to mutate state (Set Claims, Deny Access, etc.).
**Example:**
If your action is named **doSomething**, your script must look like this:
```js
function doSomething(ctx, api){
// read from ctx and manipulate with api
}
```
Available Modules [#available-modules]
You can use the following built-in modules inside your JavaScript code:
* [**HTTP module**](../../../apis/actions/modules#http): To call external APIs / Webhooks.
* [**Logging module**](../../../apis/actions/modules#log): To log information to stdout (useful for debugging).
* [**UUID module**](../../../apis/actions/modules#uuid): To generate UUIDs.
Stuck customizing ZITADEL actions? Find samples for setting OIDC claims, SAML attributes, extending JIT provisioning data, calling external APIs, and more in [this repository](https://github.com/zitadel/actions).
Managing Actions in Management Console [#managing-actions-in-management-console]
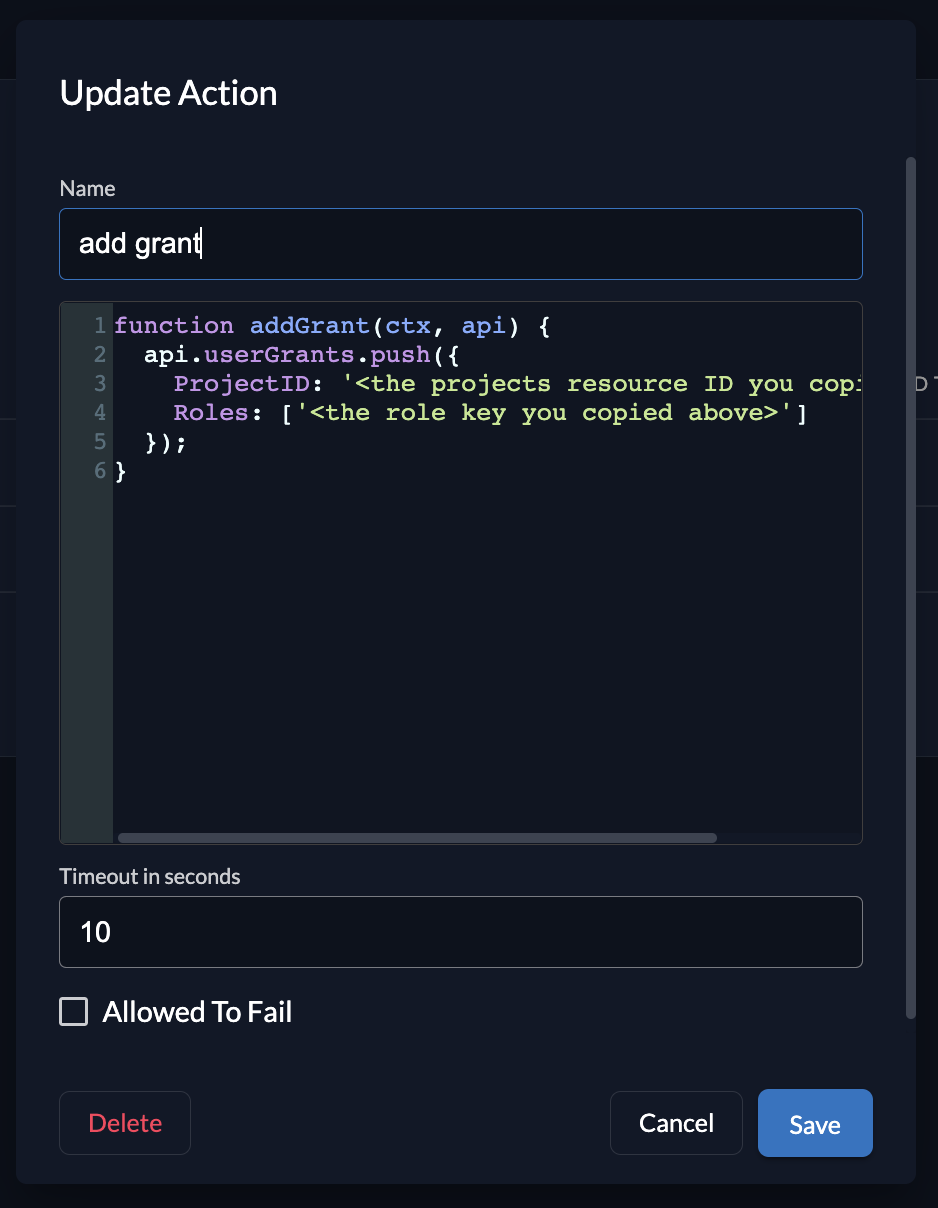
1. Create an Action [#1-create-an-action]
To add an action, navigate to your Organization's top navigation and select **Actions**. Click the **New** button and provide:
* **Name:** Must match the function name in your script.
* **Script:** Your JavaScript code.
* **Timeout:** How long the script is allowed to run before being terminated.
* **Allowed to Fail:** If checked, the flow will continue even if the script throws an error.
How Actions Work [#how-actions-work]
The Actions architecture consists of three main components:
1. **Action:** The JavaScript code containing your business logic.
2. **Trigger Type:** The specific event in ZITADEL (e.g., "Post Authentication") where code execution is allowed.
3. **Flow:** The settings that links an Action to a Trigger Type.
The JavaScript Runtime [#the-java-script-runtime]
ZITADEL interprets your Action scripts as JavaScript.
* **Compliance:** Scripts must be **ECMAScript 5.1(+)** compliant.
* **Engine:** The underlying engine is [goja](https://github.com/dop251/goja). Refer to their documentation for detailed references about the underlying library features and limitations.
Structure of an Action Script [#structure-of-an-action-script]
The script of an action must contain a function that matches the Action's name. ZITADEL calls this function at runtime.
The function receives two primary objects:
* `ctx` (Context): Provides **readable** information about the current request (User, Request Info, etc.).
* `api` (API): Provides **methods** to mutate state (Set Claims, Deny Access, etc.).
**Example:**
If your action is named **doSomething**, your script must look like this:
```js
function doSomething(ctx, api){
// read from ctx and manipulate with api
}
```
Available Modules [#available-modules]
You can use the following built-in modules inside your JavaScript code:
* [**HTTP module**](../../../apis/actions/modules#http): To call external APIs / Webhooks.
* [**Logging module**](../../../apis/actions/modules#log): To log information to stdout (useful for debugging).
* [**UUID module**](../../../apis/actions/modules#uuid): To generate UUIDs.
Stuck customizing ZITADEL actions? Find samples for setting OIDC claims, SAML attributes, extending JIT provisioning data, calling external APIs, and more in [this repository](https://github.com/zitadel/actions).
Managing Actions in Management Console [#managing-actions-in-management-console]
1. Create an Action [#1-create-an-action]
To add an action, navigate to your Organization's top navigation and select **Actions**. Click the **New** button and provide:
* **Name:** Must match the function name in your script.
* **Script:** Your JavaScript code.
* **Timeout:** How long the script is allowed to run before being terminated.
* **Allowed to Fail:** If checked, the flow will continue even if the script throws an error.
 2. Create a Flow (Link Action to Trigger) [#2-create-a-flow-link-action-to-trigger]
Merely creating an Action does not run it. You must create a **Flow** to define *when* it runs.
1. Select the **Flow Type** (e.g., External Authentication).
2. Select the **Trigger** (e.g., Post Authentication).
3. Add your Action to the list of executed scripts.
2. Create a Flow (Link Action to Trigger) [#2-create-a-flow-link-action-to-trigger]
Merely creating an Action does not run it. You must create a **Flow** to define *when* it runs.
1. Select the **Flow Type** (e.g., External Authentication).
2. Select the **Trigger** (e.g., Post Authentication).
3. Add your Action to the list of executed scripts.
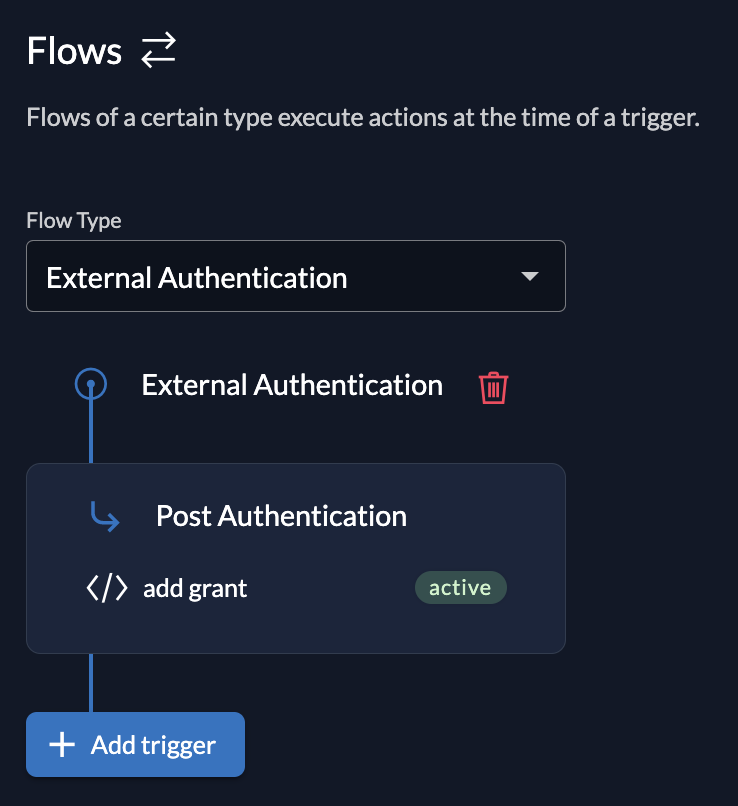 **Example Scenario:**
You create an **External Authentication** Flow with a **Post Authentication** trigger. Now, whenever a user authenticates via an external IDP (like Google or Azure AD), your Action is triggered immediately after the authentication step but before the session is finalized.
Available Flow Types [#available-flow-types]
Trigger types define the point during the execution of a request. Each trigger defines which readable information (`ctx`) and mutable properties (`api`) are passed into the called function.
Currently, ZITADEL supports the following flows:
* [**Internal Authentication**](../../../apis/actions/internal-authentication): Triggers during login with ZITADEL (username/password).
* [**External Authentication**](../../../apis/actions/external-authentication): Triggers during login with an external Identity Provider.
* [**Complement Token**](../../../apis/actions/complement-token): Triggers when tokens (ID Token / Access Token) are created, allowing you to add custom claims.
* [**Customize SAML Response**](../../../apis/actions/customize-samlresponse): Triggers when a SAML response is generated.
References [#references]
* [Guide: Customize Behavior with Actions](/guides/manage/customize/behavior)
* [ZITADEL Roadmap](https://zitadel.com/roadmap)
# ZITADEL Administrators
import AdministratorDescription from "../../../concepts/structure/_administrator_description.mdx";
import AddAdministrator from "./_add_administrator.mdx";
import PermissionTable from '@/components/PermissionTable';
import permissionData from "../../../../../../cmd/defaults.yaml";
**Example Scenario:**
You create an **External Authentication** Flow with a **Post Authentication** trigger. Now, whenever a user authenticates via an external IDP (like Google or Azure AD), your Action is triggered immediately after the authentication step but before the session is finalized.
Available Flow Types [#available-flow-types]
Trigger types define the point during the execution of a request. Each trigger defines which readable information (`ctx`) and mutable properties (`api`) are passed into the called function.
Currently, ZITADEL supports the following flows:
* [**Internal Authentication**](../../../apis/actions/internal-authentication): Triggers during login with ZITADEL (username/password).
* [**External Authentication**](../../../apis/actions/external-authentication): Triggers during login with an external Identity Provider.
* [**Complement Token**](../../../apis/actions/complement-token): Triggers when tokens (ID Token / Access Token) are created, allowing you to add custom claims.
* [**Customize SAML Response**](../../../apis/actions/customize-samlresponse): Triggers when a SAML response is generated.
References [#references]
* [Guide: Customize Behavior with Actions](/guides/manage/customize/behavior)
* [ZITADEL Roadmap](https://zitadel.com/roadmap)
# ZITADEL Administrators
import AdministratorDescription from "../../../concepts/structure/_administrator_description.mdx";
import AddAdministrator from "./_add_administrator.mdx";
import PermissionTable from '@/components/PermissionTable';
import permissionData from "../../../../../../cmd/defaults.yaml";
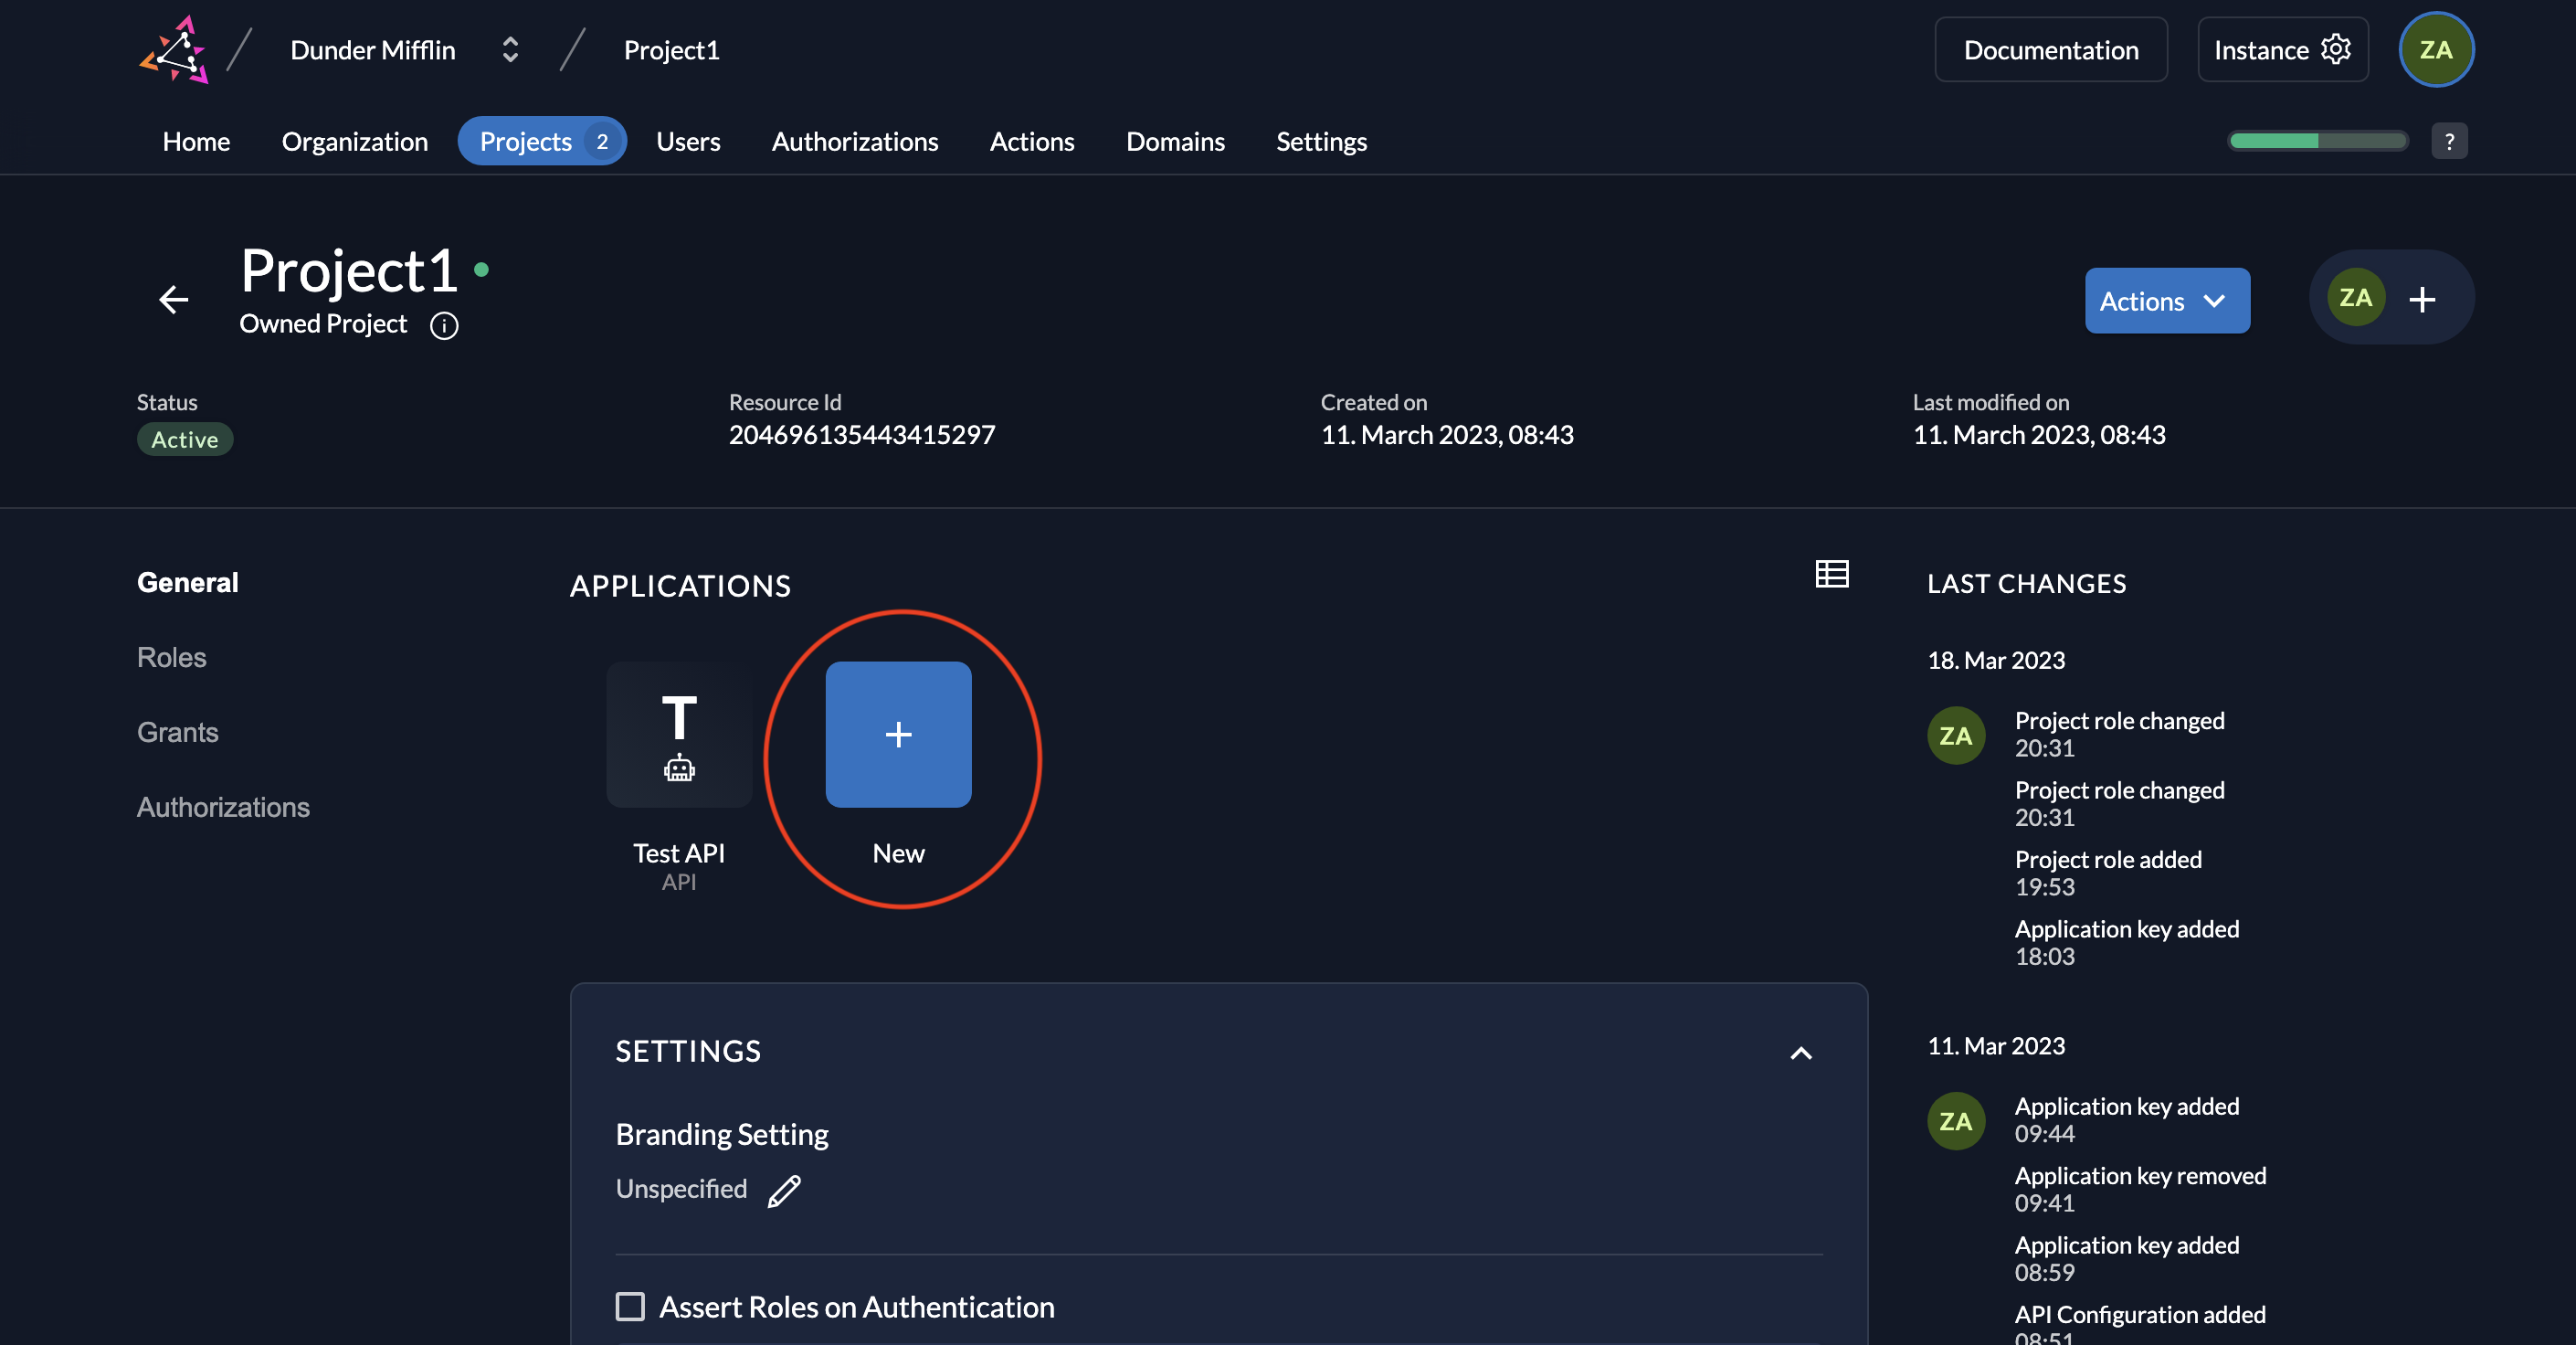
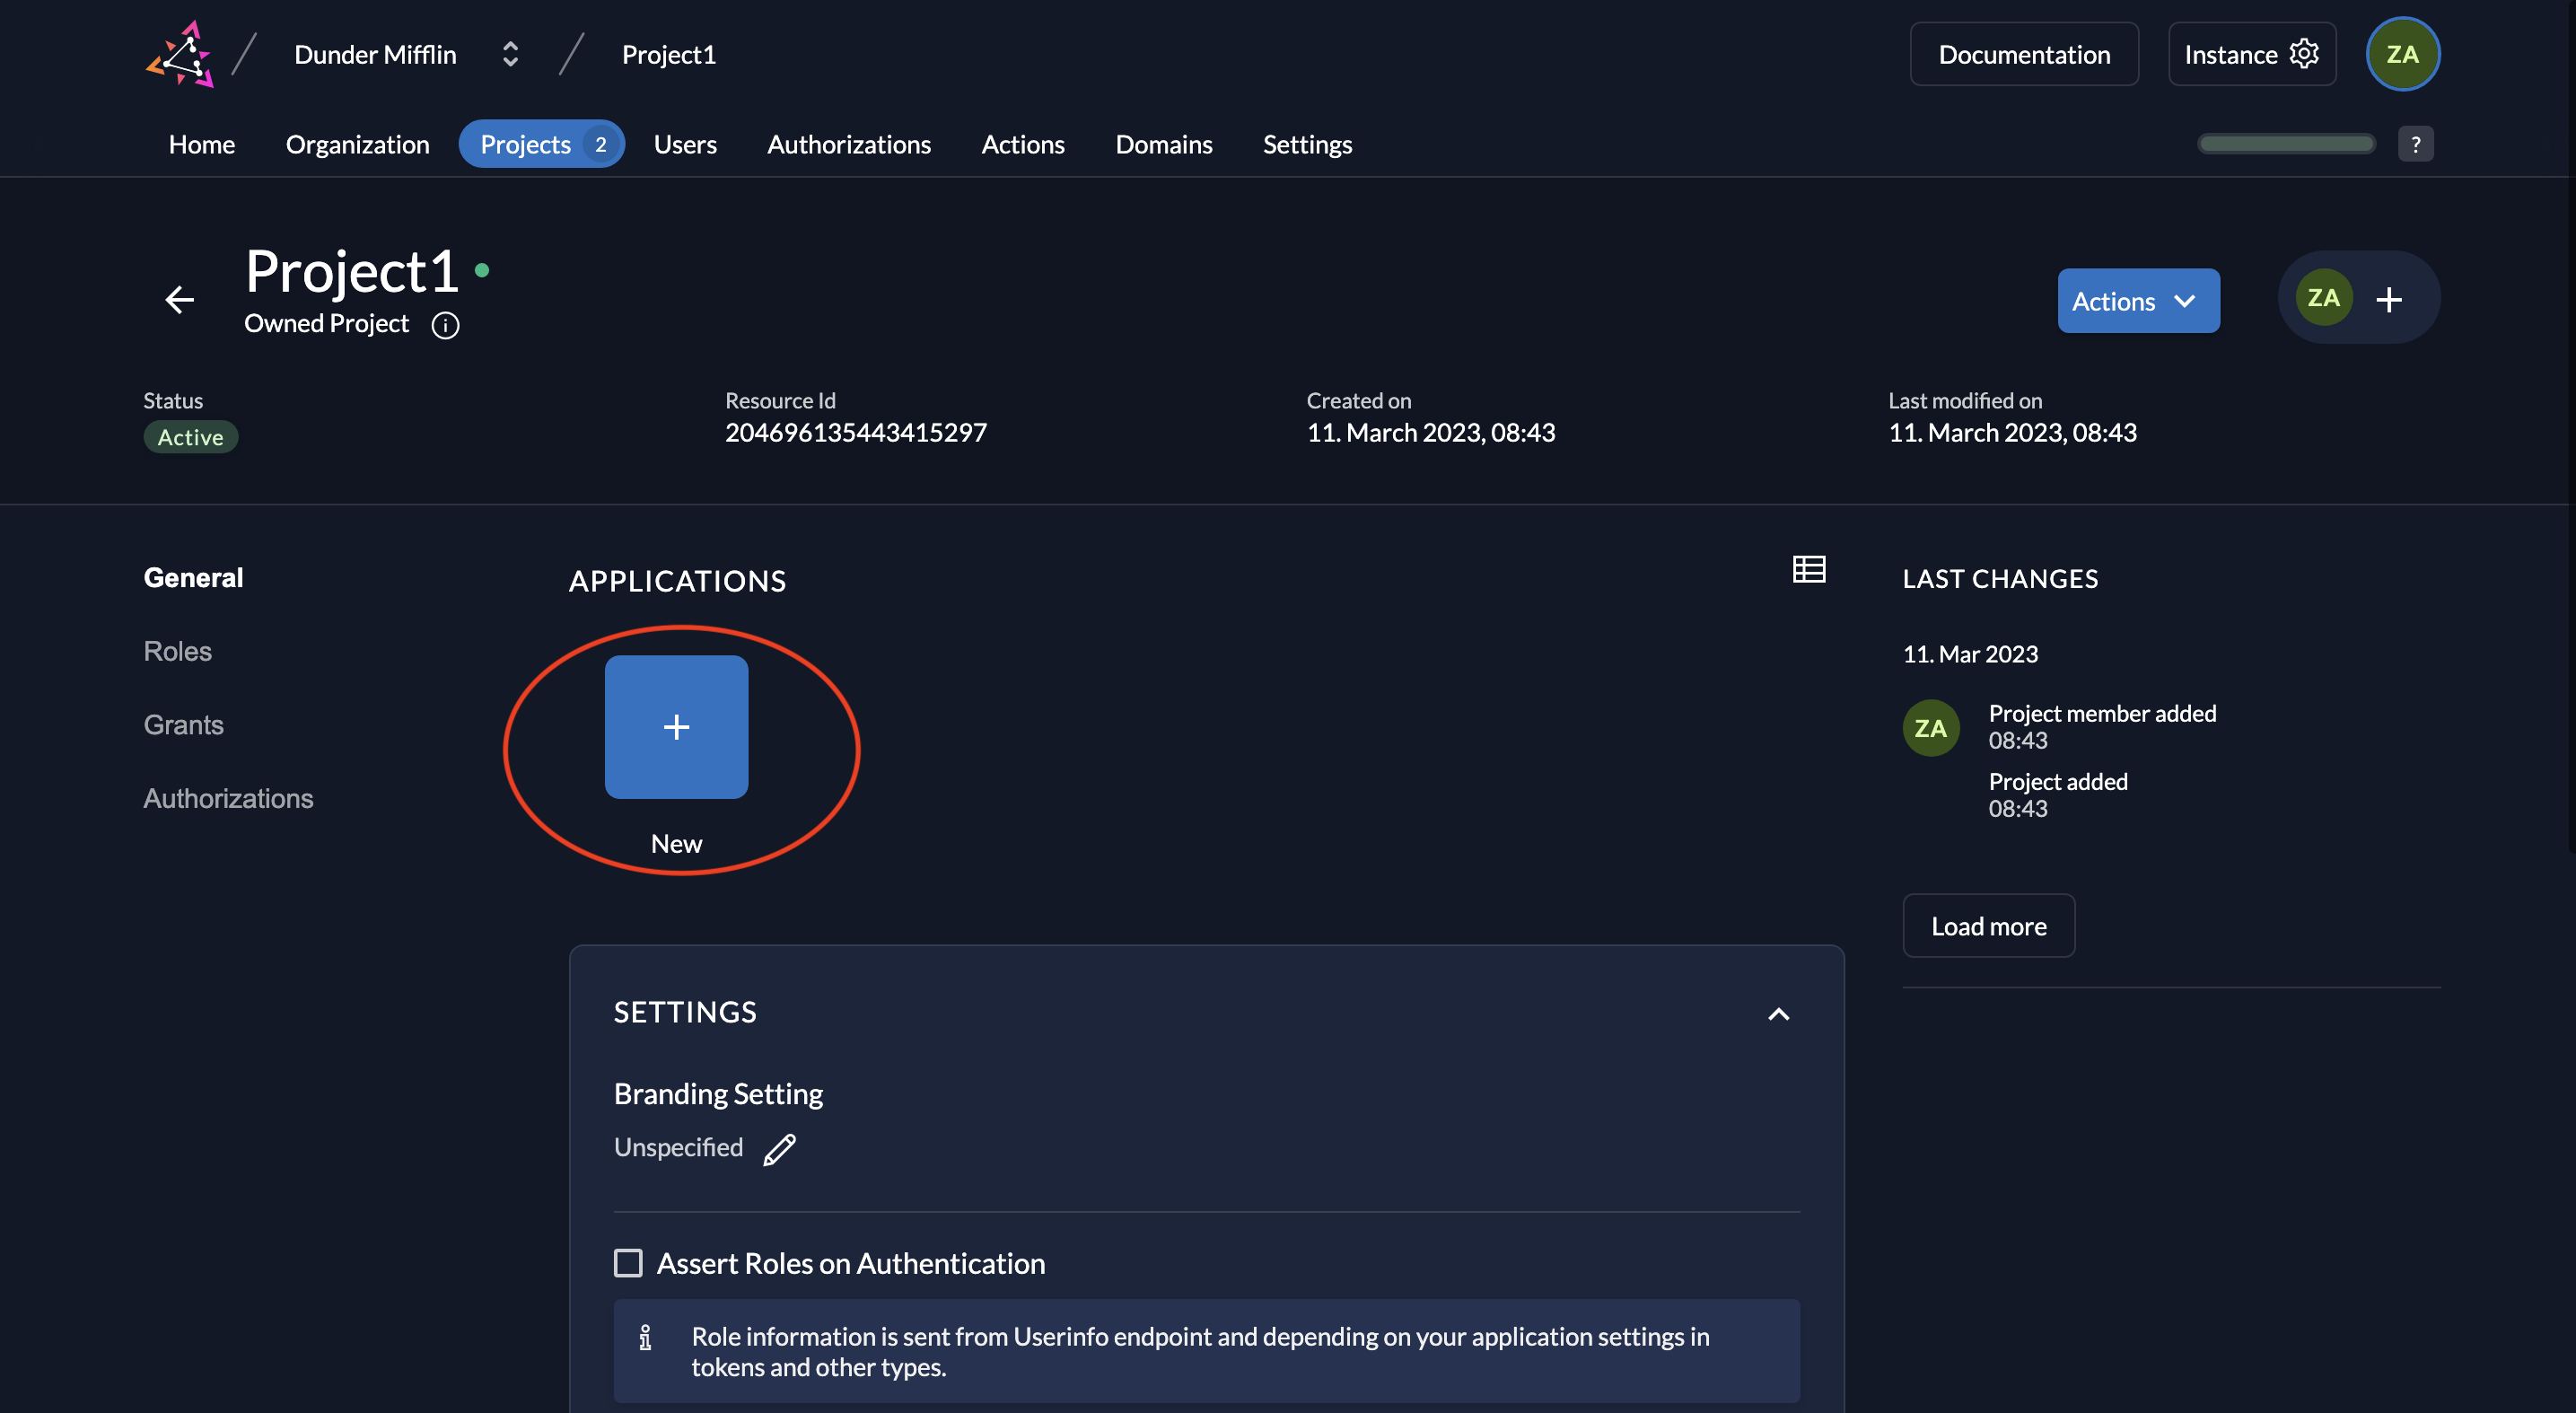
 Create an Application [#create-an-application]
To add an application to your project, click on the **New** button and select your application type.
Create an Application [#create-an-application]
To add an application to your project, click on the **New** button and select your application type.
 Application Types [#application-types]
ZITADEL offers five application types to cover different architectural patterns:
Application Types [#application-types]
ZITADEL offers five application types to cover different architectural patterns:
 Development Mode [#development-mode]
If you are developing locally or need to redirect users to a non-secure protocol (other than `https://`), you must enable **Development mode**.
When disabled, ZITADEL enforces strict security and only allows `https`.
Development Mode [#development-mode]
If you are developing locally or need to redirect users to a non-secure protocol (other than `https://`), you must enable **Development mode**.
When disabled, ZITADEL enforces strict security and only allows `https`.
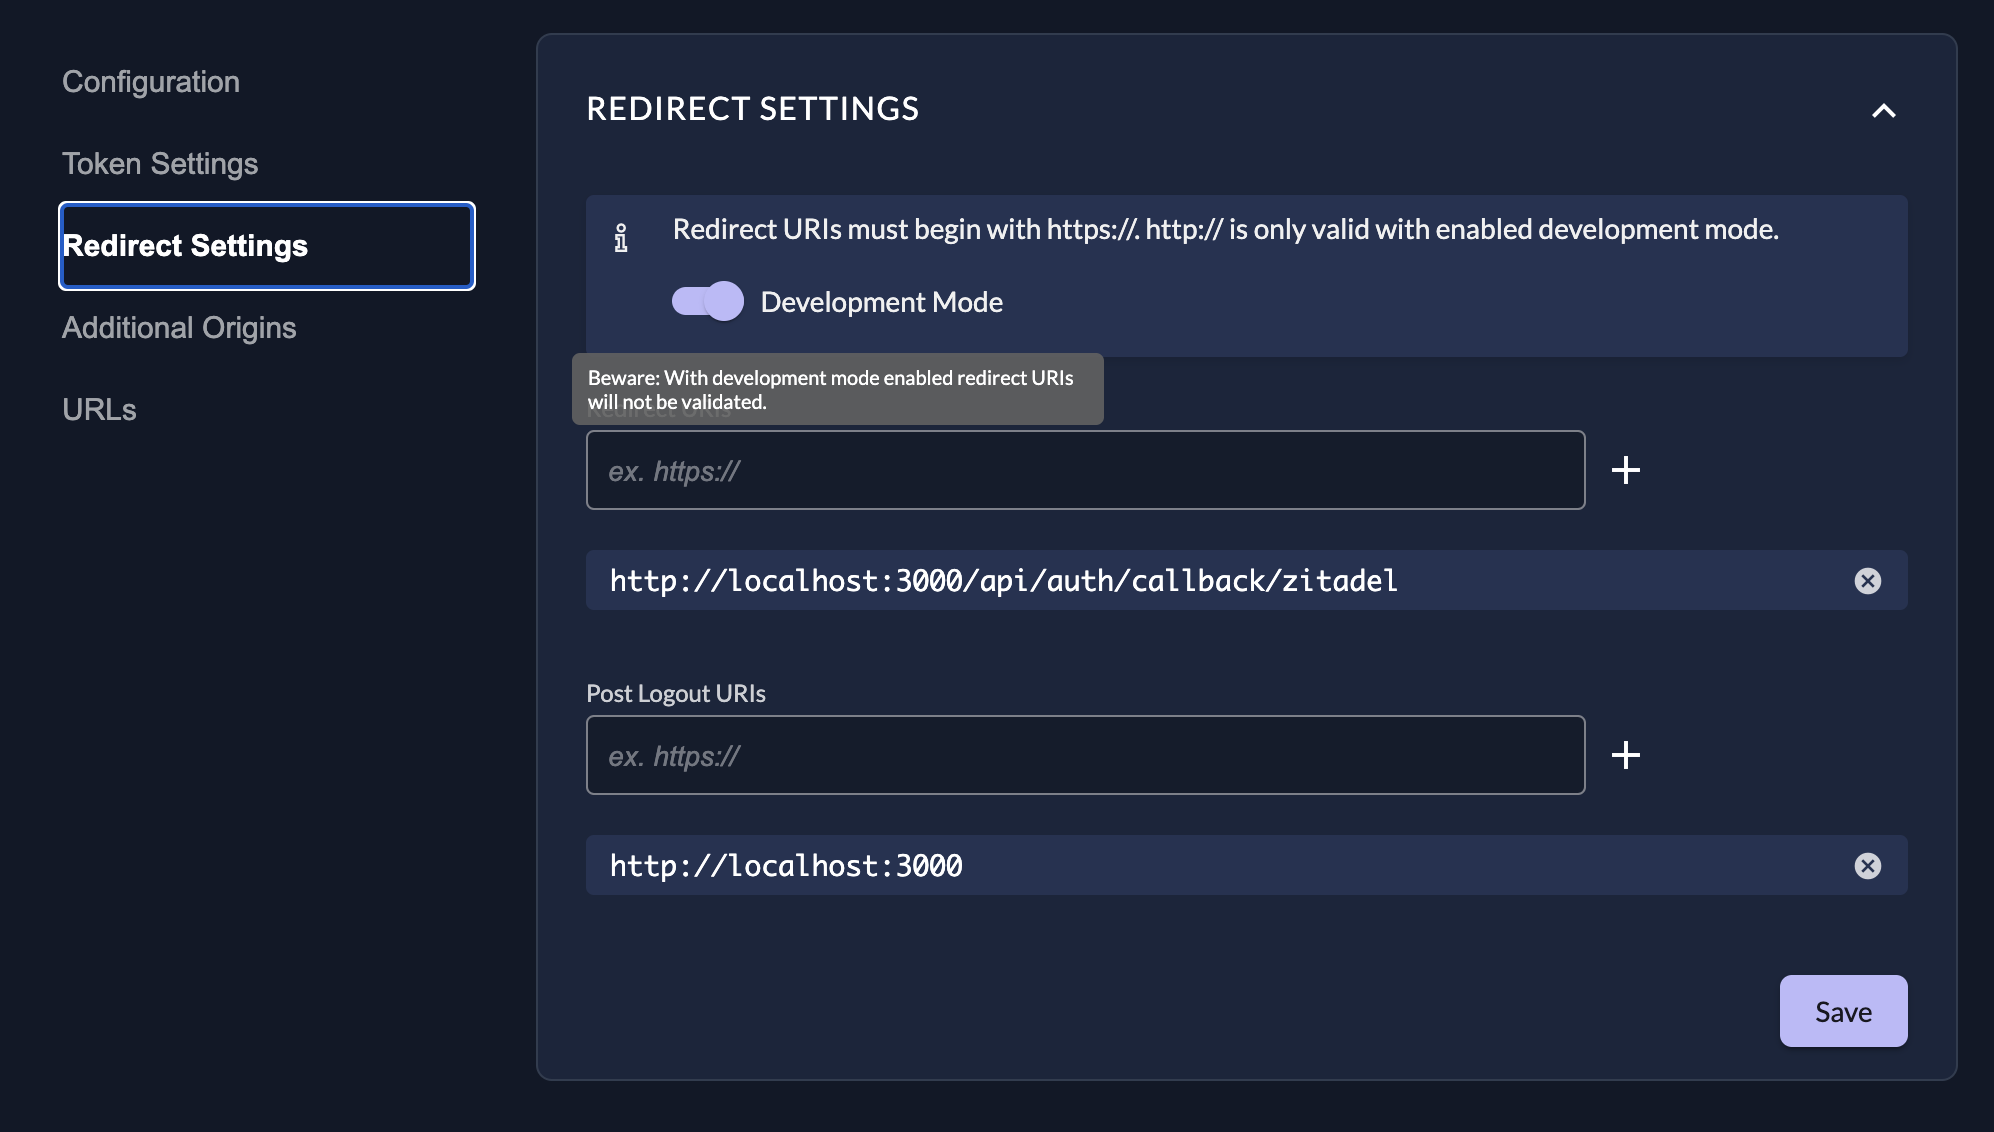 **Glob Patterns:**
Development mode allows the use of glob patterns in Redirect URIs for flexibility:
| Special Terms | Meaning |
| :------------ | :-------------------------------------------------------------------------- |
| `*` | Matches any sequence of **non-path-separators**. |
| `/**/` | Matches zero or more directories. |
| `?` | Matches any single non-path-separator character. |
| `[class]` | Matches any single character against a class of characters (e.g., `[a-z]`). |
| `{alt1,...}` | Matches a sequence if one of the comma-separated alternatives matches. |
**Glob Patterns:**
Development mode allows the use of glob patterns in Redirect URIs for flexibility:
| Special Terms | Meaning |
| :------------ | :-------------------------------------------------------------------------- |
| `*` | Matches any sequence of **non-path-separators**. |
| `/**/` | Matches zero or more directories. |
| `?` | Matches any single non-path-separator character. |
| `[class]` | Matches any single character against a class of characters (e.g., `[a-z]`). |
| `{alt1,...}` | Matches a sequence if one of the comma-separated alternatives matches. |
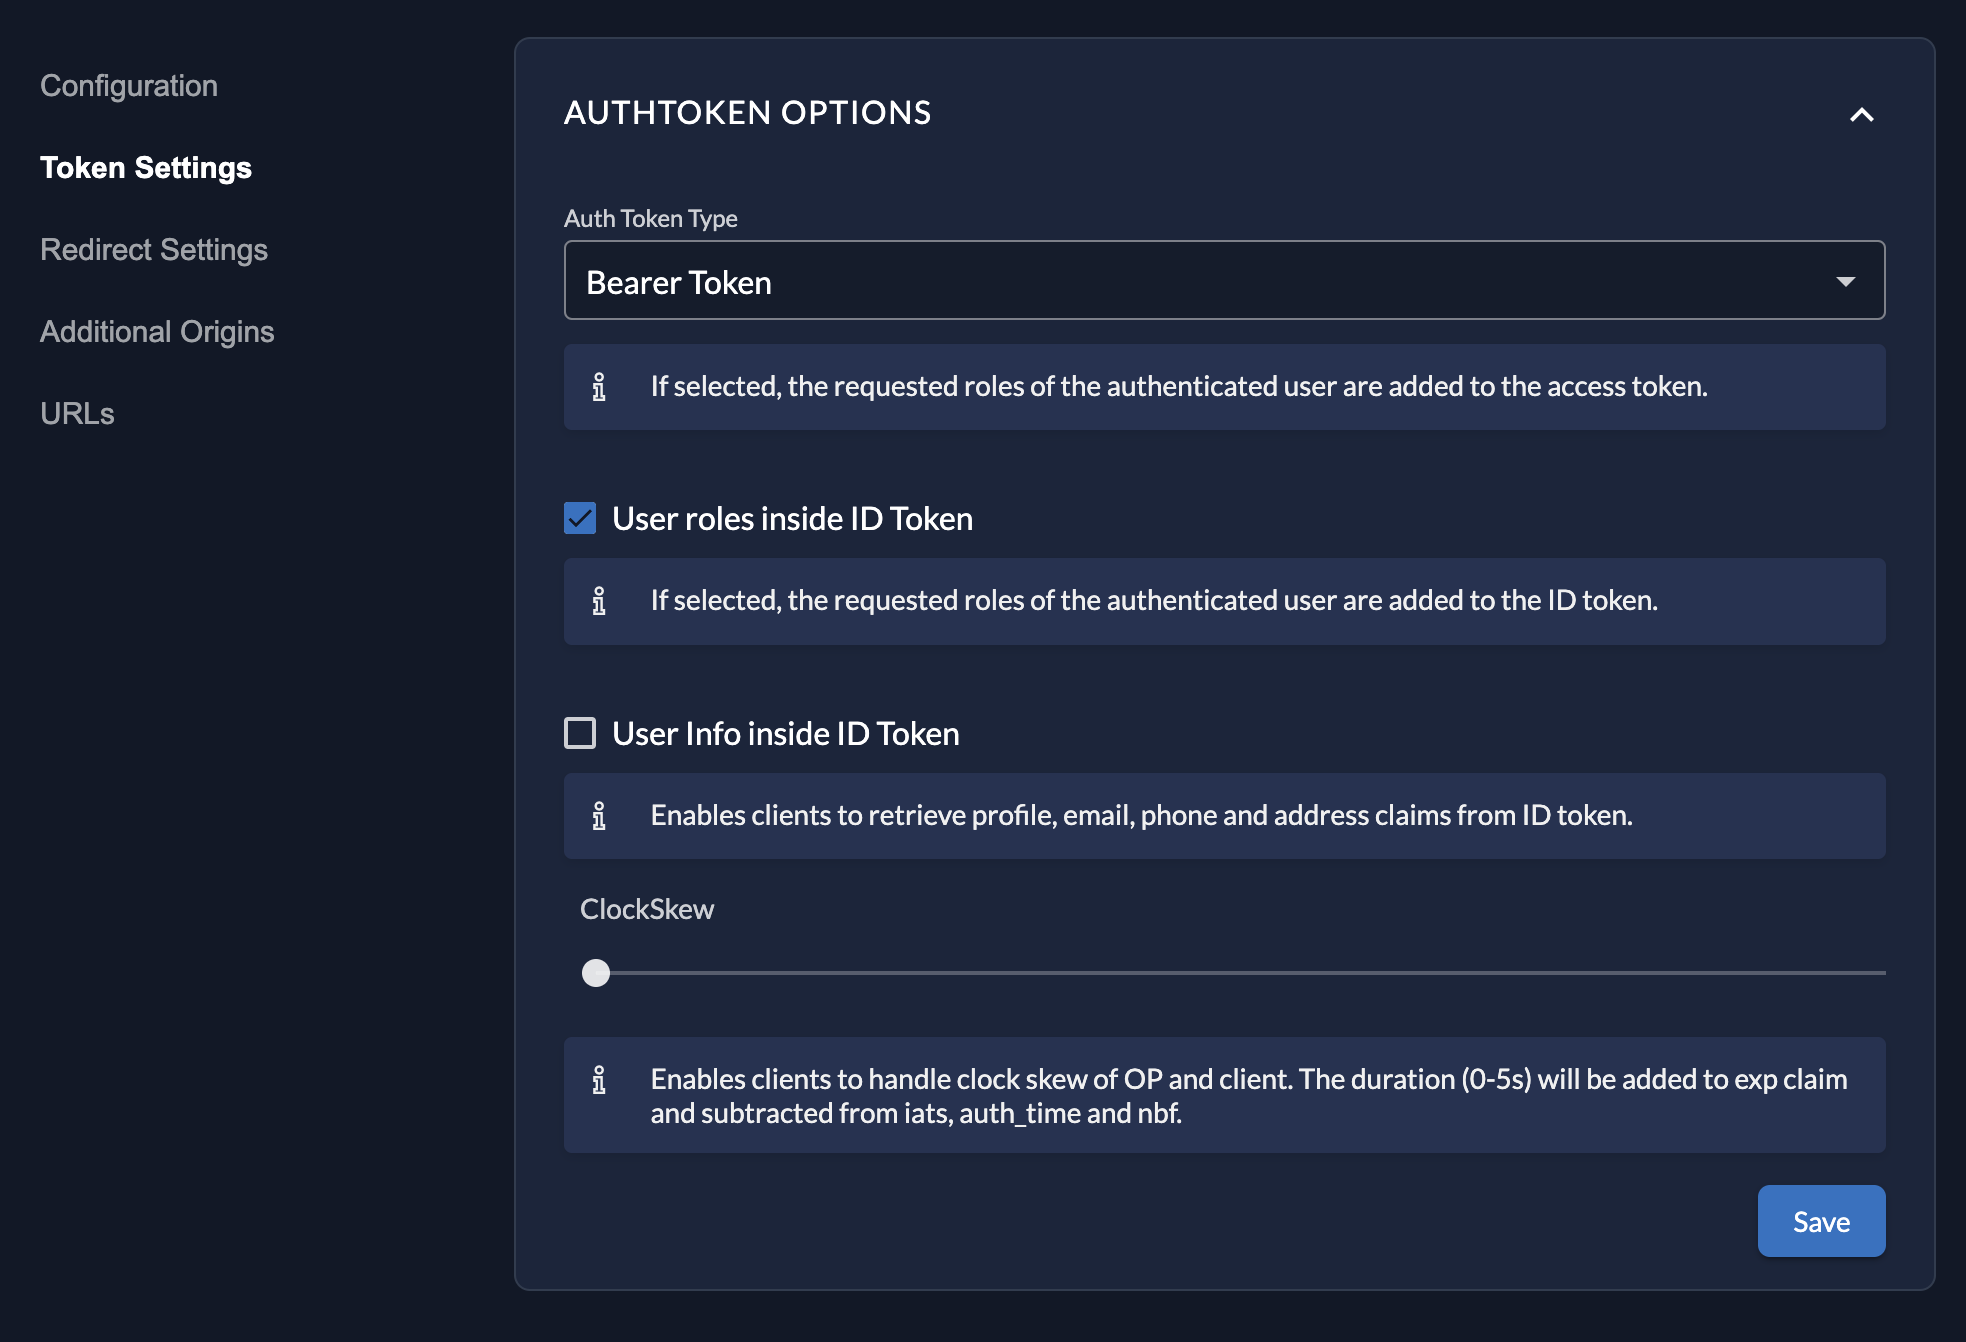
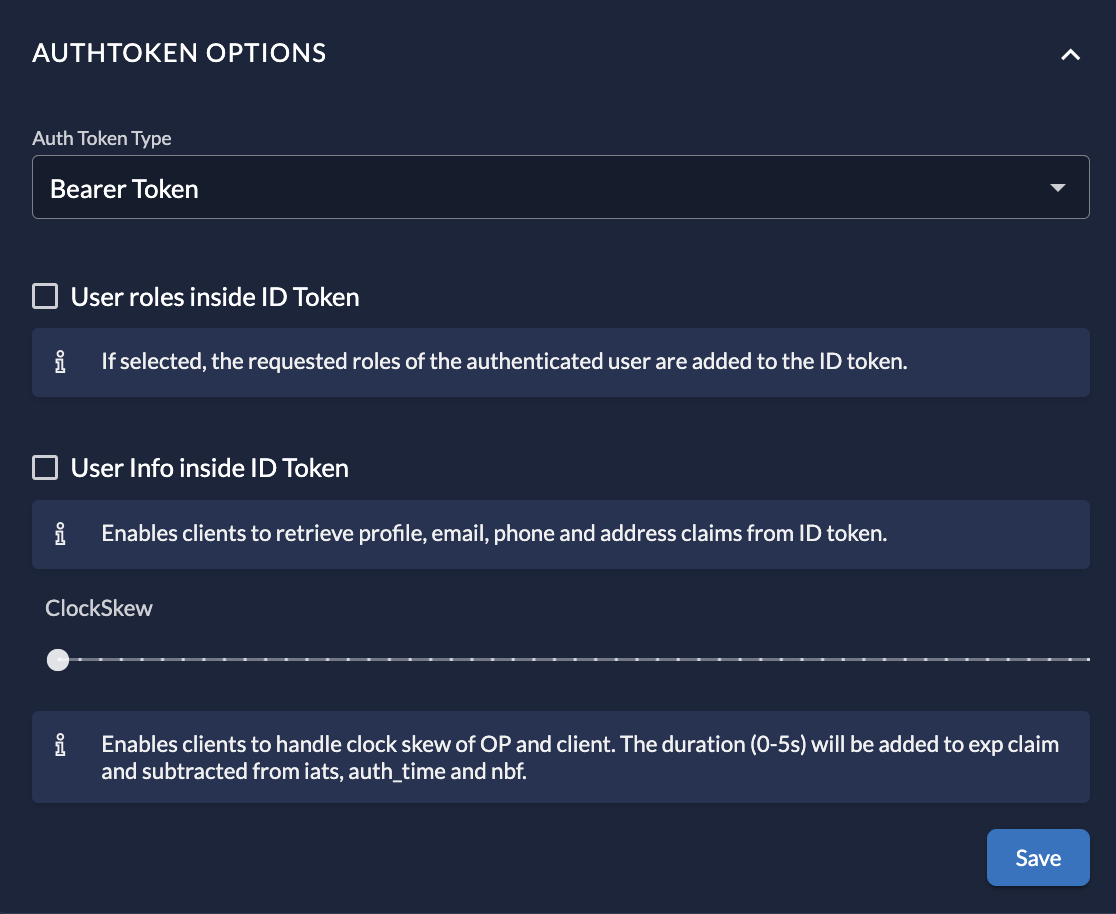
 Token Settings [#token-settings]
In the **Token Settings** section, you can customize the tokens issued for this application:
* **Token Type:** Switch between **Bearer Token** (Opaque) and **JWT**.
* **Content:** Check options to include User Roles and User Information inside the ID Token.
* **ClockSkew:** Optionally set a time buffer added to the expiration time of the issued token to handle server time differences.
Token Settings [#token-settings]
In the **Token Settings** section, you can customize the tokens issued for this application:
* **Token Type:** Switch between **Bearer Token** (Opaque) and **JWT**.
* **Content:** Check options to include User Roles and User Information inside the ID Token.
* **ClockSkew:** Optionally set a time buffer added to the expiration time of the issued token to handle server time differences.
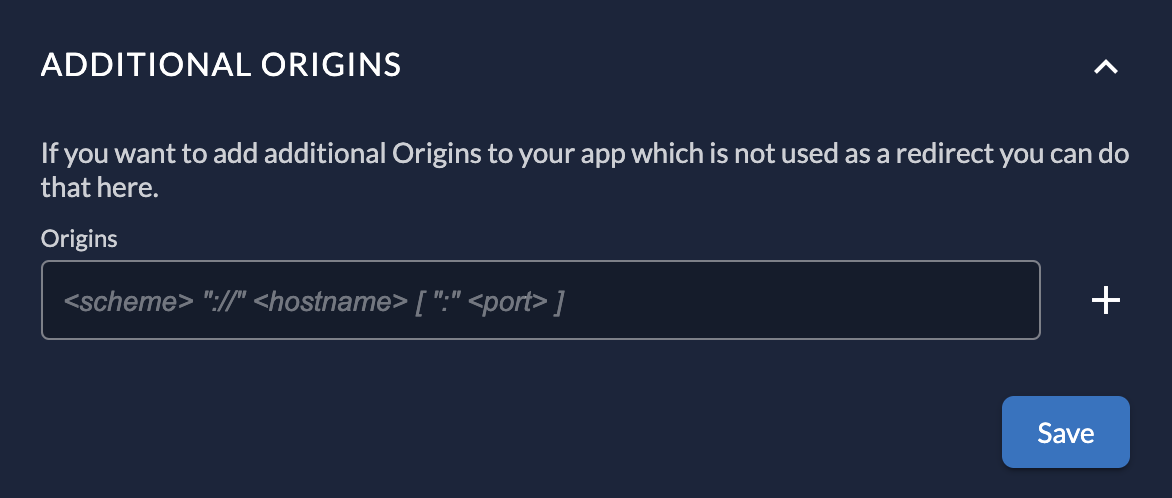
 Additional Origins [#additional-origins]
If your application makes requests from domains other than the Redirect URI (e.g., a Javascript app fetching data from an API on a different domain), you can specify them here to configure CORS (Cross-Origin Resource Sharing).
Additional Origins [#additional-origins]
If your application makes requests from domains other than the Redirect URI (e.g., a Javascript app fetching data from an API on a different domain), you can specify them here to configure CORS (Cross-Origin Resource Sharing).
 Security Considerations [#security-considerations]
Ensure the management of application settings is limited to authorized users only.
* Use [Administrator roles](./administrators) to limit permissions for your users to make changes to your applications.
* When [granting projects](../../../concepts/structure/granted_projects) to other organizations, the receiving organization **cannot** see or change the application settings. They can only assign roles.
References [#references]
* [Recommended OIDC Flows](../../integrate/login/oidc/oauth-recommended-flows)
# Management Console
Overview [#overview]
The ZITADEL Management Console is the web-based Dashboard UI designed to facilitate the management and administration of ZITADEL resources and settings. It serves as a central hub where [Administrators](/concepts/structure/administrators) can perform tasks related to identity and access management, configure authentication methods, and manage the organization's infrastructure.
While the Management Console is primarily a tool for administrators, it can also be accessed by end-users to manage their own profiles (e.g., password reset, MFA setup), unless you [restrict access](/guides/solution-scenarios/restrict-console) to build your own custom UI.
Accessing the Management Console [#accessing-the-management-console]
The management console is available by navigating to the [Custom Domain](/concepts/features/custom-domain) of your instance and appending the path `/ui/console`.
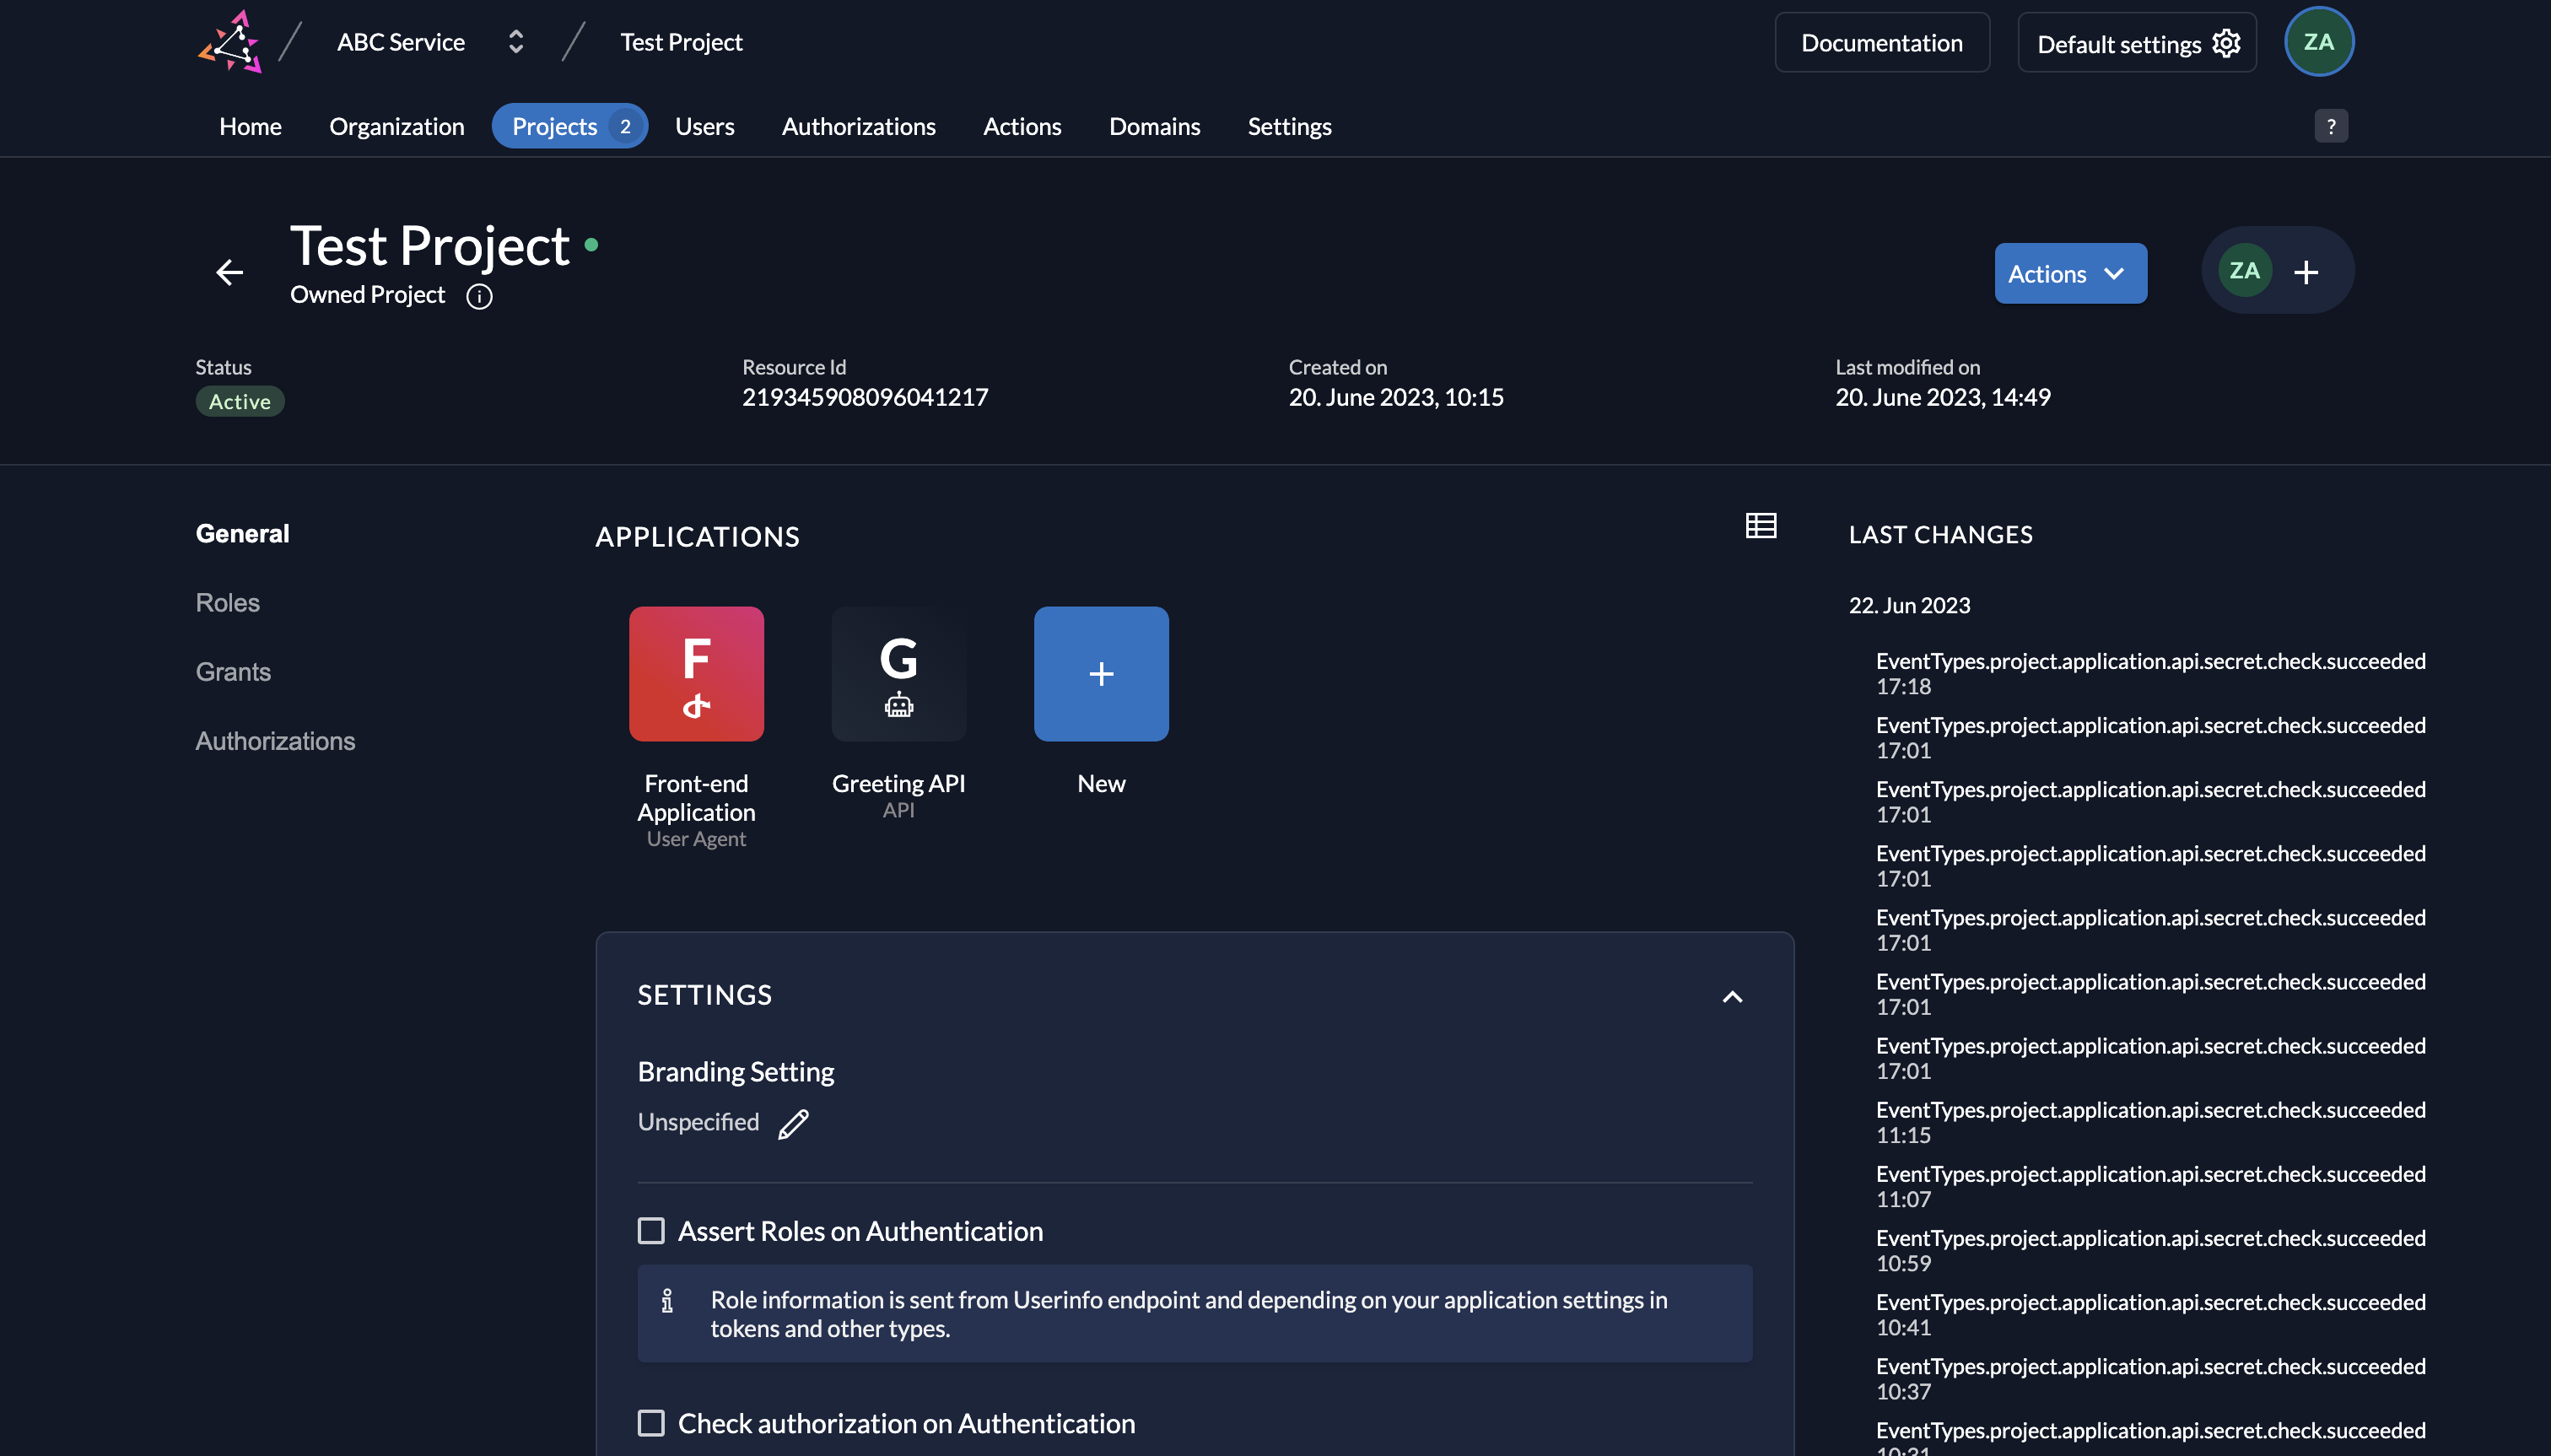
Navigation and Context [#navigation-and-context]
When logged in, you are greeted by the home page, which allows you to set shortcuts to frequently used settings and projects.
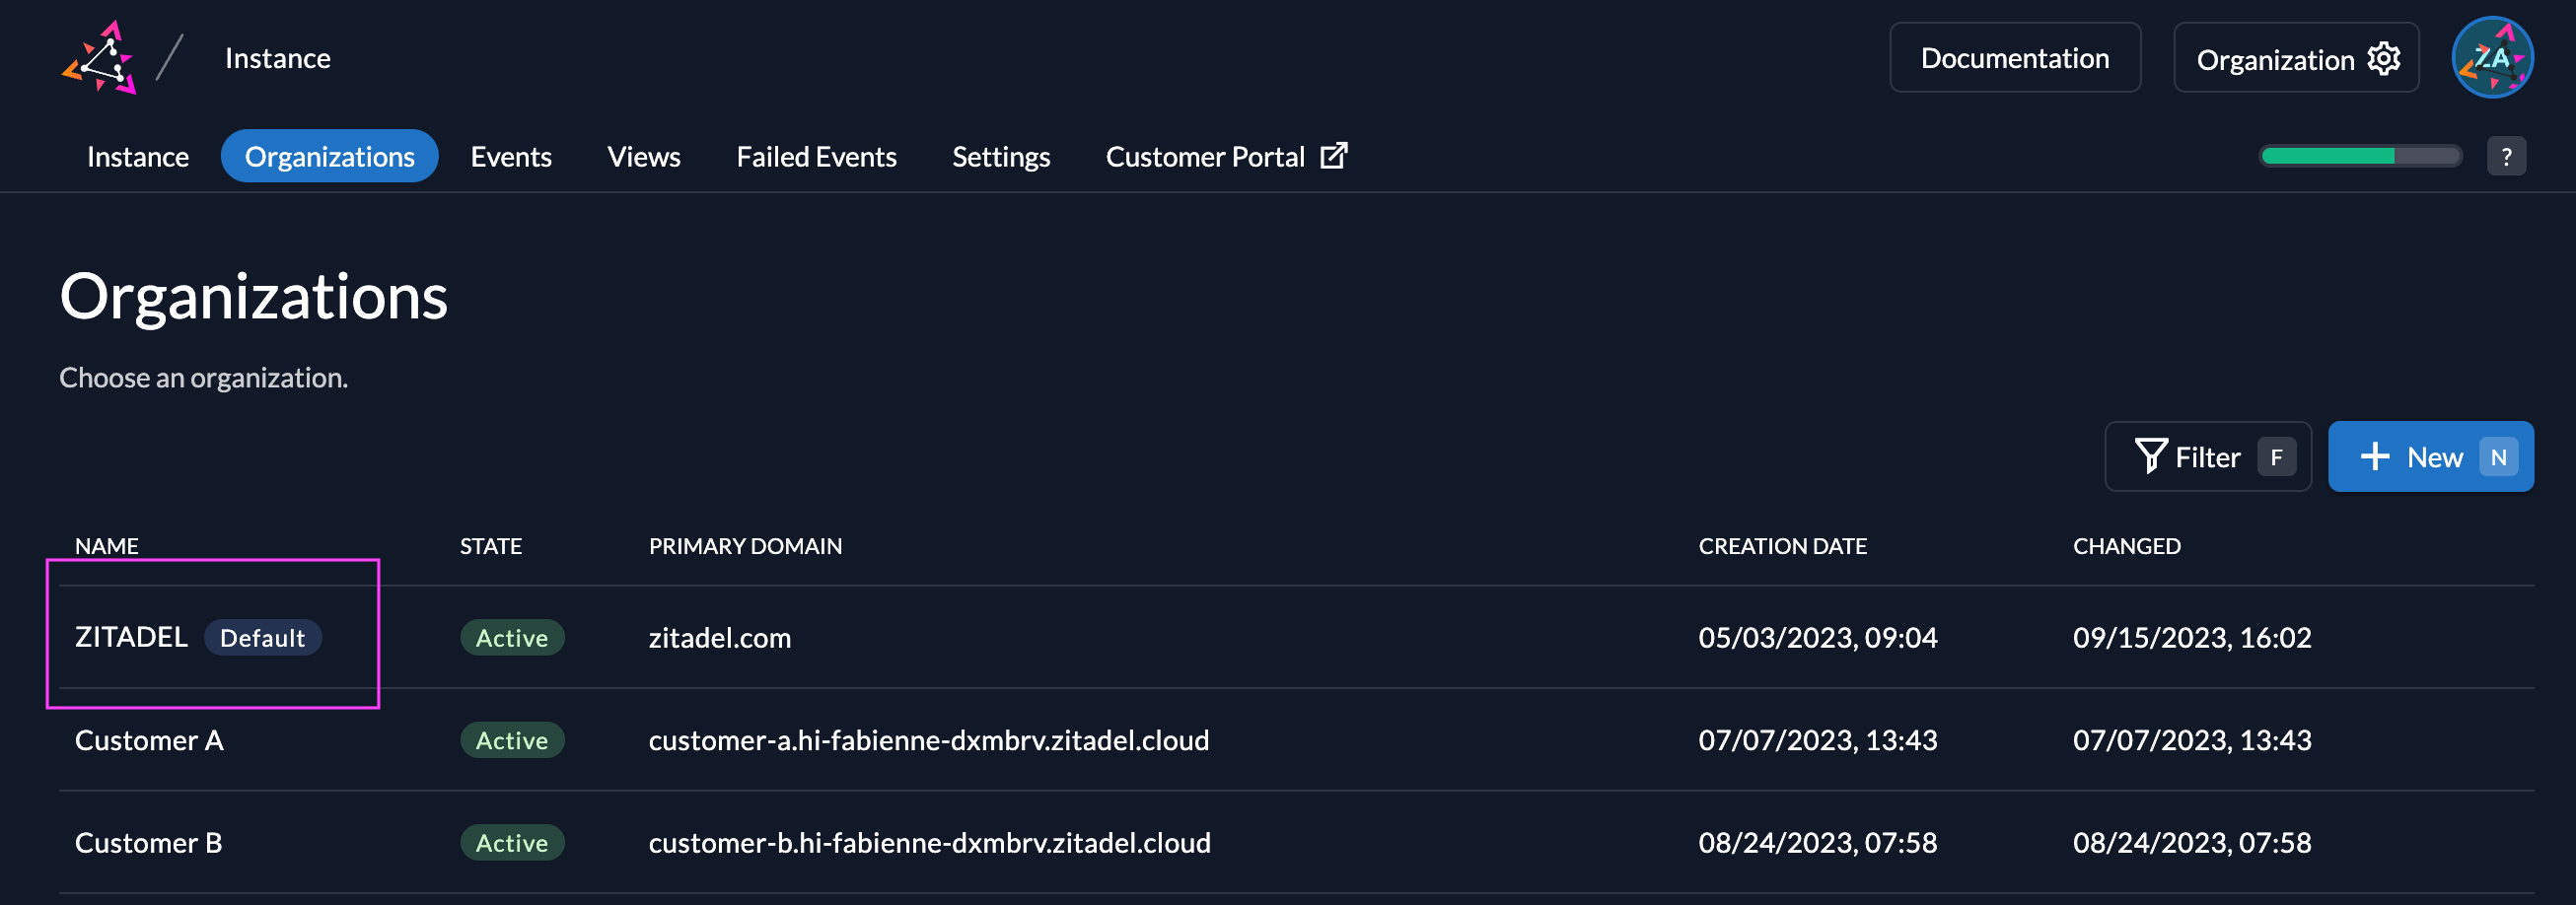
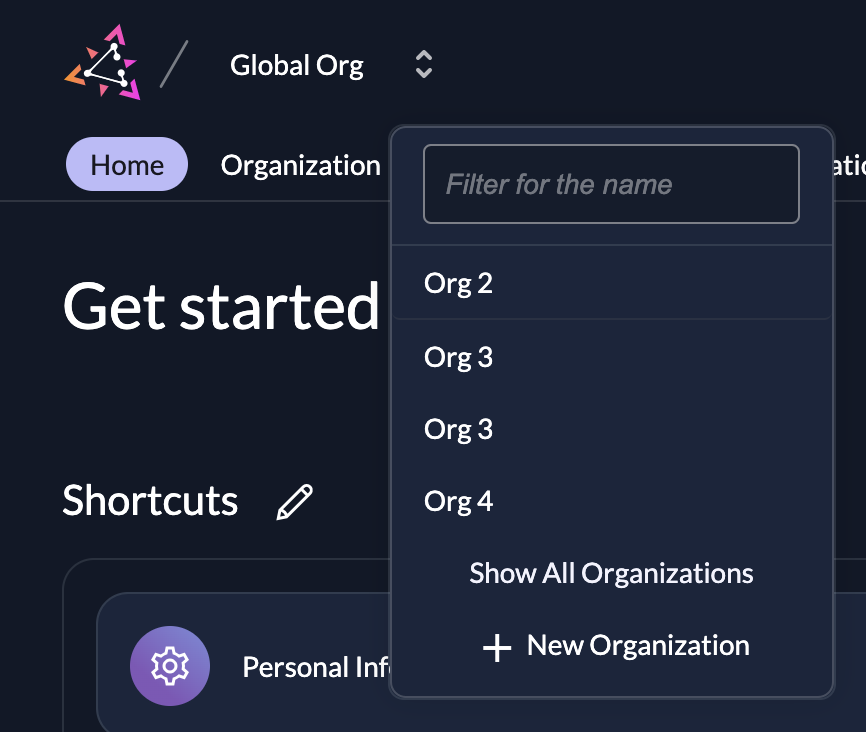
Context Switcher [#context-switcher]
ZITADEL is a multi-tenant system. The Management Console features a **Context Switcher** in the **top-left** corner. This allows you to switch between the different **Organizations** you manage.
Depending on your use case:
* **B2C:** You might stick to your global organization.
* **B2B:** You will frequently switch between multiple organizations to manage specific customer settings.
Security Considerations [#security-considerations]
Ensure the management of application settings is limited to authorized users only.
* Use [Administrator roles](./administrators) to limit permissions for your users to make changes to your applications.
* When [granting projects](../../../concepts/structure/granted_projects) to other organizations, the receiving organization **cannot** see or change the application settings. They can only assign roles.
References [#references]
* [Recommended OIDC Flows](../../integrate/login/oidc/oauth-recommended-flows)
# Management Console
Overview [#overview]
The ZITADEL Management Console is the web-based Dashboard UI designed to facilitate the management and administration of ZITADEL resources and settings. It serves as a central hub where [Administrators](/concepts/structure/administrators) can perform tasks related to identity and access management, configure authentication methods, and manage the organization's infrastructure.
While the Management Console is primarily a tool for administrators, it can also be accessed by end-users to manage their own profiles (e.g., password reset, MFA setup), unless you [restrict access](/guides/solution-scenarios/restrict-console) to build your own custom UI.
Accessing the Management Console [#accessing-the-management-console]
The management console is available by navigating to the [Custom Domain](/concepts/features/custom-domain) of your instance and appending the path `/ui/console`.
Navigation and Context [#navigation-and-context]
When logged in, you are greeted by the home page, which allows you to set shortcuts to frequently used settings and projects.
Context Switcher [#context-switcher]
ZITADEL is a multi-tenant system. The Management Console features a **Context Switcher** in the **top-left** corner. This allows you to switch between the different **Organizations** you manage.
Depending on your use case:
* **B2C:** You might stick to your global organization.
* **B2B:** You will frequently switch between multiple organizations to manage specific customer settings.
 To understand how to structure your organizations, read our [Solution Scenario](/guides/solution-scenarios/configurations) guides.
Key Capabilities [#key-capabilities]
The Management Console enables administrators to perform the following critical tasks:
1. **Default Settings:** Administrators can configure global system defaults. This includes authentication methods, security policies (like password complexity or lockout policies), and other system-wide parameters.
2. **Resource Management:** Create, update, and delete essential resources such as [Organizations](./organizations-overview), [Projects](./projects-overview), and [Applications](./applications-overview).
3. **User Management:** Manage the lifecycle of [User accounts](./users-overview). This includes creating new users, updating profiles, resetting passwords, and deactivating accounts.
4. **Access Control:** Define and manage permissions. Administrators can assign [Roles](/guides/manage/console/roles) to users and configure fine-grained access controls for specific resources.
5. **Administrator Assignment:** Delegate administrative tasks by assigning **Administrator** roles (e.g., Org Owner, Project Owner) to specific users, ensuring proper oversight and segregation of duties.
6. **Customization and Branding:** Customize the look and feel of ZITADEL. You can upload custom logos, select color schemes, and apply [branding](/guides/manage/customize/branding) to match your corporate identity.
7. **Audit Logging:** Access [Audit Logs](/concepts/features/audit-trail) to track user activity and setting changes. This is essential for monitoring security events and maintaining regulatory compliance.
Security and Restrictions [#security-and-restrictions]
Prevent Management Console Access [#prevent-management-console-access]
In many implementations, specifically white-label B2C scenarios, you may want to prevent end-users from accessing the generic ZITADEL Management Console entirely.
Administrators can restrict access to the management console, forcing users to interact only with your own applications or custom user interfaces.
Please follow the [Restrict Management Console Access guide](/guides/solution-scenarios/restrict-console) to achieve this.
References [#references]
* [Administrator Roles Concept](/concepts/structure/administrators)
# ZITADEL Default Settings
Default settings work as default or fallback settings for your organizational settings. Most of the time you only have to set default settings for the cases where you don't need specific behavior in the organizations themselves or you only have one organization.
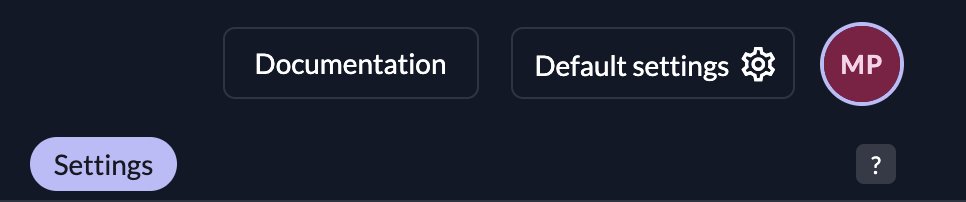
To access default settings, use the settings page at `{instanceDomain}/ui/console/settings` or click at the default settings button on the **top-right** of the page and then navigate to settings in the navigation.
To understand how to structure your organizations, read our [Solution Scenario](/guides/solution-scenarios/configurations) guides.
Key Capabilities [#key-capabilities]
The Management Console enables administrators to perform the following critical tasks:
1. **Default Settings:** Administrators can configure global system defaults. This includes authentication methods, security policies (like password complexity or lockout policies), and other system-wide parameters.
2. **Resource Management:** Create, update, and delete essential resources such as [Organizations](./organizations-overview), [Projects](./projects-overview), and [Applications](./applications-overview).
3. **User Management:** Manage the lifecycle of [User accounts](./users-overview). This includes creating new users, updating profiles, resetting passwords, and deactivating accounts.
4. **Access Control:** Define and manage permissions. Administrators can assign [Roles](/guides/manage/console/roles) to users and configure fine-grained access controls for specific resources.
5. **Administrator Assignment:** Delegate administrative tasks by assigning **Administrator** roles (e.g., Org Owner, Project Owner) to specific users, ensuring proper oversight and segregation of duties.
6. **Customization and Branding:** Customize the look and feel of ZITADEL. You can upload custom logos, select color schemes, and apply [branding](/guides/manage/customize/branding) to match your corporate identity.
7. **Audit Logging:** Access [Audit Logs](/concepts/features/audit-trail) to track user activity and setting changes. This is essential for monitoring security events and maintaining regulatory compliance.
Security and Restrictions [#security-and-restrictions]
Prevent Management Console Access [#prevent-management-console-access]
In many implementations, specifically white-label B2C scenarios, you may want to prevent end-users from accessing the generic ZITADEL Management Console entirely.
Administrators can restrict access to the management console, forcing users to interact only with your own applications or custom user interfaces.
Please follow the [Restrict Management Console Access guide](/guides/solution-scenarios/restrict-console) to achieve this.
References [#references]
* [Administrator Roles Concept](/concepts/structure/administrators)
# ZITADEL Default Settings
Default settings work as default or fallback settings for your organizational settings. Most of the time you only have to set default settings for the cases where you don't need specific behavior in the organizations themselves or you only have one organization.
To access default settings, use the settings page at `{instanceDomain}/ui/console/settings` or click at the default settings button on the **top-right** of the page and then navigate to settings in the navigation.
 When you configure your default settings, you can set the following:
* **Organizations**: A list of your organizations
* [**Features**](#features): Feature Settings let you try out new features before they become generally available. You can also disable features you are not interested in.
* [**Notification settings**](#notification-settings): Setup Notification and Email Server settings for initialization-, verification- and other mails. Setup Twilio as SMS notification provider.
* [**Login Behavior and Security**](#login-behavior-and-security): Multifactor Authentication Options and Enforcement, Define whether passkeys are allowed or not, Set Login Lifetimes and advanced behavior for the login interface.
* [**Identity Providers**](#identity-providers): Define IDPs which are available for all organizations
* [**Password Complexity**](#password-complexity): Requirements for Passwords ex. Symbols, Numbers, min length and more.
* [**Password Expiry**](#password-expiry): Set an expiry for passwords. After the expiration, a user will be prompted to change their password during the next login.
* [**Lockout**](#lockout): Set the maximum attempts a user can try to enter the password or any (T)OTP method. When the number is exceeded, the user gets locked out and has to be unlocked.
* [**Domain settings**](#domain-settings): Whether users use their email or the generated username to login. Other Validation, SMTP settings
* [**Branding**](#branding): Appearance of the login interface.
* [**Message Texts**](#message-texts): Text and internationalization for emails
* [**Login Interface Texts**](#login-interface-texts): Text and internationalization for the login interface
* [**External Links**](#external-links): Links to your own Terms of Service and Privacy Policy regulations, Help Page, Support email, documentation link...
* [**OIDC Token Lifetimes and Expiration**](#oidc-token-lifetimes-and-expiration): Token lifetime and expiration settings.
* [**Secret Generator**](#secret-generator): Appearance and expiration of the generated codes and secrets used in mails for verification etc.
Features [#features]
Feature Settings let you try out new features before they become generally available. You can also disable features you are not interested in.
The Page lets you choose between the settings `Enabled`, `Disabled` or `Inherit`.
If a feature is set to `Inherit`, it becomes available once its enabled per default.
When you configure your default settings, you can set the following:
* **Organizations**: A list of your organizations
* [**Features**](#features): Feature Settings let you try out new features before they become generally available. You can also disable features you are not interested in.
* [**Notification settings**](#notification-settings): Setup Notification and Email Server settings for initialization-, verification- and other mails. Setup Twilio as SMS notification provider.
* [**Login Behavior and Security**](#login-behavior-and-security): Multifactor Authentication Options and Enforcement, Define whether passkeys are allowed or not, Set Login Lifetimes and advanced behavior for the login interface.
* [**Identity Providers**](#identity-providers): Define IDPs which are available for all organizations
* [**Password Complexity**](#password-complexity): Requirements for Passwords ex. Symbols, Numbers, min length and more.
* [**Password Expiry**](#password-expiry): Set an expiry for passwords. After the expiration, a user will be prompted to change their password during the next login.
* [**Lockout**](#lockout): Set the maximum attempts a user can try to enter the password or any (T)OTP method. When the number is exceeded, the user gets locked out and has to be unlocked.
* [**Domain settings**](#domain-settings): Whether users use their email or the generated username to login. Other Validation, SMTP settings
* [**Branding**](#branding): Appearance of the login interface.
* [**Message Texts**](#message-texts): Text and internationalization for emails
* [**Login Interface Texts**](#login-interface-texts): Text and internationalization for the login interface
* [**External Links**](#external-links): Links to your own Terms of Service and Privacy Policy regulations, Help Page, Support email, documentation link...
* [**OIDC Token Lifetimes and Expiration**](#oidc-token-lifetimes-and-expiration): Token lifetime and expiration settings.
* [**Secret Generator**](#secret-generator): Appearance and expiration of the generated codes and secrets used in mails for verification etc.
Features [#features]
Feature Settings let you try out new features before they become generally available. You can also disable features you are not interested in.
The Page lets you choose between the settings `Enabled`, `Disabled` or `Inherit`.
If a feature is set to `Inherit`, it becomes available once its enabled per default.
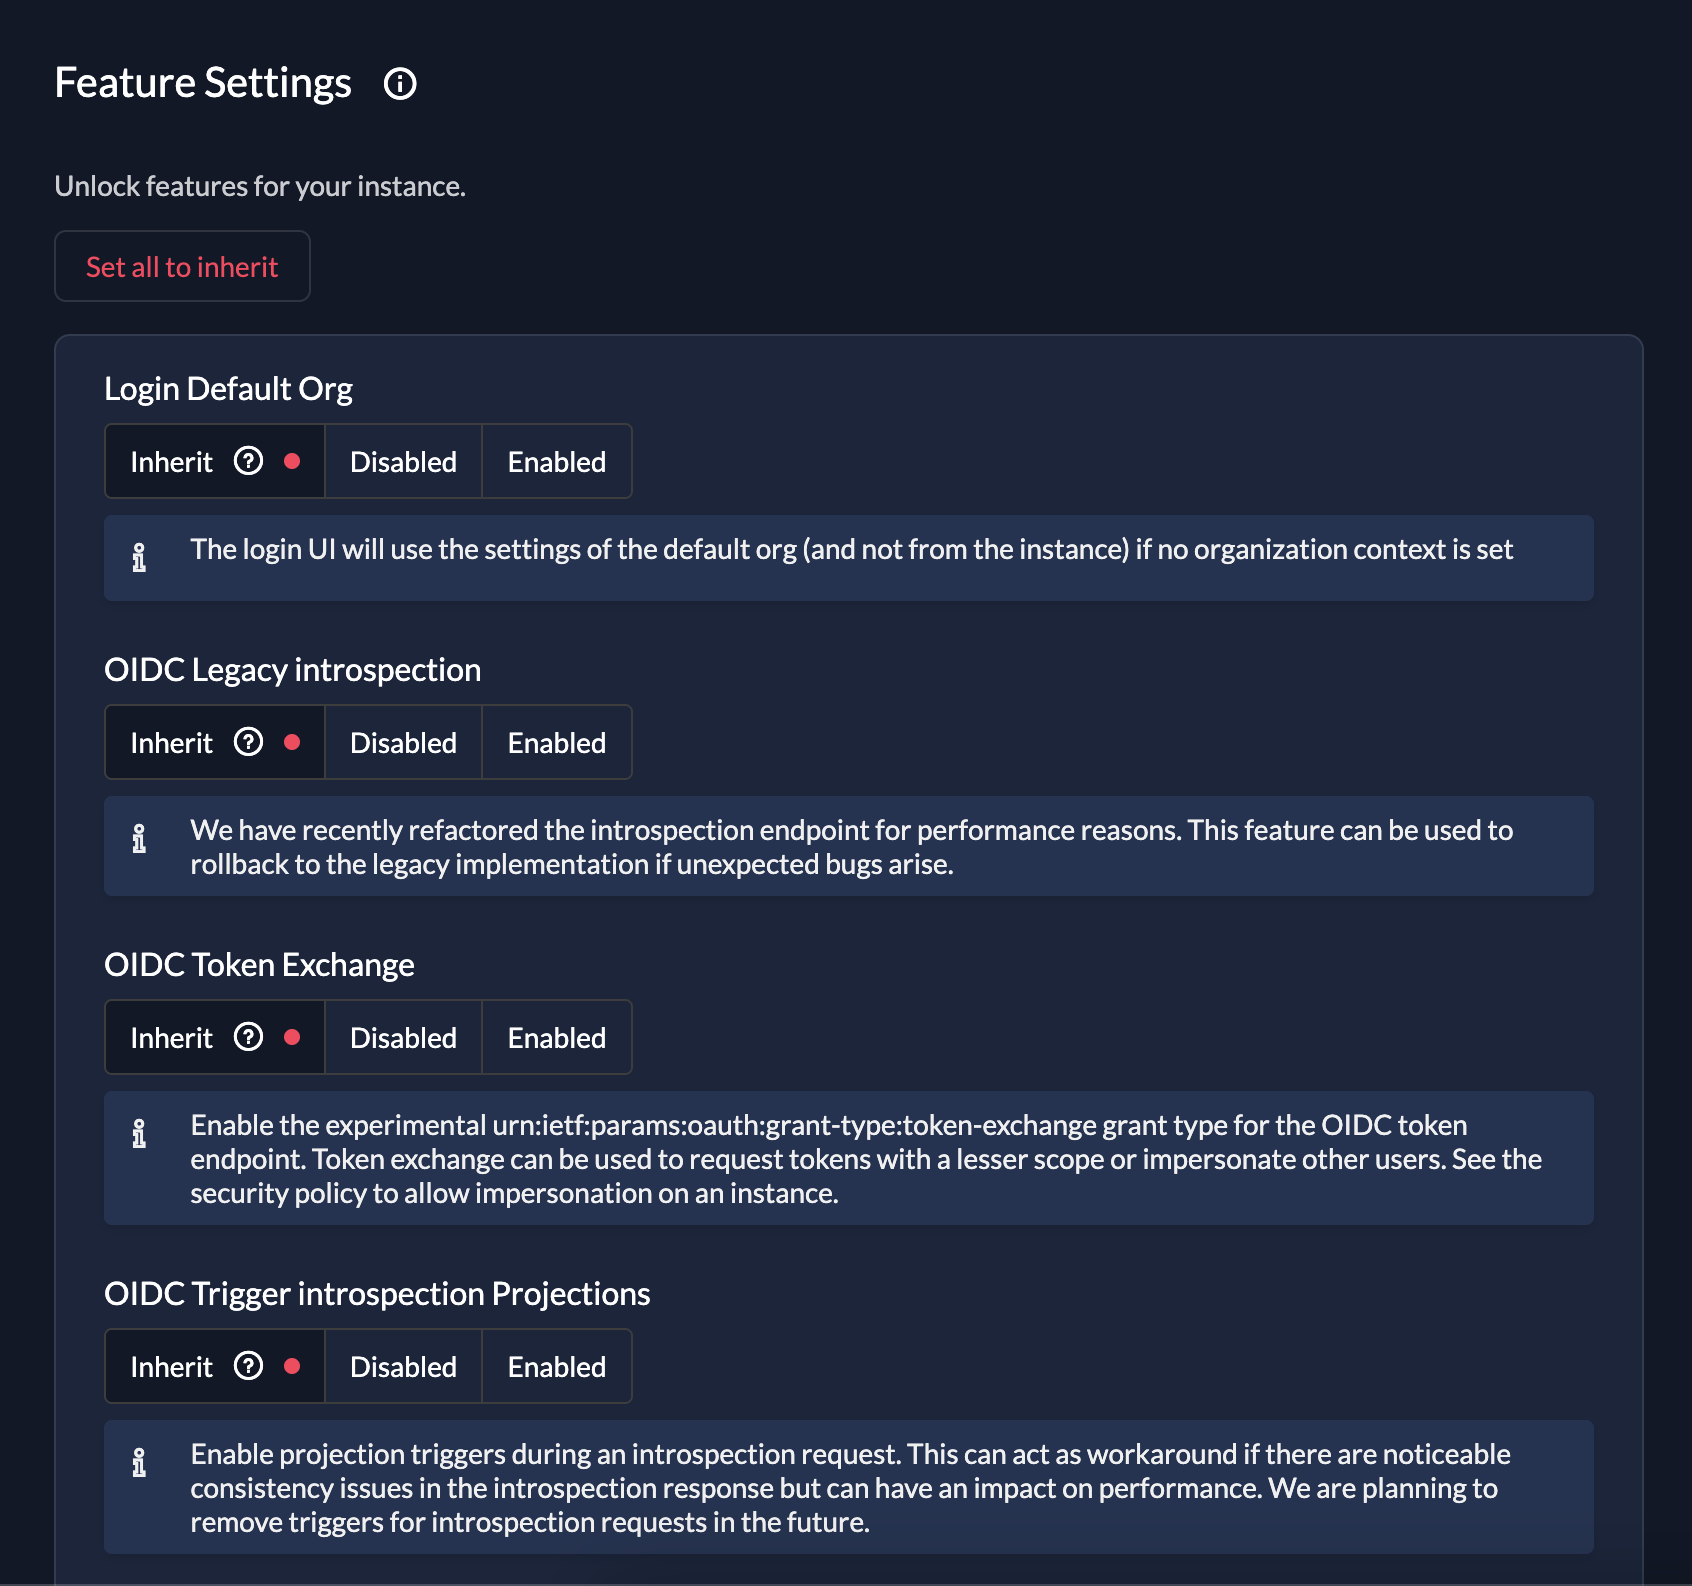 Features can range from UI changes in the management console, to new APIs or performance improvements.
 SMTP [#smtp]
On each instance we configure our default SMTP provider. To make sure, that you only send some E-Mails from domains you own, you need to add a Custom Domain on your instance.
You can configure many SMTP providers using templates for popular providers. The templates will add known settings like host, port or default user and will suggest values for user and/or password.
SMTP [#smtp]
On each instance we configure our default SMTP provider. To make sure, that you only send some E-Mails from domains you own, you need to add a Custom Domain on your instance.
You can configure many SMTP providers using templates for popular providers. The templates will add known settings like host, port or default user and will suggest values for user and/or password.
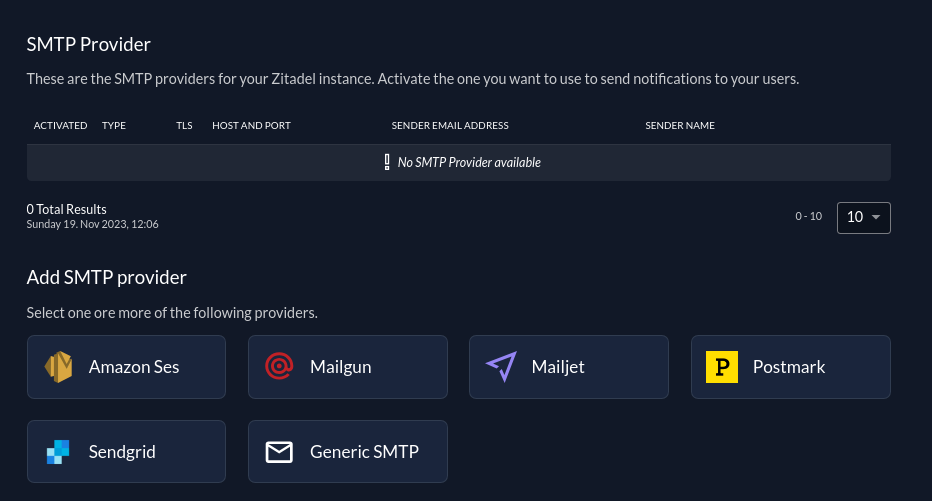 While you create/update a SMTP provider you have the chance to test your SMTP settings
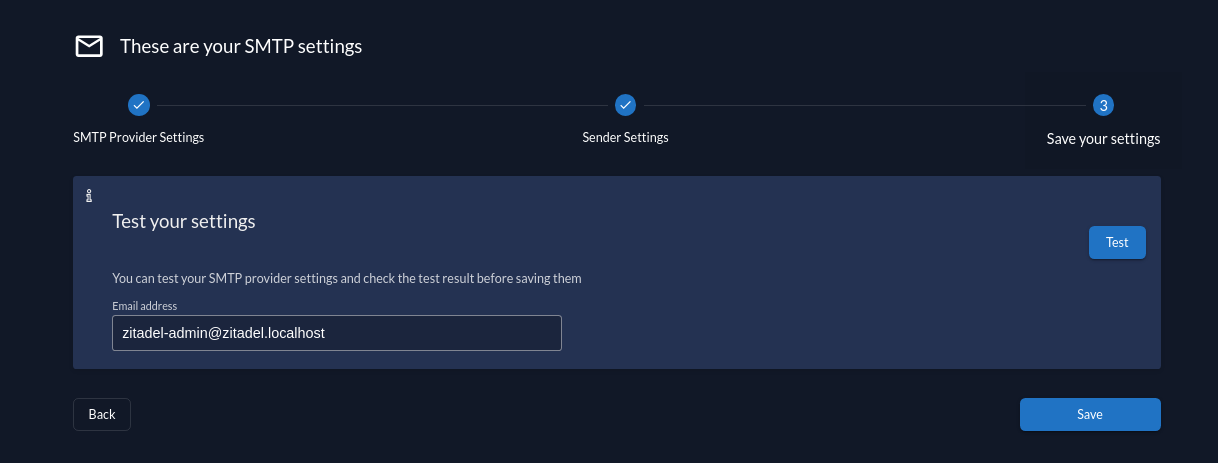 In the SMTP providers table you can hover on a provider row to show buttons that allow you to activate/deactivate a provider, test your smtp settings and delete a provider
 SMS [#sms]
No default provider is configured to send some SMS to your users. If you like to validate the phone numbers of your users make sure to add your twilio settings by adding your Sid, Token and either a Sender Number or a Verification Service Sid.
Setting a Verification Service Sid allows using the Twilio Verify Service instead of the Messages Service for verification.
SMS [#sms]
No default provider is configured to send some SMS to your users. If you like to validate the phone numbers of your users make sure to add your twilio settings by adding your Sid, Token and either a Sender Number or a Verification Service Sid.
Setting a Verification Service Sid allows using the Twilio Verify Service instead of the Messages Service for verification.
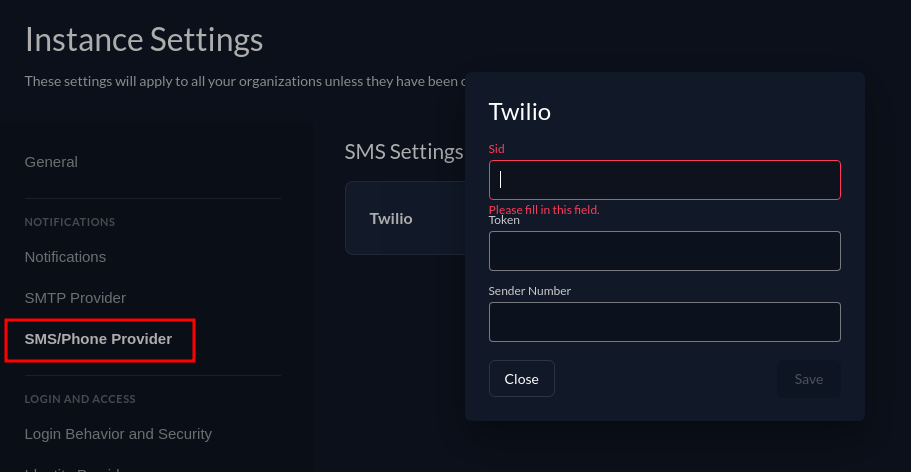 Login Behavior and Security [#login-behavior-and-security]
The Login Policy defines how the login process should look like and which authentication options a user has to authenticate.
| Setting | Description |
| -------------------------------- | --------------------------------------------------------------------------------------------------------------------------------------------------------------------------------------------------------------------------------------------------------------------------------------------------------------------------------------------------------------------------------------------------------------------------------------------------------------------------------- |
| Username Password allowed | Possibility to login with username and password. If this is disabled only login with external identity providers will be allowed |
| Register allowed | Enable self register possibility in the login ui, this enables username password registration as well as registration with configured external identity providers |
| External IDP allowed | Possibility to login with an external identity (e.g Google, Microsoft, Apple, etc), If you like to allow external Identity providers add them to the providers list |
| Hide password reset | Disable the self-service option for users to reset their password. |
| Domain discovery allowed | If this setting is enabled, the user doesn't have to exist when entering the username. It is required to have an Organization Domain on the organization. Example: ZITADEL is registered as organization with the domain zitadel.com and Entra ID as identity provider. A user enters [john@zitadel.com](mailto:john@zitadel.com) in the login but the user doesn't exist. The domain can be mapped to the organization and therefore the user can be redirected to the Entra ID. |
| Ignore unknown usernames | This setting can be enabled, if no error message should be shown if the user doesn't exist. Example: A user enters the login name [john@zitadel.com](mailto:john@zitadel.com), the user doesn't exist, but will be redirected to the password screen. After entering a password, the user will get an error that either username or password are wrong. |
| Disable login with email address | By default users can additionally [login with the email attribute](/guides/solution-scenarios/configurations#use-an-email-address-as-username) of their user. Check this option to disable. |
| Disable login with phone number | By default users can additionally [login with the phonenumber attribute](/guides/solution-scenarios/configurations#use-a-phone-number-as-username) of their user. Check this option to disable. |
Login Behavior and Security [#login-behavior-and-security]
The Login Policy defines how the login process should look like and which authentication options a user has to authenticate.
| Setting | Description |
| -------------------------------- | --------------------------------------------------------------------------------------------------------------------------------------------------------------------------------------------------------------------------------------------------------------------------------------------------------------------------------------------------------------------------------------------------------------------------------------------------------------------------------- |
| Username Password allowed | Possibility to login with username and password. If this is disabled only login with external identity providers will be allowed |
| Register allowed | Enable self register possibility in the login ui, this enables username password registration as well as registration with configured external identity providers |
| External IDP allowed | Possibility to login with an external identity (e.g Google, Microsoft, Apple, etc), If you like to allow external Identity providers add them to the providers list |
| Hide password reset | Disable the self-service option for users to reset their password. |
| Domain discovery allowed | If this setting is enabled, the user doesn't have to exist when entering the username. It is required to have an Organization Domain on the organization. Example: ZITADEL is registered as organization with the domain zitadel.com and Entra ID as identity provider. A user enters [john@zitadel.com](mailto:john@zitadel.com) in the login but the user doesn't exist. The domain can be mapped to the organization and therefore the user can be redirected to the Entra ID. |
| Ignore unknown usernames | This setting can be enabled, if no error message should be shown if the user doesn't exist. Example: A user enters the login name [john@zitadel.com](mailto:john@zitadel.com), the user doesn't exist, but will be redirected to the password screen. After entering a password, the user will get an error that either username or password are wrong. |
| Disable login with email address | By default users can additionally [login with the email attribute](/guides/solution-scenarios/configurations#use-an-email-address-as-username) of their user. Check this option to disable. |
| Disable login with phone number | By default users can additionally [login with the phonenumber attribute](/guides/solution-scenarios/configurations#use-a-phone-number-as-username) of their user. Check this option to disable. |
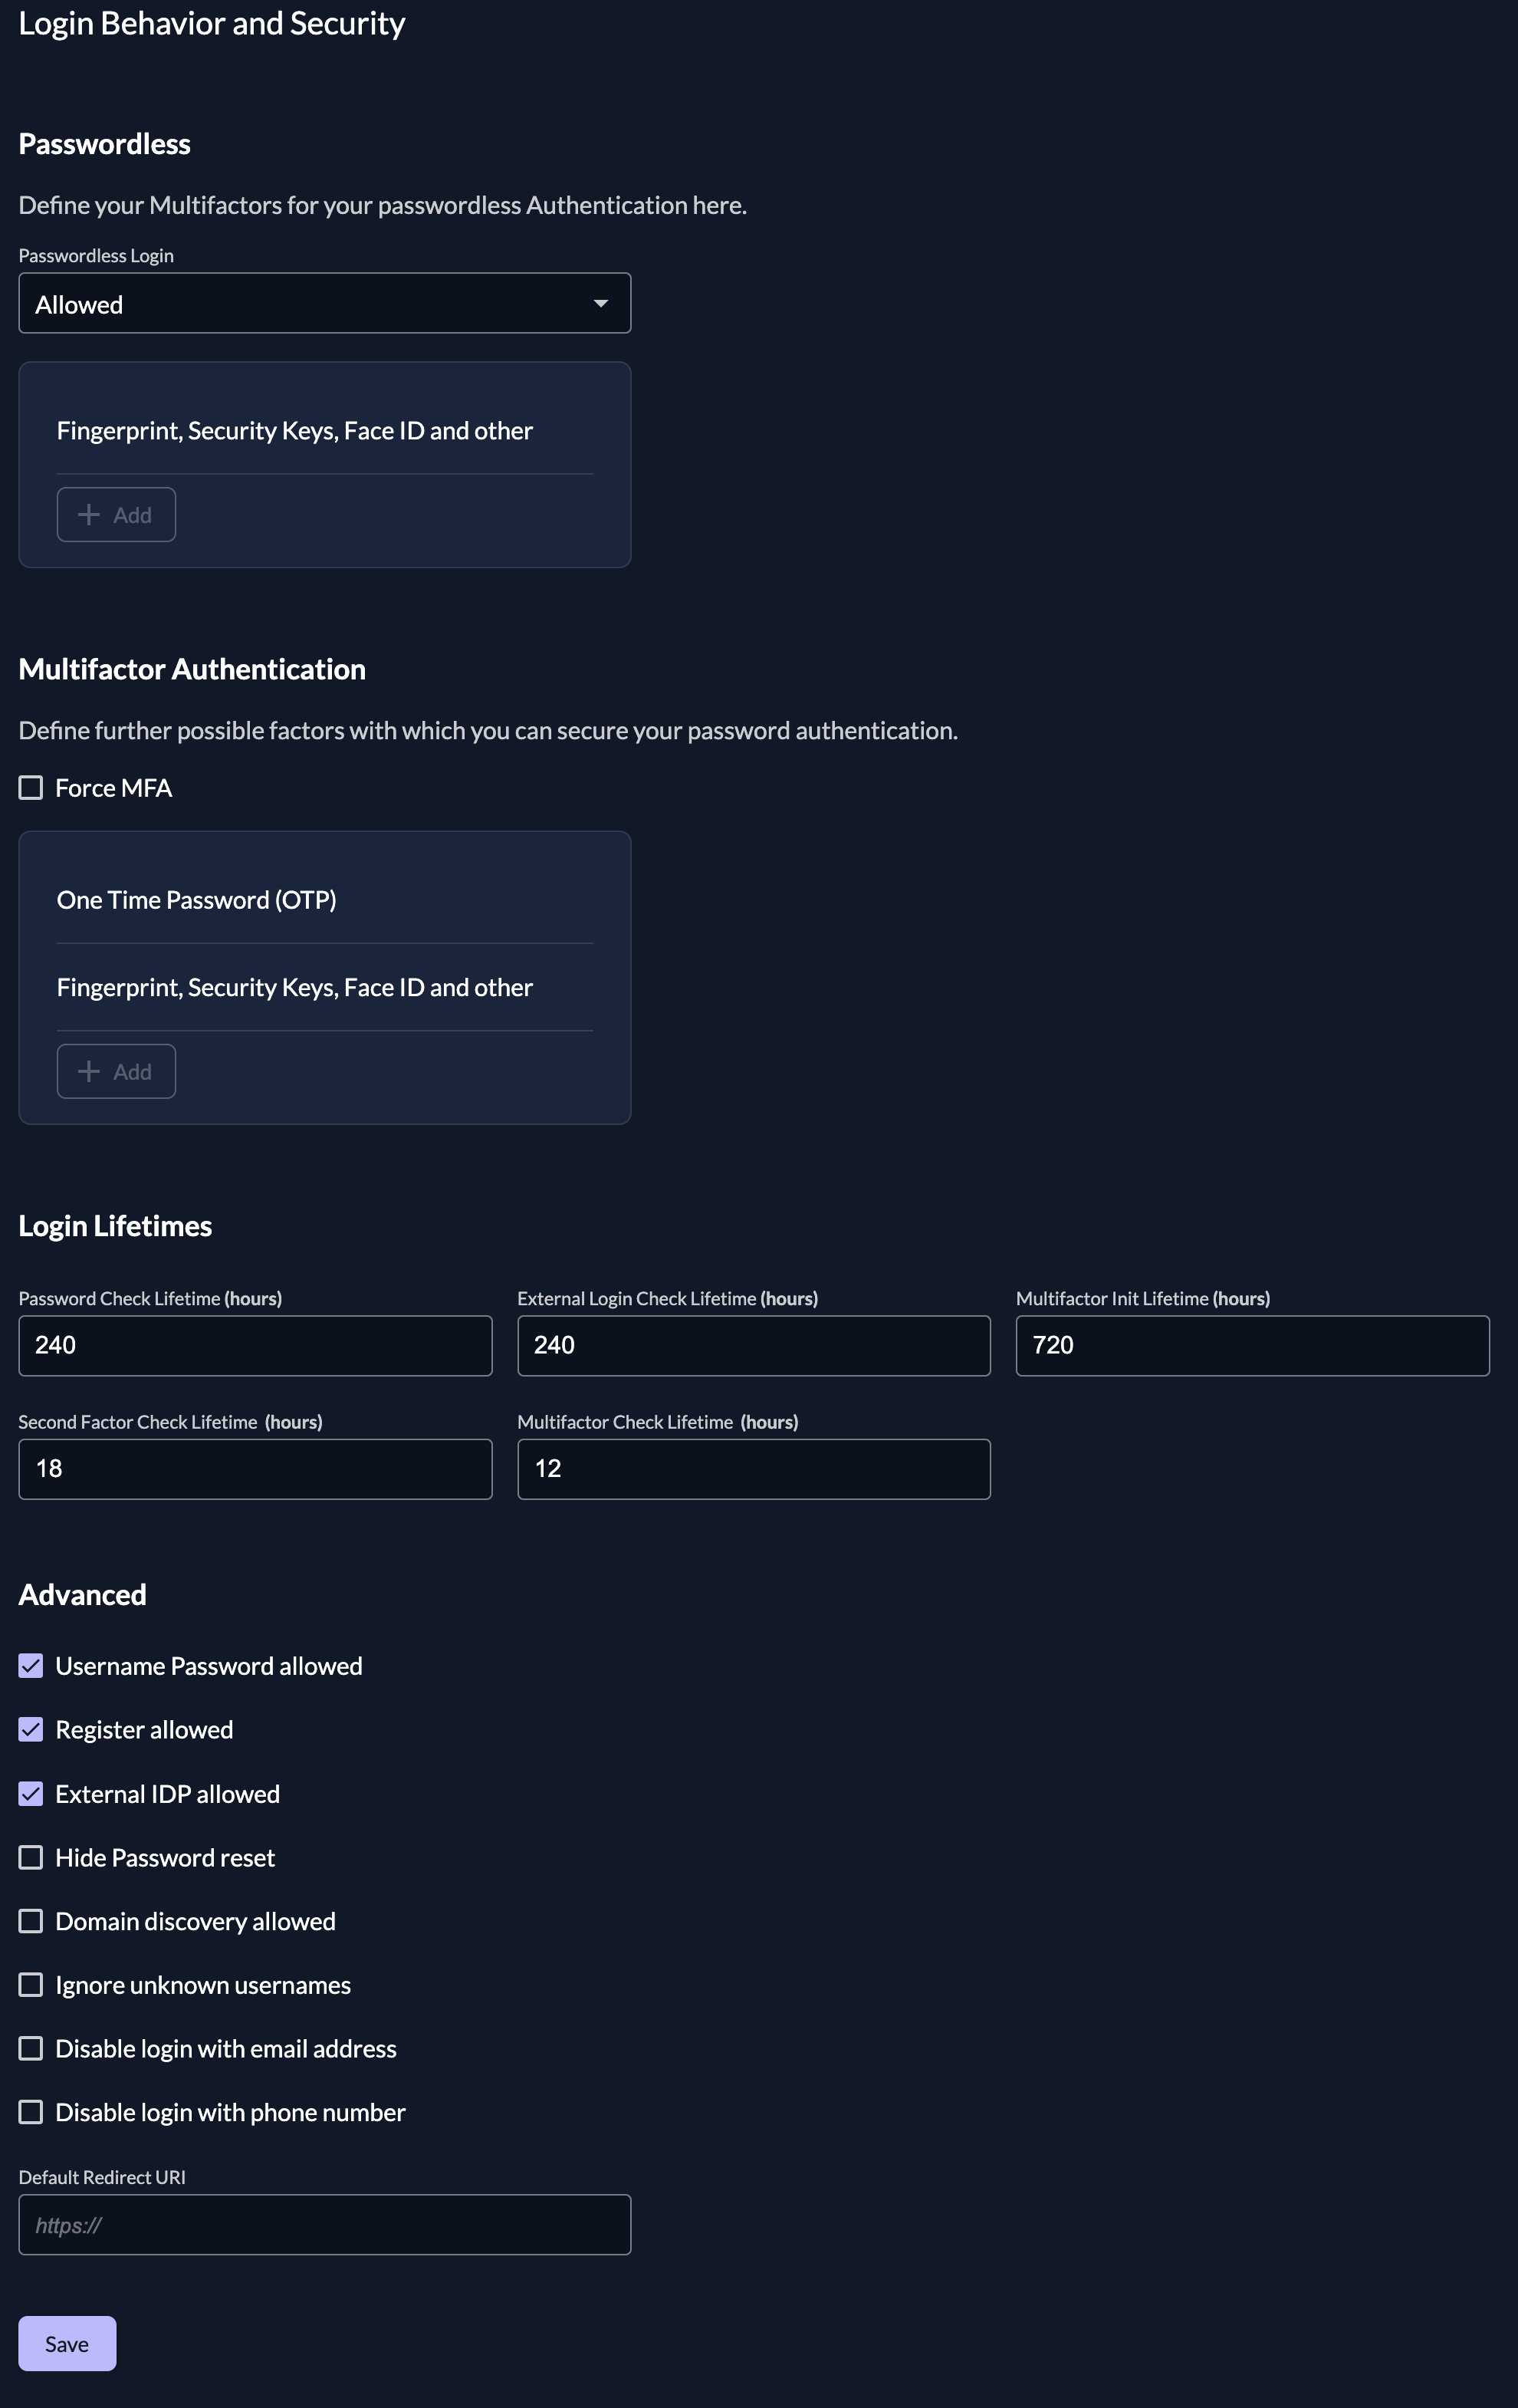 Default Redirect URI [#default-redirect-uri]
The Default Redirect URI will be used, if a user calls the login page directly.
More specifically, typically an application will initiate login with an auth request.
The auth request contains a client-id and a redirect uri, that must match the settings in ZITADEL.
If there is no [auth request](https://zitadel.com/playgrounds/oidc), users will be redirected to the Default Redirect URI, which is by default `https://${CUSTOM_DOMAIN}/ui/console/`
Reasons why ZITADEL doesn't have a redirect URI:
* The login has not been called with an OIDC authorize request
* The user landed on the login through an email link, e.g. Password Reset, Initialize User
We recommend setting your own default redirect URI, if you do not want end users to access ZITADEL Management Console.
Change default redirect url of instance: `https://${CUSTOM_DOMAIN}/ui/console/instance?id=login`
Default Redirect URI [#default-redirect-uri]
The Default Redirect URI will be used, if a user calls the login page directly.
More specifically, typically an application will initiate login with an auth request.
The auth request contains a client-id and a redirect uri, that must match the settings in ZITADEL.
If there is no [auth request](https://zitadel.com/playgrounds/oidc), users will be redirected to the Default Redirect URI, which is by default `https://${CUSTOM_DOMAIN}/ui/console/`
Reasons why ZITADEL doesn't have a redirect URI:
* The login has not been called with an OIDC authorize request
* The user landed on the login through an email link, e.g. Password Reset, Initialize User
We recommend setting your own default redirect URI, if you do not want end users to access ZITADEL Management Console.
Change default redirect url of instance: `https://${CUSTOM_DOMAIN}/ui/console/instance?id=login`
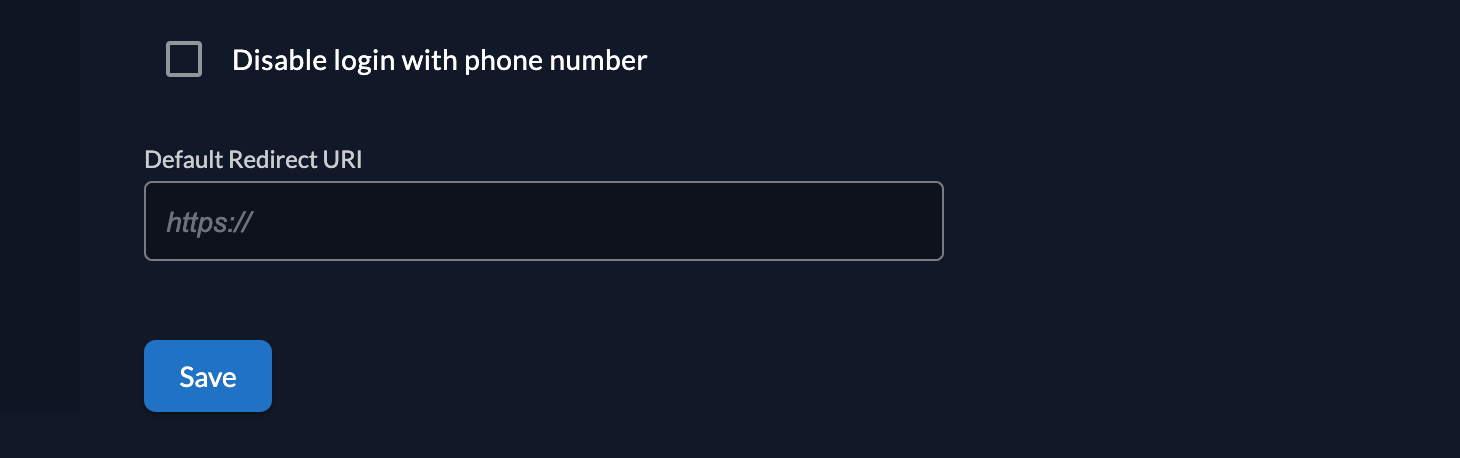 Passkeys [#passkeys]
Passkey authentication means that the user doesn't need to enter a password to login. In our case the user has to enter his loginname and as the next step proof the identity through a registered device or token.
There are two different types one is depending on the device (e.g. Fingerprint, Face recognition, WindowsHello) and the other is independent (eg. Yubikey, Solokey).
Multifactor (MFA) [#multifactor-mfa]
In the multifactors section you can configure what kind of multifactors should be allowed. For passkeys to work, it's required to enable U2F (Universal Second Factor) with PIN. There is no other option at the moment.
Multifactors:
* U2F (Universal Second Factor) with PIN, e.g FaceID, WindowsHello, Fingerprint, Hardwaretokens like Yubikey
Second factors (2FA):
* Time-based One Time Password (TOTP), Authenticator Apps like Google/Microsoft Authenticator, Authy, etc.
* Universal Second Factor (U2F), e.g FaceID, WindowsHello, Fingerprint, Hardware tokens like Yubikey
* One Time Password with Email (OTP Email)
* One Time Password with SMS (OTP SMS)
Force a user to register and use a multifactor authentication, by checking the option "Force MFA".
Ensure that you have added the MFA methods you want to allow.
Or you can enable the "Force MFA for local authenticated users", which will enforce this rule only on local authentication, but not on users authenticated through an Identity Provider.
Login Lifetimes [#login-lifetimes]
Configure the different lifetimes checks for the login process:
* **Password Check Lifetime** specifies after which period a user has to reenter his password during the login process
* **External Login Check Lifetime** specifies after which period a user will be redirected to the IDP during the login process
* **Multi-factor Init Lifetime** specifies after which period a user will be prompted to setup a 2-Factor / Multi-factor during the login process (value 0 will deactivate the prompt)
* **Second Factor Check Lifetime** specifies after which period a user has to revalidate the 2-Factor during the login process
* **Multi-factor Login Check Lifetime** specifies after which period a user has to revalidate the Multi-factor during the login process
Identity Providers [#identity-providers]
You can set up all kinds of external identity providers for identity brokering, which support OIDC (OpenID Connect).
Create a new identity provider configuration and enable it in the list afterwards.
For a detailed guide about how to set up a new identity provider for identity brokering have a look at our [identity provider guides](/guides/integrate/identity-providers/introduction).
Password Complexity [#password-complexity]
With the password complexity policy you can define the requirements for a users password.
The following properties can be set:
* Minimum Length
* Has Uppercase
* Has Lowercase
* Has Number
* Has Symbol (Everything that is not a number or letter)
Passkeys [#passkeys]
Passkey authentication means that the user doesn't need to enter a password to login. In our case the user has to enter his loginname and as the next step proof the identity through a registered device or token.
There are two different types one is depending on the device (e.g. Fingerprint, Face recognition, WindowsHello) and the other is independent (eg. Yubikey, Solokey).
Multifactor (MFA) [#multifactor-mfa]
In the multifactors section you can configure what kind of multifactors should be allowed. For passkeys to work, it's required to enable U2F (Universal Second Factor) with PIN. There is no other option at the moment.
Multifactors:
* U2F (Universal Second Factor) with PIN, e.g FaceID, WindowsHello, Fingerprint, Hardwaretokens like Yubikey
Second factors (2FA):
* Time-based One Time Password (TOTP), Authenticator Apps like Google/Microsoft Authenticator, Authy, etc.
* Universal Second Factor (U2F), e.g FaceID, WindowsHello, Fingerprint, Hardware tokens like Yubikey
* One Time Password with Email (OTP Email)
* One Time Password with SMS (OTP SMS)
Force a user to register and use a multifactor authentication, by checking the option "Force MFA".
Ensure that you have added the MFA methods you want to allow.
Or you can enable the "Force MFA for local authenticated users", which will enforce this rule only on local authentication, but not on users authenticated through an Identity Provider.
Login Lifetimes [#login-lifetimes]
Configure the different lifetimes checks for the login process:
* **Password Check Lifetime** specifies after which period a user has to reenter his password during the login process
* **External Login Check Lifetime** specifies after which period a user will be redirected to the IDP during the login process
* **Multi-factor Init Lifetime** specifies after which period a user will be prompted to setup a 2-Factor / Multi-factor during the login process (value 0 will deactivate the prompt)
* **Second Factor Check Lifetime** specifies after which period a user has to revalidate the 2-Factor during the login process
* **Multi-factor Login Check Lifetime** specifies after which period a user has to revalidate the Multi-factor during the login process
Identity Providers [#identity-providers]
You can set up all kinds of external identity providers for identity brokering, which support OIDC (OpenID Connect).
Create a new identity provider configuration and enable it in the list afterwards.
For a detailed guide about how to set up a new identity provider for identity brokering have a look at our [identity provider guides](/guides/integrate/identity-providers/introduction).
Password Complexity [#password-complexity]
With the password complexity policy you can define the requirements for a users password.
The following properties can be set:
* Minimum Length
* Has Uppercase
* Has Lowercase
* Has Number
* Has Symbol (Everything that is not a number or letter)
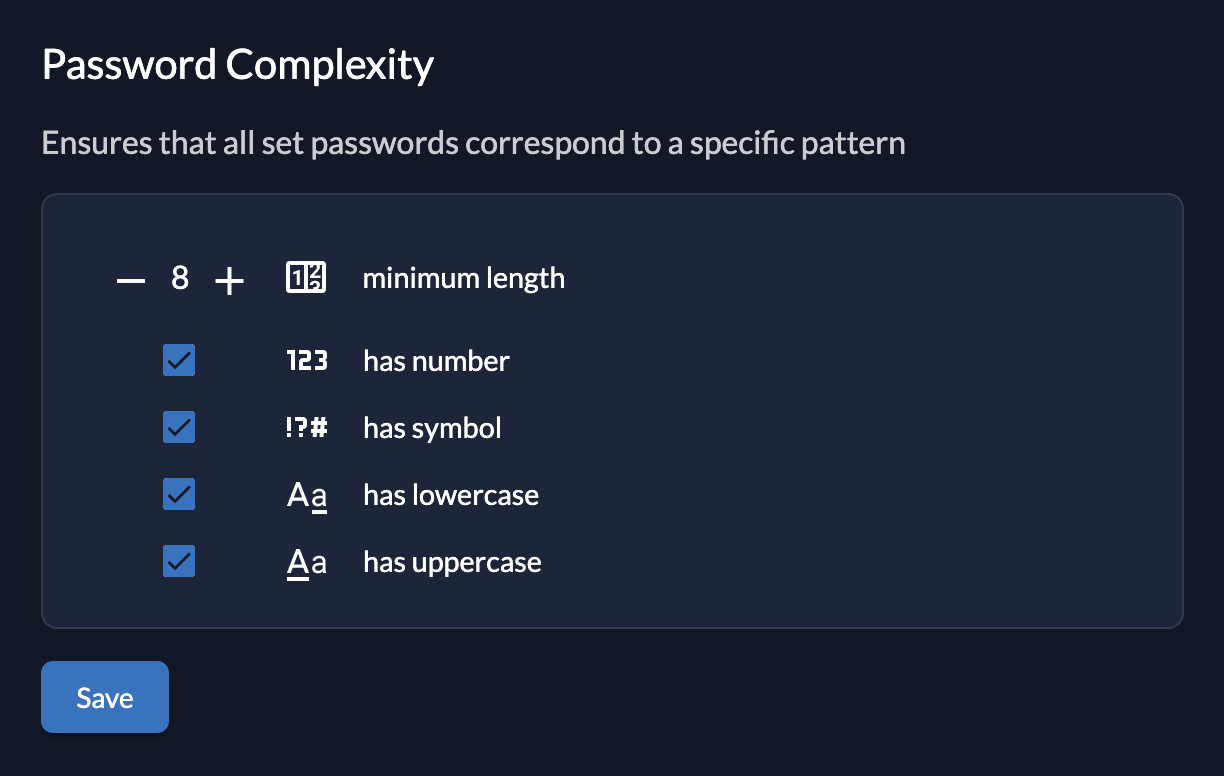 Password Expiry [#password-expiry]
With the password expiry policy you can set an expiration for user password.
After the expiration, a user will be prompted to change their password during the next authentication.
Note, that ZITADEL will not warn or notify the user about the expiry, yet. If you want your users to be notified, you can read this setting and send the notification yourself.
The following properties can be set:
* Maximum validity in days
* Expiration warning after days
Password Expiry [#password-expiry]
With the password expiry policy you can set an expiration for user password.
After the expiration, a user will be prompted to change their password during the next authentication.
Note, that ZITADEL will not warn or notify the user about the expiry, yet. If you want your users to be notified, you can read this setting and send the notification yourself.
The following properties can be set:
* Maximum validity in days
* Expiration warning after days
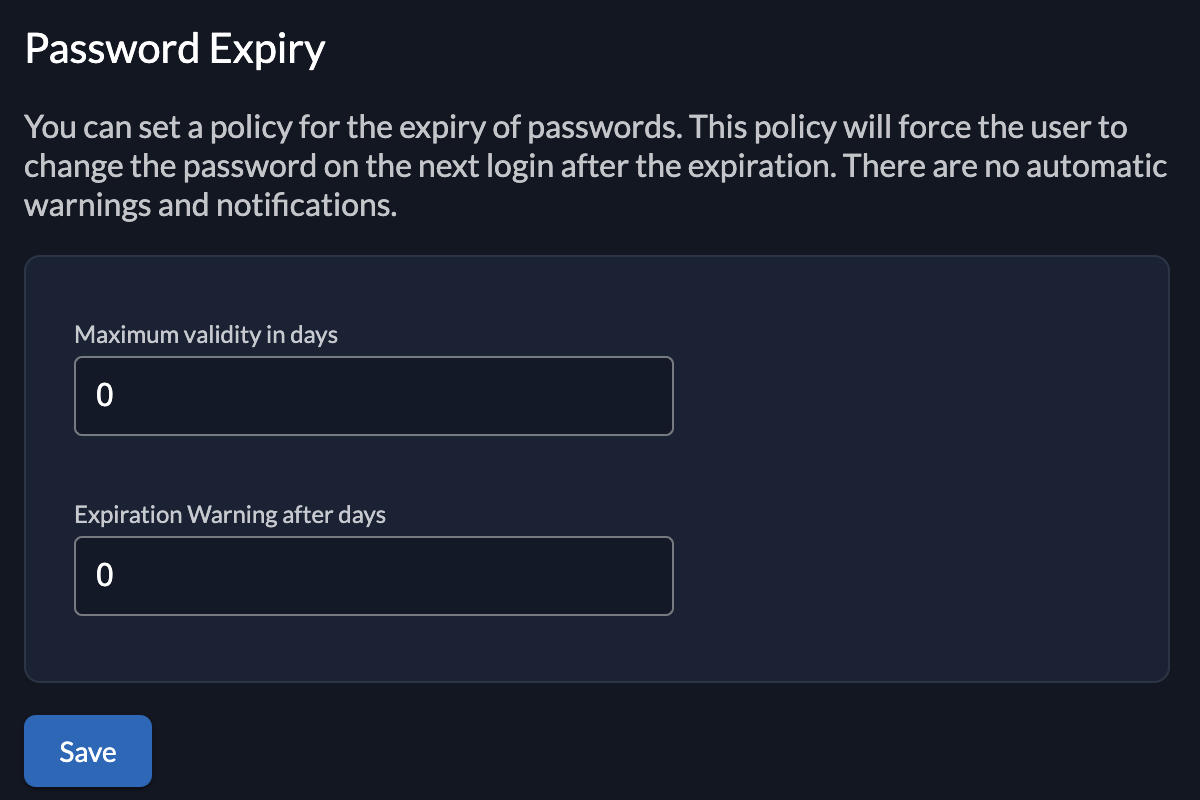 Lockout [#lockout]
Define when an account should be locked.
The following settings are available:
* Maximum Password Attempts: When the user has reached the maximum password attempts the account will be locked, If this is set to 0 the lockout will not trigger.
* Maximum OTP Attempts: When the user has reached the maximum (T)OTP attempts the account will be locked, If this is set to 0 the lockout will not trigger.
If an account is locked, the administrator has to unlock it in the ZITADEL Management Console
Lockout [#lockout]
Define when an account should be locked.
The following settings are available:
* Maximum Password Attempts: When the user has reached the maximum password attempts the account will be locked, If this is set to 0 the lockout will not trigger.
* Maximum OTP Attempts: When the user has reached the maximum (T)OTP attempts the account will be locked, If this is set to 0 the lockout will not trigger.
If an account is locked, the administrator has to unlock it in the ZITADEL Management Console
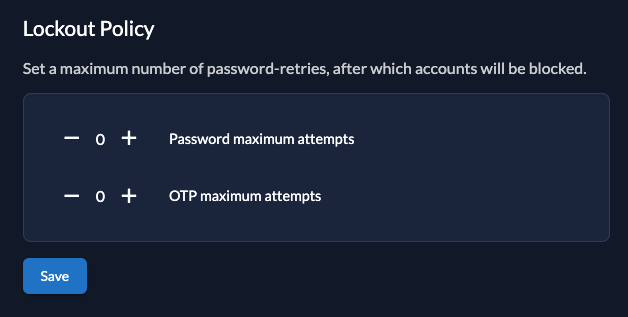 Domain settings [#domain-settings]
Add Organization Domain as suffix to loginnames [#add-organization-domain-as-suffix-to-loginnames]
If you enable this setting, all loginnames will be suffixed with the Organization Domain. If this setting is disabled, you have to ensure that usernames are unique over all organizations.
Validate Organization Domains [#validate-organization-domains]
If this is enabled all created domains on an organization must be verified per dns/acme challenge.
More about how to verify a domain [here](/guides/manage/console/organizations-overview#domain-verification-guide).
If it is set to false, all registered domain will automatically be created as verified and the users will be able to use the domain for login.
SMTP Sender Address matches Custom Domain [#smtp-sender-address-matches-custom-domain]
If enabled, the SMTP server address must match the instance's primary Custom Domain.
With that you can ensure that users receive notifications from the same domain that is used for login.
Use email as username [#use-email-as-username]
To be able to use the email as username you have to disable the attribute "User Loginname must contain orgdomain" on your domain settings.
This means that all your users will not be suffixed with the domain of your organization and you can enter the email as username.
All usernames will then be globally unique within your instance.
You can either set this attribute on your whole ZITADEL instance or just on some specific organizations.
Please refer to the [settings guide](/guides/solution-scenarios/configurations#use-email-to-login) for more information.
External links [#external-links]
With this setting you are able to configure your privacy policy, terms of service, help links and help/support email address.
On register each user has to accept these policies.
This policy can be also be overridden by your organizations.
When focused on an input field you can see the language attribute, which can then be integrated into your link.
Example:
`https://demo.com/tos-{{.Lang}}`
Domain settings [#domain-settings]
Add Organization Domain as suffix to loginnames [#add-organization-domain-as-suffix-to-loginnames]
If you enable this setting, all loginnames will be suffixed with the Organization Domain. If this setting is disabled, you have to ensure that usernames are unique over all organizations.
Validate Organization Domains [#validate-organization-domains]
If this is enabled all created domains on an organization must be verified per dns/acme challenge.
More about how to verify a domain [here](/guides/manage/console/organizations-overview#domain-verification-guide).
If it is set to false, all registered domain will automatically be created as verified and the users will be able to use the domain for login.
SMTP Sender Address matches Custom Domain [#smtp-sender-address-matches-custom-domain]
If enabled, the SMTP server address must match the instance's primary Custom Domain.
With that you can ensure that users receive notifications from the same domain that is used for login.
Use email as username [#use-email-as-username]
To be able to use the email as username you have to disable the attribute "User Loginname must contain orgdomain" on your domain settings.
This means that all your users will not be suffixed with the domain of your organization and you can enter the email as username.
All usernames will then be globally unique within your instance.
You can either set this attribute on your whole ZITADEL instance or just on some specific organizations.
Please refer to the [settings guide](/guides/solution-scenarios/configurations#use-email-to-login) for more information.
External links [#external-links]
With this setting you are able to configure your privacy policy, terms of service, help links and help/support email address.
On register each user has to accept these policies.
This policy can be also be overridden by your organizations.
When focused on an input field you can see the language attribute, which can then be integrated into your link.
Example:
`https://demo.com/tos-{{.Lang}}`
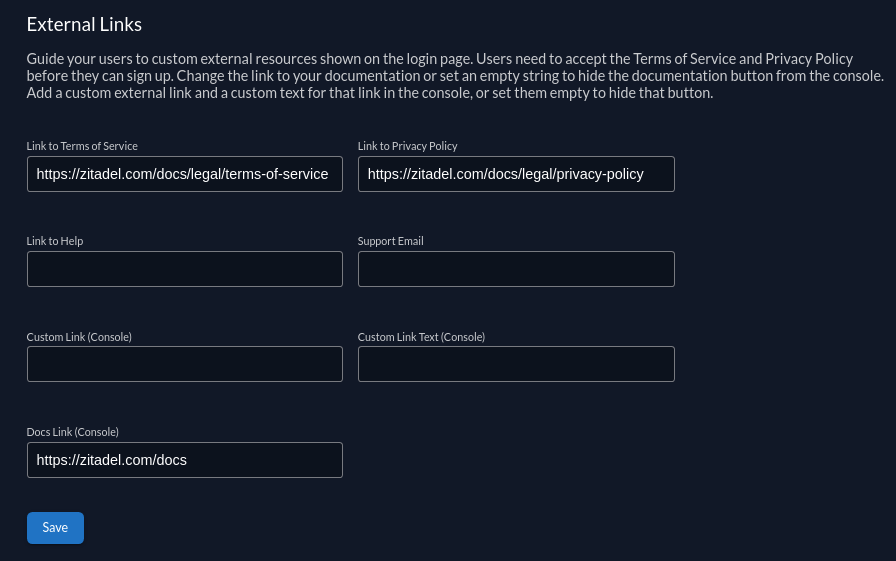 Also you can set the link associated to the Documentation button in the console. Set an empty text if you don't want to show a Documentation button in your console. If you need a custom button to be shown in the management console you can set the button text and the link associated to the button (if the button text is button no text will be shown).
 Message texts [#message-texts]
These are the texts for your notification mails. Available for change are:
| Message Text | Description |
| ---------------- | -------------------------------------------------------------------------------------------------------------------------- |
| Domain Claim | The Mail after an organisation claimed a domain for itself. Users on other organisations with this domain will be notified |
| Initialization | The mail after a user has been created. A code is part of the message which then must be verified on first login |
| Passkey | The Mail to register an additional passkey device by a link |
| Password Reset | The Mail to reset the password by a link |
| Verify Email | The mail after the email has been changed. A code is part of the message which then must be verified on the next login |
| Password Changed | Notify the user, that the password has been changed. Can be configured in [Notification](#notification) |
You can set the locale of the translations on the right.
Message texts [#message-texts]
These are the texts for your notification mails. Available for change are:
| Message Text | Description |
| ---------------- | -------------------------------------------------------------------------------------------------------------------------- |
| Domain Claim | The Mail after an organisation claimed a domain for itself. Users on other organisations with this domain will be notified |
| Initialization | The mail after a user has been created. A code is part of the message which then must be verified on first login |
| Passkey | The Mail to register an additional passkey device by a link |
| Password Reset | The Mail to reset the password by a link |
| Verify Email | The mail after the email has been changed. A code is part of the message which then must be verified on the next login |
| Password Changed | Notify the user, that the password has been changed. Can be configured in [Notification](#notification) |
You can set the locale of the translations on the right.
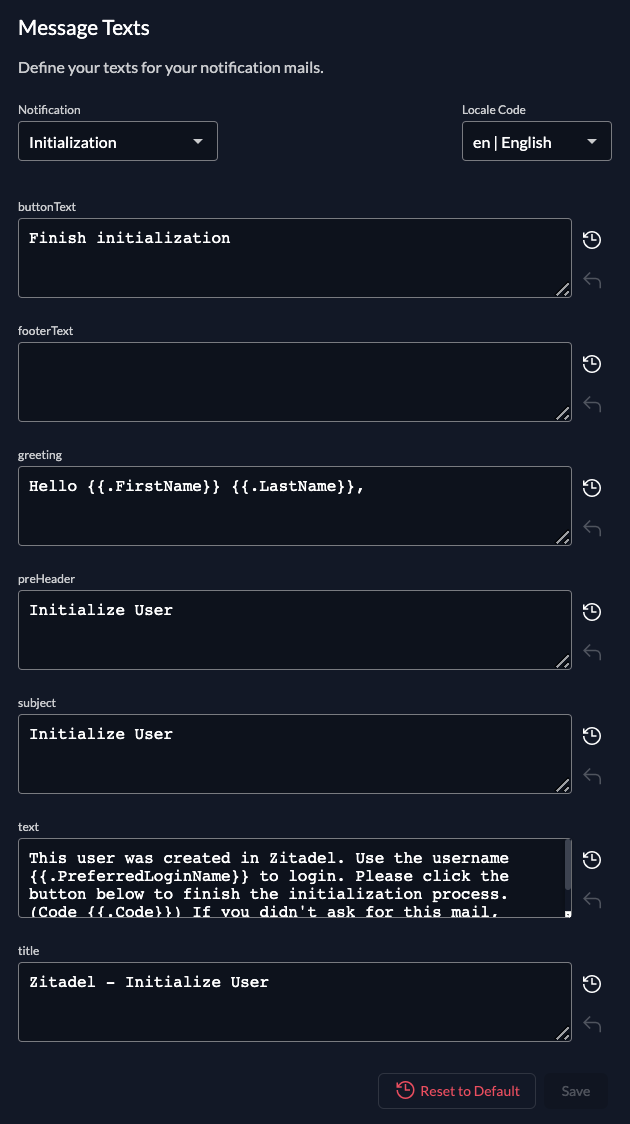 Login interface texts [#login-interface-texts]
These are the texts for the login. Just like for message texts, you can select the locale on the right.
Login interface texts [#login-interface-texts]
These are the texts for the login. Just like for message texts, you can select the locale on the right.
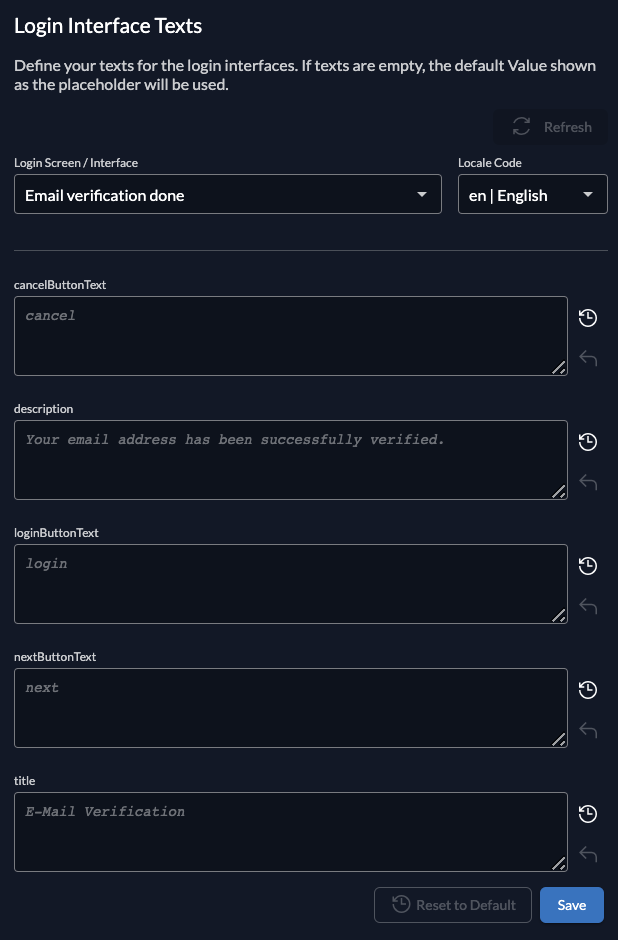 Languages [#languages]
Drag allowed languages to the left column. Languages in the right column are not shown to your users.
Choose a default language which acts as a fallback, if no language header is set.
Languages [#languages]
Drag allowed languages to the left column. Languages in the right column are not shown to your users.
Choose a default language which acts as a fallback, if no language header is set.
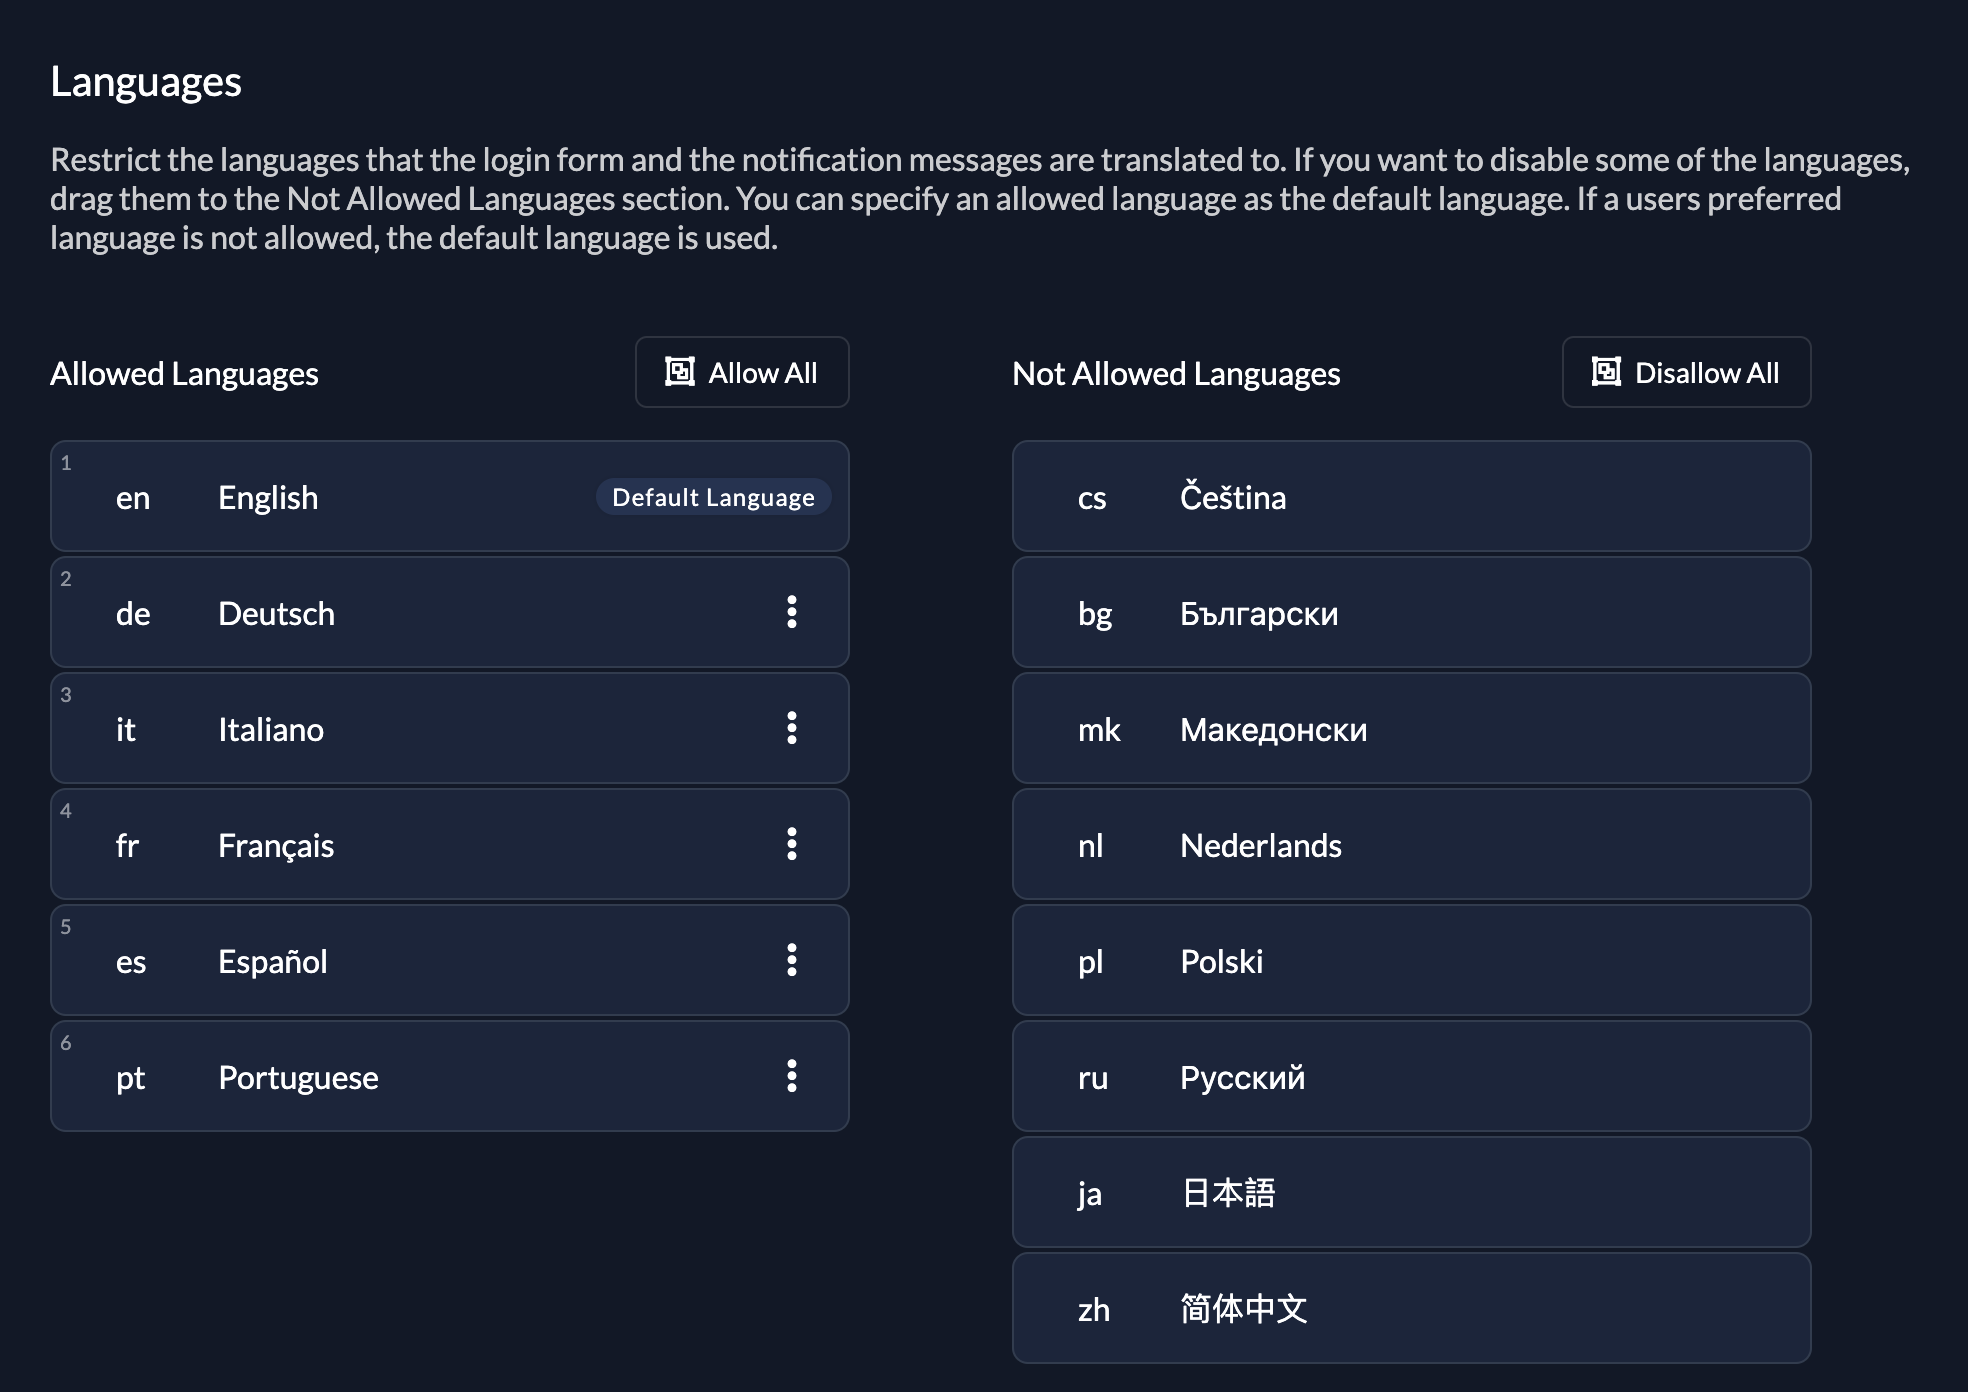 OIDC token lifetimes and expiration [#oidc-token-lifetimes-and-expiration]
Set up how long the different oidc tokens should live.
You can set the following times:
* Access Token Lifetime
* ID Token Lifetime
* Refresh Token Expiration
* Refresh Token Idle Expiration
OIDC token lifetimes and expiration [#oidc-token-lifetimes-and-expiration]
Set up how long the different oidc tokens should live.
You can set the following times:
* Access Token Lifetime
* ID Token Lifetime
* Refresh Token Expiration
* Refresh Token Idle Expiration
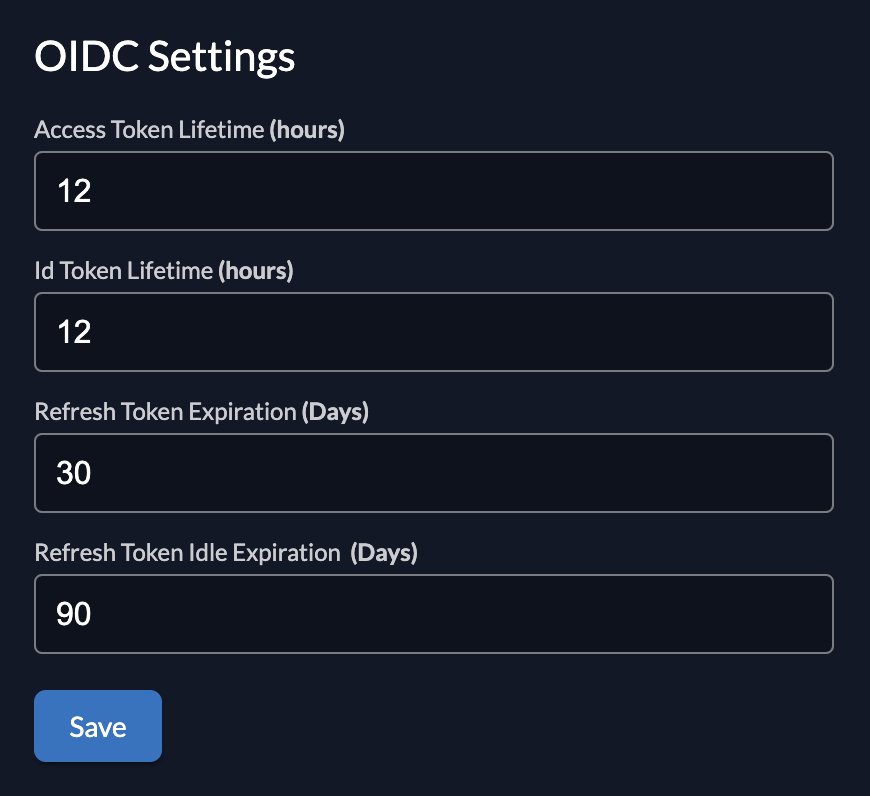 Secret generator [#secret-generator]
ZITADEL has some different codes and secrets, that can be specified.
You can specify what kind of characters should be included, how long the secret should be and the expiration.
The following secrets can be specified:
* Initialization Mail Code
* Email verification code
* Phone verification code
* Password reset code
* Passkey initialization code
* Application secrets
* One Time Password (OTP) - SMS
* One Time Password (OTP) - Email
Secret generator [#secret-generator]
ZITADEL has some different codes and secrets, that can be specified.
You can specify what kind of characters should be included, how long the secret should be and the expiration.
The following secrets can be specified:
* Initialization Mail Code
* Email verification code
* Phone verification code
* Password reset code
* Passkey initialization code
* Application secrets
* One Time Password (OTP) - SMS
* One Time Password (OTP) - Email
 If your done with your default settings, you can proceed setting up your organizations. Again, make sure you get an understanding on how your project is structured and then continue.
# Organizations
Overview [#overview]
ZITADEL is organized around the idea of multi-tenancy. An **Organization** is the vessel where your projects and users live. It is comparable to a tenant in a SaaS system or an organizational unit (OU) in a directory-based system.
Key characteristics of Organizations in ZITADEL include:
* **Multi-tenancy:** Multiple organizations can be managed within one [instance](/concepts/structure/instance).
* **Isolation:** Users and data from one organization are separated from others.
* **Delegation:** Organizations can grant each other rights to self-manage certain aspects of the IAM (e.g., roles for access management).
In a B2B use case, an organization typically represents a business partner who requires their own branding, specific access settings, or distinct federated login providers.
If your done with your default settings, you can proceed setting up your organizations. Again, make sure you get an understanding on how your project is structured and then continue.
# Organizations
Overview [#overview]
ZITADEL is organized around the idea of multi-tenancy. An **Organization** is the vessel where your projects and users live. It is comparable to a tenant in a SaaS system or an organizational unit (OU) in a directory-based system.
Key characteristics of Organizations in ZITADEL include:
* **Multi-tenancy:** Multiple organizations can be managed within one [instance](/concepts/structure/instance).
* **Isolation:** Users and data from one organization are separated from others.
* **Delegation:** Organizations can grant each other rights to self-manage certain aspects of the IAM (e.g., roles for access management).
In a B2B use case, an organization typically represents a business partner who requires their own branding, specific access settings, or distinct federated login providers.
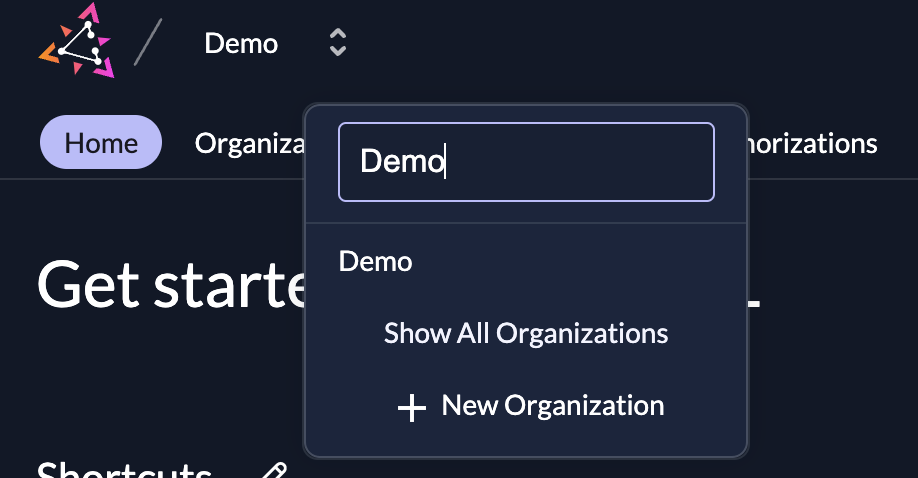 Self-Service Registration [#self-service-registration]
If you want to enable your customers to create organizations themselves, ZITADEL provides a built-in registration form at:
`https://$CUSTOM-DOMAIN/ui/login/register/org`
The customer simply fills in the organization name and contact details to get started.
Self-Service Registration [#self-service-registration]
If you want to enable your customers to create organizations themselves, ZITADEL provides a built-in registration form at:
`https://$CUSTOM-DOMAIN/ui/login/register/org`
The customer simply fills in the organization name and contact details to get started.
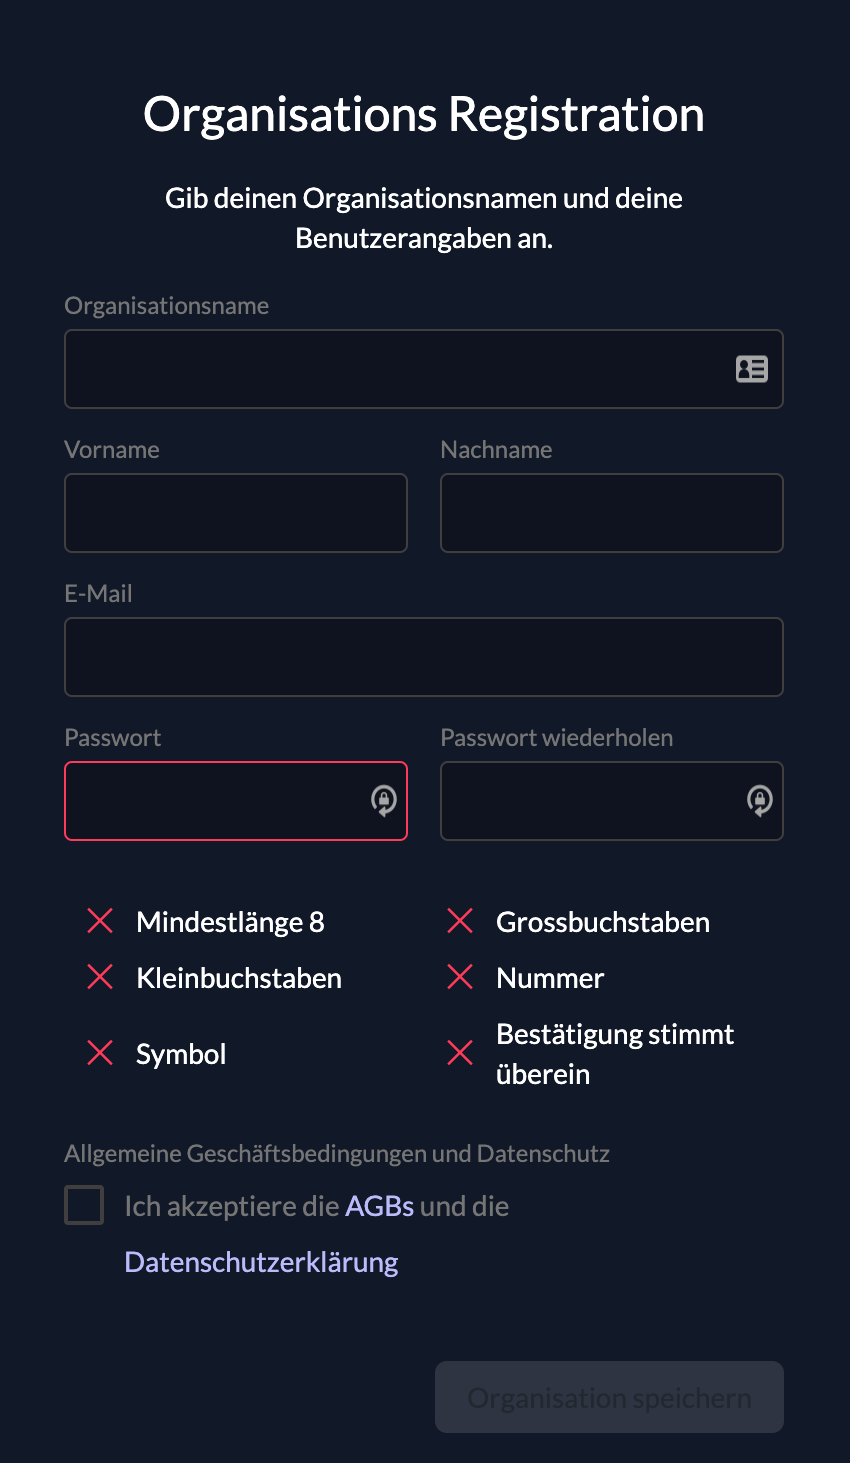 Default Organization [#default-organization]
On the **Default settings** page (`${CUSTOM_DOMAIN}`/ui/console/orgs), you can designate a specific organization as the "Default".
* Click the **...** on the right-hand side of the table and select **Set as default organization**.
* The current default is marked by a "Default" label.
When no specific organization is selected (e.g., during an auth request or via [Domain Discovery](/guides/solution-scenarios/domain-discovery)), users are directed to this default organization for login and self-registration.
Usernames and Domains [#usernames-and-domains]
Each organization has its own pool of users, covering both users and service accounts. How these users authenticate depends on your domain settings.
Login Name Formats [#login-name-formats]
By default, if the setting **User Loginname must contain orgdomain** is **disabled**, usernames are unique across the entire instance.
If you require usernames to be scoped to the organization (common in multi-tenant setups), you can enable **User Loginname must contain orgdomain** in your [Domain settings](./default-settings#domain-settings). Login names will then follow the format:
`{username}@{domainname}.{zitadeldomain}`
**Example:**
If a user has the username `john.doe` in an organization with the domain `acme`, the generated login name is:
`john.doe@acme.zitadel.cloud`
Custom Domain Names [#custom-domain-names]
You can verify your own domain names (e.g., `acme.ch`) to simplify the user experience. Once verified:
1. ZITADEL generates additional login names for users.
2. The user `john.doe` can log in via `john.doe@acme.ch` OR `john.doe@acme.zitadel.cloud`.
Default Organization [#default-organization]
On the **Default settings** page (`${CUSTOM_DOMAIN}`/ui/console/orgs), you can designate a specific organization as the "Default".
* Click the **...** on the right-hand side of the table and select **Set as default organization**.
* The current default is marked by a "Default" label.
When no specific organization is selected (e.g., during an auth request or via [Domain Discovery](/guides/solution-scenarios/domain-discovery)), users are directed to this default organization for login and self-registration.
Usernames and Domains [#usernames-and-domains]
Each organization has its own pool of users, covering both users and service accounts. How these users authenticate depends on your domain settings.
Login Name Formats [#login-name-formats]
By default, if the setting **User Loginname must contain orgdomain** is **disabled**, usernames are unique across the entire instance.
If you require usernames to be scoped to the organization (common in multi-tenant setups), you can enable **User Loginname must contain orgdomain** in your [Domain settings](./default-settings#domain-settings). Login names will then follow the format:
`{username}@{domainname}.{zitadeldomain}`
**Example:**
If a user has the username `john.doe` in an organization with the domain `acme`, the generated login name is:
`john.doe@acme.zitadel.cloud`
Custom Domain Names [#custom-domain-names]
You can verify your own domain names (e.g., `acme.ch`) to simplify the user experience. Once verified:
1. ZITADEL generates additional login names for users.
2. The user `john.doe` can log in via `john.doe@acme.ch` OR `john.doe@acme.zitadel.cloud`.
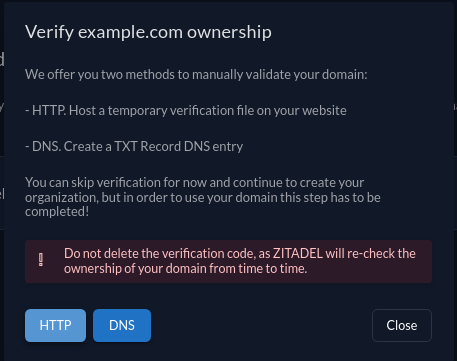 4. **DNS Challenge Example:** Create a TXT record with your DNS provider using the value provided by ZITADEL.
* [Cloudflare Guide](https://www.zoho.com/mail/help/adminconsole/cloudflare.html#alink1)
* [Squarespace Guide](https://support.squarespace.com/hc/en-us/articles/205812388-Domain-verification-with-a-TXT-Record-alternative-method-)
* [Name.com Guide](https://www.name.com/support/articles/115004972547-adding-a-txt-record)
* [EasyDNS Guide](https://kb.easydns.com/knowledge/how-to-make-a-dns-entry/)
5. Once verified, click **Verify**.
6. (Optional) Click **Set as primary** to make this the default domain for user login names.
4. **DNS Challenge Example:** Create a TXT record with your DNS provider using the value provided by ZITADEL.
* [Cloudflare Guide](https://www.zoho.com/mail/help/adminconsole/cloudflare.html#alink1)
* [Squarespace Guide](https://support.squarespace.com/hc/en-us/articles/205812388-Domain-verification-with-a-TXT-Record-alternative-method-)
* [Name.com Guide](https://www.name.com/support/articles/115004972547-adding-a-txt-record)
* [EasyDNS Guide](https://kb.easydns.com/knowledge/how-to-make-a-dns-entry/)
5. Once verified, click **Verify**.
6. (Optional) Click **Set as primary** to make this the default domain for user login names.
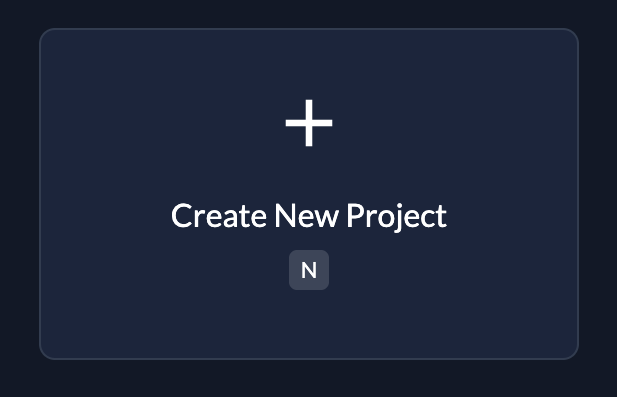 4. Enter your project name and continue.
Granted Projects (B2B) [#granted-projects-b-2-b]
A powerful feature of ZITADEL is the ability to **Grant** a project to other organizations. This is essential for B2B scenarios where you sell your software to business partners.
* **The Concept:** You enable another organization to use your Project.
* **Delegation:** The granted organization can manage the role assignments of *their own users* for your project. They can assign the roles you defined to their employees without your intervention.
* **Isolation:** You can select specifically which roles are available to the granted organization. This allows you to restrict features (e.g., "Premium" roles) per customer.
Using the POS example above: You could grant the `POS` project to a partner organization. That partner can then log in with their own domain, use their own branding, and manage their own cashier users, all while using your underlying application structure.
4. Enter your project name and continue.
Granted Projects (B2B) [#granted-projects-b-2-b]
A powerful feature of ZITADEL is the ability to **Grant** a project to other organizations. This is essential for B2B scenarios where you sell your software to business partners.
* **The Concept:** You enable another organization to use your Project.
* **Delegation:** The granted organization can manage the role assignments of *their own users* for your project. They can assign the roles you defined to their employees without your intervention.
* **Isolation:** You can select specifically which roles are available to the granted organization. This allows you to restrict features (e.g., "Premium" roles) per customer.
Using the POS example above: You could grant the `POS` project to a partner organization. That partner can then log in with their own domain, use their own branding, and manage their own cashier users, all while using your underlying application structure.
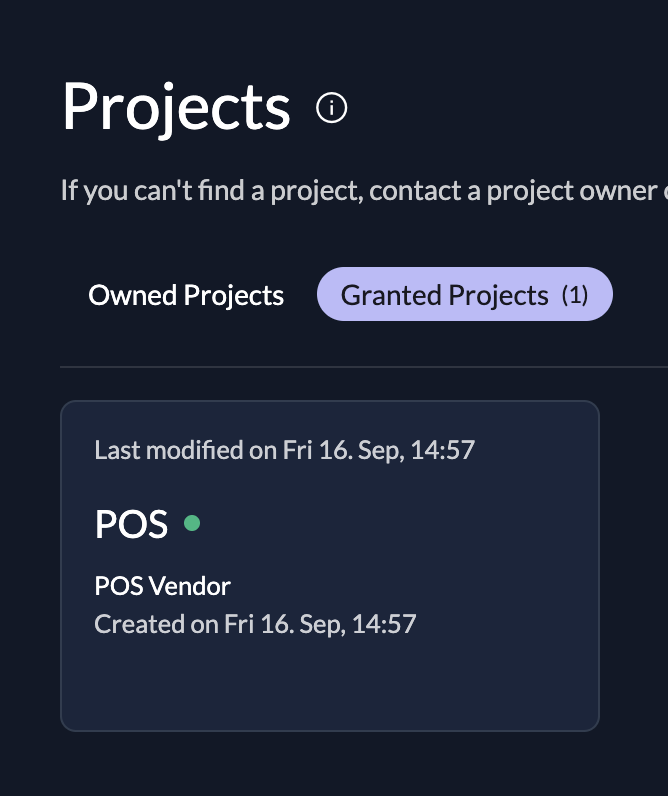 How to Grant a Project [#how-to-grant-a-project]
1. Navigate to the Project you want to share (e.g., `POS`).
2. In the **Project Grants** section, click **New**.
How to Grant a Project [#how-to-grant-a-project]
1. Navigate to the Project you want to share (e.g., `POS`).
2. In the **Project Grants** section, click **New**.
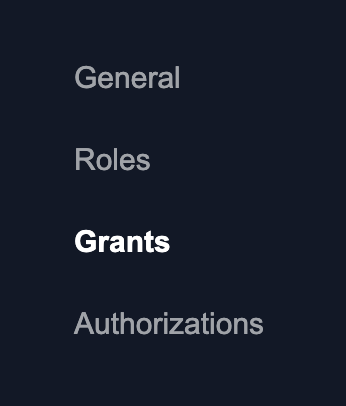 3. Enter the **Domain** of the partner organization you want to grant access to.
* *Tip: If you don't know the domain, navigate to the Organization detail page to find it.*
4. Search and select the organization.
5. Select the **Roles** you want to grant to this organization and click **Save**.
Project Settings [#project-settings]
You can customize the behavior of your project, particularly regarding how login screens look and how tokens are issued.
Branding [#branding]
If you have different designs for your organizations (Private Labeling), you can define the login behavior on the project detail page.
3. Enter the **Domain** of the partner organization you want to grant access to.
* *Tip: If you don't know the domain, navigate to the Organization detail page to find it.*
4. Search and select the organization.
5. Select the **Roles** you want to grant to this organization and click **Save**.
Project Settings [#project-settings]
You can customize the behavior of your project, particularly regarding how login screens look and how tokens are issued.
Branding [#branding]
If you have different designs for your organizations (Private Labeling), you can define the login behavior on the project detail page.
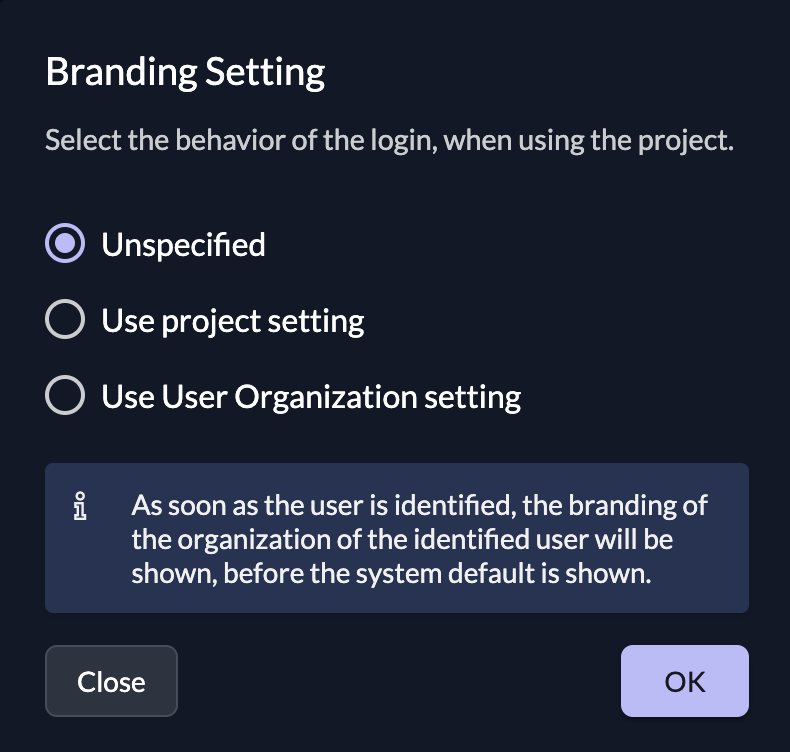 | Setting | Description |
| :--------------------------- | :-------------------------------------------------------------------------------------------------------------------------------------------------------------------------------------------------------- |
| **Unspecified** | If nothing is specified, the system default settings will trigger. |
| **Enforce project's policy** | This forces the branding of the organization that *owns* the project throughout the entire login process. Useful if you want your users to always see *your* brand, even if they belong to a partner org. |
| **Allow login user policy** | The login starts with the project's branding. However, as soon as the user is identified (e.g., by entering their email), the branding switches to match the user's organization. |
In a B2B use case, you would typically use **Allow login user policy**. If you want to skip the detection step, you can preselect an organization using the [Organization Domain scope](/apis/openidoauth/scopes#reserved-scopes) (e.g., `urn:zitadel:iam:org:domain:primary:{domainname}`).
Role Settings [#role-settings]
You can configure strict security checks regarding roles during authentication.
| Setting | Description |
| :--------------------------- | :-------------------------------------------------------------------------------------------------------------------------------------------------------------------------------------------------------- |
| **Unspecified** | If nothing is specified, the system default settings will trigger. |
| **Enforce project's policy** | This forces the branding of the organization that *owns* the project throughout the entire login process. Useful if you want your users to always see *your* brand, even if they belong to a partner org. |
| **Allow login user policy** | The login starts with the project's branding. However, as soon as the user is identified (e.g., by entering their email), the branding switches to match the user's organization. |
In a B2B use case, you would typically use **Allow login user policy**. If you want to skip the detection step, you can preselect an organization using the [Organization Domain scope](/apis/openidoauth/scopes#reserved-scopes) (e.g., `urn:zitadel:iam:org:domain:primary:{domainname}`).
Role Settings [#role-settings]
You can configure strict security checks regarding roles during authentication.
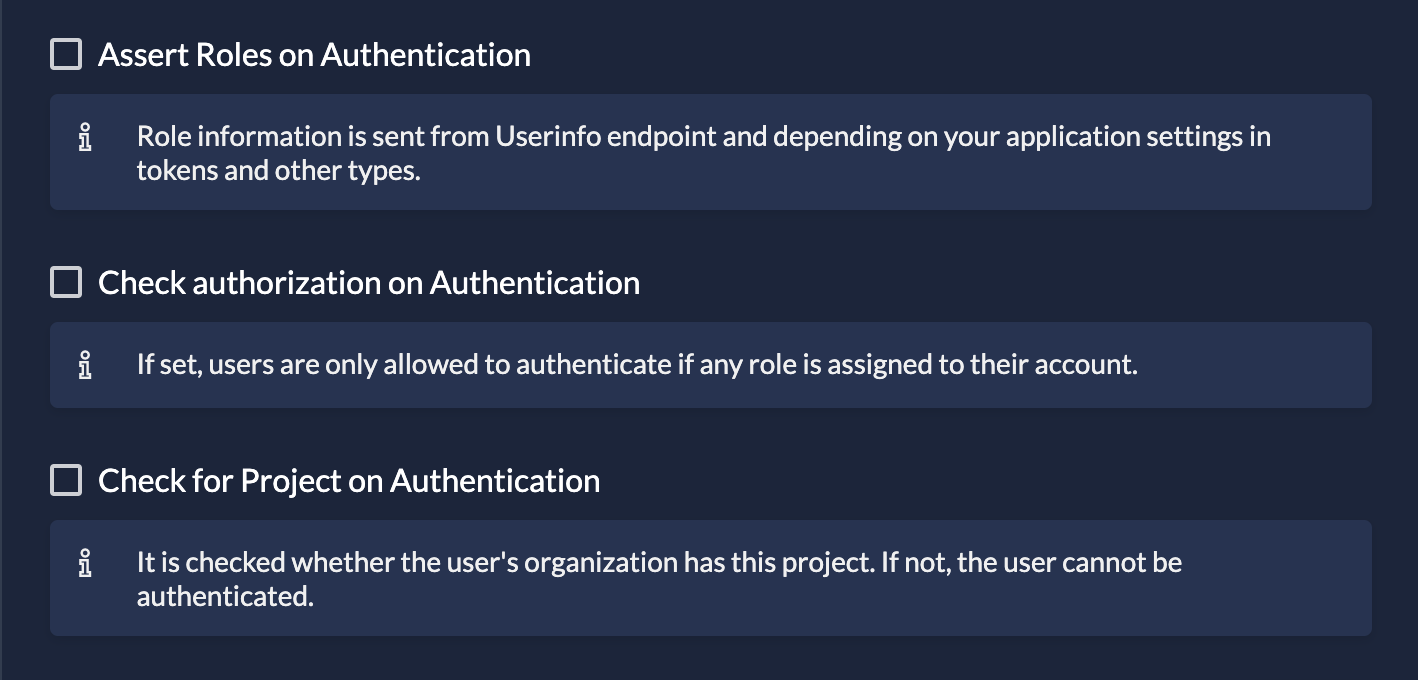 * **Assert Roles on Authentication:** Role information is sent from the Userinfo endpoint (and in tokens, depending on app settings).
* **Check Role Assignment on Authentication:** Users are **only** allowed to log in if they have at least one role assigned for this project. If they have no roles, access is denied immediately.
* **Check for Project on Authentication:** Checks if the user's organization actually has a grant for this project. If not, the user cannot be authenticated.
Roles in Tokens [#roles-in-tokens]
If you want roles to appear directly inside your Access or ID Tokens (to avoid calling the Userinfo endpoint), you must enable this per application.
1. Navigate to your **Application**.
2. Open **Token Settings**.
3. Check **Assert Roles on Authentication**.
* **Assert Roles on Authentication:** Role information is sent from the Userinfo endpoint (and in tokens, depending on app settings).
* **Check Role Assignment on Authentication:** Users are **only** allowed to log in if they have at least one role assigned for this project. If they have no roles, access is denied immediately.
* **Check for Project on Authentication:** Checks if the user's organization actually has a grant for this project. If not, the user cannot be authenticated.
Roles in Tokens [#roles-in-tokens]
If you want roles to appear directly inside your Access or ID Tokens (to avoid calling the Userinfo endpoint), you must enable this per application.
1. Navigate to your **Application**.
2. Open **Token Settings**.
3. Check **Assert Roles on Authentication**.
 You can learn more about Application and Token settings [here](./applications-overview).
# ZITADEL Roles and Role Assignments
If you built out the [POS use case example](./projects-overview#example-scenario), you would probably need an application for administration.
In this application you would probably have somebody accessing as an accountant and somebody as an administrator, who is somebody with enhanced rights.
To achieve this, you would have to add this distinction as roles.
To add roles, jump to the section **Roles** and create those new roles with the following values
* Key: admin
* Display Name: Administrator
* Group: Administration
and
* Key: account
* Display Name: Accountant
* Group: Administration
You can learn more about Application and Token settings [here](./applications-overview).
# ZITADEL Roles and Role Assignments
If you built out the [POS use case example](./projects-overview#example-scenario), you would probably need an application for administration.
In this application you would probably have somebody accessing as an accountant and somebody as an administrator, who is somebody with enhanced rights.
To achieve this, you would have to add this distinction as roles.
To add roles, jump to the section **Roles** and create those new roles with the following values
* Key: admin
* Display Name: Administrator
* Group: Administration
and
* Key: account
* Display Name: Accountant
* Group: Administration
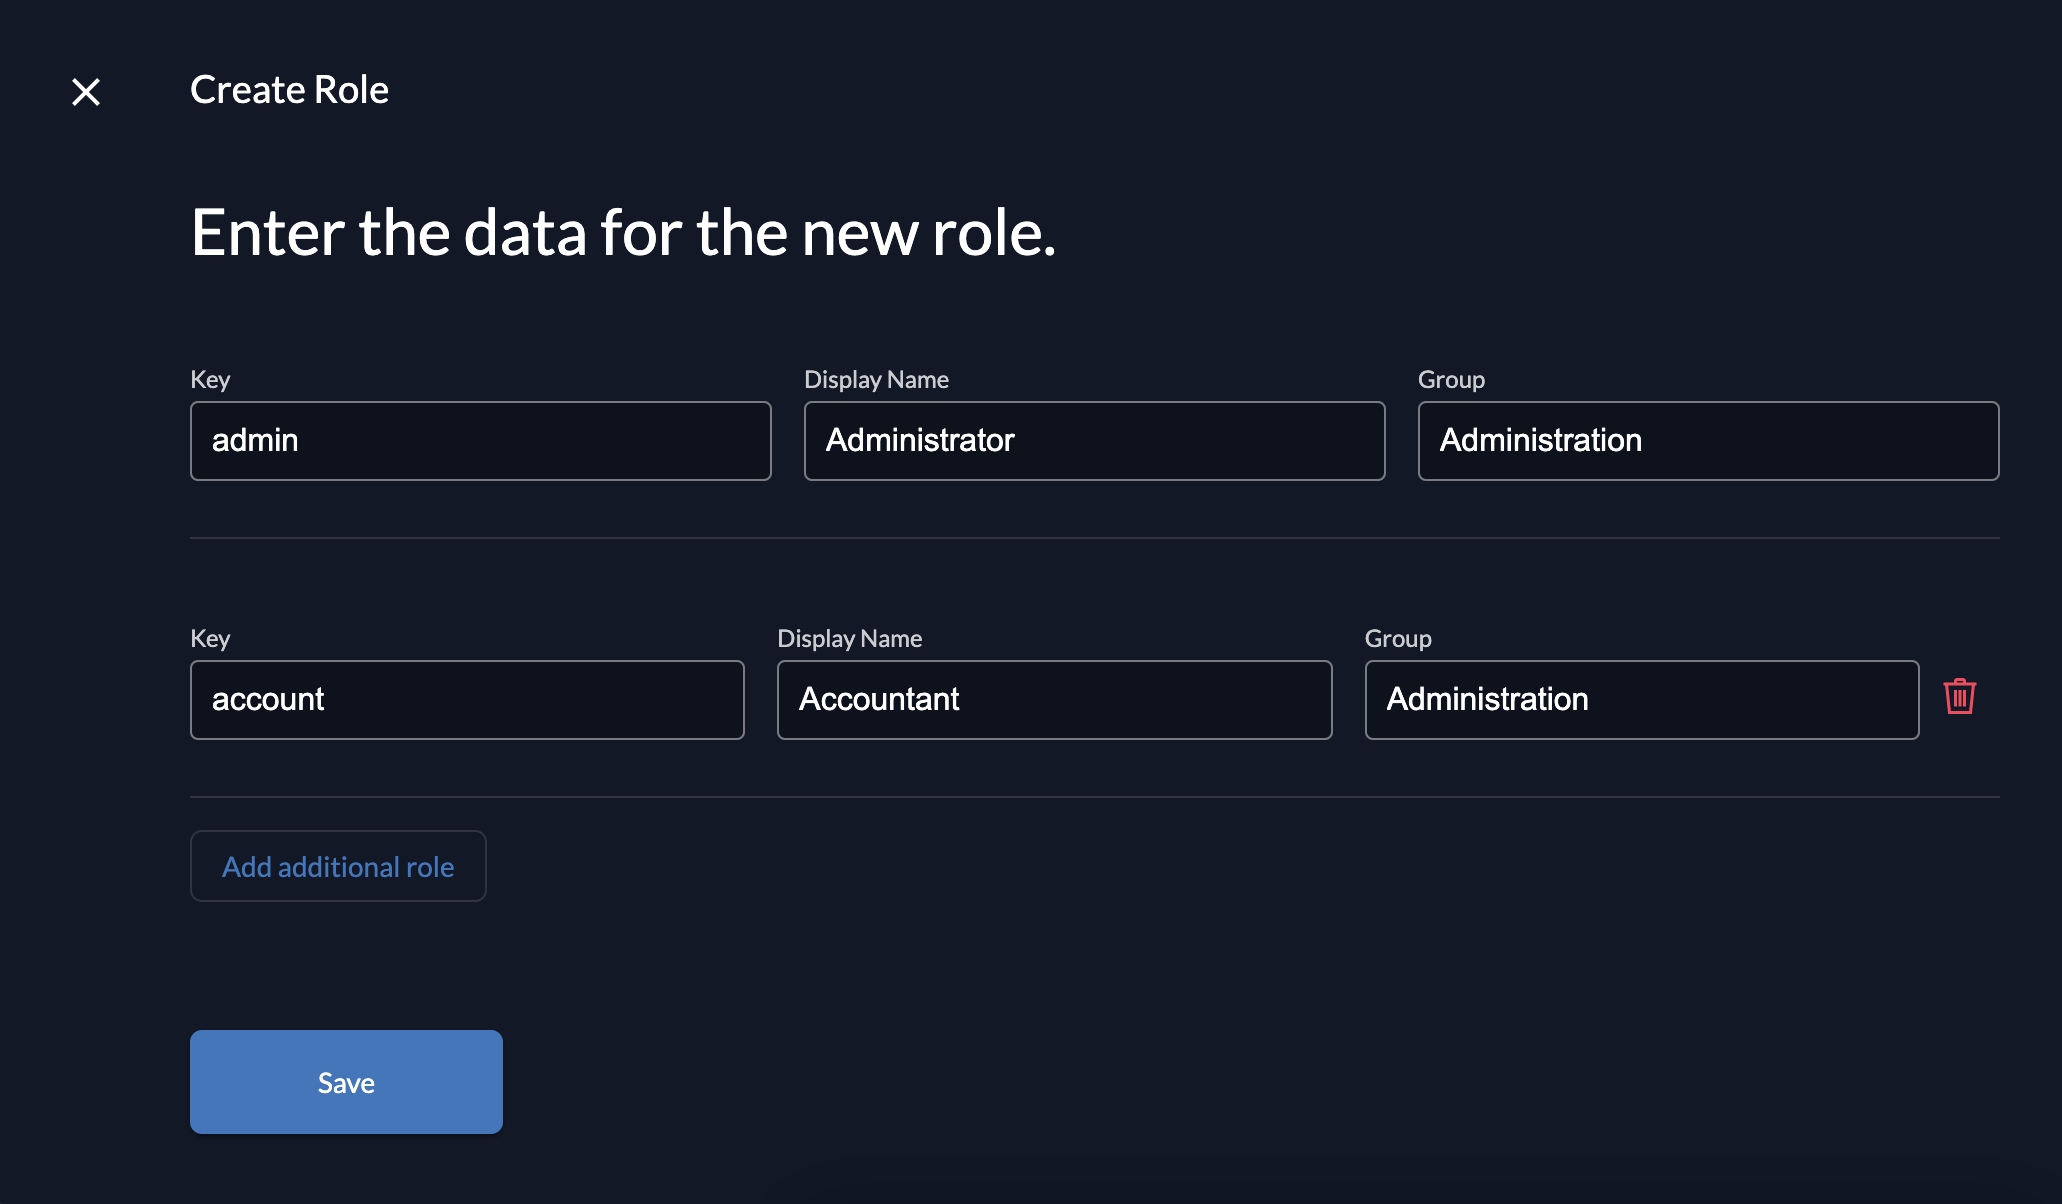 The **Key** is used for coding (can then, for example, be requested in the ID Token).
The **Display Name** is just for you to remember its use case
The **Group** is to make it easier to assign multiple roles at once.
The **Key** is used for coding (can then, for example, be requested in the ID Token).
The **Display Name** is just for you to remember its use case
The **Group** is to make it easier to assign multiple roles at once.
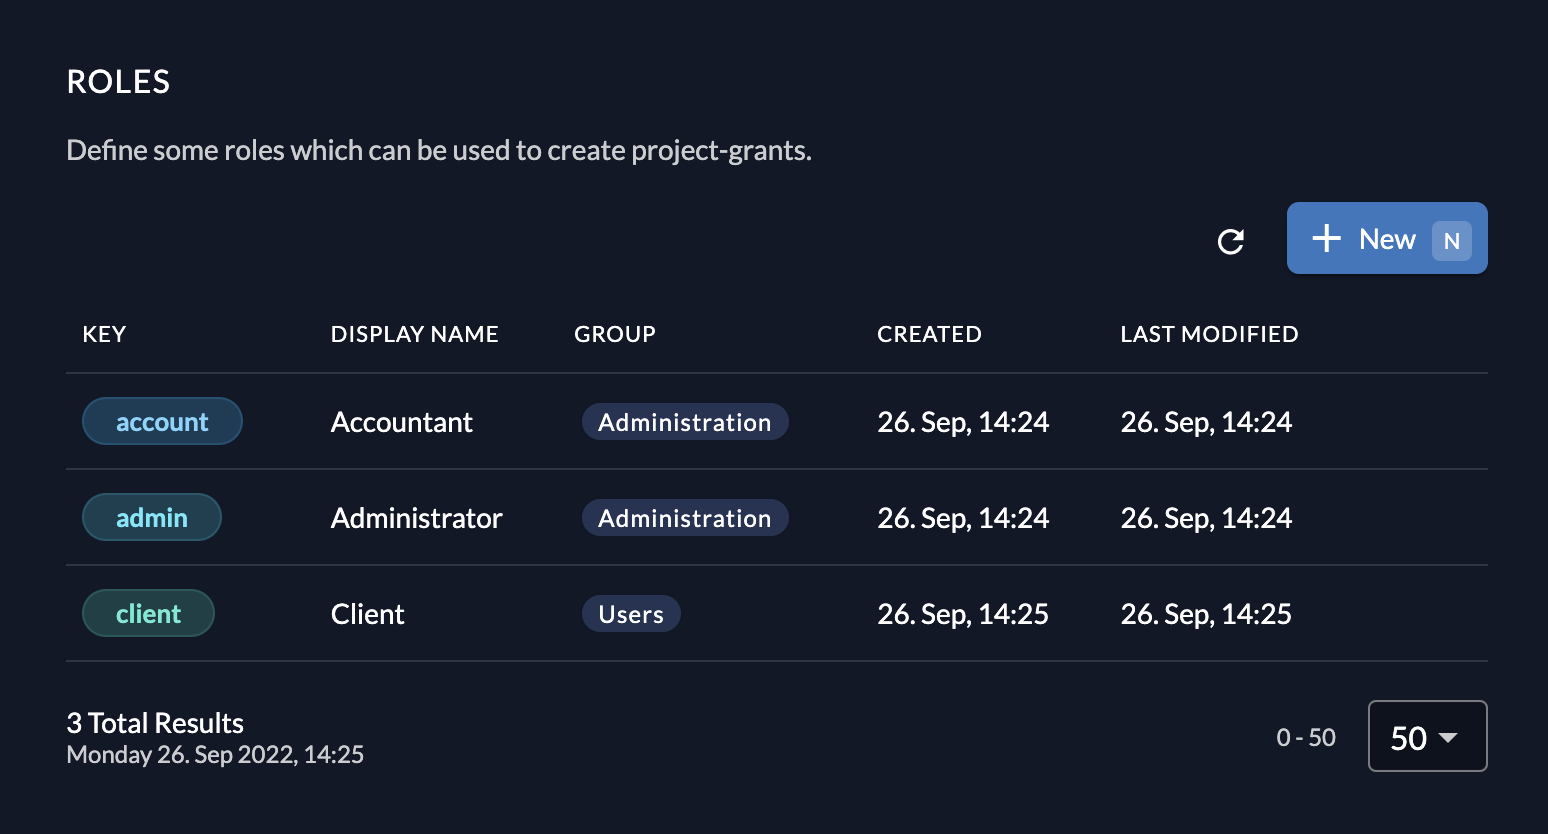 > The role client is for another application of the project `POS`, as all possible roles from your POS applications are defined in your project.
Role Assignments [#role-assignments]
Now, to make use of these roles, add a role assignment.
A role assignment combines a user of your organization with one or multiple roles.
> You can also add users of other organizations. Click on the hint below the username field to create an [external user role assignment](/concepts/features/external-user-grant).
> The role client is for another application of the project `POS`, as all possible roles from your POS applications are defined in your project.
Role Assignments [#role-assignments]
Now, to make use of these roles, add a role assignment.
A role assignment combines a user of your organization with one or multiple roles.
> You can also add users of other organizations. Click on the hint below the username field to create an [external user role assignment](/concepts/features/external-user-grant).
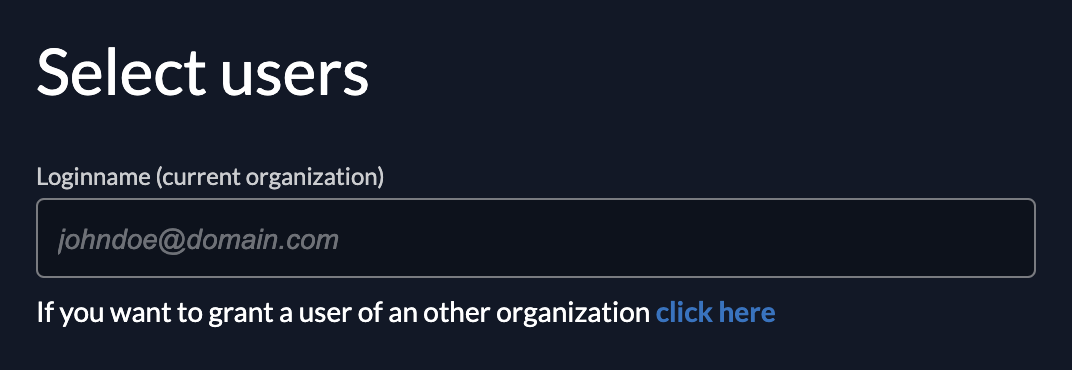 If you want to test your application with your own user, navigate to the **Role Assignments** section under your project and click on **new**.
Type your username, hit "Continue," select the roles you want your user to have, and save. If you want to add all roles of the Administration group, you can click on the group to select all.
If you want to test your application with your own user, navigate to the **Role Assignments** section under your project and click on **new**.
Type your username, hit "Continue," select the roles you want your user to have, and save. If you want to add all roles of the Administration group, you can click on the group to select all.
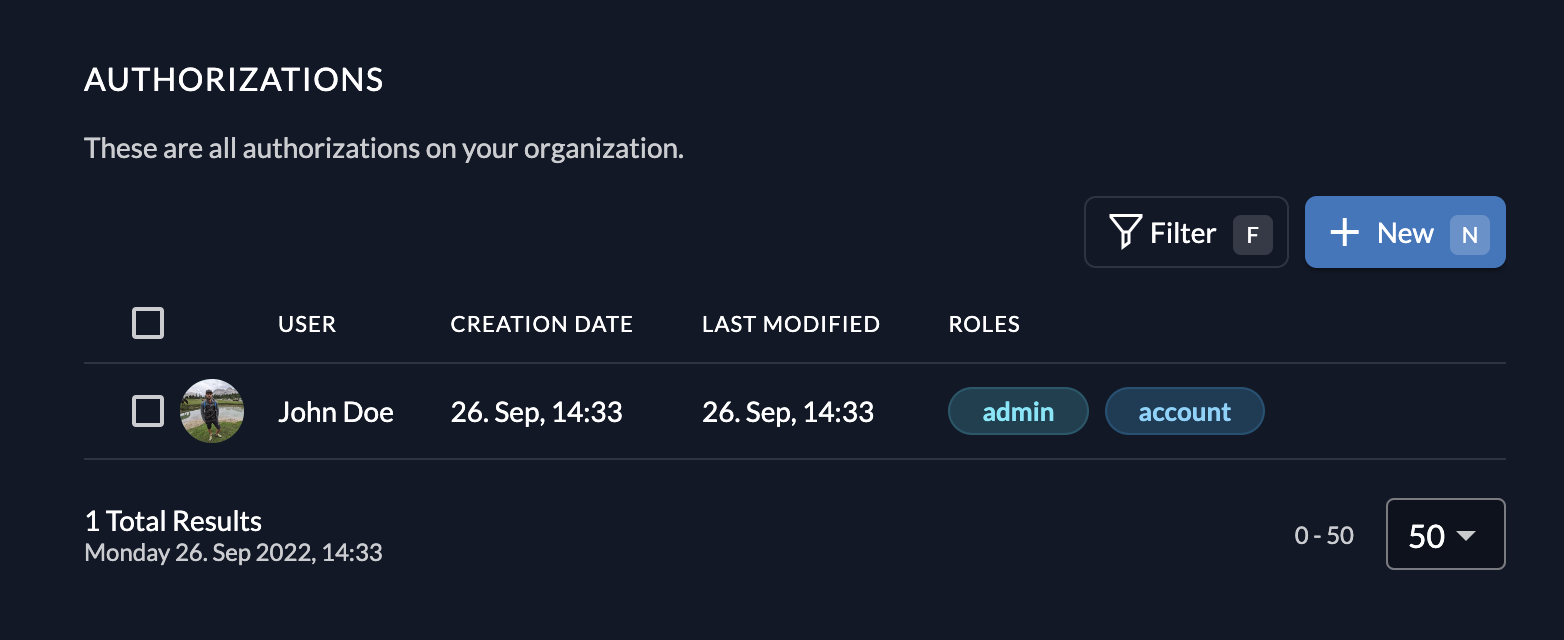 Now you can retrieve those roles in your application. ZITADEL has [multiple settings](./projects-overview#project-settings) for you to access them more easily. Navigate to the **General** section of your project for more settings.
> Note: We set up the role assignments from projects, but this can be achieved from multiple locations in the console. You can view and assign roles from the organization, the projects, or from the users page.
# Users
import CreateUser from './_create-user.mdx';
Overview [#overview]
ZITADEL supports authentication and authorization for different user types. We mainly differentiate between **users** (interactive) and **Service Accounts** (machine-to-machine).
Now you can retrieve those roles in your application. ZITADEL has [multiple settings](./projects-overview#project-settings) for you to access them more easily. Navigate to the **General** section of your project for more settings.
> Note: We set up the role assignments from projects, but this can be achieved from multiple locations in the console. You can view and assign roles from the organization, the projects, or from the users page.
# Users
import CreateUser from './_create-user.mdx';
Overview [#overview]
ZITADEL supports authentication and authorization for different user types. We mainly differentiate between **users** (interactive) and **Service Accounts** (machine-to-machine).
 Types of Users [#types-of-users]
Users (Human) [#users-human]
Users represent actual people who log in via an interactive interface (e.g., a login page).
* **Profile:** Has an email address, password, and optional profile data (phone, nickname, gender, language).
* **Authentication:** Can authenticate via password, multiple factors (MFA), or passwordless authentication (Passkeys).
* **Flow:** The application redirects the user to ZITADEL, which handles the credentials and issues a token to the application.
Read more on how to [login users with ZITADEL](/guides/integrate/login/login-users).
Service Accounts [#service-accounts]
Service accounts represent machines, backend services, or IoT devices requiring non-interactive access.
* **Profile:** Only has a name, description, and username.
* **Authentication:** Authenticates via **JWT Profile** or **Personal Access Tokens (PAT)**. Both methods support expiration settings.
* **Usage:** Primarily used to gain access to the ZITADEL Management API or to secure backend-to-backend communication.
To see how service accounts are utilized in practice, check out our [NextJS B2B Demo application](https://github.com/zitadel/zitadel-nextjs-b2b).
Federated Users [#federated-users]
Federated users are identities managed by a third-party Identity Provider (IdP) such as Google, Azure AD, or GitHub.
* **Identity Brokering:** Users log in via the external IdP ("Single Sign-On").
* **Account Linking:** Federated identities are [linked](../../../concepts/features/account-linking) to internal ZITADEL users to facilitate role assignment and audit trails.
External Users [#external-users]
In a multi-tenancy architecture, users are typically isolated within [Organizations](./organizations-overview).
However, using [External User Grants](../../../concepts/features/external-user-grant), an organization can invite users from *another* organization to access their projects. These invited users are referred to as **External Users** within the context of the inviting organization.
Administrators [#administrators]
Any user—whether User or Service Account—can be assigned an [Administrator Role](/concepts/structure/administrators).
A user with an administrator role is not just an end-user of your application but also has permissions to manage specific aspects of the ZITADEL instance, organization, or project (e.g., `ORG_OWNER`, `PROJECT_OWNER`).
Considerations [#considerations]
Uniqueness of Users [#uniqueness-of-users]
* **Scope:** Users exist strictly within **one** [Organization](./organizations-overview). It is currently not possible to move users between organizations.
* **Identifier:** User accounts are uniquely identified by their `id` or their `loginname` combined with the `Organization Domain` (e.g., `road.runner@acme.zitadel.local`).
* **Emails:** You can reuse the same email address for different user accounts across organizations.
Structuring User Pools [#structuring-user-pools]
How you organize users depends on your scenario:
* **B2B / Multi-Tenancy:** We recommend creating separate organizations for each business customer (e.g., based on their domain). Grant your projects to these organizations so they can manage their own users.
* **B2C / CIAM:** You might want to store all users in a single organization and enable a specific set of social logins for that organization.
Types of Users [#types-of-users]
Users (Human) [#users-human]
Users represent actual people who log in via an interactive interface (e.g., a login page).
* **Profile:** Has an email address, password, and optional profile data (phone, nickname, gender, language).
* **Authentication:** Can authenticate via password, multiple factors (MFA), or passwordless authentication (Passkeys).
* **Flow:** The application redirects the user to ZITADEL, which handles the credentials and issues a token to the application.
Read more on how to [login users with ZITADEL](/guides/integrate/login/login-users).
Service Accounts [#service-accounts]
Service accounts represent machines, backend services, or IoT devices requiring non-interactive access.
* **Profile:** Only has a name, description, and username.
* **Authentication:** Authenticates via **JWT Profile** or **Personal Access Tokens (PAT)**. Both methods support expiration settings.
* **Usage:** Primarily used to gain access to the ZITADEL Management API or to secure backend-to-backend communication.
To see how service accounts are utilized in practice, check out our [NextJS B2B Demo application](https://github.com/zitadel/zitadel-nextjs-b2b).
Federated Users [#federated-users]
Federated users are identities managed by a third-party Identity Provider (IdP) such as Google, Azure AD, or GitHub.
* **Identity Brokering:** Users log in via the external IdP ("Single Sign-On").
* **Account Linking:** Federated identities are [linked](../../../concepts/features/account-linking) to internal ZITADEL users to facilitate role assignment and audit trails.
External Users [#external-users]
In a multi-tenancy architecture, users are typically isolated within [Organizations](./organizations-overview).
However, using [External User Grants](../../../concepts/features/external-user-grant), an organization can invite users from *another* organization to access their projects. These invited users are referred to as **External Users** within the context of the inviting organization.
Administrators [#administrators]
Any user—whether User or Service Account—can be assigned an [Administrator Role](/concepts/structure/administrators).
A user with an administrator role is not just an end-user of your application but also has permissions to manage specific aspects of the ZITADEL instance, organization, or project (e.g., `ORG_OWNER`, `PROJECT_OWNER`).
Considerations [#considerations]
Uniqueness of Users [#uniqueness-of-users]
* **Scope:** Users exist strictly within **one** [Organization](./organizations-overview). It is currently not possible to move users between organizations.
* **Identifier:** User accounts are uniquely identified by their `id` or their `loginname` combined with the `Organization Domain` (e.g., `road.runner@acme.zitadel.local`).
* **Emails:** You can reuse the same email address for different user accounts across organizations.
Structuring User Pools [#structuring-user-pools]
How you organize users depends on your scenario:
* **B2B / Multi-Tenancy:** We recommend creating separate organizations for each business customer (e.g., based on their domain). Grant your projects to these organizations so they can manage their own users.
* **B2C / CIAM:** You might want to store all users in a single organization and enable a specific set of social logins for that organization.
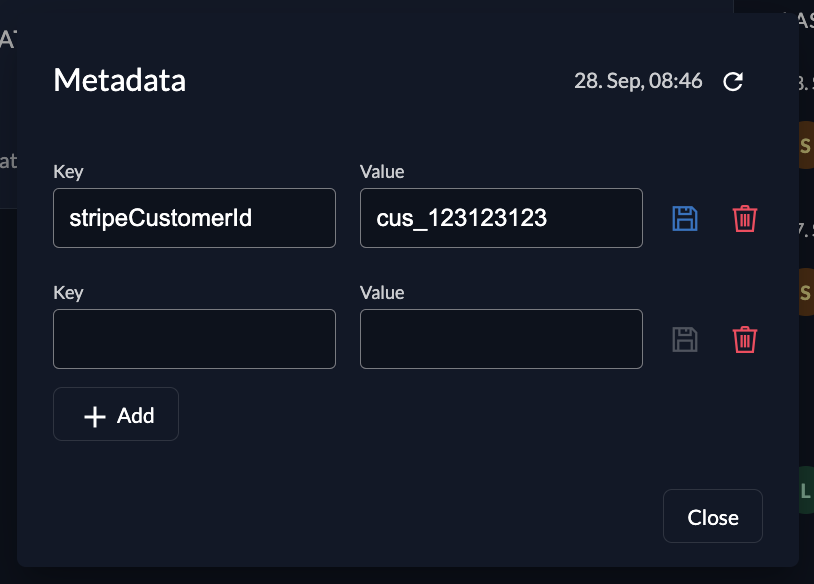 **Accessing Metadata:**
Metadata can be requested via the Auth and Management APIs, the Userinfo endpoint, or asserted directly into the ID Token.
1. **Userinfo Endpoint:** Add the scope `urn:zitadel:iam:user:metadata` to your authentication request.
2. **ID Token:** To include metadata in the token, navigate to your **Application Settings** and toggle **User Info inside ID Token**.
**Accessing Metadata:**
Metadata can be requested via the Auth and Management APIs, the Userinfo endpoint, or asserted directly into the ID Token.
1. **Userinfo Endpoint:** Add the scope `urn:zitadel:iam:user:metadata` to your authentication request.
2. **ID Token:** To include metadata in the token, navigate to your **Application Settings** and toggle **User Info inside ID Token**.
 Role Assignments [#role-assignments]
The roles assigned to a user are displayed on user profile pages.
To access these roles in your application:
* **Userinfo Endpoint:** Check the **Assert roles on authentication** box in your [Project Settings](./roles#role-assignments).
* **ID Token:** Toggle **User roles inside ID Token** in your [Application Settings](./applications-overview).
References [#references]
* [Manage users in the Management Console](./users-overview#managing-users)
* [Migrate to ZITADEL](/guides/migrate/introduction)
* [User onboarding and registration](/guides/integrate/onboarding)
# Behavior Customization
In this guide, you will create a [ZITADEL action](../../../concepts/features/actions).
After users register using an external identity provider, the action assigns them a role.
Prerequisites [#prerequisites]
Before you start, make sure you have everything set up correctly.
* You need to be at least a ZITADEL *ORG\_OWNER*
* Your ZITADEL organization needs to have the actions feature enabled. - [Your ZITADEL organization needs to have at least one external identity provider enabled](../../integrate/identity-providers/introduction)
* [You need to have at least one role configured for a project](../console/projects)
Copy some information for the action [#copy-some-information-for-the-action]
1. Select the **Projects** navigation item.
2. Select a project that has a role configured.
3. Copy the Project ID on the screens top right.
4. Scroll to the **ROLES** section and note some roles key.
Create the action [#create-the-action]
1. Select the **Actions** navigation item.
2. In the **Actions ** section, select the **+ New** button.
3. Give the new action the name `addGrant`.
4. Paste this snippet into the multiline text-field.
5. Replace the snippets placeholders and select **Save**.
```js reference
https://github.com/zitadel/actions/blob/main/examples/add_user_grant.js
```
Run the action when a user registers [#run-the-action-when-a-user-registers]
Now, make the action hook into the [external authentication flow](/apis/actions/external-authentication).
1. In the **Flows ** section, select the **+ New** button.
2. Select the **Flow Type** *External Authentication*.
3. Select the **Trigger Type** *Post Creation*.
4. In the **Actions** dropdown, check *addGrant*.
5. Select the **Save** button.
New users automatically are assigned a role now if they register by authenticating with an external identity provider.
What's next? [#whats-next]
* [Read more about the concepts around actions](/concepts/features/actions)
* [Read more about all the options you have with actions](/guides/manage/console/actions-overview)
# Brand Customization
ZITADEL offers various customization options for your projects brand design. The branding can be configured on two different levels.
The settings on the instance level will set the default settings, which are triggered for all users if not overwritten on an organization specifically.
The second possibility is to configure it on each organization. This guide will describe the second possibility.
For this head over to the Branding Setting on your Organization Page.
How it works [#how-it-works]
You are able to customize the light and a dark mode separately.
All your changes will be shown in the preview window on the right side.
As soon as you are happy with your settings click the "Apply settings" button.
After this your settings will trigger in your system. The login and the emails will be sent with your branding.
Settings [#settings]
Role Assignments [#role-assignments]
The roles assigned to a user are displayed on user profile pages.
To access these roles in your application:
* **Userinfo Endpoint:** Check the **Assert roles on authentication** box in your [Project Settings](./roles#role-assignments).
* **ID Token:** Toggle **User roles inside ID Token** in your [Application Settings](./applications-overview).
References [#references]
* [Manage users in the Management Console](./users-overview#managing-users)
* [Migrate to ZITADEL](/guides/migrate/introduction)
* [User onboarding and registration](/guides/integrate/onboarding)
# Behavior Customization
In this guide, you will create a [ZITADEL action](../../../concepts/features/actions).
After users register using an external identity provider, the action assigns them a role.
Prerequisites [#prerequisites]
Before you start, make sure you have everything set up correctly.
* You need to be at least a ZITADEL *ORG\_OWNER*
* Your ZITADEL organization needs to have the actions feature enabled. - [Your ZITADEL organization needs to have at least one external identity provider enabled](../../integrate/identity-providers/introduction)
* [You need to have at least one role configured for a project](../console/projects)
Copy some information for the action [#copy-some-information-for-the-action]
1. Select the **Projects** navigation item.
2. Select a project that has a role configured.
3. Copy the Project ID on the screens top right.
4. Scroll to the **ROLES** section and note some roles key.
Create the action [#create-the-action]
1. Select the **Actions** navigation item.
2. In the **Actions ** section, select the **+ New** button.
3. Give the new action the name `addGrant`.
4. Paste this snippet into the multiline text-field.
5. Replace the snippets placeholders and select **Save**.
```js reference
https://github.com/zitadel/actions/blob/main/examples/add_user_grant.js
```
Run the action when a user registers [#run-the-action-when-a-user-registers]
Now, make the action hook into the [external authentication flow](/apis/actions/external-authentication).
1. In the **Flows ** section, select the **+ New** button.
2. Select the **Flow Type** *External Authentication*.
3. Select the **Trigger Type** *Post Creation*.
4. In the **Actions** dropdown, check *addGrant*.
5. Select the **Save** button.
New users automatically are assigned a role now if they register by authenticating with an external identity provider.
What's next? [#whats-next]
* [Read more about the concepts around actions](/concepts/features/actions)
* [Read more about all the options you have with actions](/guides/manage/console/actions-overview)
# Brand Customization
ZITADEL offers various customization options for your projects brand design. The branding can be configured on two different levels.
The settings on the instance level will set the default settings, which are triggered for all users if not overwritten on an organization specifically.
The second possibility is to configure it on each organization. This guide will describe the second possibility.
For this head over to the Branding Setting on your Organization Page.
How it works [#how-it-works]
You are able to customize the light and a dark mode separately.
All your changes will be shown in the preview window on the right side.
As soon as you are happy with your settings click the "Apply settings" button.
After this your settings will trigger in your system. The login and the emails will be sent with your branding.
Settings [#settings]
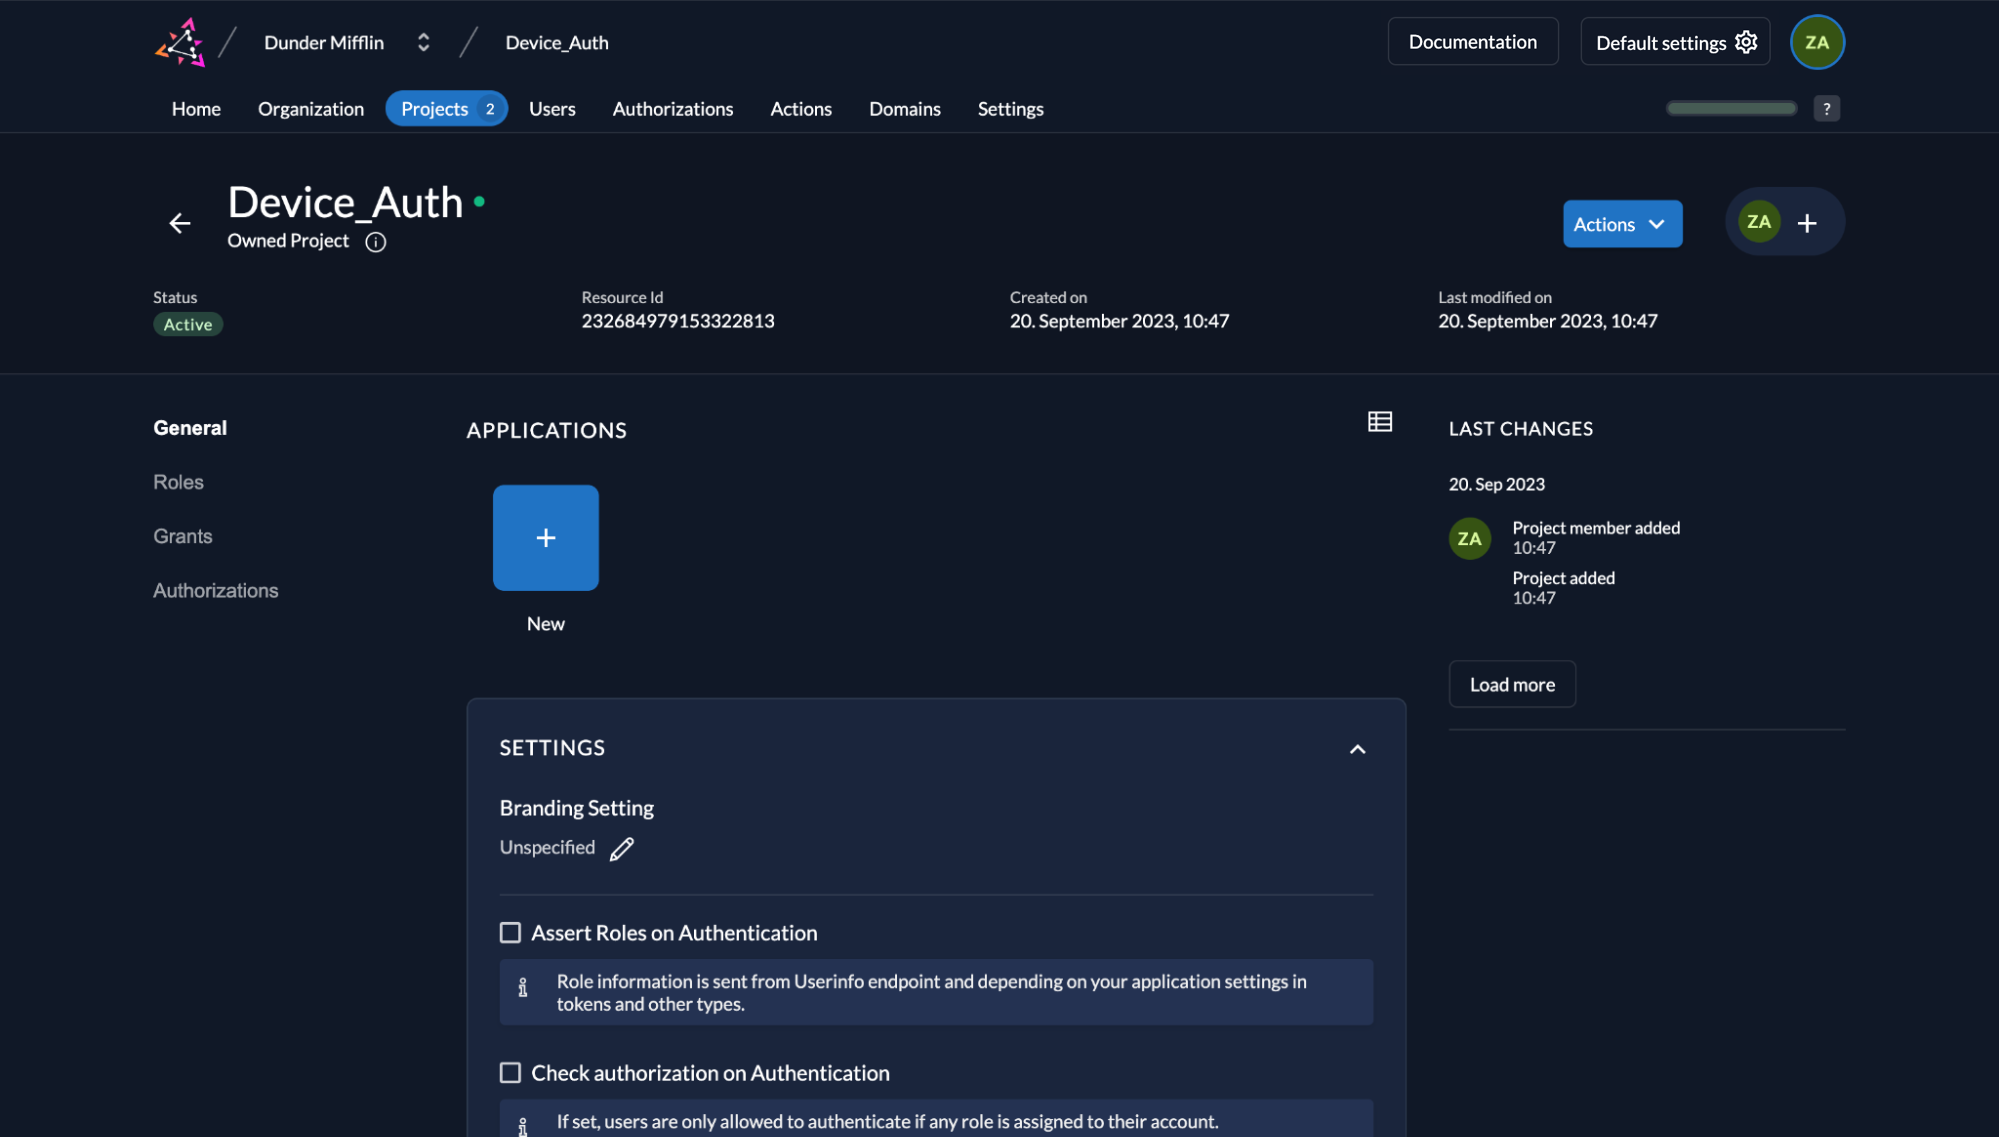 3. Select “Native” and enter a name for the application, and click “Continue”.
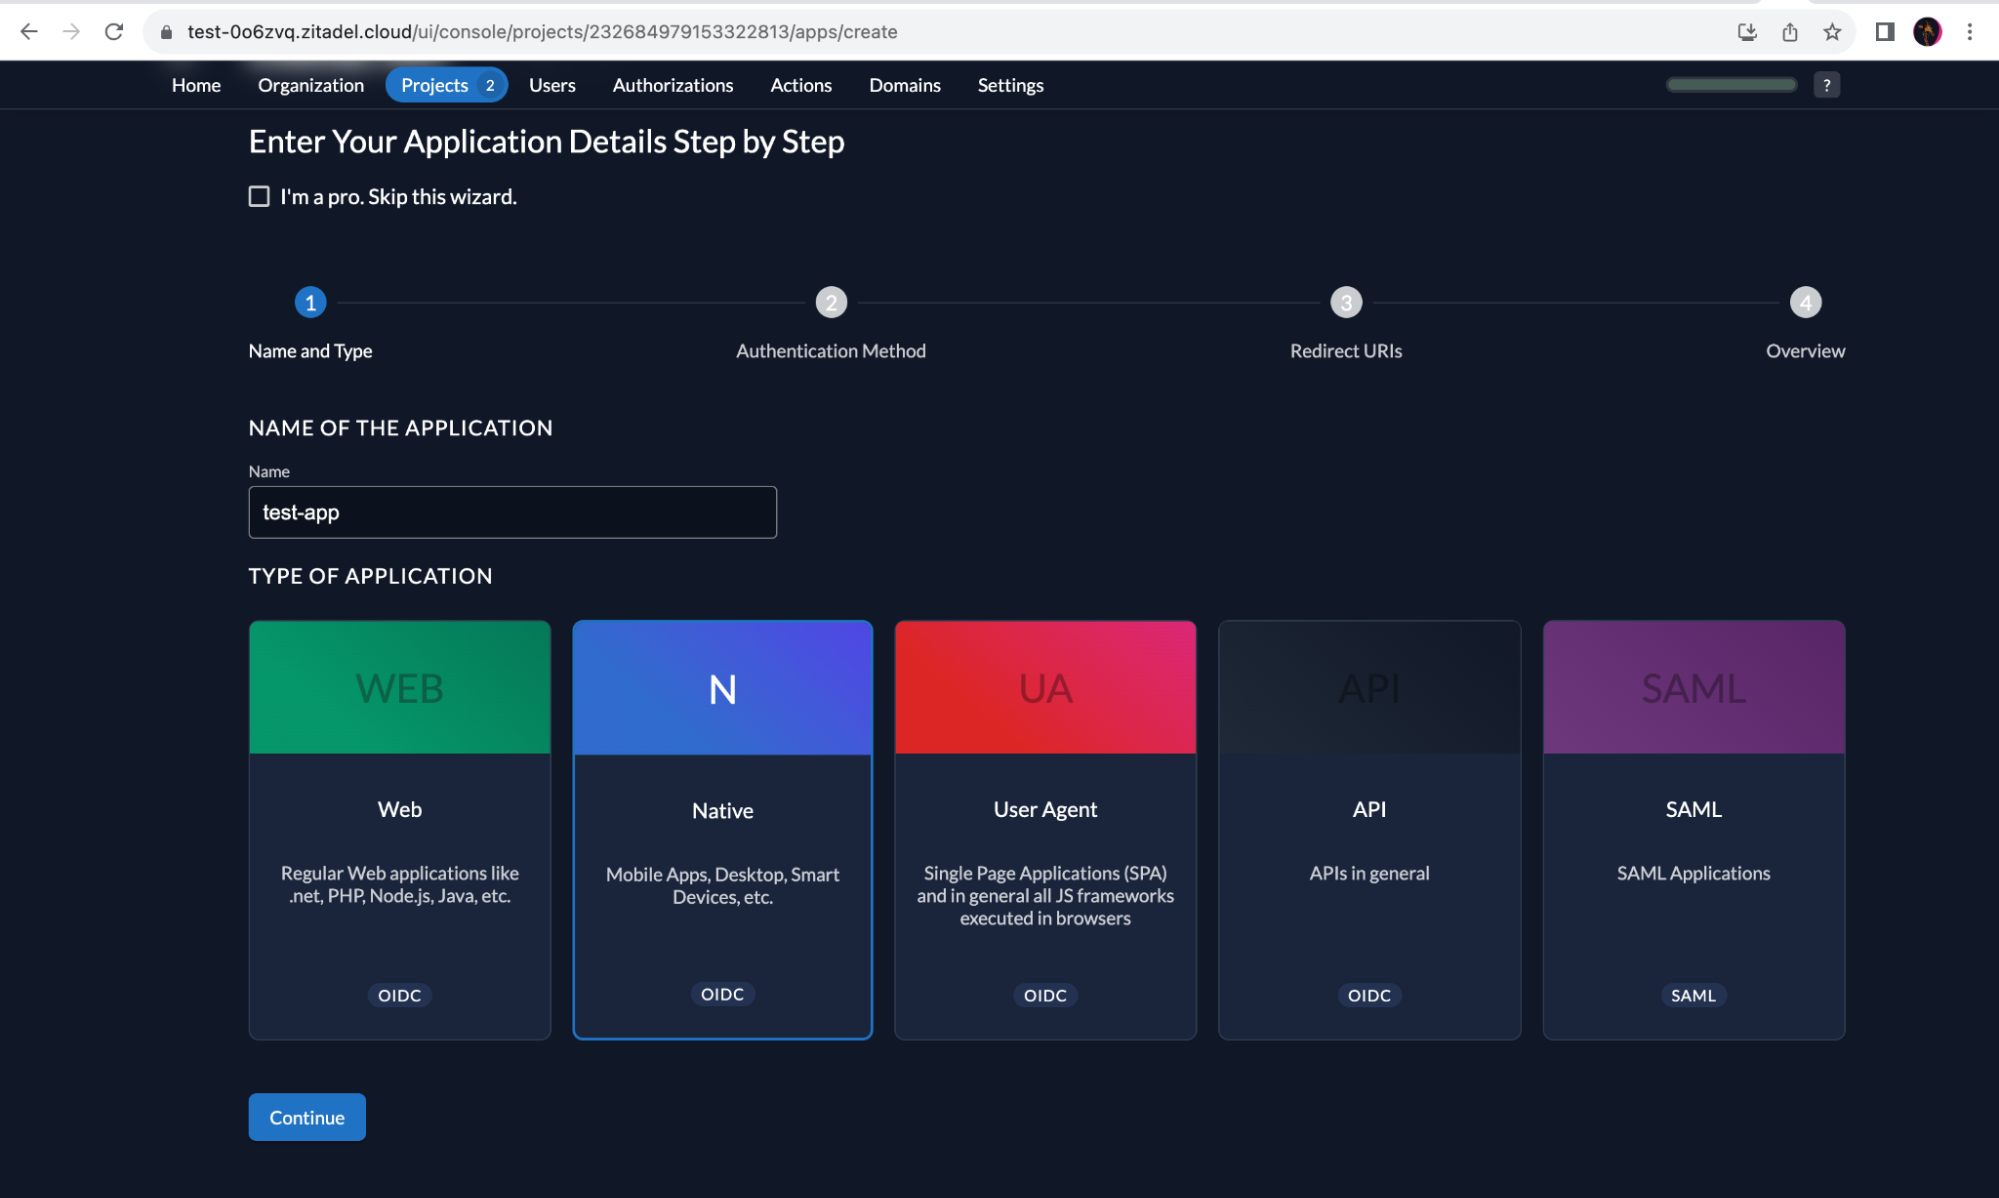 4. Select “Device Code”. Click “Continue”.
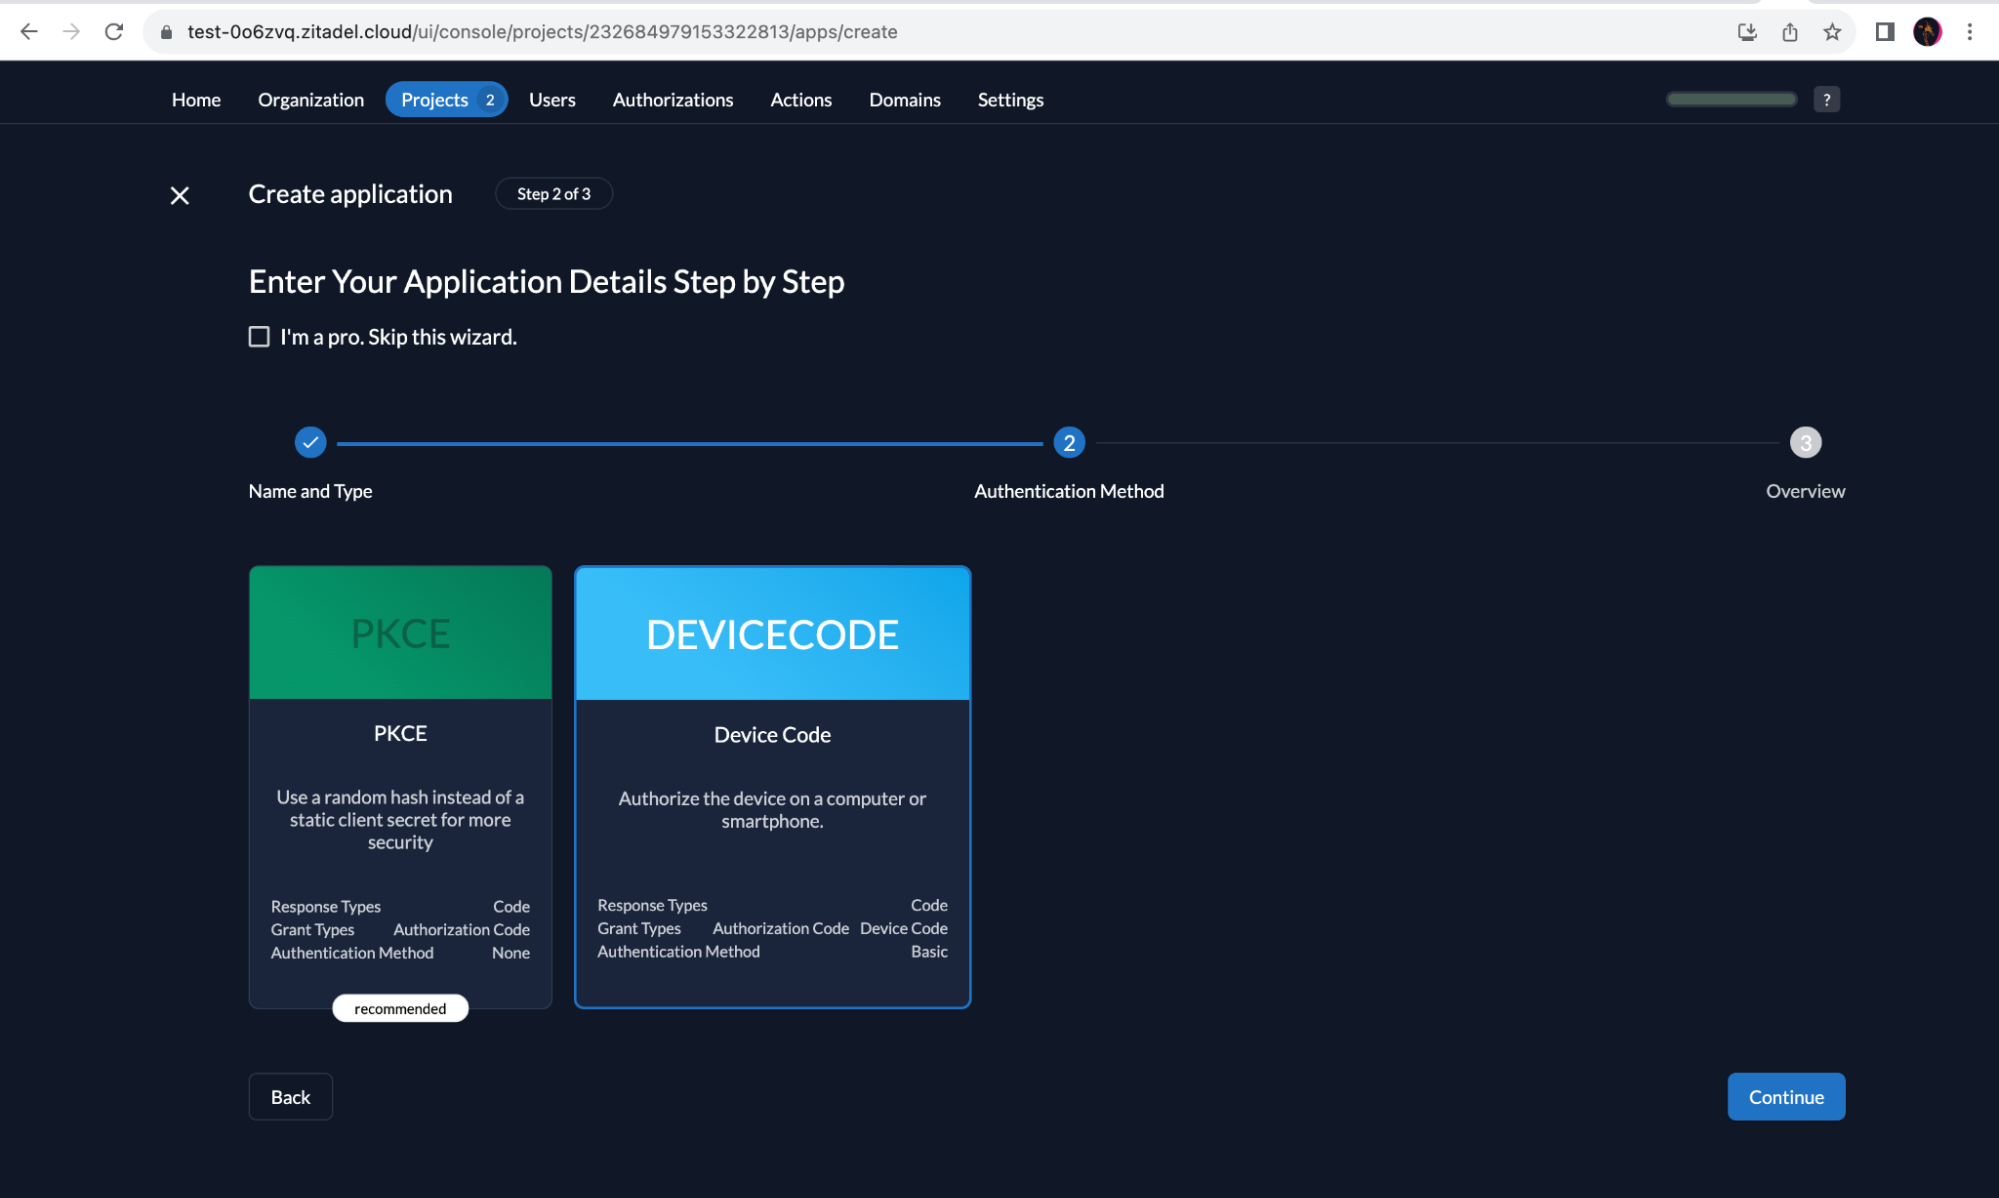 5. Check the details and click “Create”.
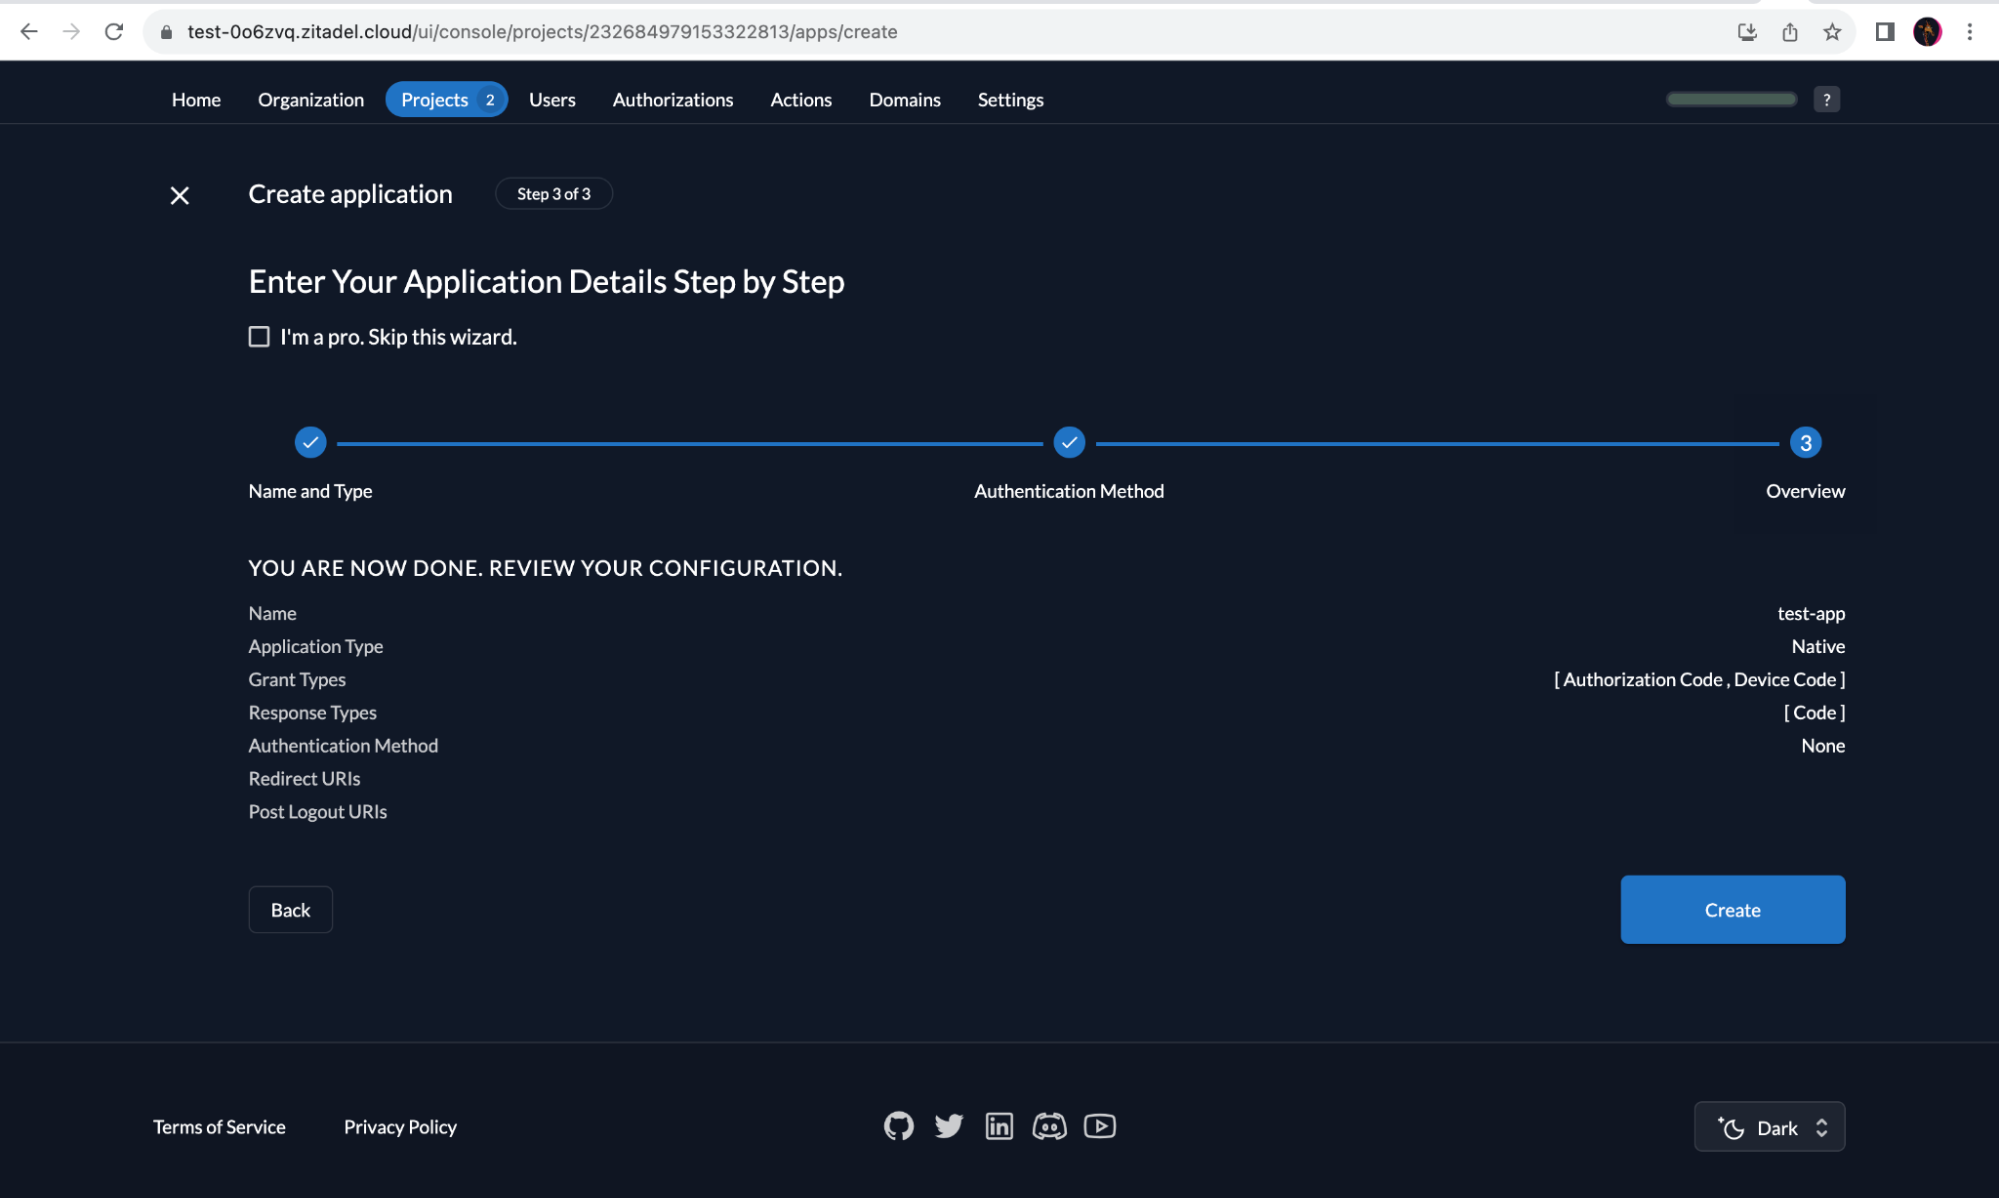 6. Copy the “Client ID” and store it for later use.
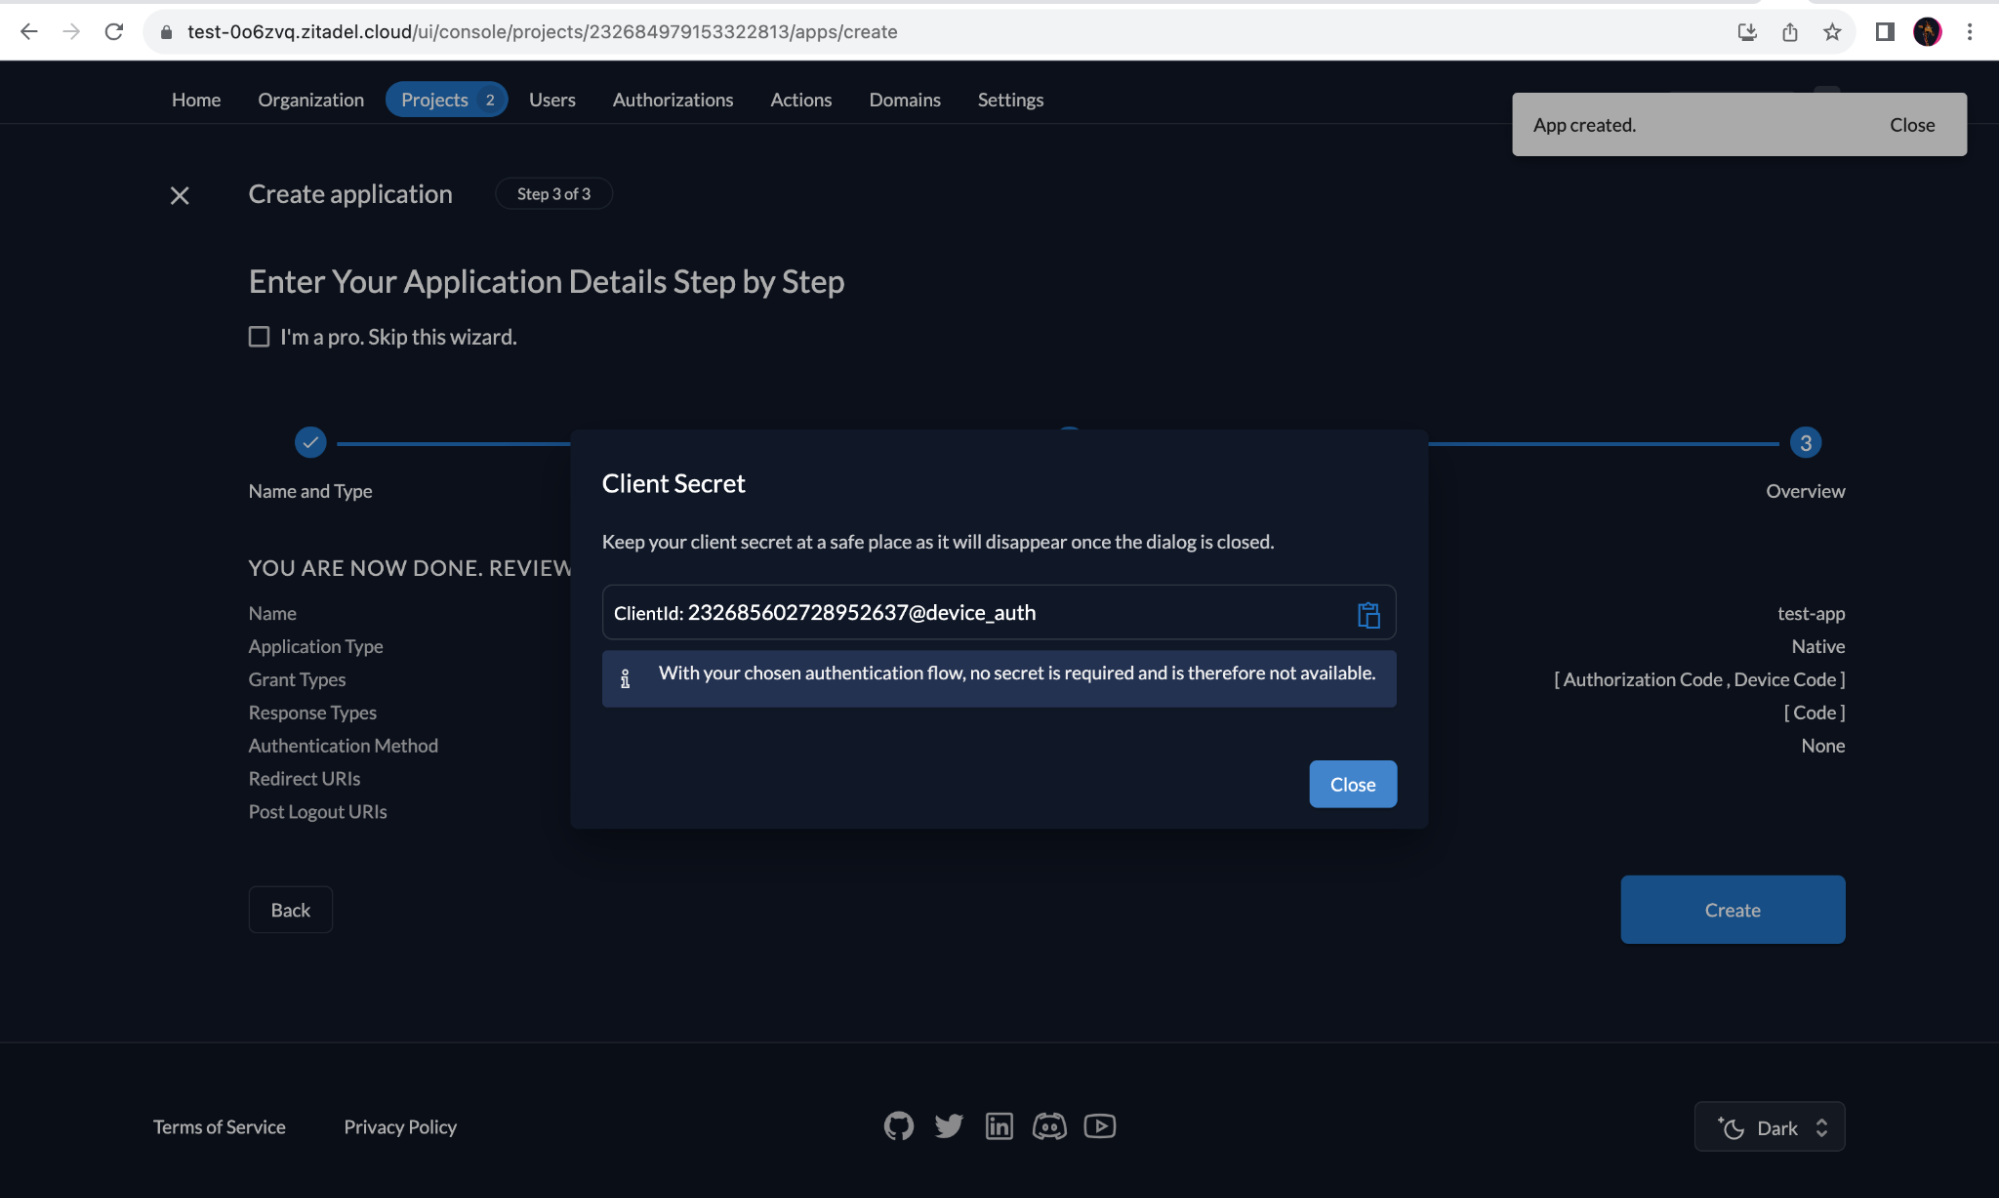 Device Client Example [#device-client-example]
The [ZITADEL OpenID Connect client and server library](https://github.com/zitadel/oidc/) written for Go has a device client example, which can behave and authenticate as a device. In order to run this client, you need a recent version of Go (>=1.20) installed on your device.
The example requires two environment variables to be set:
* `ISSUER`: server address of your instance or domain. You can find the issuer URL in the “URLs” section. In this example, it will be set to [https://test-0o6zvq.zitadel.cloud](https://test-0o6zvq.zitadel.cloud). **Do not use a trailing slash!**
Device Client Example [#device-client-example]
The [ZITADEL OpenID Connect client and server library](https://github.com/zitadel/oidc/) written for Go has a device client example, which can behave and authenticate as a device. In order to run this client, you need a recent version of Go (>=1.20) installed on your device.
The example requires two environment variables to be set:
* `ISSUER`: server address of your instance or domain. You can find the issuer URL in the “URLs” section. In this example, it will be set to [https://test-0o6zvq.zitadel.cloud](https://test-0o6zvq.zitadel.cloud). **Do not use a trailing slash!**
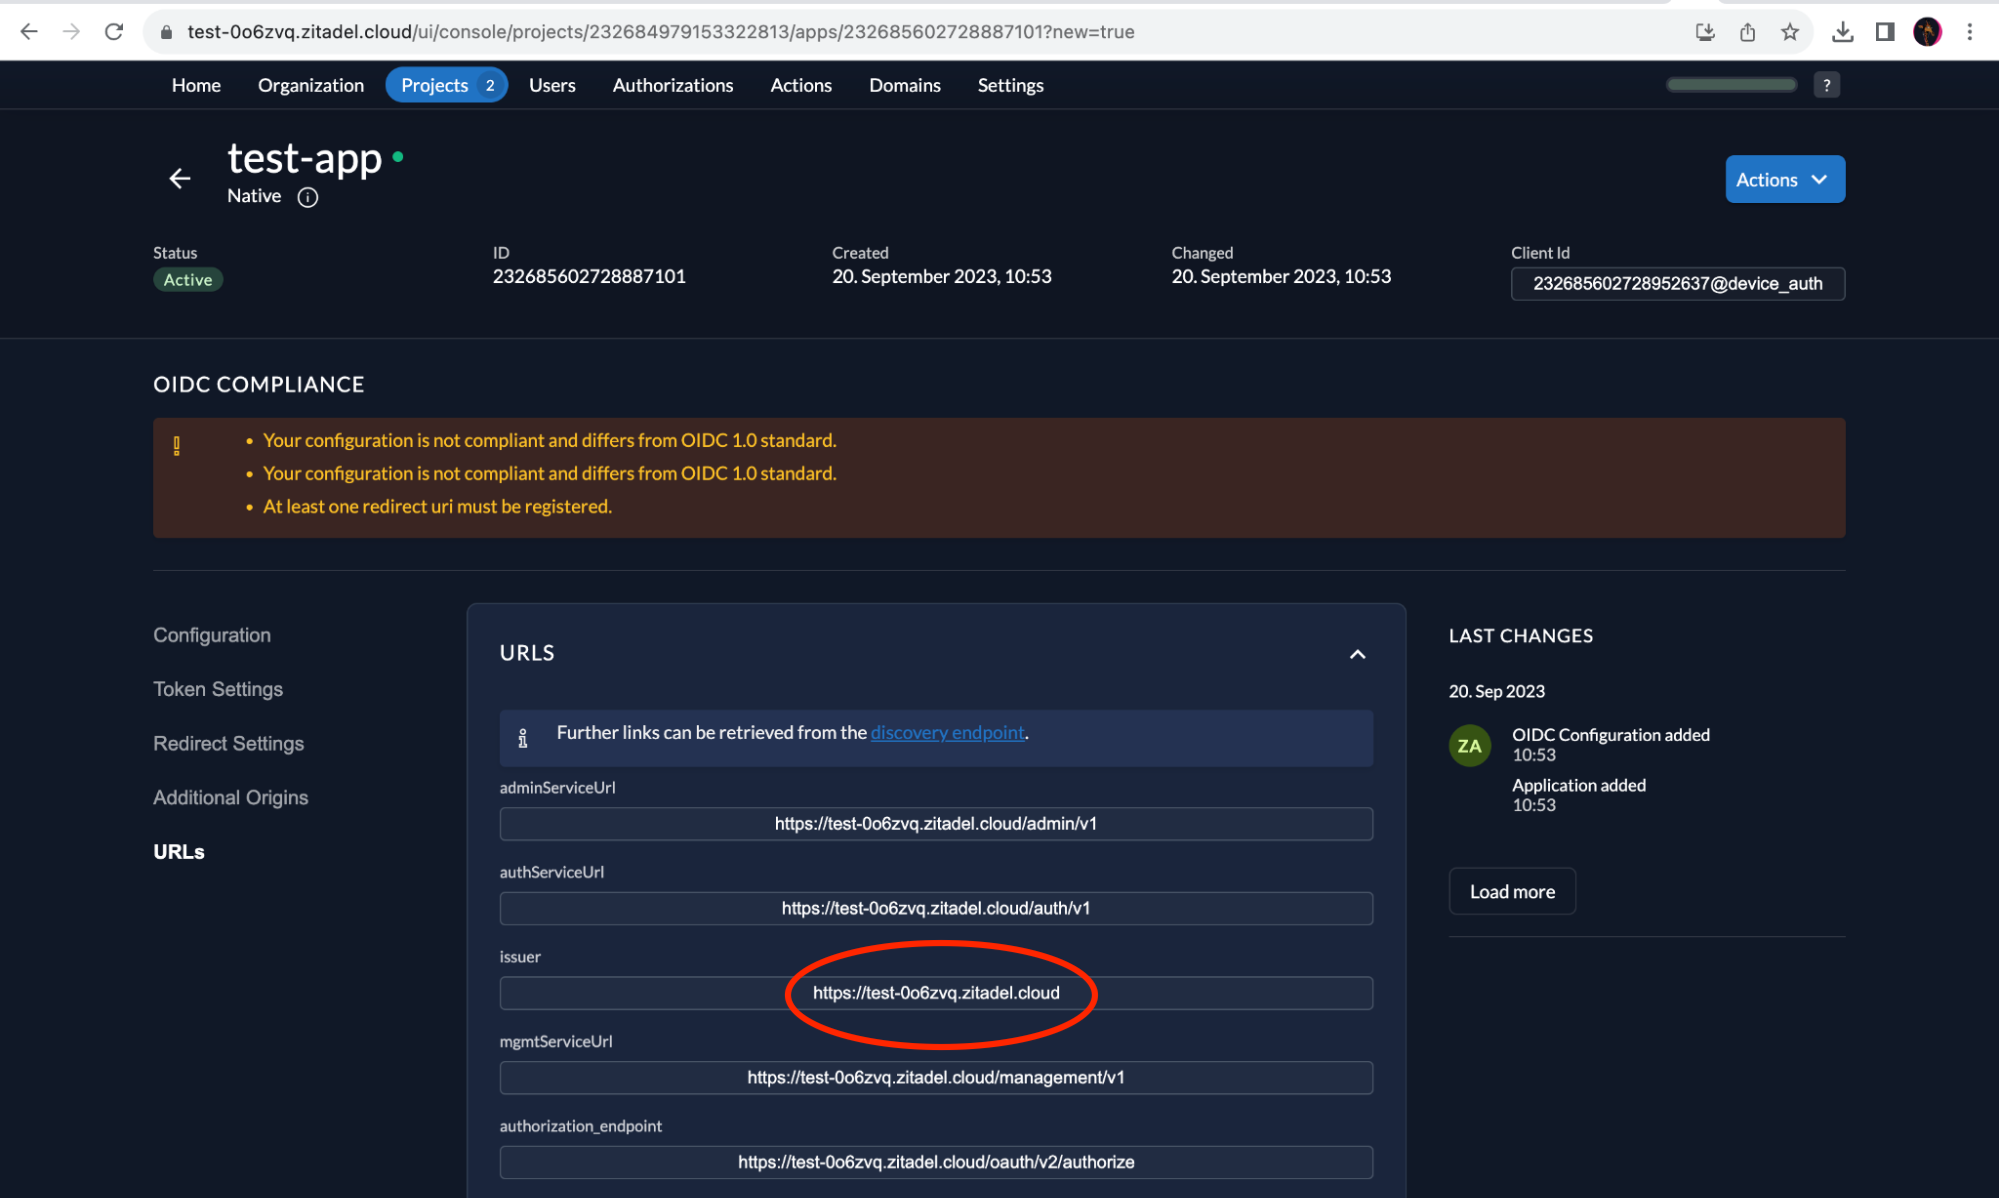 * `CLIENT_ID`: the Client ID we obtained earlier.
Replace `ISSUER` and `CLIENT_ID` values with the ones you obtained and run the example as shown below:
```bash
ISSUER="https://test-0o6zvq.zitadel.cloud" \
CLIENT_ID="232685602728952637@device_auth" \
go run github.com/zitadel/oidc/v2/example/client/device@latest
```
You should see some info-level log output with response data and a line with login instructions as given below:
```bash
Please browse to https://test-0o6zvq.zitadel.cloud/device and enter code GQWC-FWFK
INFO[0002] start polling
```
At this point, the device app starts polling the token endpoint at 5-second intervals until the request is allowed, denied, or times out (currently 5 minutes).
Authenticate [#authenticate]
When you browse to the given URL and the device code is entered, the authentication flow for a user is started. If you are already logged in, it skips right ahead to the final screen where you can choose to allow or deny the request. If you are not logged in, you will have to enter your credentials for login.
* `CLIENT_ID`: the Client ID we obtained earlier.
Replace `ISSUER` and `CLIENT_ID` values with the ones you obtained and run the example as shown below:
```bash
ISSUER="https://test-0o6zvq.zitadel.cloud" \
CLIENT_ID="232685602728952637@device_auth" \
go run github.com/zitadel/oidc/v2/example/client/device@latest
```
You should see some info-level log output with response data and a line with login instructions as given below:
```bash
Please browse to https://test-0o6zvq.zitadel.cloud/device and enter code GQWC-FWFK
INFO[0002] start polling
```
At this point, the device app starts polling the token endpoint at 5-second intervals until the request is allowed, denied, or times out (currently 5 minutes).
Authenticate [#authenticate]
When you browse to the given URL and the device code is entered, the authentication flow for a user is started. If you are already logged in, it skips right ahead to the final screen where you can choose to allow or deny the request. If you are not logged in, you will have to enter your credentials for login.
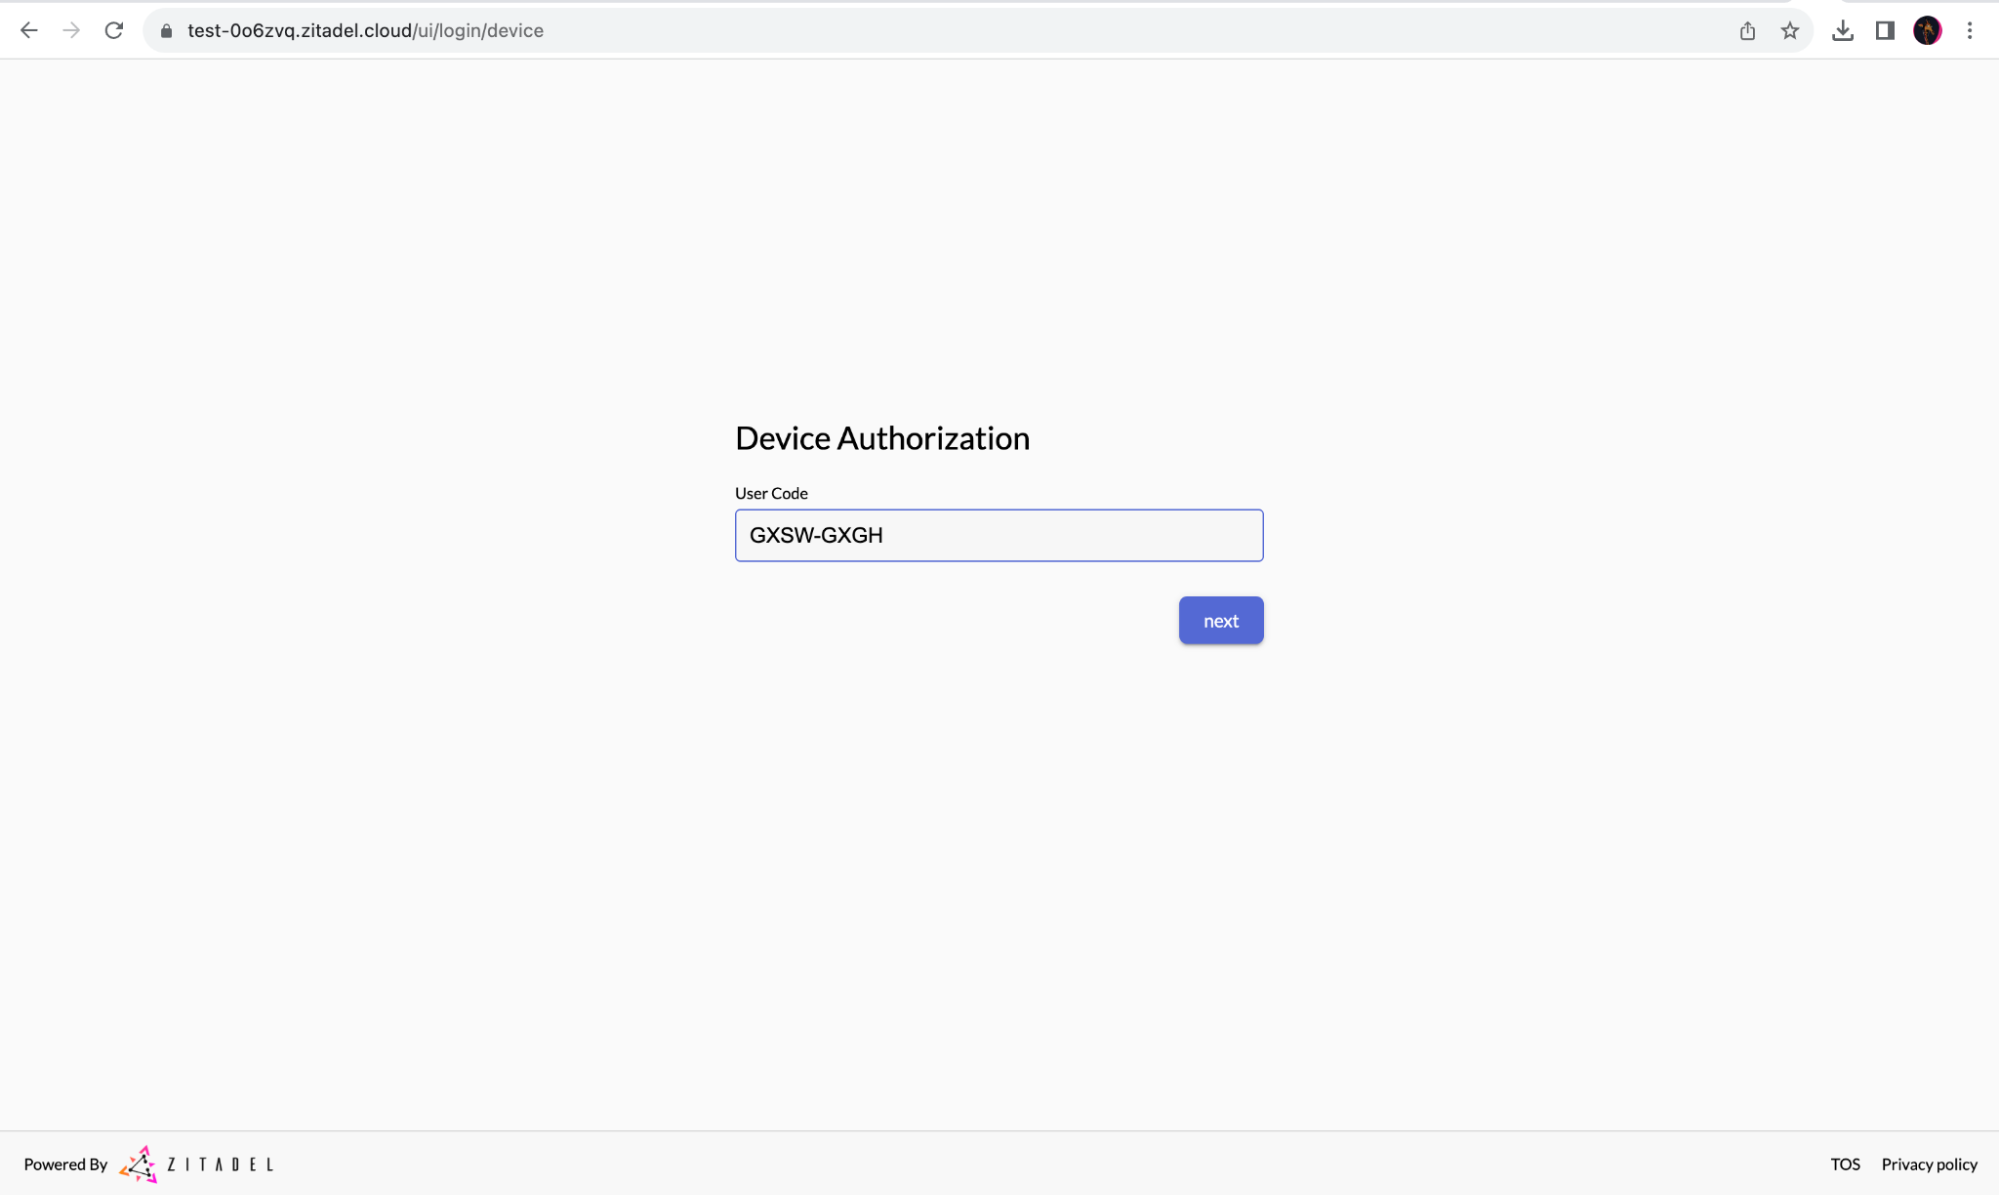
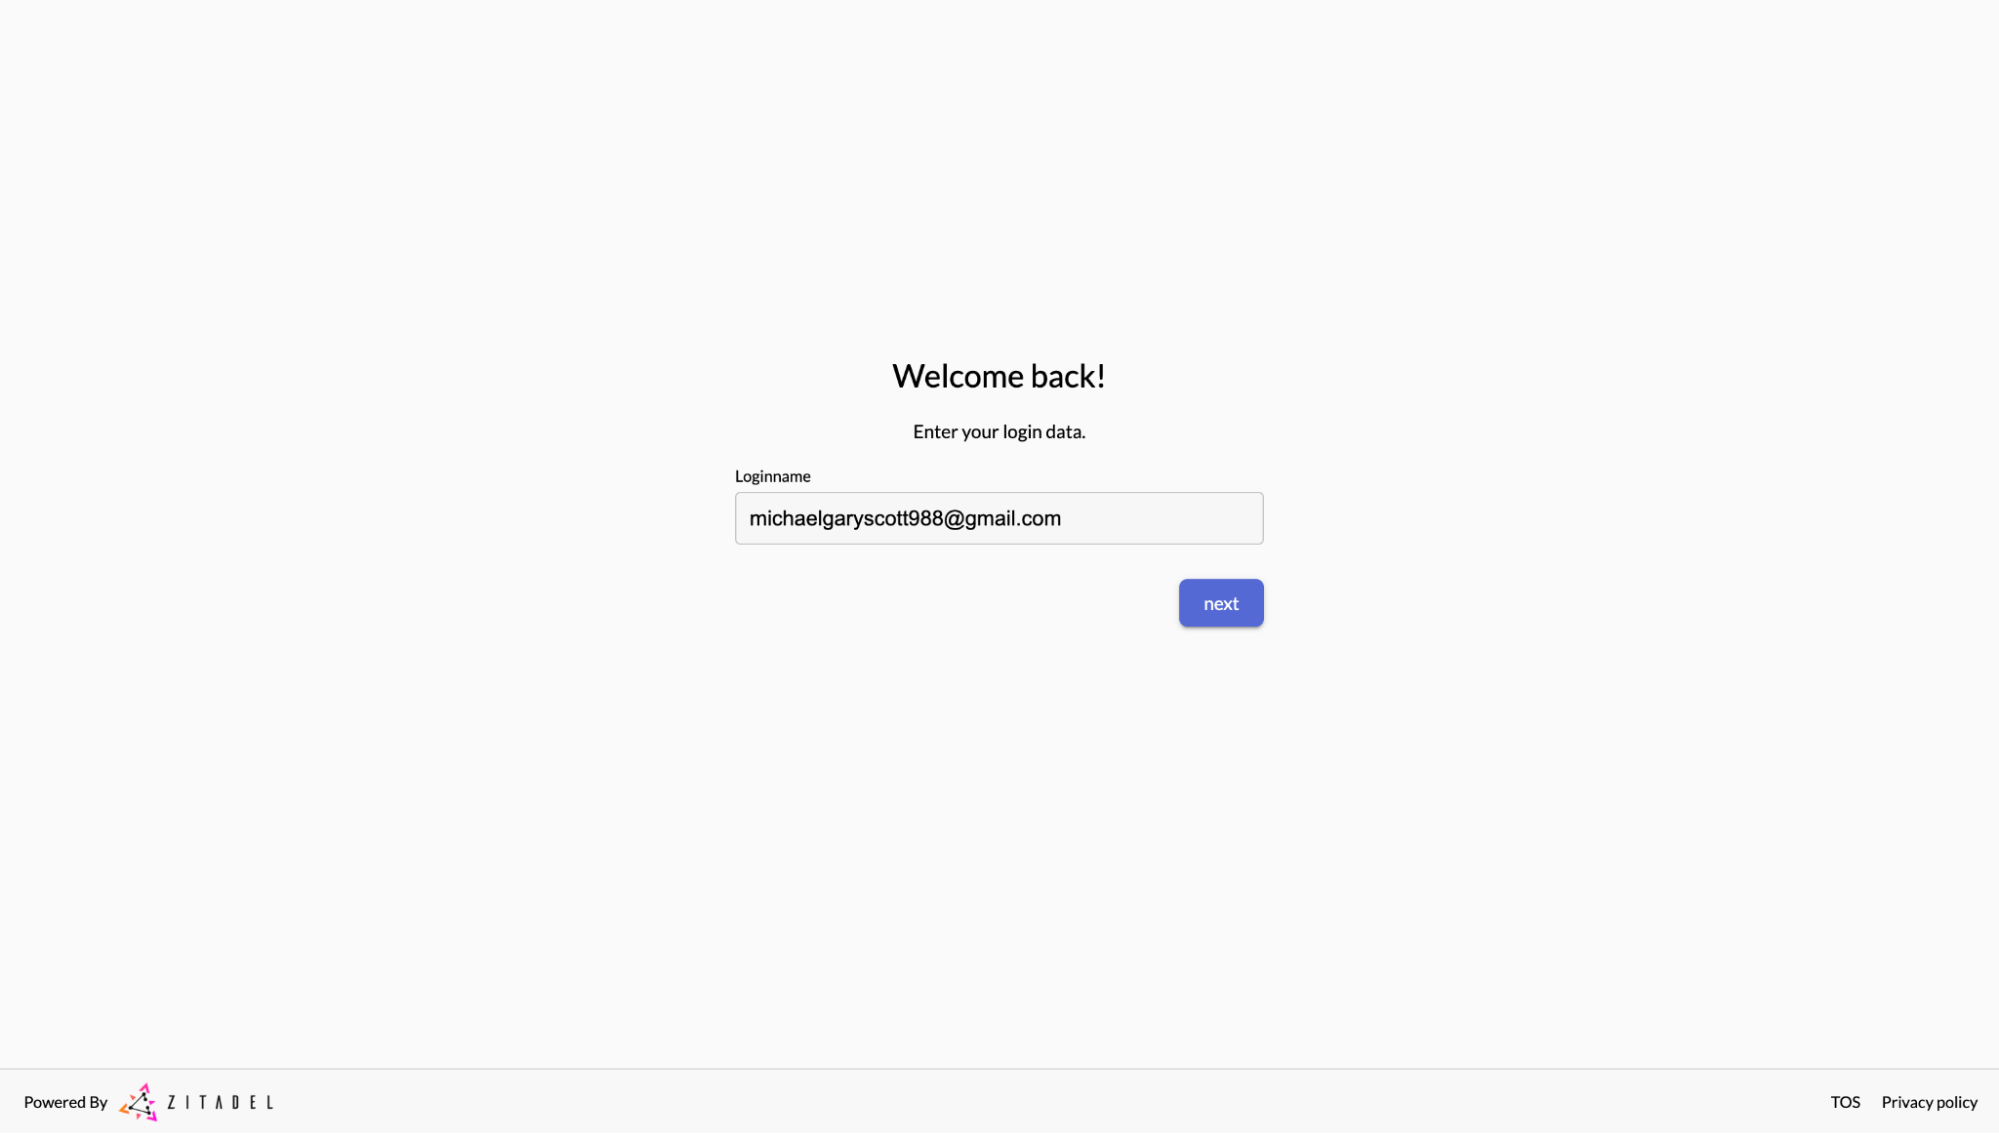

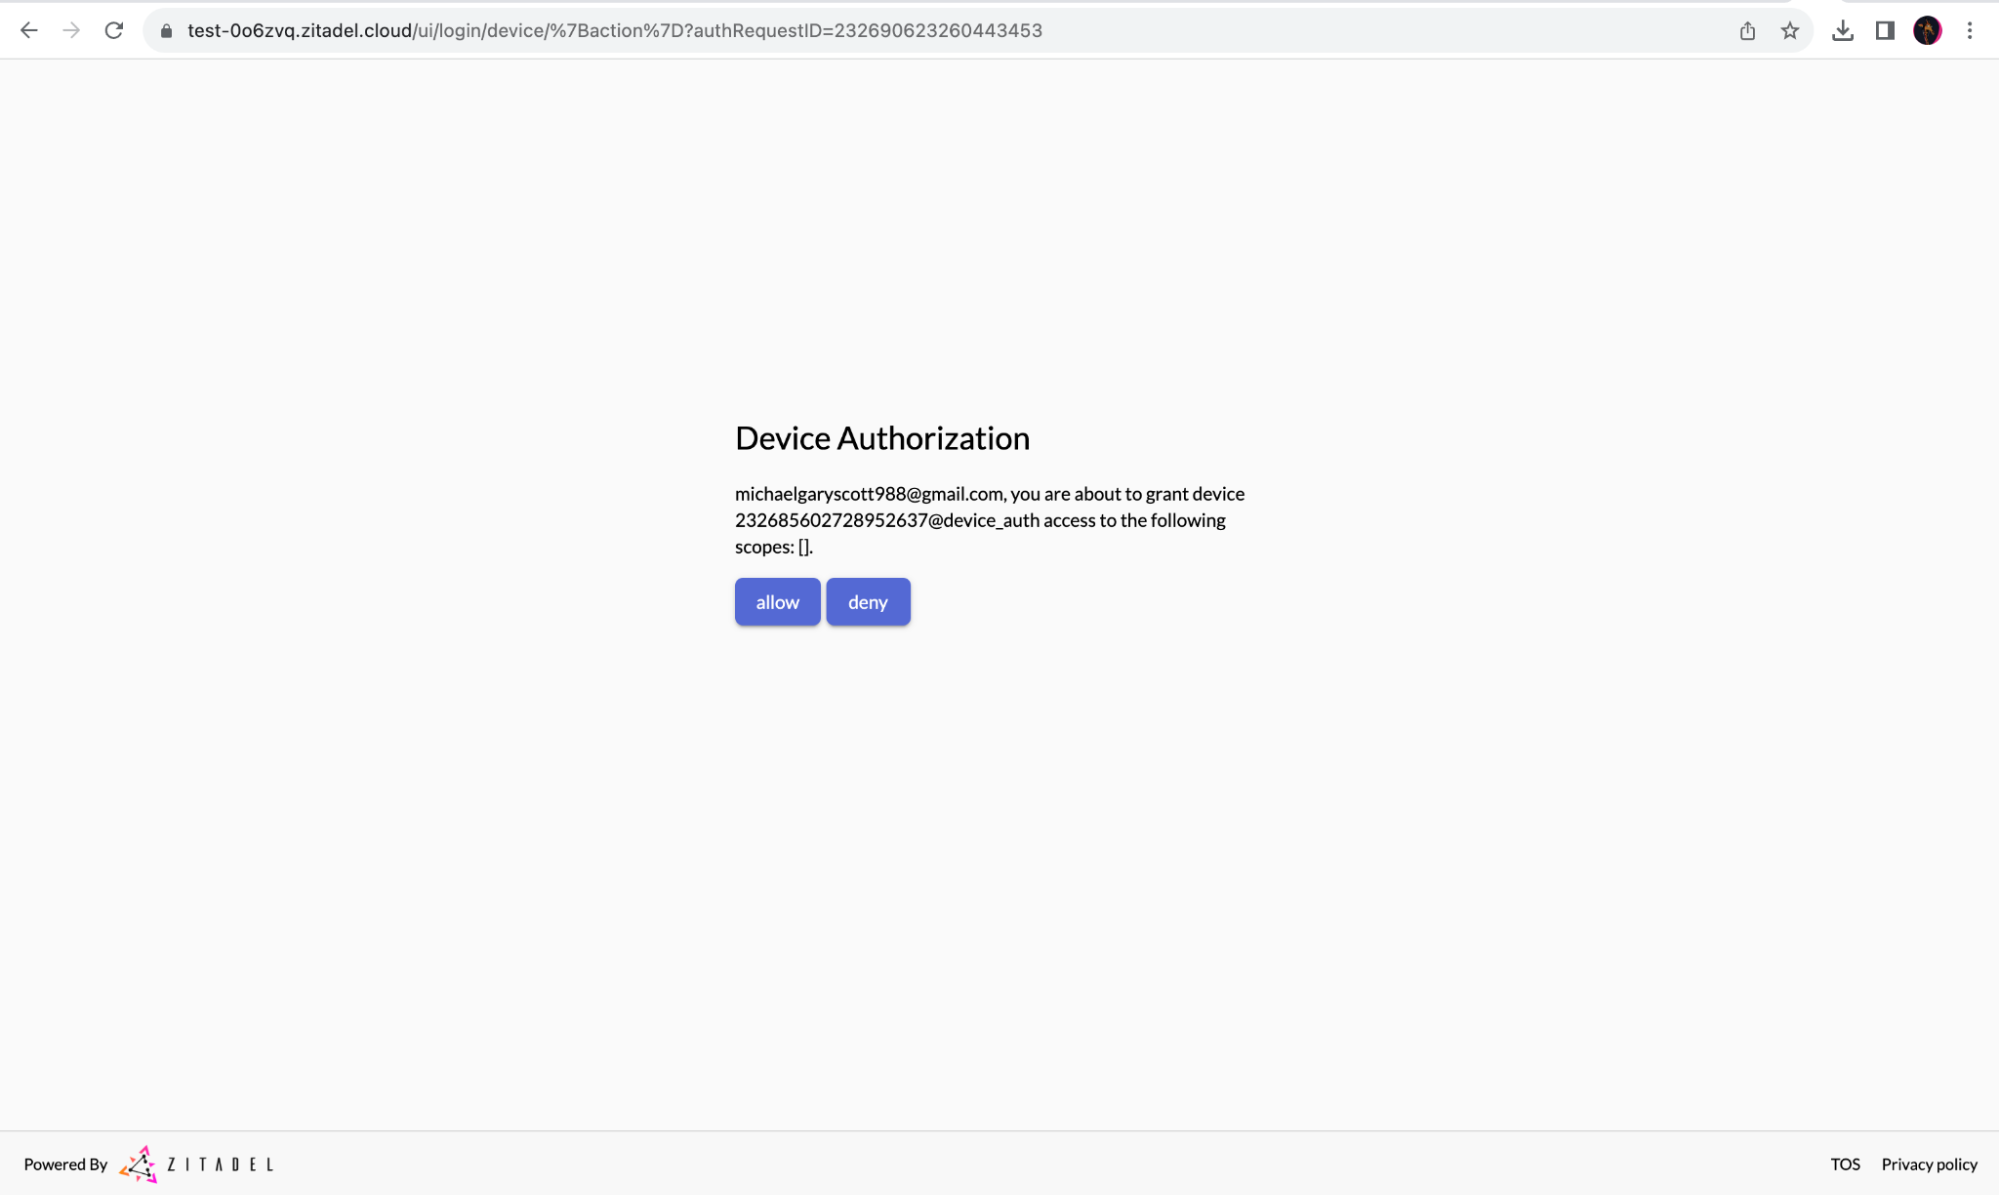
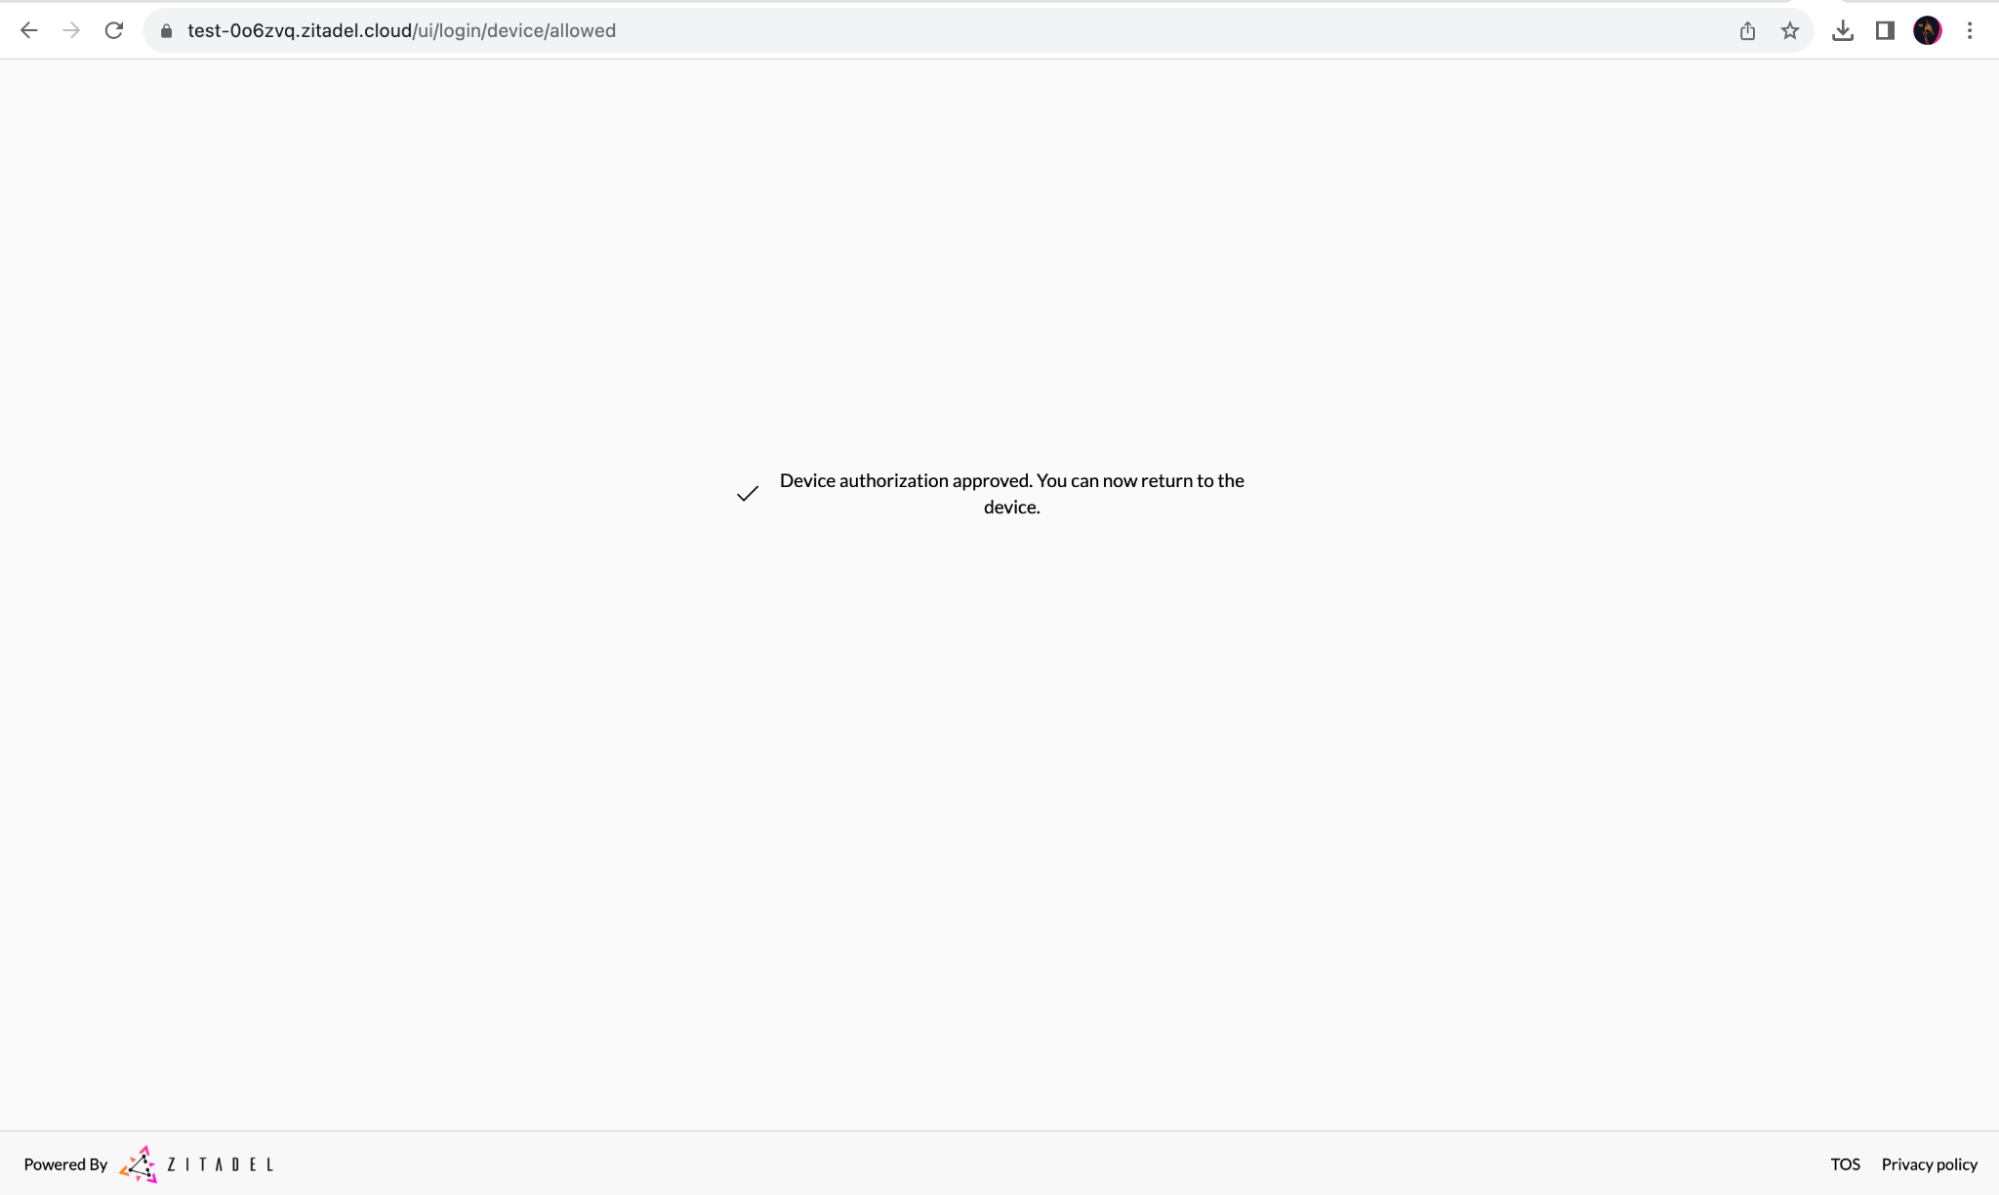 When “allow” is clicked, the device (the CLI in this case) will receive a token on the next poll. A log line will be shown as given below:
```bash
INFO[0165] successfully obtained token: &{Um2W5Od0yBU0KHfhP0AD0726rXrpxlepOR7yyftMvocgMWr25pVCuca1oiSSLiQjcXQqCEA Bearer 43199 }
```
At this point, the program terminates as it doesn’t have any other useful purpose. Regular device apps would of course use the token to consume the actual service.
Code URL [#code-url]
During the start of the authorization flow ,there is a log line printed with the complete response object from ZITADEL that looks like this:
```bash
resp&{dOcbPeysDhT26ZatRh9n7Q KPVZ-DJGG https://test-0o6zvq.zitadel.cloud/device https://test-0o6zvq.zitadel.cloud/device?user_code=GQWC-FWFK 300 5}
```
From this object, we used the `verification_uri` and `user_code` fields to print the information to the user to go to an address and enter the code. We also return a `verification_uri_complete` field, which already includes the code and allows skipping manual entry of the code.
```bash
https://test-0o6zvq.zitadel.cloud/device?user_code=GQWC-FWFK
```
In real-life applications, this could be used to create a QR code on the device screen, and users can use their mobile phones to scan the code to go to the required URL for authentication. In the context of this example, you can restart the device example program and copy/paste the complete link instead of manually entering it.
Security considerations [#security-considerations]
The user uses a low entropy code to link a device to their account, which is easy to brute-force. Also, the code or QR might be displayed in environments where others could observe and use the code to authenticate the device (hijack the session) to their account.
The device authorization grant specification was written with the philosophy that hijacking such sessions is not beneficial for the attacker. For example, with an on-demand streaming service, the attacker would be paying for the services the user is benefiting from. Hence, economically, the attack would not make sense.
See [here](https://datatracker.ietf.org/doc/html/rfc8628#section-5) for more information.
Client library [#client-library]
For Go clients, the ZITADEL OIDC repository already includes device authorization in the `rp` package.
Use [rp.DeviceAuthorization](https://pkg.go.dev/github.com/zitadel/oidc/v2/pkg/client/rp#DeviceAuthorization) to start the flow and receive the URL and user code.
[rp.DeviceAccessToken](https://pkg.go.dev/github.com/zitadel/oidc/v2/pkg/client/rp#DeviceAccessToken) polls the token endpoint and returns the access token once it succeeds.
The client implementation is rather simple and can easily be recreated in other languages. Go can be used as an example, or simply follow the [RFC](https://datatracker.ietf.org/doc/html/rfc8628) as a guide.
# Authenticate users with OpenID Connect (OIDC)
{/* THIS FILE IS AUTO-GENERATED FROM SIDEBAR-DATA.
ANY MANUAL CHANGES WILL BE OVERWRITTEN.
*/}
import { Card, Cards } from 'fumadocs-ui/components/card';
import { FileText, Folder, Link as LinkIcon } from 'lucide-react';
When “allow” is clicked, the device (the CLI in this case) will receive a token on the next poll. A log line will be shown as given below:
```bash
INFO[0165] successfully obtained token: &{Um2W5Od0yBU0KHfhP0AD0726rXrpxlepOR7yyftMvocgMWr25pVCuca1oiSSLiQjcXQqCEA Bearer 43199 }
```
At this point, the program terminates as it doesn’t have any other useful purpose. Regular device apps would of course use the token to consume the actual service.
Code URL [#code-url]
During the start of the authorization flow ,there is a log line printed with the complete response object from ZITADEL that looks like this:
```bash
resp&{dOcbPeysDhT26ZatRh9n7Q KPVZ-DJGG https://test-0o6zvq.zitadel.cloud/device https://test-0o6zvq.zitadel.cloud/device?user_code=GQWC-FWFK 300 5}
```
From this object, we used the `verification_uri` and `user_code` fields to print the information to the user to go to an address and enter the code. We also return a `verification_uri_complete` field, which already includes the code and allows skipping manual entry of the code.
```bash
https://test-0o6zvq.zitadel.cloud/device?user_code=GQWC-FWFK
```
In real-life applications, this could be used to create a QR code on the device screen, and users can use their mobile phones to scan the code to go to the required URL for authentication. In the context of this example, you can restart the device example program and copy/paste the complete link instead of manually entering it.
Security considerations [#security-considerations]
The user uses a low entropy code to link a device to their account, which is easy to brute-force. Also, the code or QR might be displayed in environments where others could observe and use the code to authenticate the device (hijack the session) to their account.
The device authorization grant specification was written with the philosophy that hijacking such sessions is not beneficial for the attacker. For example, with an on-demand streaming service, the attacker would be paying for the services the user is benefiting from. Hence, economically, the attack would not make sense.
See [here](https://datatracker.ietf.org/doc/html/rfc8628#section-5) for more information.
Client library [#client-library]
For Go clients, the ZITADEL OIDC repository already includes device authorization in the `rp` package.
Use [rp.DeviceAuthorization](https://pkg.go.dev/github.com/zitadel/oidc/v2/pkg/client/rp#DeviceAuthorization) to start the flow and receive the URL and user code.
[rp.DeviceAccessToken](https://pkg.go.dev/github.com/zitadel/oidc/v2/pkg/client/rp#DeviceAccessToken) polls the token endpoint and returns the access token once it succeeds.
The client implementation is rather simple and can easily be recreated in other languages. Go can be used as an example, or simply follow the [RFC](https://datatracker.ietf.org/doc/html/rfc8628) as a guide.
# Authenticate users with OpenID Connect (OIDC)
{/* THIS FILE IS AUTO-GENERATED FROM SIDEBAR-DATA.
ANY MANUAL CHANGES WILL BE OVERWRITTEN.
*/}
import { Card, Cards } from 'fumadocs-ui/components/card';
import { FileText, Folder, Link as LinkIcon } from 'lucide-react';
| Confidentiality of client credentials | Client profile | Examples of clients |
|---|---|---|
| Public | User-Agent | Single-page web applications (SPA), generally JavaScript executed in Browser |
| Native | Native, Mobile, or Desktop applications | |
| Confidential | Web | Server-side web applications such as java, .net, … |
| Machine-to-Machine | APIs, generally services without direct user-interaction at the authorization server |