ZITADEL on Google Cloud Workforce Identity
This guide shows how to login users and assign roles with Workforce Identity Federation to Google Cloud.
It covers how to:
- create and configure your application in ZITADEL
- configure an Action to transform claims
- create and configure the connection to Google Cloud with Workforce Identity Federation using OpenID Connect (OIDC)
Prerequisites:
- existing ZITADEL Instance, if not present follow this guide
- existing ZITADEL Organization, if not present follow this guide
- existing ZITADEL project, if not present follow the first 3 steps here
- prerequisites on Google Cloud side in the settings guide.
We have to switch between ZITADEL and a Google Cloud. If the headings begin with "ZITADEL" switch to the ZITADEL Management Console and if the headings start with "Google Cloud" please refer to the configuration guide on Google Cloud.
Google Cloud: Configure
Follow the steps Before you begin, Required roles, and create a workforce identity pool (OIDC) in the in the configuration guide.
Before you create the workforce identity pool provider you should create your application in ZITADEL.
ZITADEL: Create the application
In your existing project:
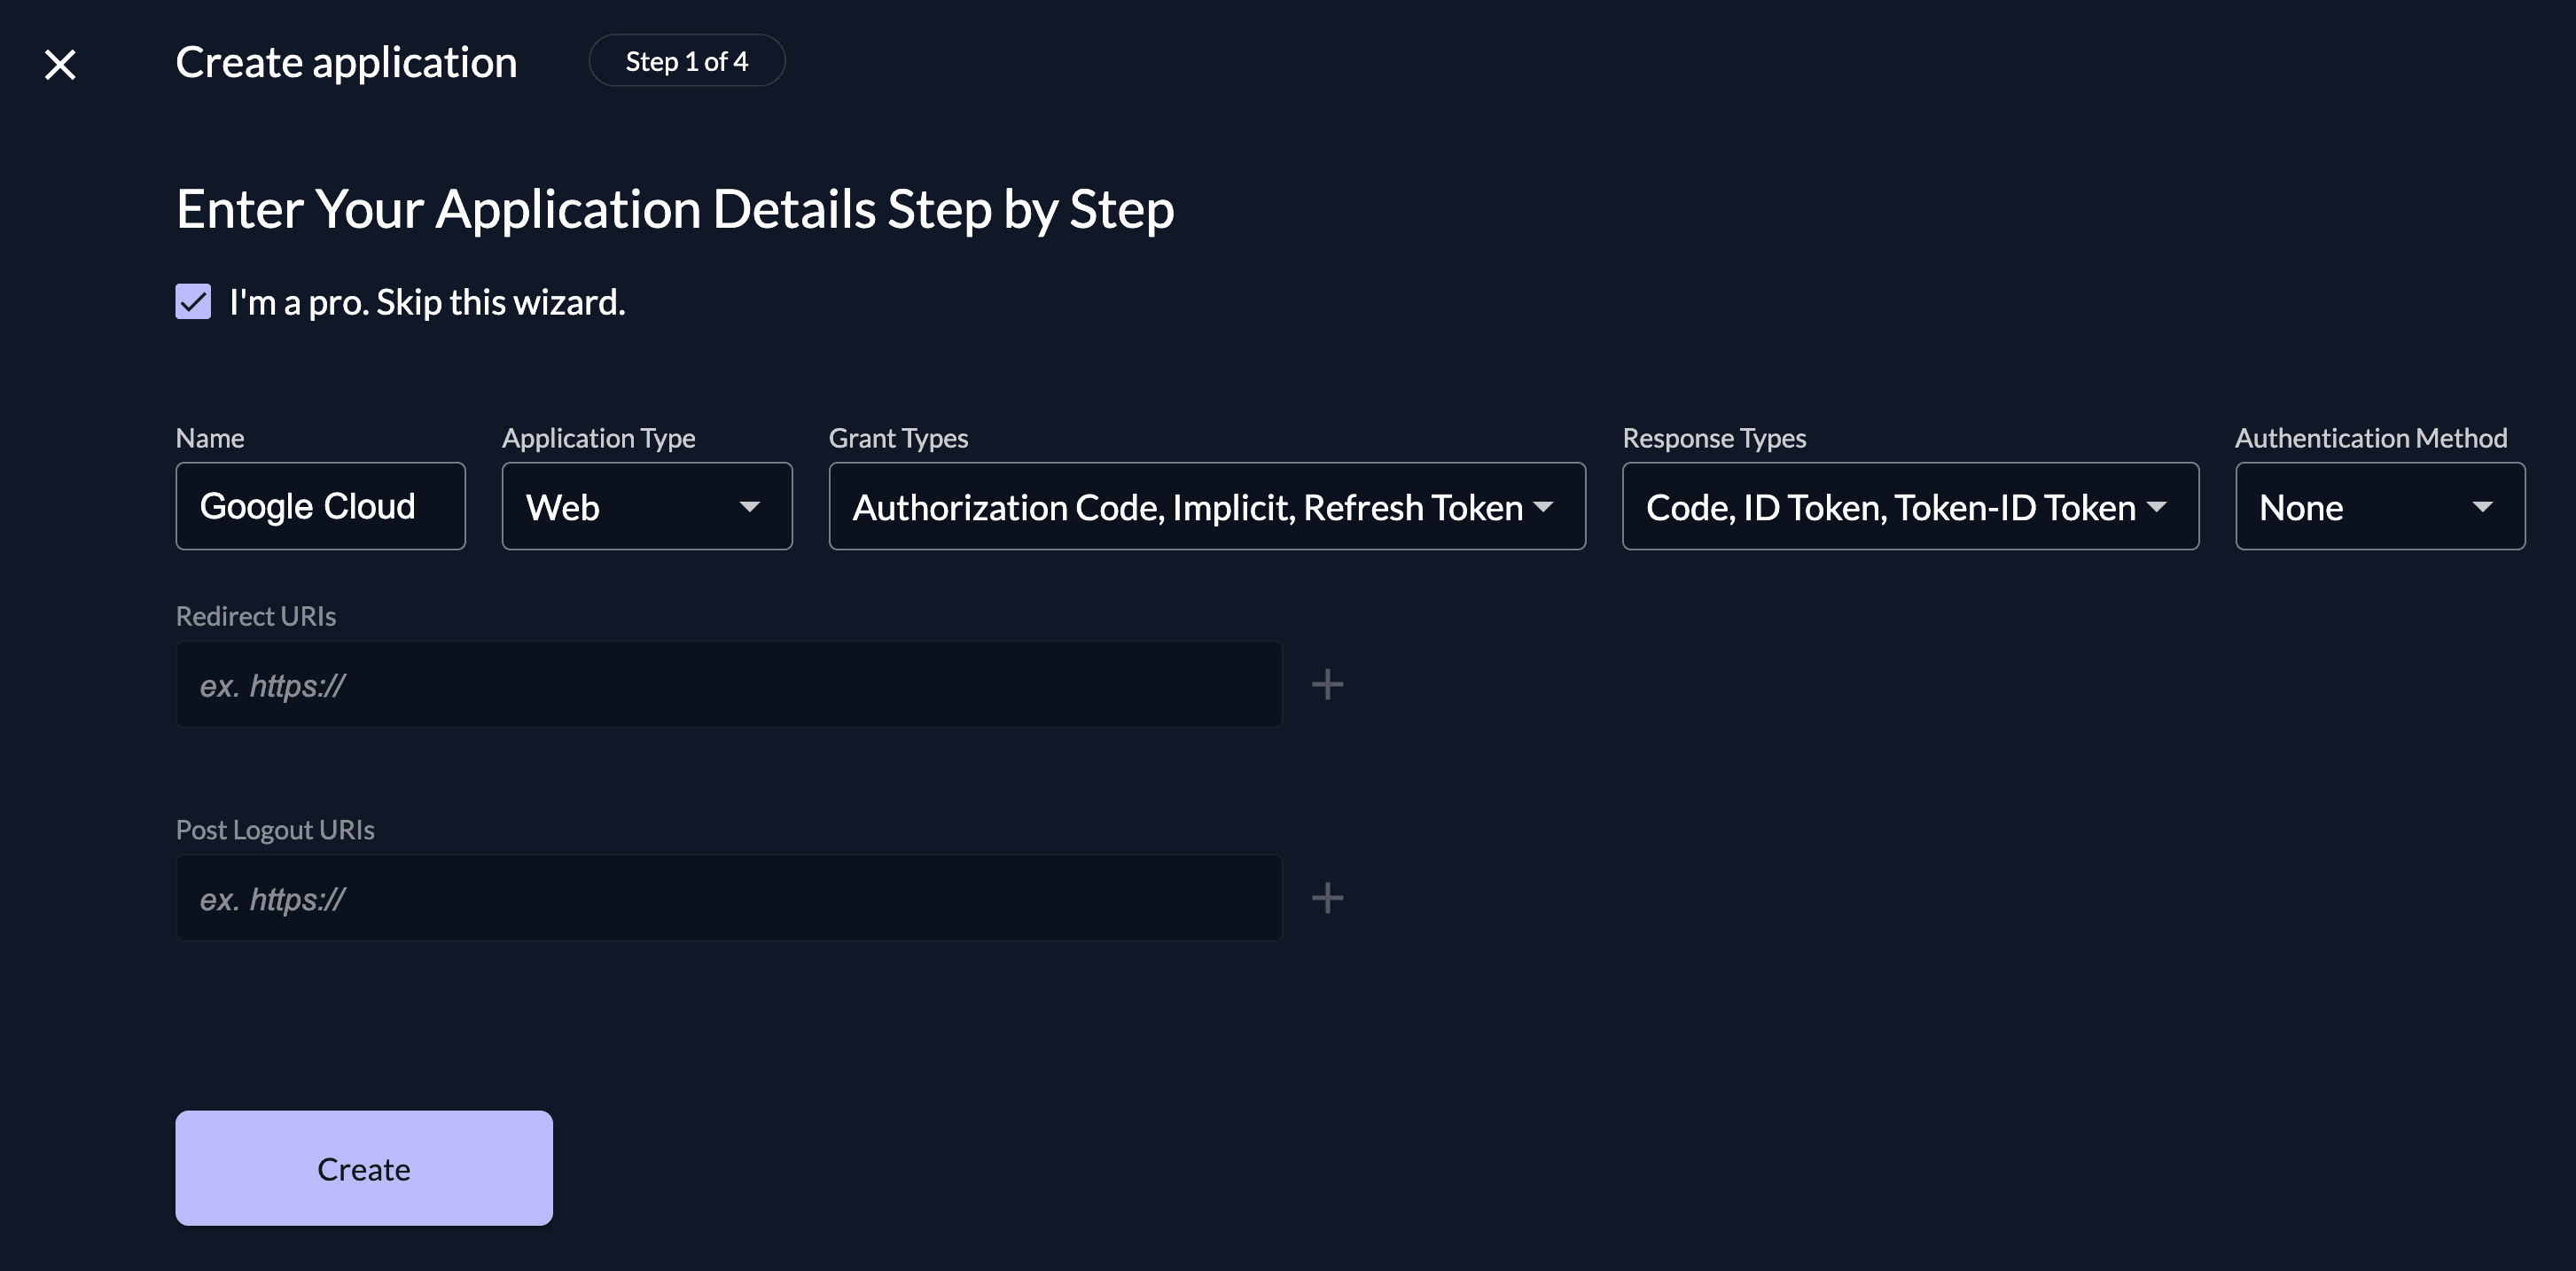
First of all we create the application in your project.
Google Cloud requires just an ID Token as JWT including the described required and optional scopes.
Create a new application and click on "I'm a pro. Skip this wizard."
- Application Type: Web
- Grant Types: Implicit
- Response Type: ID Token
- Authentication Method: None
You need to add the redirect URL and configure token settings after creating the application.
ZITADEL: Redirect url
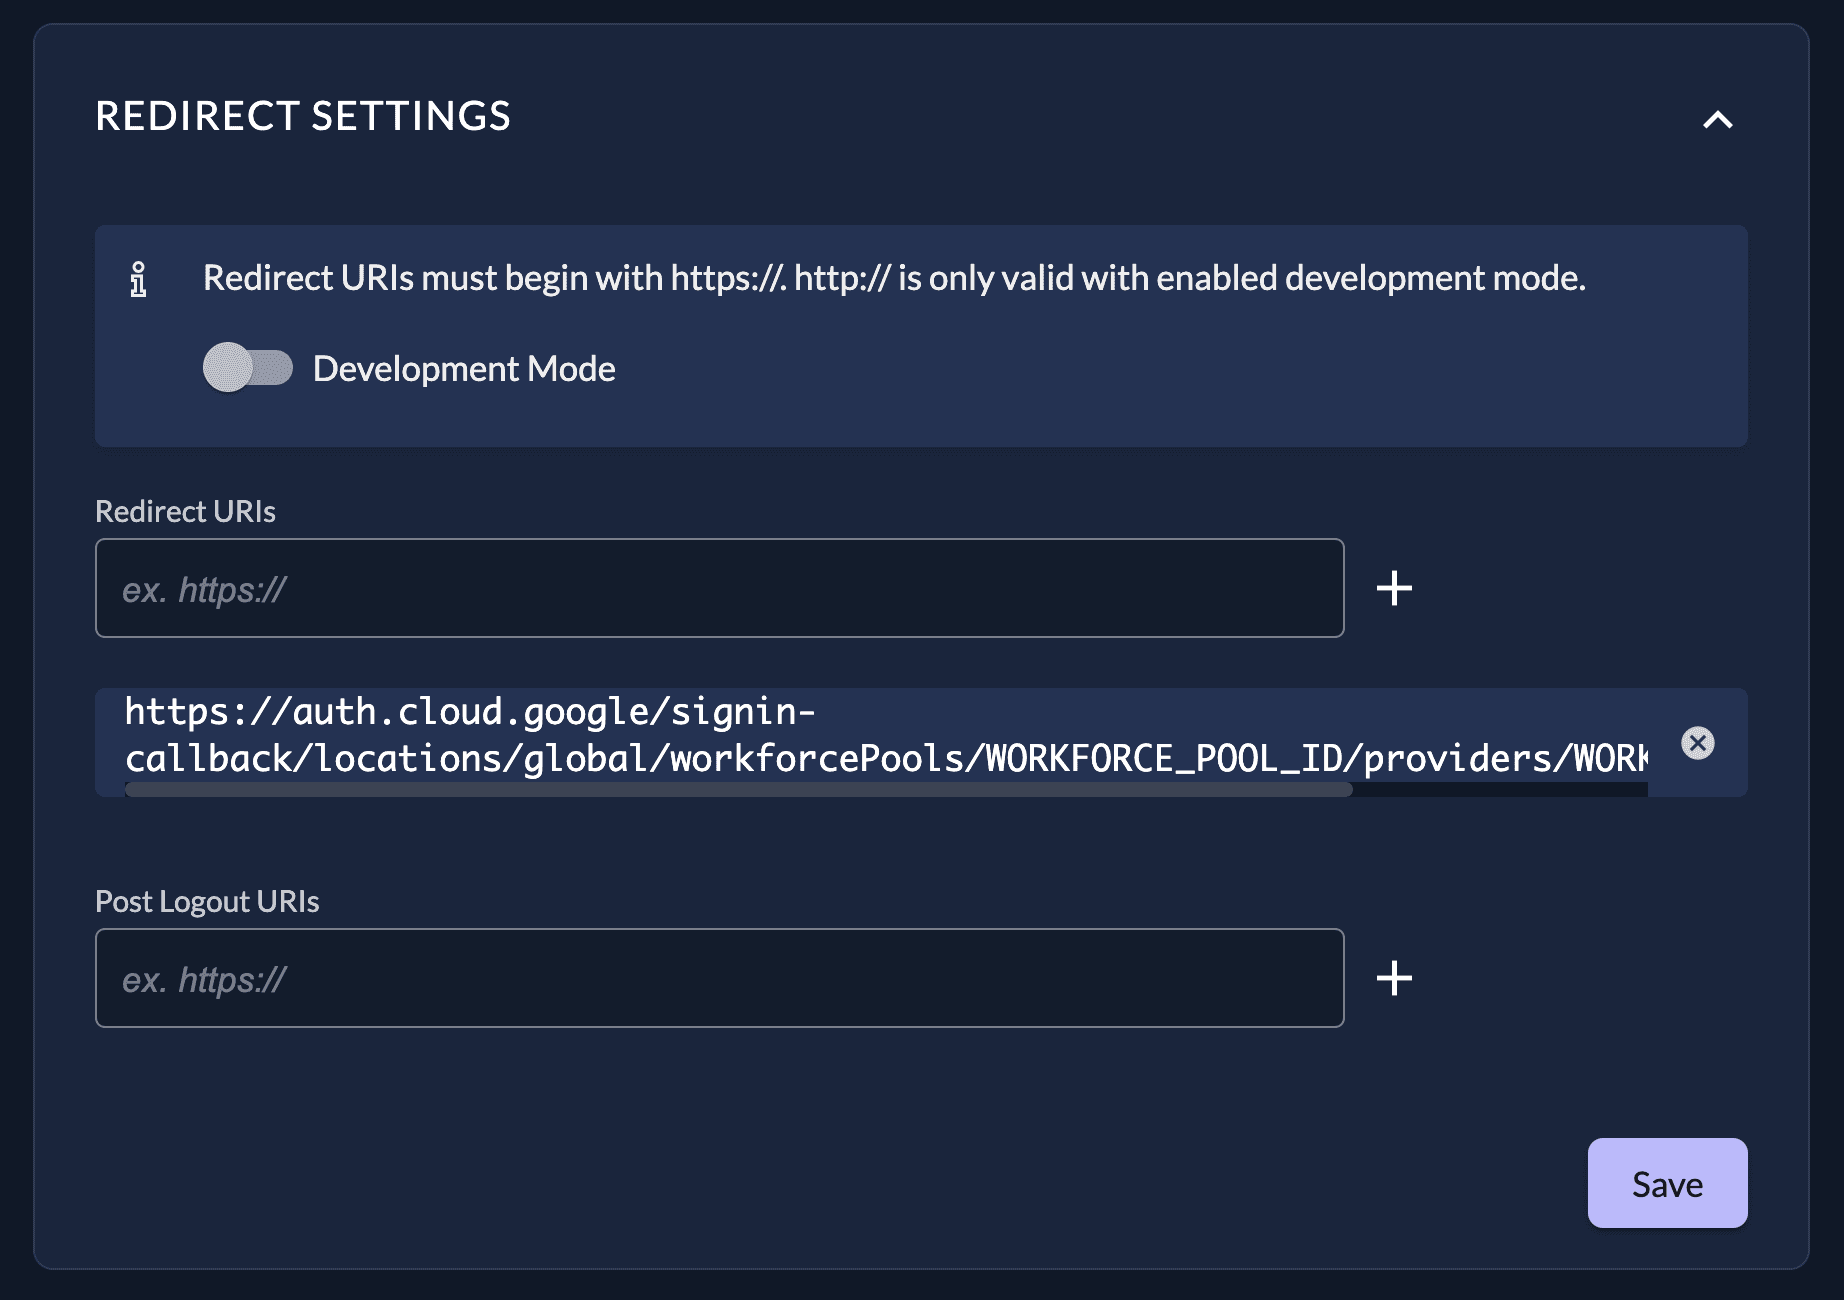
After creating, go to the application settings "Redirect settings" and add the redirect url from Googles configuration guide.
It looks something like https://auth.cloud.google/signin-callback/locations/global/workforcePools/WORKFORCE_POOL_ID/providers/WORKFORCE_PROVIDER_ID.
Save the settings.
Make sure to replace the WORKFORCE_POOL_ID and WORKFORCE_PROVIDER_ID with your values in the redirect url
ZITADEL: Token settings
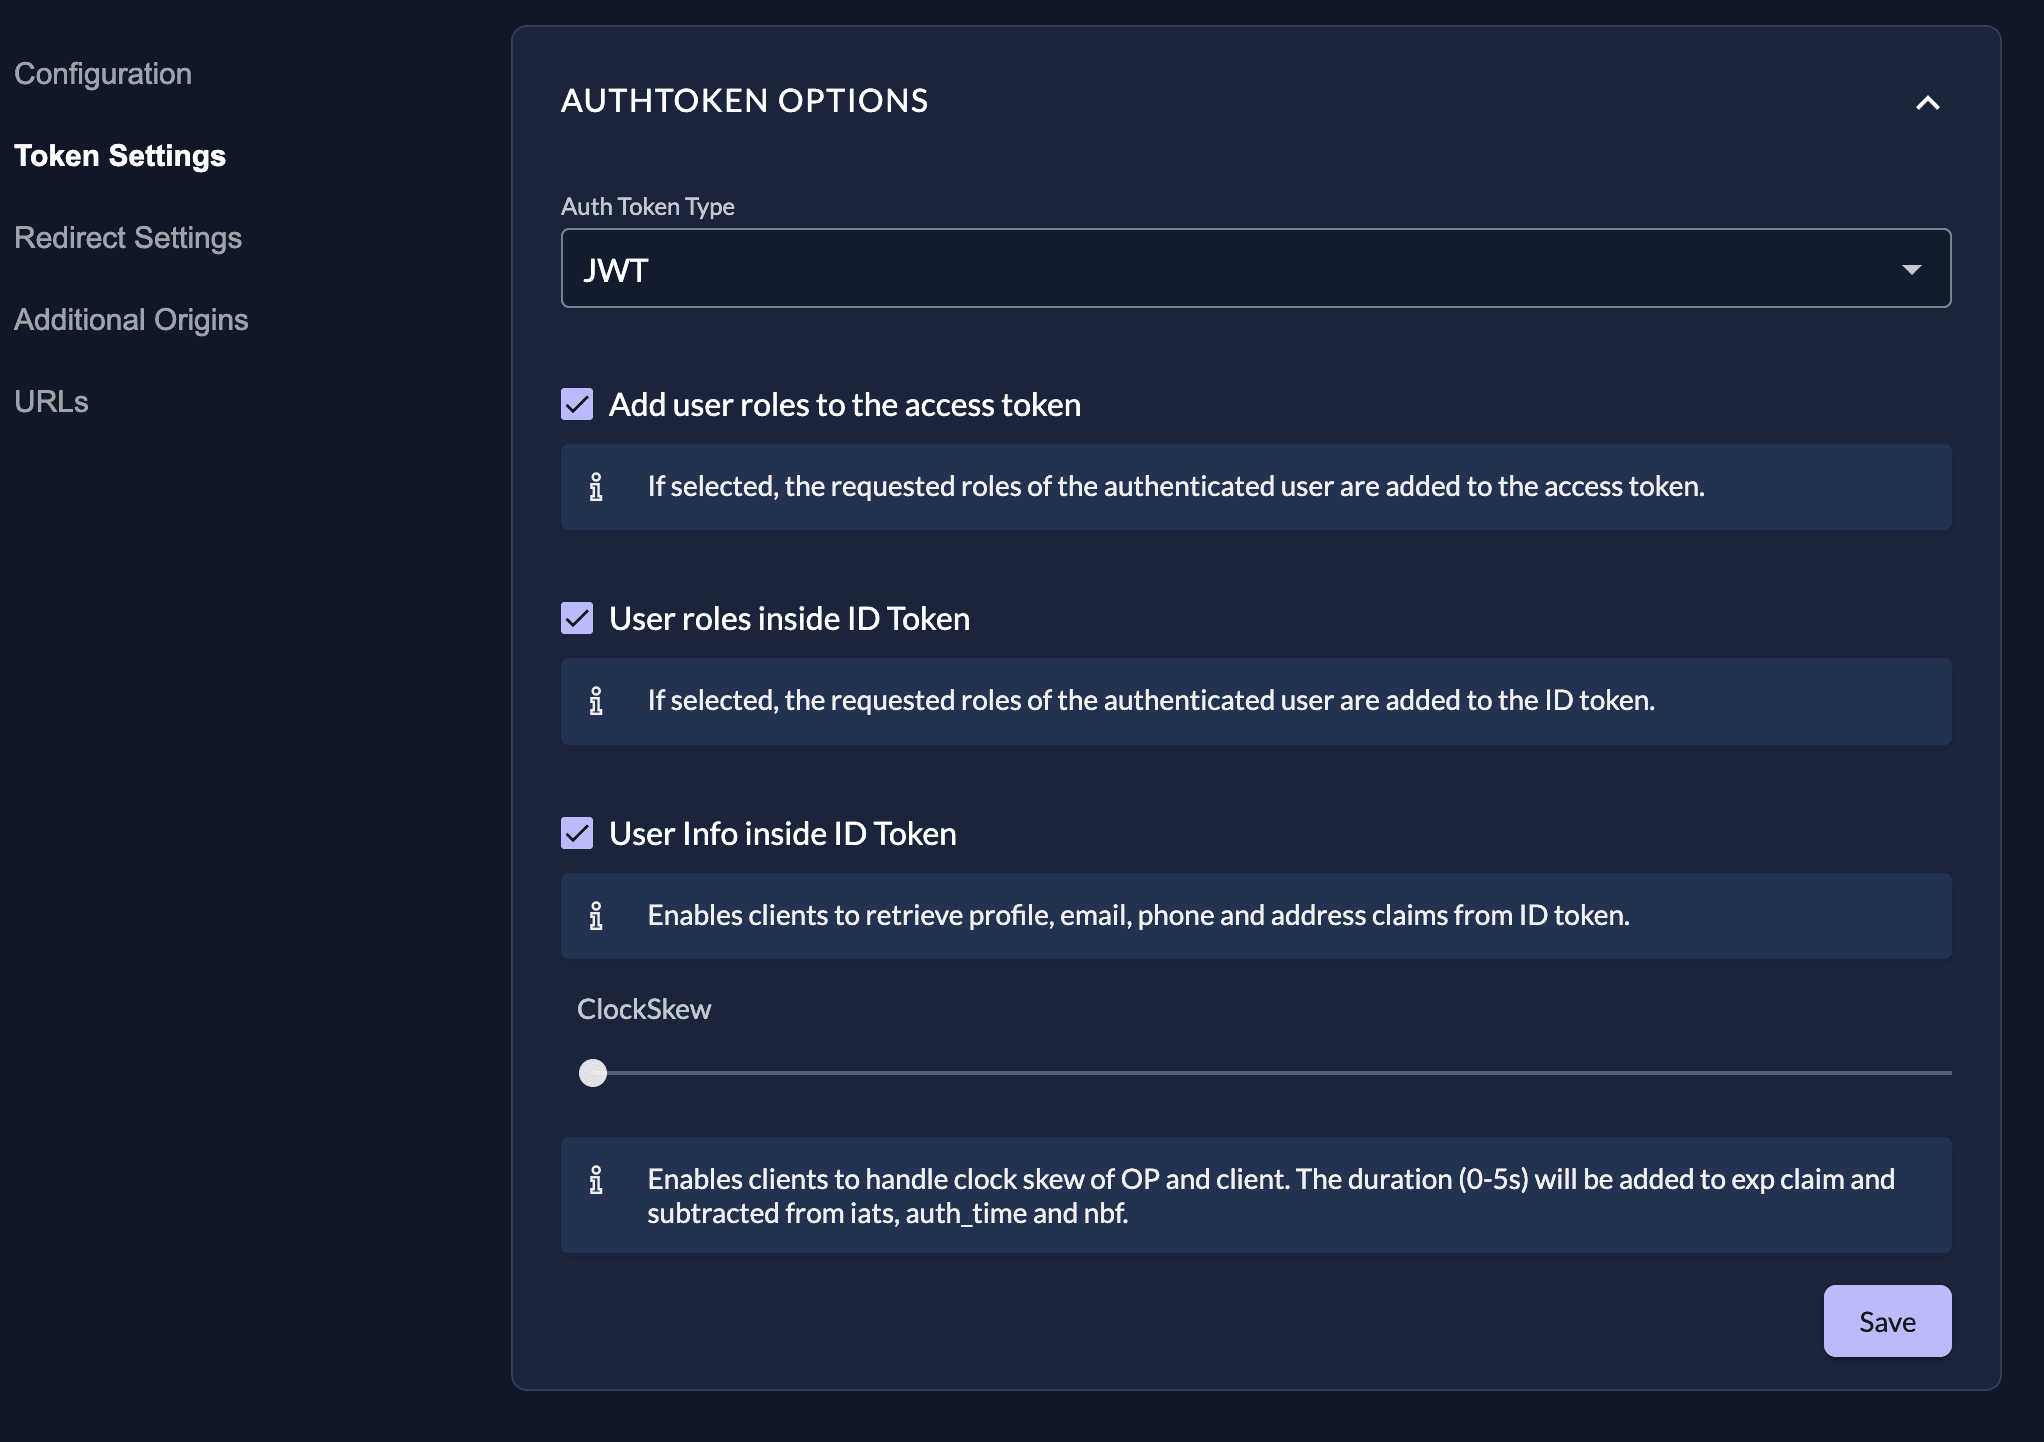
After creating, go to the application settings "Token settings" and configure as follows:
- Auth Token Type: JWT
- Add user roles to the access token: disabled (optional)
- User roles inside ID Token: enabled
- User Info inside ID Token: enabled
Save the settings.
ZITADEL: Custom claims
Go to your project and create roles according to the Groups in Google Cloud. Authorize a test user by assigning roles in ZITADEL.
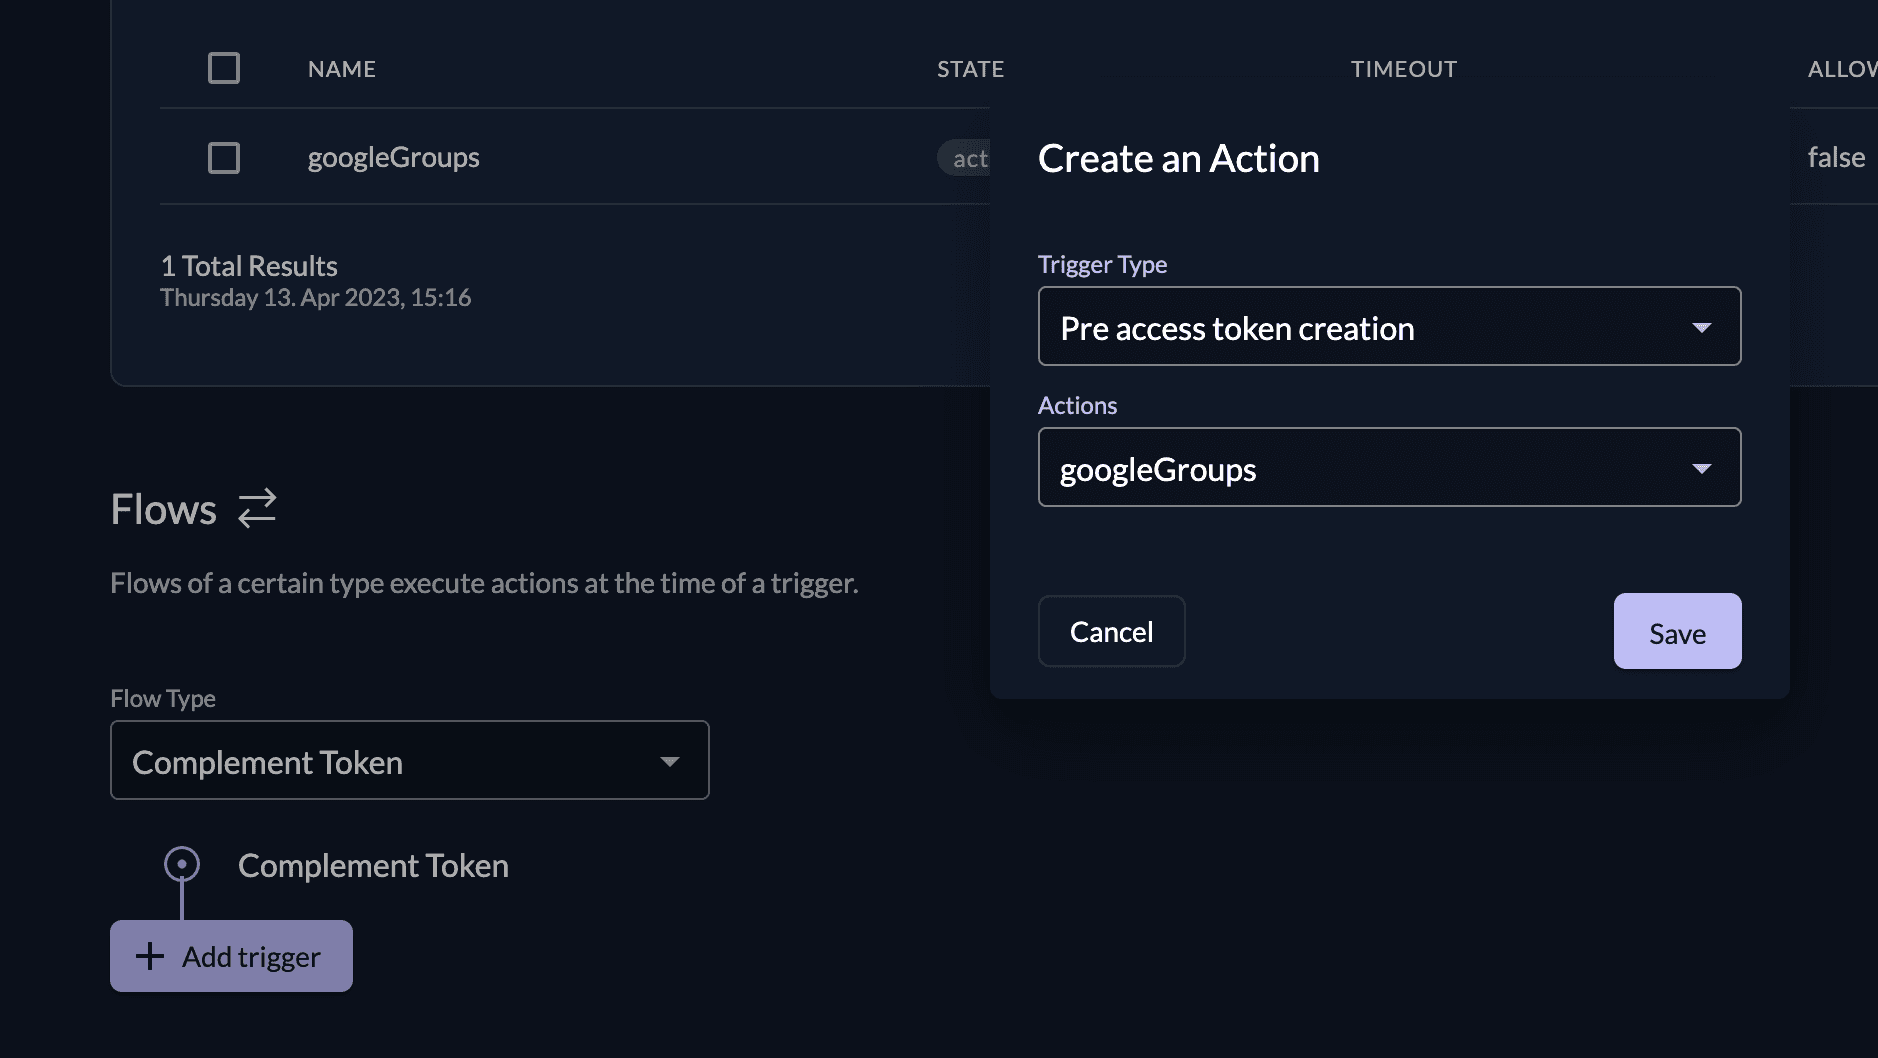
Google Cloud expects some claims, including groups, in a specific format as described here. Claims can be transformed in ZITADEL with Actions.
Create an Action with the following code to flatten the roles and include the claim for the users' display name.
If you want to configure a special attribute mapping in the workforce identity pool provider, then adjust the claims accordingly.
function googleGroups(ctx, api) {
  if (ctx.v1.user.grants == undefined || ctx.v1.user.grants.count == 0) {
    return;
  }

  let grants = [];
  ctx.v1.user.grants.grants.forEach(claim => {
    claim.roles.forEach(role => {
        grants.push(claim.projectId+':'+role)
    })
  })

  api.v1.claims.setClaim('google.groups', grants)
  api.v1.claims.setClaim('google.display_name', ctx.v1.getUser().human.displayName)
}
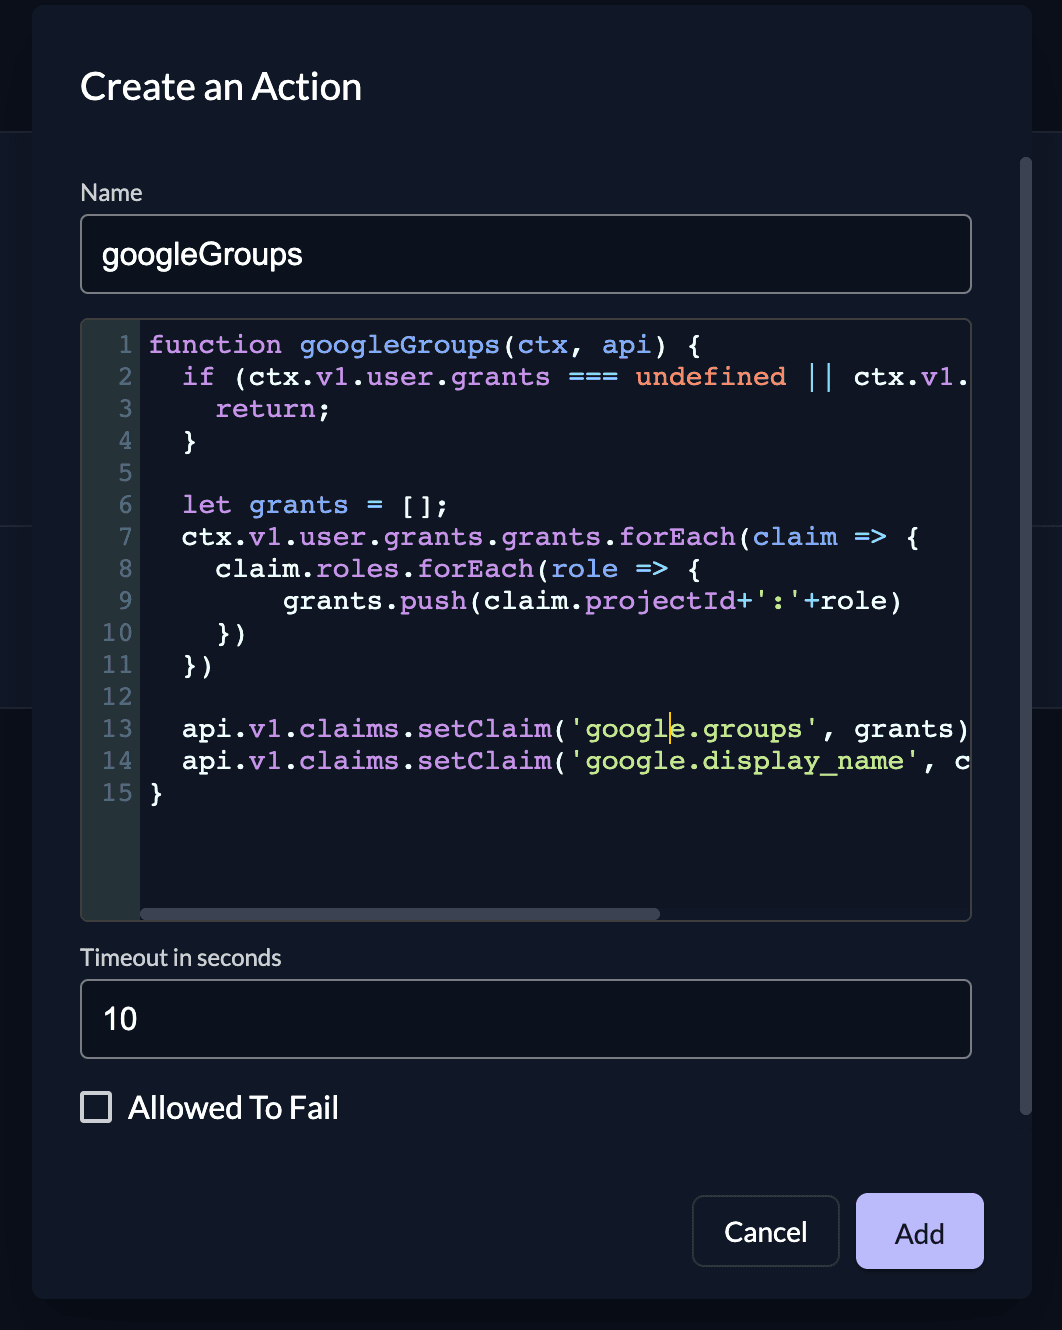
Make sure that the name of the action matches the name of the function.
And add the the Action Script to the following Flow and Trigger:
- Flow Type: Complement Token
- Trigger Type: Pre access token creation
- Actions: googleGroups
Google Cloud: Create a WIP provider
Complete the steps in the in the configuration guide with the ISSUER_URI and CLIENT_ID from ZITADEL.
Was this page helpful?