Authenticate users with OpenID Connect
Overview
This guide will show you how to use ZITADEL to login users into your application (authentication). It will guide you step-by-step through the basics and point out on how to customize process.
OIDC / OAuth Flow
OAuth and therefore OIDC know three different application types:
- Web (Server-side web applications such as java, .net, ...)
- Native (native, mobile or desktop applications)
- User Agent (single page applications / SPA, generally JavaScript executed in the browser)
Depending on the app type you're trying to register, there are small differences. But regardless of the app type we recommend using Proof Key for Code Exchange (PKCE).
Please read the following guide about the different-client-profiles and why to use PKCE.
Code Flow
For a basic understanding of OAuth and its flows, we'll briefly describe the most important flow: Authorization Code.
The following diagram demonstrates a basic authorization_code flow:
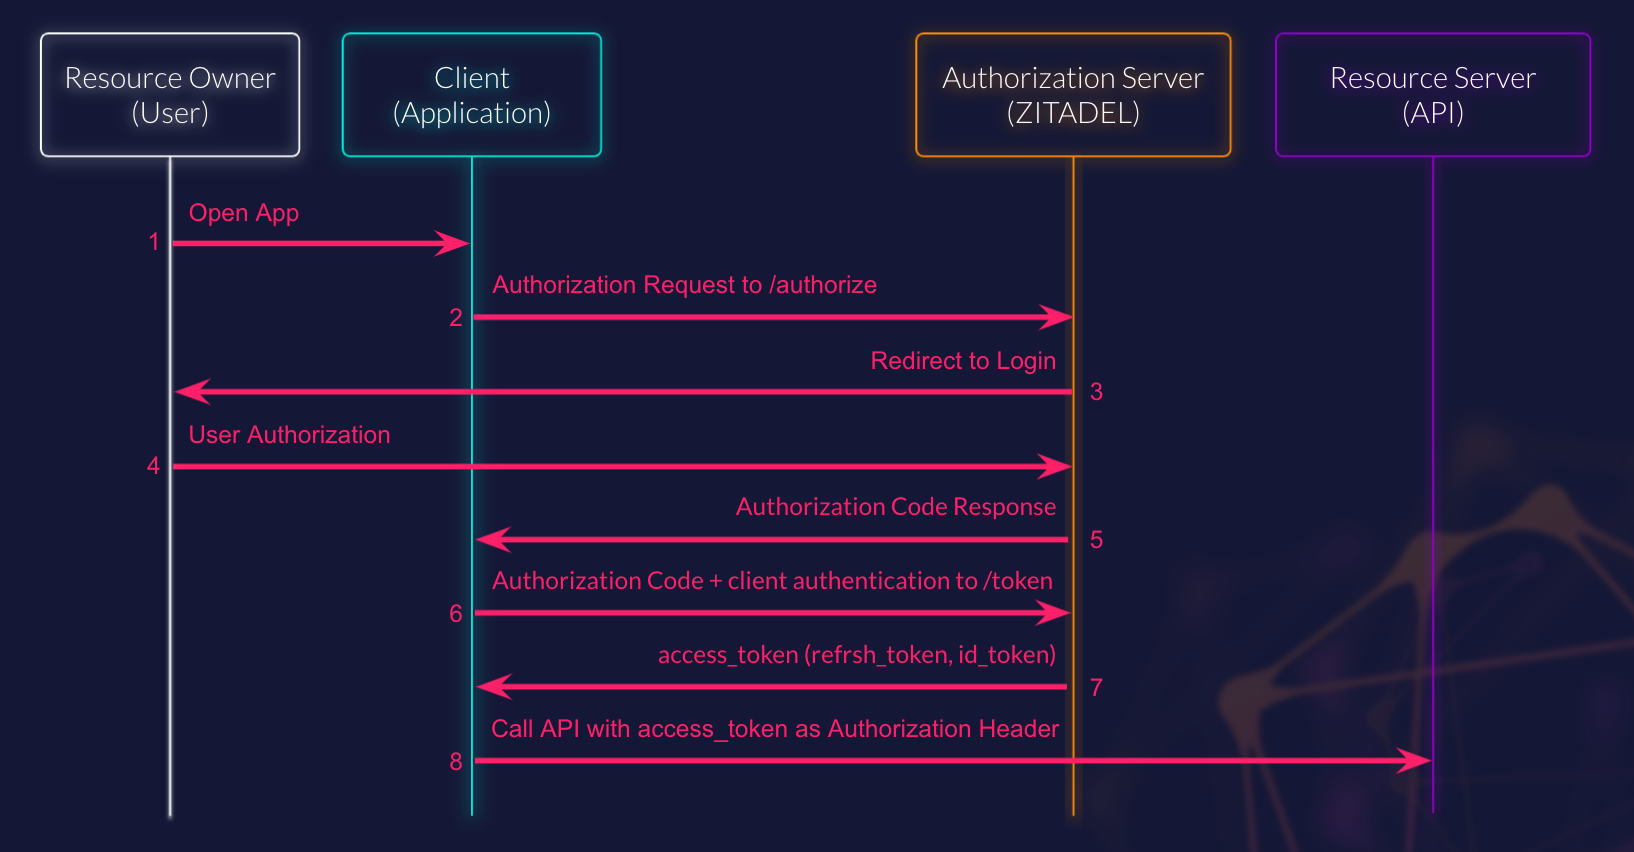
- When an unauthenticated user visits your application,
- you will create an authorization request to the authorization endpoint.
- The Authorization Server (ZITADEL) will send an HTTP 302 to the user's browser, which will redirect them to the login UI.
- The user will have to authenticate using the demanded auth mechanics.
- Your application will be called on the registered callback path (redirect_uri) and be provided an authorization_code.
- This authorization_code must then be sent together with you applications authentication (client_id + client_secret) to the token_endpoint
- In exchange the Authorization Server (ZITADEL) will return an access_token and if requested a refresh_token and in the case of OIDC an id_token as well
- The access_token can then be used to call a Resource Server (API). The token will be sent as Authorization Header.
This flow is the same when using PKCE or JWT with Private Key for authentication.
Create Application
To create an application, open your project in Console and start by clicking on the "New" button in the Application section.
Application type
This will start a wizard asking you for an application name and a type.
- Web Application
- Native Application
- Single Page Application
Authentication method
After selecting WEB, you'll next have to choose an authentication method. As mentioned before we recommend using PKCE. For even better security you could switch to JWT or just rely on the standard Code Flow. For security reasons we don't recommend using POST and will not cover it in this guide.
Please change the authentication method here as well, if you did so in the wizard, so we can better guide you through the process:
- PKCE
- Basic Auth
- JWT with Private Key
redirect_uri
After selecting the authentication method, you can register a redirect_uri and post_logout_redirect_uri. The redirect_uri will be called after user authentication for code exchange.
You can even register multiple, but typically one will be enough. If you need to distinguish between different scenarios
or environments we recommend using the state parameter for the former and multiple projects for the latter.
Auth Request
To initialize the user authentication, you will have to create an authorization request using HTTP GET in the user agent (browser) on /authorize with at least the following parameters:
client_id: this tells the authorization server which application it is, copy from Consoleredirect_uri: where the authorization code is sent to after the user authentication, must be one of the registered in the previous stepresponse_type: if you want to have a code (authorization code flow) or directly a token (implicit flow), so when ever possible usecodescope: what scope you want to grant to the access_token / id_token, minimum isopenid, if you're unsure what you need you might start withopenid profile email
We recommend always using two additional parameters state and nonce. The former enables you to transfer a state through
the authentication process. The latter is used to bind the client session with the id_token and to mitigate replay attacks.
PKCE
PKCE stands for Proof Key for Code Exchange. So other than "normal" code exchange, the PKCE does not authenticate using client_id and client_secret but an additional code. You will have to generate a random string, hash it and send this hash on the authorization_endpoint. On the token_endpoint you will then send the plain string for the authorization to compute the hash as well and to verify it's correct. In order to do so you're required to send the following two parameters as well:
code_challenge: the base64url representation of the (sha256) hash of your random stringcode_challenge_method: must always beS256standing for sha256, this is the only algorithm we support
For example for random-string the code_challenge would be 9az09PjcfuENS7oDK7jUd2xAWRb-B3N7Sr3kDoWECOY
Try out the request in our OIDC Authentication Request Playground.
Additional parameters and customization
There are additional parameters and values you can provide to satisfy your use case and to customize the user's authentication flow. Please check the authorization_endpoint reference in the OAuth / OIDC documentation.
Callback
Regardless of a successful or error response from the authorization_endpoint, the authorization server will call your
callback endpoint you provided by the redirect_uri.
If the redirect_uri is not provided, was not registered or anything other prevents the auth server form returning the response to the client, the error will be display directly to the user on the auth server.
Upon successful authentication you'll be given a code and if provided the unmodified state parameter.
You will need this code in the token request.
If a parameter was missing, malformed or any other error occurred, your answer will contain an error stating the error type,
possibly an error_description providing some information about the error and its reason and the state parameter.
Check the error response section in the authorization_endpoint reference.
Token request
Next you will have to exchange the given code for the tokens. For this HTTP POST request (form-urlencoded) you will need to provide the following:
- code: the code that was issued from the authorization request
- grant_type: must be
authorization_code - redirect_uri: callback uri where the code was sent to. Must match exactly the redirect_uri of the authorization request
Depending on your authentication method you'll need additional headers and parameters:
Send your client_id and the previously generated string as code_verifier for us to recompute the code_challenge of the authorization request:
curl --request POST \
--url ${CUSTOM_DOMAIN}/oauth/v2/token \
--header 'Content-Type: application/x-www-form-urlencoded' \
--data grant_type=authorization_code \
--data code=${code} \
--data redirect_uri=${redirect_uri} \
--data client_id=${client_id} \
--data code_verifier=${code_verifier}
redirect_uri
After selecting the authentication method, you can register a redirect_uri and post_logout_redirect_uri. The redirect_uri will be called after user authentication for code exchange.
You can even register multiple, but typically one will be enough. If you need to distinguish between different scenarios
or environments we recommend using the state parameter for the former and multiple projects for the latter.
Auth Request
To initialize the user authentication, you will have to create an authorization request using HTTP GET in the user agent (browser) on /authorize with at least the following parameters:
client_id: this tells the authorization server which application it is, copy from Consoleredirect_uri: where the authorization code is sent to after the user authentication, must be one of the registered in the previous stepresponse_type: if you want to have a code (authorization code flow) or directly a token (implicit flow), so when ever possible usecodescope: what scope you want to grant to the access_token / id_token, minimum isopenid, if you're unsure what you need you might start withopenid profile email
We recommend always using two additional parameters state and nonce. The former enables you to transfer a state through
the authentication process. The latter is used to bind the client session with the id_token and to mitigate replay attacks.
You don't need any additional parameter for this request. We're identifying the app by the client_id parameter.
Try out the request in our OIDC Authentication Request Playground.
Additional parameters and customization
There are additional parameters and values you can provide to satisfy your use case and to customize the user's authentication flow. Please check the authorization_endpoint reference in the OAuth / OIDC documentation.
Callback
Regardless of a successful or error response from the authorization_endpoint, the authorization server will call your
callback endpoint you provided by the redirect_uri.
If the redirect_uri is not provided, was not registered or anything other prevents the auth server form returning the response to the client, the error will be display directly to the user on the auth server.
Upon successful authentication you'll be given a code and if provided the unmodified state parameter.
You will need this code in the token request.
If a parameter was missing, malformed or any other error occurred, your answer will contain an error stating the error type,
possibly an error_description providing some information about the error and its reason and the state parameter.
Check the error response section in the authorization_endpoint reference.
Token request
Next you will have to exchange the given code for the tokens. For this HTTP POST request (form-urlencoded) you will need to provide the following:
- code: the code that was issued from the authorization request
- grant_type: must be
authorization_code - redirect_uri: callback uri where the code was sent to. Must match exactly the redirect_uri of the authorization request
Depending on your authentication method you'll need additional headers and parameters:
Send your client_id and client_secret as Basic Auth Header. Note that OAuth2 requires client_id and client_secret to be form url encoded.
So check Client Secret Basic Auth Method on how to build it correctly.
curl --request POST \
--url ${CUSTOM_DOMAIN}/oauth/v2/token \
--header 'Authorization: Basic ${basic}' \
--header 'Content-Type: application/x-www-form-urlencoded' \
--data grant_type=authorization_code \
--data code=${code} \
--data redirect_uri=${redirect_uri}
redirect_uri
After selecting the authentication method, you can register a redirect_uri and post_logout_redirect_uri. The redirect_uri will be called after user authentication for code exchange.
You can even register multiple, but typically one will be enough. If you need to distinguish between different scenarios
or environments we recommend using the state parameter for the former and multiple projects for the latter.
Auth Request
To initialize the user authentication, you will have to create an authorization request using HTTP GET in the user agent (browser) on /authorize with at least the following parameters:
client_id: this tells the authorization server which application it is, copy from Consoleredirect_uri: where the authorization code is sent to after the user authentication, must be one of the registered in the previous stepresponse_type: if you want to have a code (authorization code flow) or directly a token (implicit flow), so when ever possible usecodescope: what scope you want to grant to the access_token / id_token, minimum isopenid, if you're unsure what you need you might start withopenid profile email
We recommend always using two additional parameters state and nonce. The former enables you to transfer a state through
the authentication process. The latter is used to bind the client session with the id_token and to mitigate replay attacks.
You don't need any additional parameter for this request. We're identifying the app by the client_id parameter.
So your request might look like this (linebreaks and whitespace for display reasons):
Try out the request in our OIDC Authentication Request Playground.
Additional parameters and customization
There are additional parameters and values you can provide to satisfy your use case and to customize the user's authentication flow. Please check the authorization_endpoint reference in the OAuth / OIDC documentation.
Callback
Regardless of a successful or error response from the authorization_endpoint, the authorization server will call your
callback endpoint you provided by the redirect_uri.
If the redirect_uri is not provided, was not registered or anything other prevents the auth server form returning the response to the client, the error will be display directly to the user on the auth server.
Upon successful authentication you'll be given a code and if provided the unmodified state parameter.
You will need this code in the token request.
If a parameter was missing, malformed or any other error occurred, your answer will contain an error stating the error type,
possibly an error_description providing some information about the error and its reason and the state parameter.
Check the error response section in the authorization_endpoint reference.
Token request
Next you will have to exchange the given code for the tokens. For this HTTP POST request (form-urlencoded) you will need to provide the following:
- code: the code that was issued from the authorization request
- grant_type: must be
authorization_code - redirect_uri: callback uri where the code was sent to. Must match exactly the redirect_uri of the authorization request
Depending on your authentication method you'll need additional headers and parameters:
Send a JWT in the client_assertion and set the client_assertion_type to urn:ietf:params:oauth:client-assertion-type:jwt-bearer
for us to validate the signature against the registered public key:
curl --request POST \
--url ${CUSTOM_DOMAIN}/oauth/v2/token \
--header 'Content-Type: application/x-www-form-urlencoded' \
--data grant_type=authorization_code \
--data code=${code} \
--data redirect_uri=${redirect_uri} \
--data client_assertion=${client_assertion} \
--data client_assertion_type=urn%3Aietf%3Aparams%3Aoauth%3Aclient-assertion-type%3Ajwt-bearer
Authentication method
When selecting Native the authentication method always needs to be PKCE.
- PKCE
redirect_uri
Native clients might have to register multiple redirect_uris as operating system have different requirements.
Typically, you register a redirect_uri starting with a custom protocol, e.g. ch.zitadel.app://callback.
You're also allowed to use http://localhost, http://127.0.0.1 and http:[::1] without specifying a port: http://locahost/callback.
post creation actions
After the application creation, you might want to set additional options like refresh_token and additional origins.
If you want to request refresh_tokens and use them to renew the user's access_tokens without their interaction, enable them in the OIDC Configuration section by ticking the checkbox.
When calling the userinfo_endpoint or any ZITADEL API, we will check if an origin header is sent. This is automatically done
by the user agent. If one is sent we will check if the origin is allowed for your application. By default, all computed
origins of the redirect_uri list are allowed.
So if your native app is built with a JavaScript base framework like ReactNative and you only specified redirect_uris
with a custom protocol, you will need to add the origin where the app is served from, e.g. http://localhost:8100.
Additional parameters and customization
There are additional parameters and values you can provide to satisfy your use case and to customize the user's authentication flow. Please check the authorization_endpoint reference in the OAuth / OIDC documentation.
Callback
Regardless of a successful or error response from the authorization_endpoint, the authorization server will call your
callback endpoint you provided by the redirect_uri.
If the redirect_uri is not provided, was not registered or anything other prevents the auth server form returning the response to the client, the error will be display directly to the user on the auth server.
Upon successful authentication you'll be given a code and if provided the unmodified state parameter.
You will need this code in the token request.
If a parameter was missing, malformed or any other error occurred, your answer will contain an error stating the error type,
possibly an error_description providing some information about the error and its reason and the state parameter.
Check the error response section in the authorization_endpoint reference.
Token request
Next you will have to exchange the given code for the tokens. For this HTTP POST request (form-urlencoded) you will need to provide the following:
- code: the code that was issued from the authorization request
- grant_type: must be
authorization_code - redirect_uri: callback uri where the code was sent to. Must match exactly the redirect_uri of the authorization request
Depending on your authentication method you'll need additional headers and parameters:
Send your client_id and the previously generated string as code_verifier for us to recompute the code_challenge of the authorization request:
curl --request POST \
--url ${CUSTOM_DOMAIN}/oauth/v2/token \
--header 'Content-Type: application/x-www-form-urlencoded' \
--data grant_type=authorization_code \
--data code=${code} \
--data redirect_uri=${redirect_uri} \
--data client_id=${client_id} \
--data code_verifier=${code_verifier}
Authentication method
When selecting SPA the recommended authentication method is again PKCE. All common Frameworks like Angular, React, Vue.js and so on are able to successfully authenticate with PKCE. Our management UI Console for instance uses PKCE as well.
- PKCE
- Implicit
redirect_uri
After selecting the authentication method, you can register a redirect_uri and post_logout_redirect_uri. The redirect_uri will be called after user authentication for code exchange.
You can even register multiple, but typically one will be enough. If you need to distinguish between different scenarios
or environments we recommend using the state parameter for the former and multiple projects for the latter.
Auth Request
To initialize the user authentication, you will have to create an authorization request using HTTP GET in the user agent (browser) on /authorize with at least the following parameters:
client_id: this tells the authorization server which application it is, copy from Consoleredirect_uri: where the authorization code is sent to after the user authentication, must be one of the registered in the previous stepresponse_type: if you want to have a code (authorization code flow) or directly a token (implicit flow), so when ever possible usecodescope: what scope you want to grant to the access_token / id_token, minimum isopenid, if you're unsure what you need you might start withopenid profile email
We recommend always using two additional parameters state and nonce. The former enables you to transfer a state through
the authentication process. The latter is used to bind the client session with the id_token and to mitigate replay attacks.
PKCE
PKCE stands for Proof Key for Code Exchange. So other than "normal" code exchange, the PKCE does not authenticate using client_id and client_secret but an additional code. You will have to generate a random string, hash it and send this hash on the authorization_endpoint. On the token_endpoint you will then send the plain string for the authorization to compute the hash as well and to verify it's correct. In order to do so you're required to send the following two parameters as well:
code_challenge: the base64url representation of the (sha256) hash of your random stringcode_challenge_method: must always beS256standing for sha256, this is the only algorithm we support
For example for random-string the code_challenge would be 9az09PjcfuENS7oDK7jUd2xAWRb-B3N7Sr3kDoWECOY
Try out the request in our OIDC Authentication Request Playground.
Additional parameters and customization
There are additional parameters and values you can provide to satisfy your use case and to customize the user's authentication flow. Please check the authorization_endpoint reference in the OAuth / OIDC documentation.
Callback
Regardless of a successful or error response from the authorization_endpoint, the authorization server will call your
callback endpoint you provided by the redirect_uri.
If the redirect_uri is not provided, was not registered or anything other prevents the auth server form returning the response to the client, the error will be display directly to the user on the auth server.
Upon successful authentication you'll be given a code and if provided the unmodified state parameter.
You will need this code in the token request.
If a parameter was missing, malformed or any other error occurred, your answer will contain an error stating the error type,
possibly an error_description providing some information about the error and its reason and the state parameter.
Check the error response section in the authorization_endpoint reference.
Token request
Next you will have to exchange the given code for the tokens. For this HTTP POST request (form-urlencoded) you will need to provide the following:
- code: the code that was issued from the authorization request
- grant_type: must be
authorization_code - redirect_uri: callback uri where the code was sent to. Must match exactly the redirect_uri of the authorization request
Depending on your authentication method you'll need additional headers and parameters:
Send your client_id and the previously generated string as code_verifier for us to recompute the code_challenge of the authorization request:
curl --request POST \
--url ${CUSTOM_DOMAIN}/oauth/v2/token \
--header 'Content-Type: application/x-www-form-urlencoded' \
--data grant_type=authorization_code \
--data code=${code} \
--data redirect_uri=${redirect_uri} \
--data client_id=${client_id} \
--data code_verifier=${code_verifier}
In contrast to the Code Flow, where you'll receive a code for token exchange, with the implicit flow you'll receive the tokens directly from the authorization endpoint. This is unsecure and might lead to token leakage and replay attacks. It will further be removed in OAuth 2.1 for the exact same reason.
We therefore discourage the use of Implicit Flow and do not cover the flow in this guide.
If you still need to rely on the implicit flow, simply keep in mind that the response on the authorization_endpoint is the same you would be given on the token_endpoint and check the OAuth / OIDC endpoint documentation for more information.
redirect_uri
After selecting the authentication method, you can register a redirect_uri and post_logout_redirect_uri. The redirect_uri will be called after user authentication for code exchange.
You can even register multiple, but typically one will be enough. If you need to distinguish between different scenarios
or environments we recommend using the state parameter for the former and multiple projects for the latter.
Auth Request
To initialize the user authentication, you will have to create an authorization request using HTTP GET in the user agent (browser) on /authorize with at least the following parameters:
client_id: this tells the authorization server which application it is, copy from Consoleredirect_uri: where the authorization code is sent to after the user authentication, must be one of the registered in the previous stepresponse_type: if you want to have a code (authorization code flow) or directly a token (implicit flow), so when ever possible usecodescope: what scope you want to grant to the access_token / id_token, minimum isopenid, if you're unsure what you need you might start withopenid profile email
When using the Implicit Flow you will also have to provide a nonce parameter to bind the client session to the id_token and to mitigate replay attacks. Furthermore, we recommend using a state parameter, which enables you to transfer a state through the authentication process.
Additional parameters and customization
There are additional parameters and values you can provide to satisfy your use case and to customize the user's authentication flow. Please check the authorization_endpoint reference in the OAuth / OIDC documentation.
Callback
Regardless of a successful or error response from the authorization_endpoint, the authorization server will call your callback endpoint you provided by the redirect_uri.
If the redirect_uri is not provided, was not registered or anything other prevents the auth server form returning the response to the client, the error will be display directly to the user on the auth server.
Upon successful authentication you'll be given the access_token, id_token, expires_in and if provided the unmodified state parameter, as you would be given from the token_endpoint when using Authorization Code Flow.
If a parameter was missing, malformed or any other error occurred, your answer will contain an error stating the error type,
possibly an error_description providing some information about the error and its reason and the state parameter.
Check the error response section in the authorization_endpoint reference.