ZITADEL with Next.js - A B2B Scenario
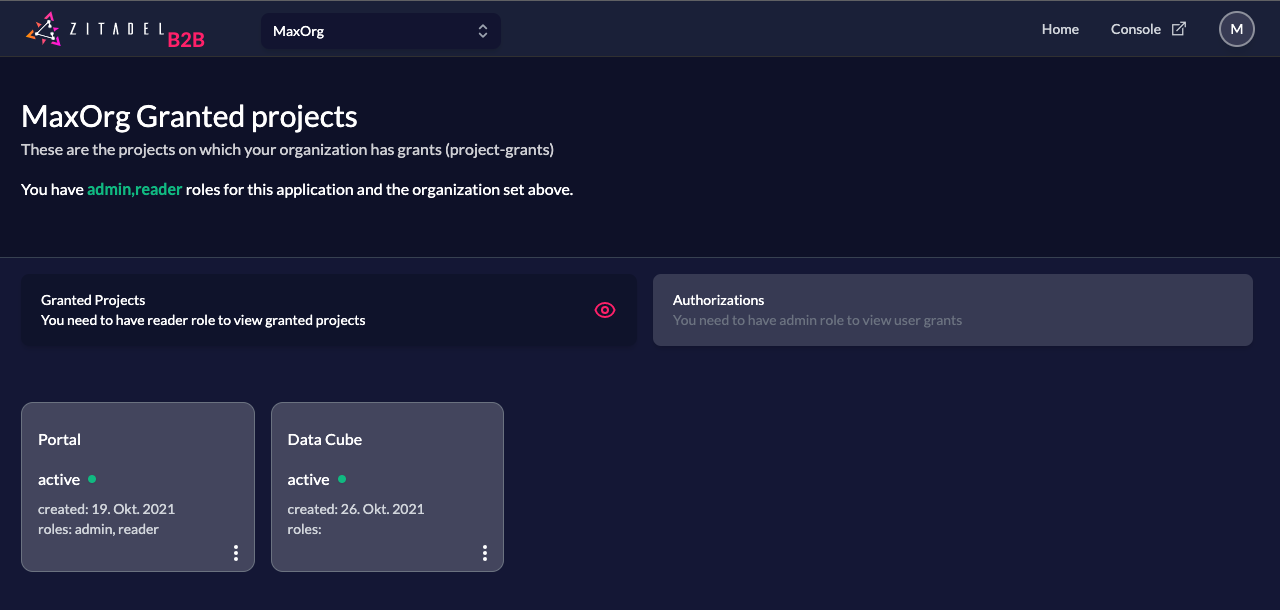
This is our ZITADEL Next.js B2B template. It shows how to authenticate as a user with multiple organizations. The application shows your users roles on the selected organizations, other projects your organization is allowed to use and other users having a grant to use the application.
If you need more info on B2B use cases consider reading our guide for the B2B solution scenario.
You can follow along with the template code in our zitadel-nextjs-b2b repo.
What does it do?
Users with view role can view granted projects on their organization which were granted by your organization (owning this portal application).
Users with admin role can view granted projects and list users of the selected organization who are granted to use the portal application too.
Setup Vendor application and users in ZITADEL
First we need to create an organization that holds the Vendor's users, projects and applications.
Vendor Organization
Navigate to https://{YourDomain}.zitadel.cloud/ui/console/orgs (replace {YourDomain}), and click on the button "New".
Toggle the setting "Use your personal account as organization owner".
Enter the name Demo-Vendor, and click "Create". Then click on that organization.
Portal Web Application
To setup this sample you have to create a project and an application in the vendor organization (Demo-Vendor) first.
Open the Console (https://{YourDomain}.zitadel.cloud/ui/console/projects) and create a new project. Let's call it Portal.
Then on the project detail page click on new application and enter a name for this app.
Let's call this one portal-web.
Select Web, continue, CODE, then enter http://localhost:3000/api/auth/callback/zitadel for the redirect, and http://localhost:3000 for the post redirect. Then press on create.
Because the requests from your NextJS application to ZITADEL are made on the server side, you can safely select CODE. You will get a secret at the end of the stepper. With NextAuth your secret never gets exposed on the browser since it is kept in your NextJS server.
Copy the "Resource Id" of the project Portal as you will need this in your environment configuration file later.
Click on the application portal-web.
On the application detail page click on the section under redirect settings and enable Development Mode. This will allow you application to work on localhost:3000.
To read the user data and roles from ID Token, go to the section Token Settings and make sure both checkboxes, User roles inside ID Token and User Info inside ID Token are enabled.
Make sure to save your changes.
Copy the "Resource Id" of the application portal-web as you will need this in your environment configuration file later.
Roles
To setup the needed roles for your project, navigate to your Portal project, and add the following roles
| Key | Display Name | Group | Description |
|---|---|---|---|
| admin | Administrator | The administrator, allowed to read granted projects and to user grants | |
| reader | Reader | A user who is allowed to read his organizations granted projects only |
Now in the General section of the Portal project, make sure to enable Assert Roles on Authentication.
This makes sure that roles, which is used by the application to enable UI components, are set in your OIDC ID Token.
Service User
To make the application work you need a service user which loads granted-projects and user-grants for you.
In the B2B-Demo organization, navigate to Users in navigation of Console, click on Service Users and create a new user.
Let's set its username to nextjs and its name to NextJS. Then press create.
On the detail page of that user, navigate to "Personal Access Tokens" and add a new entry, set an optional expiration date.
Copy the generated Token as you will need this in your environment configuration file later.
Go back to the Portal project and add the Service User as Manager (top right).
Make sure to select Project Owner Viewer as the management role.
To show granted projects, go to the Demo-Vendor organization and add the Service User as Org Project Permission Editor Manager.
Configuration
Now clone this project and navigate to its root folder.
Create a file .env.local and copy paste the following:
NEXTAUTH_URL=http://localhost:3000
NEXT_PUBLIC_ZITADEL_ISSUER=https://{YourDomain}.zitadel.cloud
ZITADEL_API=https://{YourDomain}.zitadel.cloud
ORG_ID={YourOrgId}
PROJECT_ID={YourProjectId}
ZITADEL_CLIENT_ID={YourClientID}
SERVICE_ACCOUNT_ACCESS_TOKEN={YourServiceAccountSecret}
NEXTAUTH_SECRET=randomsecret
Replace the values as follows
NEXTAUTH_URL: Base url of this demo app (B2B portal); runs per default on http://localhost:3000
NEXT_PUBLIC_ZITADEL_ISSUER: The url to your zitadel instance. When using zitadel.cloud for this demo you can find the domain of your ZITADEL instance in the customer portal. You can also find this information by going to your application portal-web and click 'URLs' in the navigation. The variable is prefixed with NEXT_PUBLIC_ such that it can be accessed from the client.
ZITADEL_API: URL of the Management API. Typically the same as ZITADEL_ISSUER.
ORG_ID: We will create an organization during later steps. You can find {YourOrgId} by selecting the Demo-Vendor organization in Console. {YourOrgId} is displayed on top of the organization detail page as "Resource Id".
PROJECT_ID: You can find {YourProjectId} by clicking on "Projects" in the navigation and select the Project Portal. {YourProjectId} is displayed on the top as "Resource Id".
ZITADEL_CLIENT_ID: Having the project Portal selected, click on the Application portal-web. {YourClientID} is displayed as a field in the OIDC configuration, labelled "Client ID" and has the format 12345678@portal.
SERVICE_ACCOUNT_ACCESS_TOKEN: Setup a service user, add a Personal Access Token and copy the secret here (see below).
Install and Run
To run this sample locally you need to install dependencies first.
Type and execute:
yarn install
then, to run the development server:
npm run dev
# or
yarn dev
and open http://localhost:3000 with your browser to see the result.
Create a customer organization
Customer organization
Create a new organization in Console. Easiest way is to use the organization dropdown on the top left.
Let's call this new organization Demo-Customer.
Users
Now switch back to the organization Demo-Customer and create a new user in this organization.
Let's call the first user Alice Admin. Create a second user called Eric Employee.
Manager Role
We want to enable Alice to assign roles to users in her organization in a self-service manner.
To make this happen, we need give Alice an Manager Role within the Organization Demo-Customer.
Still in the organization Demo-Customer, navigate to Organization. Click on the plus on the top right and give Alice Admin the Manager Role Org Owner.
Login with your user on the customer organization to validate the setup.
Create a project grant
Organization Grant
Switch to the Demo-Vendor organization, select Projects in the navigation, and click on Portal and then Grants.
Grant all roles of the Project to the organization demo-customer.{YourDomain}.zitadel.cloud.
Authorization
As you have guessed, these two users need to be authorized.
On the Demo-Customer organization, navigate to Projects and select "Granted Projects" in the sub-navigation.
Select the project portal Portal and navigate to "Authorizations".
Give Alice Admin the roles reader and admin.
Eric Employee will get only the role reader.
Login
You should be able to login to the Demo Application with Alice Admin and see all granted projects.
You can log out and log in with Eric Employee and you should only have access to the granted projects, but not to the Authorizations tab.
What next
You could create another project (eg, Data Cube) and grant that project to the customer organization. The granted project should appear after a reload automatically. This gives you an idea of how you could do Service Discovery with ZITADEL.
You could also build out the code (PRs welcome 😉) for this application, for example:
- Create a mock
datacube-webapplication and show how SSO between the portal and the application works with ZITADEL. - Implement a feature in the Authorization tab to assign roles directly from the customer portal.